SpringBoot系列之集成Druid配置数据源监控
SpringBoot系列之集成Druid配置数据源监控
继上一篇博客SpringBoot系列之JDBC数据访问之后,本博客再介绍数据库连接池框架Druid的使用
实验环境准备:
- Maven
- IntelliJ IDEA
先新建一个Springboot Initializer项目,详情参考SpringBoot系列之快速创建Initializer项目,注意引入必须的JDBC,web依赖等等,因为Druid默认没提供,所以去https://mvnrepository.com/artifact/com.alibaba/druid获取配置信息,项目创建之后,pom配置应该有如下:
<dependency>

			<groupId>org.springframework.boot</groupId>

			<artifactId>spring-boot-starter-jdbc</artifactId>

		</dependency>

		<dependency>

			<groupId>org.springframework.boot</groupId>

			<artifactId>spring-boot-starter-web</artifactId>

		</dependency>

		<dependency>

			<groupId>mysql</groupId>

			<artifactId>mysql-connector-java</artifactId>

			<version>5.1.27</version>

			<scope>runtime</scope>

		</dependency>

		<!-- https://mvnrepository.com/artifact/com.alibaba/druid -->

		<dependency>

			<groupId>com.alibaba</groupId>

			<artifactId>druid</artifactId>

			<version>1.1.2</version>

		</dependency>
新增一个application.yml配置文件,加上如下配置:type: com.alibaba.druid.pool.DruidDataSource必须指定
spring:

  datasource:

    url: jdbc:mysql://127.0.0.1:3306/springboot?characterEncoding=utf8&useSSL=true

    username: root

    password: root

    driver-class-name: com.mysql.jdbc.Driver

    initialization-mode: always

    type: com.alibaba.druid.pool.DruidDataSource

    # 连接池设置

    initial-size: 5

    min-idle: 5

    max-active: 20

    # 配置获取连接等待超时的时间

    max-wait: 60000

    # 配置间隔多久才进行一次检测,检测需要关闭的空闲连接,单位是毫秒

    time-between-eviction-runs-millis: 90000

    # 配置一个连接在池中最小生存的时间,单位是毫秒

    min-evictable-idle-time-millis: 300000

    # Oracle请使用select 1 from dual

    validation-query: SELECT 1

    test-while-idle: true

    test-on-borrow: false

    test-on-return: false

    # 打开PSCache,并且指定每个连接上PSCache的大小

    pool-prepared-statements: true

    max-pool-prepared-statement-per-connection-size: 20

    # 配置监控统计拦截的filters,去掉后监控界面sql无法统计,'wall'用于防火墙

    filters: stat,wall,slf4j

    # 通过connectProperties属性来打开mergeSql功能;慢SQL记录

    connection-properties: druid.stat.mergeSql=true;druid.stat.slowSqlMillis=5000

    # 合并多个DruidDataSource的监控数据

    use-global-data-source-stat: true
写一个junit测试类进行测试:
package com.example.springboot.jdbc;

import org.junit.jupiter.api.Test;

import org.springframework.beans.factory.annotation.Autowired;

import org.springframework.boot.test.context.SpringBootTest;

import javax.sql.DataSource;

import java.sql.Connection;

import java.sql.SQLException;

@SpringBootTest

class SppringbootJdbcApplicationTests {

	@Autowired

	DataSource dataSource;

	@Test

	public void contextLoads() throws SQLException {

		System.out.println(dataSource.getClass());

		Connection connection = dataSource.getConnection();

		System.out.println(connection);

		connection.close();

	}

}
经过调试,属性都没起效,原因是Springboot的自动配置类并没有如下属性的,所以在idea里都标识显示如下颜色:
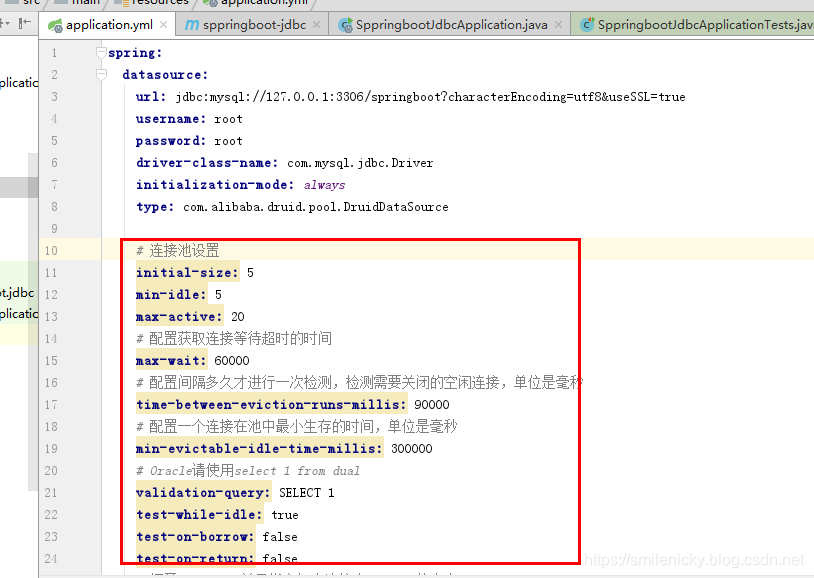
所以要让这些配置起效,需要写个配置类,通过ConfigurationProperties进行属性映射
@Configuration

public class DriudConfig {

    @Primary

    @Bean

    @ConfigurationProperties(prefix = "spring.datasource")

    public DataSource dataSource(){

        return new DruidDataSource();

    }

}
再次启动junit调试,发现属性都起效了,ok,测试通过

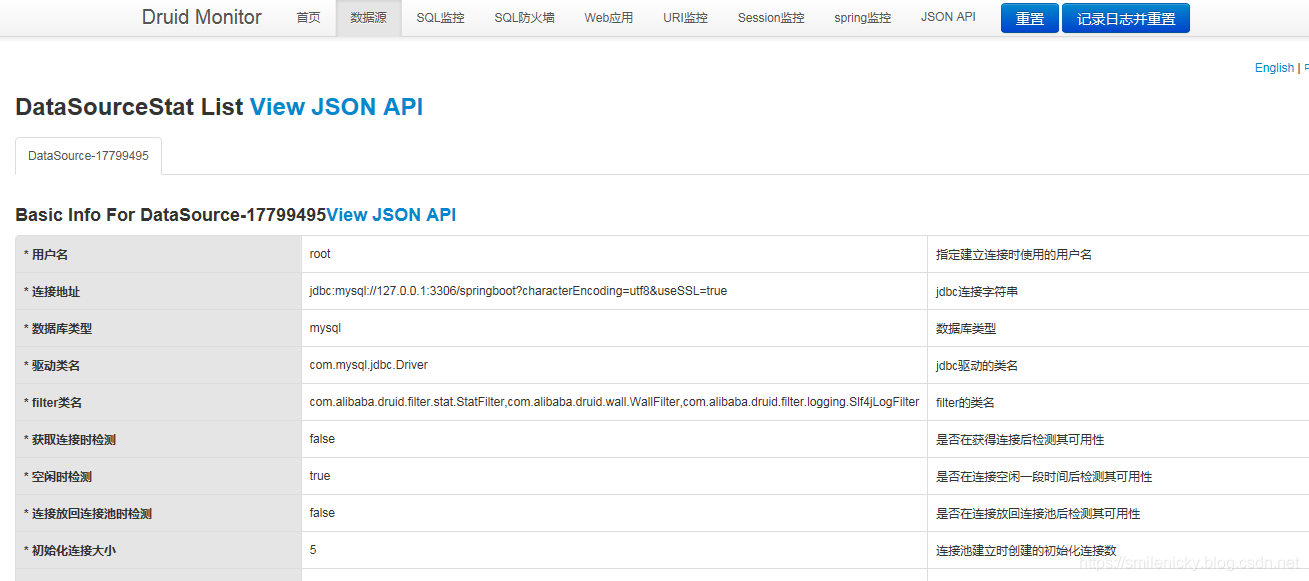
Druid提供了一个针对数据源等等进行监控的平台,所以需要配置才能正常使用
package com.example.springboot.jdbc.config;

import com.alibaba.druid.pool.DruidDataSource;

import com.alibaba.druid.support.http.StatViewServlet;

import com.alibaba.druid.support.http.WebStatFilter;

import org.springframework.boot.context.properties.ConfigurationProperties;

import org.springframework.boot.web.servlet.FilterRegistrationBean;

import org.springframework.boot.web.servlet.ServletRegistrationBean;

import org.springframework.context.annotation.Bean;

import org.springframework.context.annotation.Configuration;

import org.springframework.context.annotation.Primary;

import javax.sql.DataSource;

/**

 * <pre>

 *  Druid配置类

 * </pre>

 *

 * @author nicky

 * <pre>

 * 修改记录

 *    修改后版本:     修改人:  修改日期: 2019年12月15日  修改内容:

 * </pre>

 */

@Configuration

public class DriudConfig {

    @Primary

    @Bean

    @ConfigurationProperties(prefix = "spring.datasource")

    public DataSource dataSource(){

        return new DruidDataSource();

    }

    /**

     * 注册ServletRegistrationBean

     * @return

     */

    @Bean

    public ServletRegistrationBean registrationBean() {

        ServletRegistrationBean bean = new ServletRegistrationBean(new StatViewServlet(), "/druid/*");

        /** 初始化参数配置,initParams**/

        //白名单

        bean.addInitParameter("allow", "127.0.0.1");

        //IP黑名单 (存在共同时,deny优先于allow) : 如果满足deny的话提示:Sorry, you are not permitted to view this page.

        bean.addInitParameter("deny", "192.168.1.73");

        //登录查看信息的账号密码.

        bean.addInitParameter("loginUsername", "admin");

        bean.addInitParameter("loginPassword", "admin");

        //是否能够重置数据.

        bean.addInitParameter("resetEnable", "false");

        return bean;

    }

    /**

     * 注册FilterRegistrationBean

     * @return

     */

    @Bean

    public FilterRegistrationBean druidStatFilter() {

        FilterRegistrationBean bean = new FilterRegistrationBean(new WebStatFilter());

        //添加过滤规则.

        bean.addUrlPatterns("/*");

        //添加不需要忽略的格式信息.

        bean.addInitParameter("exclusions","*.js,*.gif,*.jpg,*.png,*.css,*.ico,/druid/*");

        return bean;

    }

}
ok,访问http://127.0.0.1:8080/ ,输入代码里配置的账号密码就可以登录进行访问,我设置的账号密码都是admin,输入账号密码登录平台,查询数据源,sql监控等等功能
代码例子下载:github下载链接
SpringBoot系列之集成Druid配置数据源监控的更多相关文章
- Spring Boot 整合 Druid && 配置数据源监控
1. 导入 Druid 包 <dependency> <groupId>com.alibaba</groupId> <artifactId>druid& ...
- SpringBoot系列之集成Mybatis教程
SpringBoot系列之集成Mybatis教程 环境准备:IDEA + maven 本博客通过例子的方式,介绍Springboot集成Mybatis的两种方法,一种是通过注解实现,一种是通过xml的 ...
- SpringBoot系列之集成jsp模板引擎
目录 1.模板引擎简介 2.环境准备 4.源码原理简介 SpringBoot系列之集成jsp模板引擎 @ 1.模板引擎简介 引用百度百科的模板引擎解释: 模板引擎(这里特指用于Web开发的模板引擎)是 ...
- SpringBoot系列之集成logback实现日志打印(篇二)
SpringBoot系列之集成logback实现日志打印(篇二) 基于上篇博客SpringBoot系列之集成logback实现日志打印(篇一)之后,再写一篇博客进行补充 logback是一款开源的日志 ...
- SpringBoot系列之集成Dubbo的方式
SpringBoot系列之集成Dubbo的方式 本博客介绍Springboot框架集成Dubbo实现微服务的3种常用方式,对于Dubbo知识不是很熟悉的,请先学习我上一篇博客:SpringBoot系列 ...
- Spring系列之集成Druid连接池及监控配置
前言 前一篇文章我们熟悉了HikariCP连接池,也了解到它的性能很高,今天我们讲一下另一款比较受欢迎的连接池:Druid,这是阿里开源的一款数据库连接池,它官网上声称:为监控而生!他可以实现页面监控 ...
- SpringBoot入门之基于Druid配置Mybatis多数据源
上一篇了解了Druid进行配置连接池的监控和慢sql处理,这篇了解下使用基于基于Druid配置Mybatis多数据源.SpringBoot默认配置数据库连接信息时只需设置url等属性信息就可以了,Sp ...
- SpringBoot入门之集成Druid
Druid:为监控而生的数据库连接池.这篇先了解下它的简单使用,下篇尝试用它做多数据源配置.主要参考:https://github.com/alibaba/druid/wiki/常见问题 https: ...
- druid配置以及监控
1.druid监控的功能: . 数据源 . SQL监控 对执行的MySQL语句进行记录,并记录执行时间.事务次数等 . SQL防火墙 对SQL进行预编译,并统计该条SQL的数据指标 . Web应用 对 ...
随机推荐
- 6. SOFAJRaft源码分析— 透过RheaKV看线性一致性读
开篇 其实这篇文章我本来想在讲完选举的时候就开始讲线性一致性读的,但是感觉直接讲没头没尾的看起来比比较困难,所以就有了RheaKV的系列,这是RheaKV,终于可以讲一下SOFAJRaft的线性一致性 ...
- 大学生活这样过,校招 offer 飞来找
01.开门见山 由于我比较喜欢分享的原因,认识了不少大学生.其中有不少佼佼者,比如说一年读 50 本书的璐璐,校招斩获一线大厂 Offer 的晓峰,通过运营公众号实现经济独立的帅土. 当然也有一些不知 ...
- C++对象模型结论
C++对象模型 1.C++对象模型探讨的是对象成员存储问题. 2.结论: (1) .类内部的函数(静态成员函数,非静态成员函数)都不在对象内部 ,不占用对象大小. (2) 类内部的静态变量不占用对象大 ...
- spark集群搭建(三台虚拟机)——hadoop集群搭建(2)
!!!该系列使用三台虚拟机搭建一个完整的spark集群,集群环境如下: virtualBox5.2.Ubuntu14.04.securecrt7.3.6_x64英文版(连接虚拟机) jdk1.7.0. ...
- CCF-画字符-详细的注释
import java.io.BufferedReader; import java.io.IOException; import java.io.InputStream; import java.i ...
- img标签不能直接作为body的子元素
前几天在一本教材上看到关于HTML标签嵌套规则一节的时候,看到这么一句话,“把图像作为body元素的子元素直接插入到页面中,这样是不妥的,一是结构嵌套有误,二是图像控制不方便.”后面还给了一段代码演示 ...
- PostGIS 结合Openlayers以及Geoserver实现最短路径分析(三)
接上篇,前面在ArcMap中和Postgis中将数据都已经进行了预处理. 接下来回到Geoserver中,进行数据发布. 1.新建工作区 2.填写完工作区信息 3.打开数据存储,添加新的数据存储 4. ...
- Java的内存分配机制
Java程序运行在JVM(Java Virtual Machine,Java虚拟机)上,可以把JVM理解成Java程序和操作系统之间的桥梁,JVM实现了Java的平台无关性,由此可 见JVM的重要性 ...
- day 18 random模块 时间模块 sys模块 os模块
import random 利用random模块可以进行从一个列表或者数字范围之间随机取出一个数字 # 取随机小数 : 数学计算 print(random.random()) # 取0-1之间的小数 ...
- 解决Debina系统自动更新软件包的问题
不知从何时开始,我的电脑每天开机连接上网络之后,不断的在下载数据,状态栏显示网速达到每秒1到2兆.开始我还不太在意,不过后来由于带宽全部被这种莫名其奥妙的下载占据了,我连网页都无否正常浏览了,所以我决 ...