Spring boot+ maven + thymeleaf + HTML 实现简单的web项目
第一步: 创建一个SpringBoot应用
第二步: 创建一个实体,用来存储数据,在src/main/java/com/example/first下创建包entity , 在entity下创建Person.java文件
package com.example.first.entity;

public class Person {

    private String name;

    private int age;

  //seter , getter,toString方法

}
第三步: 创建resource, 在src/main/java/com/example/first下创建包resource, resource下创建PersonResource.java
package com.example.first.resource;

import com.example.first.entity.Person;

import org.springframework.stereotype.Controller;

import org.springframework.ui.ModelMap;

import org.springframework.web.bind.annotation.RequestMapping;

import org.springframework.web.bind.annotation.RequestMethod;

import org.springframework.web.bind.annotation.RequestParam;

@Controller

@RequestMapping("/person")

public class PersonResource {

    @RequestMapping(value = "/show",method = RequestMethod.GET)  /**请求地址: localhost:8080/person/show?name=zhang&age=23 请求方式是get*/

    private String show(@RequestParam("name")String name,@RequestParam("age")int age,ModelMap map){   /**@RequestParam("name")绑定请求地址中的name到参数name中    ModelMap map 存放返回内容*/

        Person person = new Person();

        person.setName(name);

        person.setAge(age);

        map.addAttribute("person",person);

        return "index";    /**返回的是显示数据的html的文件名*/

    }

}
第三步:创建index.html文件
<!DOCTYPE html>

<html xmlns:th="http://www.thymeleaf.org" lang="zh">

<head>

    <meta charset="UTF-8"/>

    <title>Title</title>

</head>

<body>

<span th:text="${person.name}"></span><hr/>

<span th:text="${person.age}"></span><hr/>

<span th:text="${person}"></span>

</body>

</html>
第四步:在application.properties中添加模板引擎
spring.thymeleaf.prefix=classpath:/templates/

spring.thymeleaf.suffix=.html

spring.thymeleaf.mode = HTML5
第五步: 在pom文件中添加依赖
<?xml version="1.0" encoding="UTF-8"?>

<project xmlns="http://maven.apache.org/POM/4.0.0" xmlns:xsi="http://www.w3.org/2001/XMLSchema-instance"

    xsi:schemaLocation="http://maven.apache.org/POM/4.0.0 http://maven.apache.org/xsd/maven-4.0.0.xsd">

    <modelVersion>4.0.0</modelVersion>

    <groupId>com.example.first</groupId>

    <artifactId>springboot</artifactId>

    <version>0.0.1-SNAPSHOT</version>

    <packaging>jar</packaging>

    <name>springboot</name>

    <description>Demo project for Spring Boot</description>

    <parent>

        <groupId>org.springframework.boot</groupId>

        <artifactId>spring-boot-starter-parent</artifactId>

        <version>1.5.6.RELEASE</version>

        <relativePath/> <!-- lookup parent from repository -->

    </parent>

    <properties>

        <project.build.sourceEncoding>UTF-8</project.build.sourceEncoding>

        <project.reporting.outputEncoding>UTF-8</project.reporting.outputEncoding>

        <java.version>1.8</java.version>

    </properties>

    <dependencies>

        <dependency>

            <groupId>org.springframework.boot</groupId>

            <artifactId>spring-boot-starter-web</artifactId>

        </dependency>

        <dependency>

            <groupId>org.springframework.boot</groupId>

            <artifactId>spring-boot-starter-test</artifactId>

            <scope>test</scope>

        </dependency>

        <dependency>

            <groupId>org.springframework.boot</groupId>

            <artifactId>spring-boot-starter-thymeleaf</artifactId>

        </dependency>

    </dependencies>

    <build>

        <plugins>

            <plugin>

                <groupId>org.springframework.boot</groupId>

                <artifactId>spring-boot-maven-plugin</artifactId>

            </plugin>

        </plugins>

    </build>

</project>
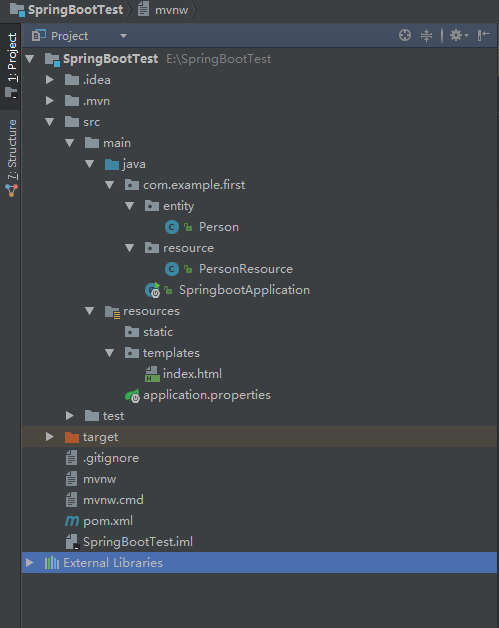
第五步:启动前目录结构
第六步: 配置启动

第七步:启动SpringbootApplication
package com.example.first;

import org.springframework.boot.SpringApplication;

import org.springframework.boot.autoconfigure.SpringBootApplication;

import org.springframework.web.bind.annotation.RestController;

@RestController

@SpringBootApplication

public class SpringbootApplication {

    public static void main(String[] args) {

        SpringApplication.run(SpringbootApplication.class, args);

    }

}
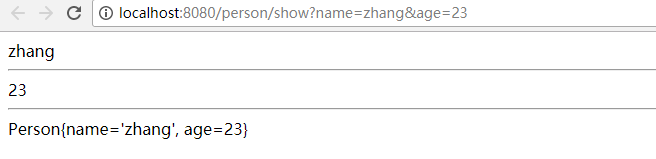
第八步:在地址栏输入http://localhost:8080/person/show?name=zhang&age=23
第九步: 显示效果
Spring boot+ maven + thymeleaf + HTML 实现简单的web项目的更多相关文章
- Spring Boot从入门到实战:整合Web项目常用功能
在Web应用开发过程中,一般都涵盖一些常用功能的实现,如数据库访问.异常处理.消息队列.缓存服务.OSS服务,以及接口日志配置,接口文档生成等.如果每个项目都来一套,则既费力又难以维护.可以通过Spr ...
- idea+Spring+Mybatis+jersey+jetty构建一个简单的web项目
一.先使用idea创建一个maven项目. 二.引入jar包,修改pom.xml <dependencies> <dependency> <groupId>org. ...
- 配置Maven环境并创建简单的web项目步骤
Maven的介绍 主要包含以下三个内容: 1.POM(Project Object Model):即An xml file(pom.xml):依赖管理.生命周期和插件的需要等都在pom.xml文件中完 ...
- 一个小demo熟悉Spring Boot 和 thymeleaf 的基本使用
目录 介绍 零.项目素材 一. 创建 Spring Boot 项目 二.定制首页 1.修改 pom.xml 2.引入相应的本地 css.js 文件 3.编辑 login.html 4.处理对 logi ...
- Spring Boot Maven Plugin(二):run目标
简介 Spring Boot Maven Plugin插件提供spring boot在maven中的支持.允许你打包可运行的jar包或war包. 插件提供了几个maven目标和Spring Boot ...
- Spring Boot Maven Plugin(一):repackage目标
简介 Spring Boot Maven Plugin插件提供spring boot在maven中的支持.允许你打包可运行的jar包或war包. 插件提供了几个maven目标和Spring Boot ...
- Spring Boot 整合 Thymeleaf 完整 Web 案例
Thymeleaf 是一种模板语言.那模板语言或模板引擎是什么?常见的模板语言都包含以下几个概念:数据(Data).模板(Template).模板引擎(Template Engine)和结果文档(Re ...
- Spring Boot2 系列教程(九)Spring Boot 整合 Thymeleaf
虽然现在慢慢在流行前后端分离开发,但是据松哥所了解到的,还是有一些公司在做前后端不分的开发,而在前后端不分的开发中,我们就会需要后端页面模板(实际上,即使前后端分离,也会在一些场景下需要使用页面模板, ...
- 极简 Spring Boot 整合 Thymeleaf 页面模板
虽然现在慢慢在流行前后端分离开发,但是据松哥所了解到的,还是有一些公司在做前后端不分的开发,而在前后端不分的开发中,我们就会需要后端页面模板(实际上,即使前后端分离,也会在一些场景下需要使用页面模板, ...
随机推荐
- 单例模式写MySQL model类,简单的增、删、改、查
单例模式的用途,可用于数据库操作 <?php Class Db { static private $whe;//条件 static private $tab;//表名 static privat ...
- 手撕coreML之yolov2 object detection物体检测(含源代码)
一些闲话: 前面我有篇博客 https://www.cnblogs.com/riddick/p/10434339.html ,大致说了下如何将pytorch训练的.pth模型转换为mlmodel,部署 ...
- Keepalived原理与实战精讲
什么是Keepalived呢,keepalived观其名可知,保持存活,在网络里面就是保持在线了,也就是所谓的高可用或热备,用来防止单点故障(单点故障是指一旦某一点出现故障就会导致整个系统架构的不可用 ...
- SPI Flash(W25Q16DV) 基本操作
读取厂家\设备 ID 发送 90H 指令,再发送 00h 的地址,然后接收即可. 代码如下: void SPIFlashReadID(int *pMID, int *pDID) { SPIFlash_ ...
- python集合操作和内置方法
一 集合基本介绍 集合:在{}内用逗号隔开每个值,集合的特点: 每个值必须是不可变类型 集合是无序的 集合的值不能重复 集合的应用场景较少,最重要的应用场景为进行关系运算以及去重. 二 集合的操作 1 ...
- [转]简单的动态修改RDLC报表页边距和列宽的方法
本文转自:http://star704983.blog.163.com/blog/static/136661264201161604413204/ 1.修改页边距 XmlDocument XMLDoc ...
- .Net实现微信公众平台开发接口(一) 之 “微信开发配置”
我们只要通过微信官方认证,成为开发者,才能实现微信提供的各种接口,否则即使调用了接口,微信也不会实现推送,功能也无法通过开发模式真正得到实现,所以需要正确配置微信信息,通过微信官方认证,成为开发者才可 ...
- EF 中多个数据库迁移
Entity Framework 允许用户基于实体来创建和更新数据库,当项目中只有一个DBContext 时使用默认的参数就可以实现数据库的一些操作.当有多个DbContext 时需要制定参数才能完成 ...
- HTML5仿微信公众号界面
jQuery连接: https://pan.baidu.com/s/1Qj948NPMDmcqzcMyKm8nMw 密码:vewr 图片连接: https://pan.baidu.com/s/1Fha ...
- LeetCode链表相加-Python<二>
上一篇:LeetCode两数之和-Python<一> 题目:https://leetcode-cn.com/problems/add-two-numbers/description/ 给定 ...