
Cobbler 部署
环境介绍
Cobbler 操作系统: Centos-7.2-x86_64
Cobbler服务器地址: 10.90.0.10
部署 Cobbler
安装 Centos epel 原
[root@node1 ~]# rpm -Uvh https://dl.fedoraproject.org/pub/epel/7/x86_64/e/epel-release-7-9.noarch.rpm
安装软件&启动服务
[root@node1 ~]# yum install httpd dhcp tftp python-ctypes cobbler cobbler-web pykickstart fence-agents

[root@node1 ~]# systemctl start cobblerd.service

[root@node1 ~]# systemctl enable httpd

[root@node1 ~]# systemctl start httpd

# 下载cobbler相关组件

[root@node1 ~]# cobbler get-loaders

出现*** TASK COMPLETE ***字符表示下载成功

检查需要修改的配置:由于不同的环境,提示会不一样,只需要安装提示内容一一解决即可
检查需要修改的配置:由于不同的环境,提示会不一样,只需要安装提示内容一一解决即可。
[root@localhost ~]# cobbler check

The following are potential configuration items that you may want to fix:

1 : The 'server' field in /etc/cobbler/settings must be set to something other than localhost, or kickstarting features will not work.  This should be a resolvable hostname or IP for the boot server as reachable by all machines that will use it.

2 : For PXE to be functional, the 'next_server' field in /etc/cobbler/settings must be set to something other than 127.0.0.1, and should match the IP of the boot server on the PXE network.

3 : change 'disable' to 'no' in /etc/xinetd.d/tftp

4 : enable and start rsyncd.service with systemctl

5 : debmirror package is not installed, it will be required to manage debian deployments and repositories

6 : The default password used by the sample templates for newly installed machines (default_password_crypted in /etc/cobbler/settings) is still set to 'cobbler' and should be changed, try: "openssl passwd -1 -salt 'random-phrase-here' 'your-password-here'" to generate new one

Restart cobblerd and then run 'cobbler sync' to apply changes.

解决第一个和第二个提示:设置cobbler地址和设置dhcp服务器地址

[root@node1 ~]# vim /etc/cobbler/settings

next_server: 10.90.0.10

server: 10.90.0.10

第三个和第四个提示解决:启动tftp和rsyncd服务

[root@node1 ~]# yum -y install tftp-server xinetd

启用tftp服务:

[root@node1 ~]# vim /etc/xinetd.d/tftp

disable = no

启动xinetd服务:

[root@node1 ~]# systemctl enable rsyncd.service

[root@node1 ~]# systemctl enable xinetd

[root@node1 ~]# systemctl start xinetd.service

[root@node1 ~]# netstat -nulp | grep xinetd

udp 0 0 0.0.0.0:69 0.0.0.0:* 3659/xinetd

第5个可以不用解决 debian系统

第六个提示解决:设置cobbler密码,同时也是安装服务器的登录密码

[root@node1 ~]# openssl passwd -1 -salt 'Tczaflw@521' 'Tczaflw@521'

$1$JM/i5ygv$cLMbz2ud00P6KI9XiEGj10

修改cobbler把生成的密码放入配置文件

[root@node1 ~]# vim /etc/cobbler/settings

default_password_crypted: "$1$JM/i5ygv$cLMbz2ud00P6KI9XiEGj10"

[root@node1 ~]# cobbler check

只剩下5即可
Cobbler管理DHCP服务器配置
编辑cobbler配置文件,开启cobbler管理dhcp
[root@node1 ~]# vim /etc/cobbler/settings

manage_dhcp: 1
编辑cobbler的dhcp管理模版,设置dhcp分配的网段,网管,dns信息
[root@node1 ~]# vim /etc/cobbler/dhcp.template

subnet 10.90.0.0 netmask 255.255.0.0 {

     option routers             10.90.0.10;

     option domain-name-servers 114.114.114.114;

     option subnet-mask         255.255.0.0;

     range dynamic-bootp        10.90.0.100 10.90.0.200;
同步cobbler配置:同步之前先重启cobbler保证所有配置生效
[root@node1 ~]# systemctl restart cobblerd.service

[root@node1 ~]# cobbler sync
Cobbler导入镜像
挂载iso文件到系统
[root@node1 ~]# mount /dev/cdrom /mnt
导入镜像文件到cobbler
cobbler import --path=/mnt/ --name=Centos-7.2-x86_64 --arch=x86_64

task started: 2016-11-19_170133_import

task started (id=Media import, time=Sat Nov 19 17:01:33 2016)

Found a candidate signature: breed=redhat, version=rhel6

Found a candidate signature: breed=redhat, version=rhel7

Found a matching signature: breed=redhat, version=rhel7

Adding distros from path /var/www/cobbler/ks_mirror/Centos-7.2-x86_64:

creating new distro: Centos-7.2-x86_64

trying symlink: /var/www/cobbler/ks_mirror/Centos-7.2-x86_64 -> /var/www/cobbler/links/Centos-7.2-x86_64

creating new profile: Centos-7.2-x86_64

associating repos

checking for rsync repo(s)

checking for rhn repo(s)

checking for yum repo(s)

starting descent into /var/www/cobbler/ks_mirror/Centos-7.2-x86_64 for Centos-7.2-x86_64

processing repo at : /var/www/cobbler/ks_mirror/Centos-7.2-x86_64

need to process repo/comps: /var/www/cobbler/ks_mirror/Centos-7.2-x86_64

looking for /var/www/cobbler/ks_mirror/Centos-7.2-x86_64/repodata/*comps*.xml

Keeping repodata as-is :/var/www/cobbler/ks_mirror/Centos-7.2-x86_64/repodata

*** TASK COMPLETE ***
查看cobbler已经有了一个安装源;使用如下命令可以获取到cobbler命令详细报表
[root@node1 ~]# cobbler profile list

    Centos-7.2-x86_64

[root@node1 ~]# cobbler profile report

Name                           : Centos-7.2-x86_64

TFTP Boot Files                : {}

Comment                        :

DHCP Tag                       : default

Distribution                   : Centos-7.2-x86_64

Enable gPXE?                   : 0

Enable PXE Menu?               : 1

Fetchable Files                : {}

Kernel Options                 : {}

Kernel Options (Post Install)  : {}

Kickstart                      : /var/lib/cobbler/kickstarts/sample_end.ks

Kickstart Metadata             : {}

Management Classes             : []

Management Parameters          : <<inherit>>

Name Servers                   : []

Name Servers Search Path       : []

Owners                         : ['admin']

Parent Profile                 :

Internal proxy                 :

Red Hat Management Key         : <<inherit>>

Red Hat Management Server      : <<inherit>>

Repos                          : []

Server Override                : <<inherit>>

Template Files                 : {}

Virt Auto Boot                 : 1

Virt Bridge                    : xenbr0

Virt CPUs                      : 1

Virt Disk Driver Type          : raw

Virt File Size(GB)             : 5

Virt Path                      :

Virt RAM (MB)                  : 512

Virt Type                      : kvm
centos7的自动安装ks 文件---CentOS-7.2-x86_64.cfg
#Kickstart Configurator for cobbler by Jason Zhao

#platform=x86, AMD64, or Intel EM64T

#System  language

lang en_US

#System keyboard

keyboard us

#Sytem timezone

timezone Asia/Shanghai

#Root password

rootpw --iscrypted $default_password_crypted #cobbler 配置文件中的密码

#Use text mode install

text

#Install OS instead of upgrade

install

#Use NFS installation Media

url --url=$tree # URL地址(也就是安装源)设置为$tree表示自动获取;

#System bootloader configuration

bootloader --location=mbr

#Clear the Master Boot Record

zerombr

#Partition clearing information

clearpart --all --initlabel

#Disk partitioning information

part / --fstype="xfs" --size=3072

part /boot --fstype="xfs" --size=500

part /software --fstype="xfs" --grow --size=1

#System authorization infomation

auth  --useshadow  --enablemd5

#Network information

$SNIPPET('network_config') # 网卡配置也无须手动配置而是由cobbler进行配置。

#network --bootproto=dhcp --device=em1 --onboot=on

# Reboot after installation

reboot

#Firewall configuration

firewall --disabled

#SELinux configuration

selinux --disabled

#Do not configure XWindows

skipx

#Package install information

%pre

$SNIPPET('log_ks_pre')

$SNIPPET('kickstart_start')

$SNIPPET('pre_install_network_config')

# Enable installation monitoring

$SNIPPET('pre_anamon')

%end

%packages --nobase

@ core

%end

%post

systemctl disable postfix.service

%end
修改Centos-7.2-x86_64的kickstart文件
[root@node1 ~]# cobbler profile edit --name Centos-7.2-x86_64 --kickstart=/var/lib/cobbler/kickstarts/CentOS-7.2-x86_64.cfg

[root@node1 ~]# cobbler profile report | grep Kickstart

Kickstart                      : /var/lib/cobbler/kickstarts/CentOS-7.2-x86_64.cfg

Kickstart Metadata             : {}

在装机时设置Centos7网卡为eth0

[root@node1 ~]# cobbler profile edit --name=Centos-7.2-x86_64 --kopts='net.ifnames=0 biosdevname=0'

设置完成使用cobbler sync进行同步配置
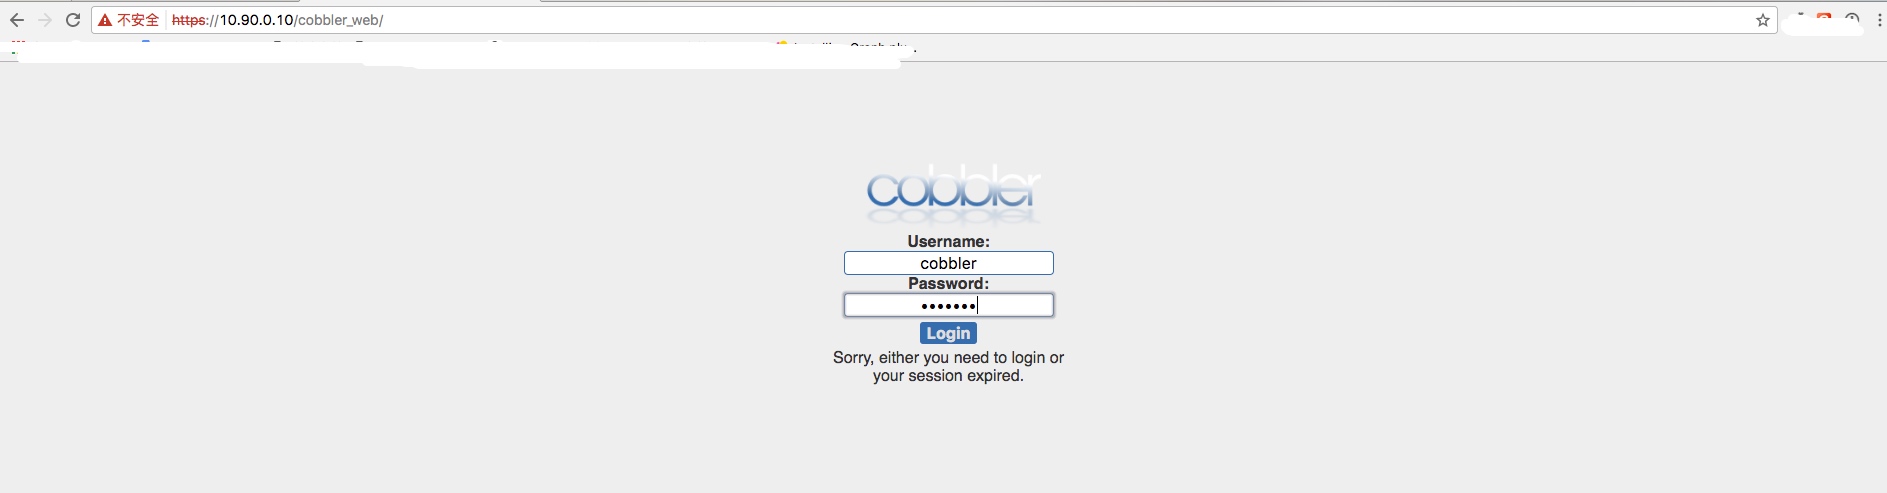
配置 cobbler_web

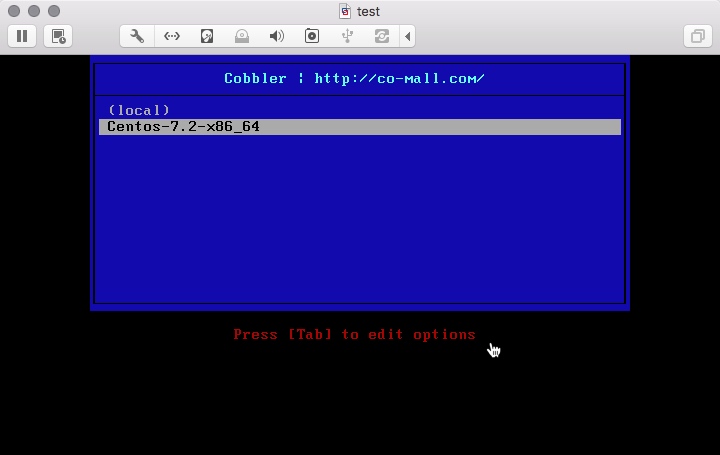
测试安装-成功

Cobbler 部署的更多相关文章
- cobbler部署
1.cobbler介绍 Cobbler是一个快速网络安装linux的服务,而且在经过调整也可以支持网络安装windows.该工具使用python开发,小巧轻便(才15k行python代码),使用简单的 ...
- cobbler部署centos6与centos7系列
cobbler部署centos6与centos7系列 转载自:http://www.jianshu.com/p/a4bed77bf40d 版权声明:完全抄自 http://www.jianshu.co ...
- Cobbler部署之FAQ处理
Cobbler报错处理 通过cobbler check检查出现的报错 红色标注为报错关键信息 9.1 报错一 # cobbler check httpd does not appear to be r ...
- cobbler部署机器的默认密码
修改cobbler的默认密码: 用 openssl 生成一串密码后加入到 cobbler 的配置文件(/etc/cobbler/settings)里,替换 default_password_crypt ...
- cobbler部署安装CentOS6.8
Linux运维:cobbler : 矮哥linux运维群:93324526 学习cobbler的话,必须先搞懂kickstart,原理不是,不懂如何排错. kickstart部署请点击这里 1. Co ...
- cobbler部署以及使用
常用软件安装及使用目录 资源链接:https://pan.baidu.com/s/1yfVnuSgY5vOTh-B74tpVyw 网盘分享的文件在此 cobbler第一次操作history. ec ...
- cobbler部署安装
挂载光驱 # mount /dev/cdrom /mnt/ 安装cobbler所需软件 # yum install cobbler cobbler-web dhcp tftp-server pykic ...
- cobbler部署错误总结
web 报错500 Internal Server Error解决方案 在安装使用Cobbler web界面的时候提示HTTP 500错误,也就是服务器内部错误,检查防火墙和selinux都是为关闭状 ...
- cobbler安装、部署、测试
cobbler功能介绍 官网:http://cobbler.github.io 安装 yum install -y httpd tftp dhcp cobbler cobbler-web pykick ...
随机推荐
- c++ string 用法
//char *和string 转换: string str="1234567; const char *p = str.c_str(); //不过这是的 *p 是const类型,不能对他进 ...
- Android详细介绍MPAndroidChart-LineChart
在开发当中曲线图用的时候太多了,之前都是自己手写,之后发现太累还丑不符合需求 MPAndroidChart 先介绍LineChart 0.效果图 首先依赖 1. implementation 'co ...
- shall 2-13
1.用一句话概括Shell Shell是一个解释器,介于应用程序(用户)和操作系统之间的一个桥梁,负责命令的解释 2.Shell的编程语言编译型语言: 程序在执行之前需要个专门的编译过程,把程序编译成 ...
- Mac安装文件已勾选“允许任何来源”,还是提示“文件已损坏”的解决方案
Mac安装文件已勾选"允许任何来源",还是提示"文件已损坏"的解决方案 打开终端,在终端中粘贴下面命令:[sudo xattr -r -d com.apple. ...
- POJ 3263 Tallest Cow 题解
题目 FJ's \(N (1 ≤ N ≤ 10,000)\) cows conveniently indexed 1..N are standing in a line. Each cow has a ...
- 结合实际需求,在webapi内利用WebSocket建立单向的消息推送平台,让A页面和服务端建立WebSocket连接,让其他页面可以及时给A页面推送消息
1.需求示意图 2.需求描述 原本是为了给做unity3d客户端开发的同事提供不定时的消息推送,比如商城购买道具后服务端将道具信息推送给客户端. 本篇文章简化理解,用“相关部门开展活动,向全市人民征集 ...
- celery 基础教程(三):配置
前言 如果你使用默认的加载器,你必须创建 celeryconfig.py 模块并且保证它在python路径中. 一.加载配置方法 1.基础方法 可以设置一些选项来改变 Celery 的工作方式.这 ...
- MCMC随机采样
1 MCMC蒙特卡罗方法 作为一种随机采样方法,马尔科夫链蒙特卡罗(Markov Chain Monte Carlo,以下简称MCMC)在机器学习,深度学习以及自然语言处理等领域都有广泛的应用,是很多 ...
- drf☞jwt自动签发与手动签发
目录 一.自动签发 二.手动签发 一.自动签发 urls from rest_framework_jwt.views import obtain_jwt_token # 使用jwt自带的登录视图 ur ...
- Python Ethical Hacking - Malware Analysis(1)
WRITING MALWARE Download file. Execute Code. Send Report. Download & Execute. Execute & Repo ...