springboot oauth 鉴权之——授权码authorization_code鉴权
近期一直在研究鉴权方面的各种案例,这几天有空,写一波总结及经验。
第一步:什么是 OAuth鉴权
OAuth2是工业标准的授权协议。OAuth2取代了在2006创建的原始OAuthTM协议所做的工作。OAuth 2.0关注客户端开发人员的简单性,同时为Web应用程序、桌面应用程序、移动电话和客厅设备提供特定的授权流。
参考理解: Oauth2.0 理解OAuth 2.0 QQ授权 微信授权
第二步:什么是授权码模式
授权码模式(authorization code)是功能最完整、流程最严密的授权模式。它的特点就是通过客户端的后台服务器,与"服务提供商"的认证服务器进行互动。
第三步:授权码授权流程
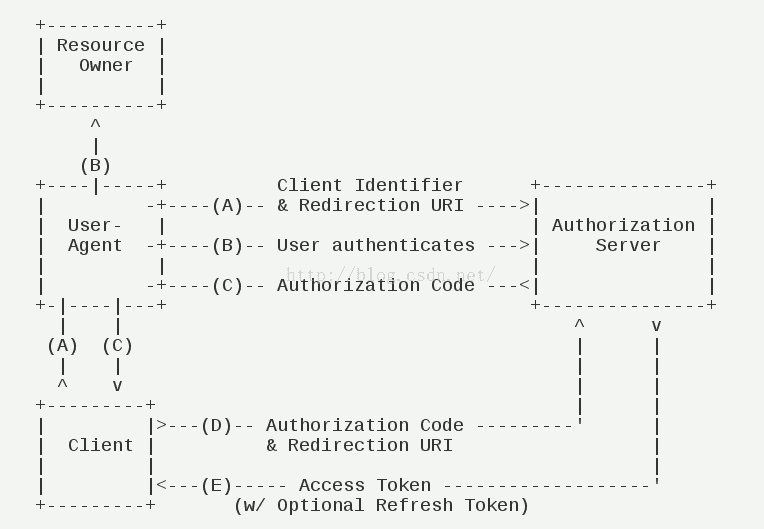
交互步骤:
  (A)用户访问客户端,后者将前者导向认证服务器。

  (B)用户选择是否给予客户端授权。

  (C)假设用户给予授权,认证服务器将用户导向客户端事先指定的"重定向URI"(redirection URI),同时附上一个授权码。

  (D)客户端收到授权码,附上早先的"重定向URI",向认证服务器申请令牌。这一步是在客户端的后台的服务器上完成的,对用户不可见。

  (E)认证服务器核对了授权码和重定向URI,确认无误后,向客户端发送访问令牌(access token)和更新令牌(refresh token)。
第四步:授权码模式实践
源码地址:
github: https://github.com/GitHubZhangCom/spring-security-oauth-example/
码云:https://gitee.com/region/spring-security-oauth-example/
1)、 引入相关jar:
<!--security  -->

<dependency>

       <groupId>org.springframework.boot</groupId>

       <artifactId>spring-boot-starter-security</artifactId>

</dependency>

<dependency>

       <groupId>org.springframework.security.oauth.boot</groupId>

       <artifactId>spring-security-oauth2-autoconfigure</artifactId>

        <version>2.0.0.RELEASE</version>

</dependency>

<!-- 使用lombok优雅的编码 -->

<dependency>

        <groupId>org.projectlombok</groupId>

        <artifactId>lombok</artifactId>

</dependency>
2)、相关oauth编程:
package com.auth.server.config;

import org.springframework.beans.factory.annotation.Autowired;

import org.springframework.beans.factory.annotation.Qualifier;

import org.springframework.context.annotation.Bean;

import org.springframework.context.annotation.Configuration;

import org.springframework.security.authentication.AuthenticationManager;

import org.springframework.security.config.annotation.authentication.builders.AuthenticationManagerBuilder;

import org.springframework.security.config.annotation.web.builders.HttpSecurity;

import org.springframework.security.config.annotation.web.configuration.WebSecurityConfigurerAdapter;

import org.springframework.security.core.userdetails.UserDetailsService;

/**

 * 鉴权配置

 * @author zyl

 *

 */

@Configuration

public class SecurityConfig extends WebSecurityConfigurerAdapter {

    @Bean

    @Override

    public AuthenticationManager authenticationManagerBean() throws Exception {

        return super.authenticationManagerBean();

    }

    @Qualifier("myUserDetailsService")

    @Autowired

    private UserDetailsService userDetailsService;

    @Override

    protected void configure(AuthenticationManagerBuilder auth) throws Exception {

        auth.userDetailsService(userDetailsService);

    }

    @Override

    protected void configure(HttpSecurity http) throws Exception {

        http.authorizeRequests()

                .antMatchers("/**/*.js",

                        "/**/*.css"

                )

                .permitAll()

                .anyRequest()

                .authenticated()

                .and()

                .formLogin()

                .loginPage("/login")

                .permitAll()

                // 自动登录

                /*.and()

                    .rememberMe()

                    // 加密的秘钥

                    .key("unique-and-secret")

                    // 存放在浏览器端cookie的key

                    .rememberMeCookieName("remember-me-cookie-name")

                    // token失效的时间,单位为秒

                    .tokenValiditySeconds(60 * 60 * 25)*/

                .and()

                // 暂时禁用CSRF,否则无法提交登录表单

                .csrf().disable();

    }

}
package com.auth.server.config;

import javax.sql.DataSource;

import org.springframework.beans.factory.annotation.Autowired;

import org.springframework.beans.factory.annotation.Qualifier;

import org.springframework.context.annotation.Bean;

import org.springframework.context.annotation.Configuration;

import org.springframework.security.authentication.AuthenticationManager;

import org.springframework.security.core.userdetails.UserDetailsService;

import org.springframework.security.oauth2.config.annotation.configurers.ClientDetailsServiceConfigurer;

import org.springframework.security.oauth2.config.annotation.web.configuration.AuthorizationServerConfigurerAdapter;

import org.springframework.security.oauth2.config.annotation.web.configuration.EnableAuthorizationServer;

import org.springframework.security.oauth2.config.annotation.web.configurers.AuthorizationServerEndpointsConfigurer;

import org.springframework.security.oauth2.config.annotation.web.configurers.AuthorizationServerSecurityConfigurer;

import org.springframework.security.oauth2.provider.token.TokenStore;

import org.springframework.security.oauth2.provider.token.store.InMemoryTokenStore;

/**

 * 授权配置

 * @author wb0024

 *

 */

@Configuration

@EnableAuthorizationServer

public class ServerConfig extends AuthorizationServerConfigurerAdapter {

    @Autowired

    private AuthenticationManager authenticationManager;

    @Qualifier("myUserDetailsService")

    @Autowired

    private UserDetailsService userDetailsService;

//    @Autowired

//    @Qualifier("dataSource")

//    private DataSource dataSource;

    @Override

    public void configure(AuthorizationServerSecurityConfigurer security) throws Exception {

        // 配置token获取和验证时的策略

        security.tokenKeyAccess("permitAll()").checkTokenAccess("isAuthenticated()");

    }

    @Override

    public void configure(ClientDetailsServiceConfigurer clients) throws Exception {

        clients.inMemory()

                .withClient("client")

                // secret密码配置从 Spring Security 5.0开始必须以 {加密方式}+加密后的密码 这种格式填写

                /* *   当前版本5新增支持加密方式:

                 *   bcrypt - BCryptPasswordEncoder (Also used for encoding)

                 *   ldap - LdapShaPasswordEncoder

                 *   MD4 - Md4PasswordEncoder

                 *   MD5 - new MessageDigestPasswordEncoder("MD5")

                 *   noop - NoOpPasswordEncoder

                 *   pbkdf2 - Pbkdf2PasswordEncoder

                 *   scrypt - SCryptPasswordEncoder

                 *   SHA-1 - new MessageDigestPasswordEncoder("SHA-1")

                 *   SHA-256 - new MessageDigestPasswordEncoder("SHA-256")

                 *   sha256 - StandardPasswordEncoder*/

                .secret("{noop}secret")

                .scopes("all")

                .authorizedGrantTypes("authorization_code")//授权码模式

//                .authorizedGrantTypes("authorization_code", "refresh_token")//授权码模式

                .autoApprove(true);

    }

    @Override

    public void configure(AuthorizationServerEndpointsConfigurer endpoints) throws Exception {

//        // 配置tokenStore,保存到redis缓存中

//        endpoints.authenticationManager(authenticationManager)

//                .tokenStore(new MyRedisTokenStore(redisConnectionFactory))

//                // 不添加userDetailsService,刷新access_token时会报错

//                .userDetailsService(userDetailsService);

        // 使用最基本的InMemoryTokenStore生成token

        endpoints.authenticationManager(authenticationManager).tokenStore(memoryTokenStore());

    }

    // 使用最基本的InMemoryTokenStore生成token

    @Bean

    public TokenStore memoryTokenStore() {

        return new InMemoryTokenStore();

    }

}
package com.jwt.server.provider;

import java.util.ArrayList;

import org.springframework.security.authentication.AuthenticationProvider;

import org.springframework.security.authentication.BadCredentialsException;

import org.springframework.security.authentication.UsernamePasswordAuthenticationToken;

import org.springframework.security.core.Authentication;

import org.springframework.security.core.AuthenticationException;

import org.springframework.security.core.GrantedAuthority;

import org.springframework.security.core.userdetails.UserDetails;

import org.springframework.security.core.userdetails.UserDetailsService;

import org.springframework.security.core.userdetails.UsernameNotFoundException;

import org.springframework.security.crypto.bcrypt.BCryptPasswordEncoder;

/**

 * 自定义身份认证验证组件

 * @author zyl

 *

 */

public class CustomAuthenticationProvider implements AuthenticationProvider {

    private UserDetailsService userDetailsService;

    private BCryptPasswordEncoder bCryptPasswordEncoder;

    public CustomAuthenticationProvider(UserDetailsService userDetailsService, BCryptPasswordEncoder bCryptPasswordEncoder){

        this.userDetailsService = userDetailsService;

        this.bCryptPasswordEncoder = bCryptPasswordEncoder;

    }

    @Override

    public Authentication authenticate(Authentication authentication) throws AuthenticationException {

        // 获取认证的用户名 & 密码

        String name = authentication.getName();

        String password = authentication.getCredentials().toString();

        // 认证逻辑

        UserDetails userDetails = userDetailsService.loadUserByUsername(name);

        if (null != userDetails) {

            if (bCryptPasswordEncoder.matches(password, userDetails.getPassword())) {

                // 这里设置权限和角色

                ArrayList<GrantedAuthority> authorities = new ArrayList<>();

                authorities.add( new GrantedAuthorityImpl("ROLE_ADMIN"));

                authorities.add( new GrantedAuthorityImpl("ROLE_API"));

                authorities.add( new GrantedAuthorityImpl("AUTH_WRITE"));

                // 生成令牌 这里令牌里面存入了:name,password,authorities, 当然你也可以放其他内容

                Authentication auth = new UsernamePasswordAuthenticationToken(name, password, authorities);

                return auth;

            } else {

                throw new BadCredentialsException("密码错误");

            }

        } else {

            throw new UsernameNotFoundException("用户不存在");

        }

    }

    /**

     * 是否可以提供输入类型的认证服务

     * @param authentication

     * @return

     */

    @Override

    public boolean supports(Class<?> authentication) {

        return authentication.equals(UsernamePasswordAuthenticationToken.class);

    }

}
核心代码需要做的就这些,详情请看源码。
springboot oauth 鉴权之——授权码authorization_code鉴权的更多相关文章
- asp.net权限认证:OWIN实现OAuth 2.0 之授权码模式(Authorization Code)
asp.net权限认证系列 asp.net权限认证:Forms认证 asp.net权限认证:HTTP基本认证(http basic) asp.net权限认证:Windows认证 asp.net权限认证 ...
- springboot oauth 鉴权之——password、authorization_code鉴权
参考一下两个案例:https://www.cnblogs.com/haoliyou/p/9606018.html https://www.cnblogs.com/haoliyou/p/9606036. ...
- OAuth 2.0之授权码模式
转载自:http://www.ruanyifeng.com/blog/2014/05/oauth_2_0.html OAuth 2.0授权码模式 授权码模式(authorization code)是功 ...
- Oauth2认证模式之授权码模式实现
Oauth2认证模式之授权码模式(authorization code) 本示例实现了Oauth2之授权码模式,授权码模式(authorization code)是功能最完整.流程最严密的授权模式.它 ...
- springboot oauth 鉴权之——password鉴权相当于jwt鉴权模式
近期一直在研究鉴权方面的各种案例,这几天有空,写一波总结及经验. 第一步:什么是 OAuth鉴权 OAuth2是工业标准的授权协议.OAuth2取代了在2006创建的原始OAuthTM协议所做的工作. ...
- OAuth 2.0 授权码请求
关于OAuth 2.0,请参见下面这两篇文章(墙裂推荐): <OAuth 2.0> <Spring Security OAuth 2.0> 纸上得来终觉浅,绝知此事要躬行.理论 ...
- 学习Spring Security OAuth认证(一)-授权码模式
一.环境 spring boot+spring security+idea+maven+mybatis 主要是spring security 二.依赖 <dependency> <g ...
- OAuth 2.0授权之授权码授权
OAuth 2.0 是一个开放的标准协议,允许应用程序访问其它应用的用户授权的数据(如用户名.头像.昵称等).比如使用微信.QQ.支付宝登录等第三方网站,只需要用户点击授权按钮,第三方网站就会获取到用 ...
- OAuth 白话简明教程 2.授权码模式(Authorization Code)
转自:http://www.cftea.com/c/2016/11/6703.asp OAuth 白话简明教程 1.简述 OAuth 白话简明教程 2.授权码模式(Authorization Code ...
随机推荐
- python爬取淘宝数据之遇到的问题
1.chormedriver.exe驱动下载地址 https://npm.taobao.org/mirrors/chromedriver 2.跳转网页页面不稳定问题 添加智能等待时间 driver.i ...
- MySql索引机制
第一部分 MySQL数据库索引的数据结构及算法理论 第二部分 MySQL索引实现机制 第三部分 MySQL中高性能使用索引的策略 数据结构及算法 MySQL官方对索引的定义为:索引(Index)是帮助 ...
- 记一次修复Windows
打开了一堆网页和应用,然后桌面不见了.. 于是很着急..就按各种快捷键..Win+R挂了.. 本来以为要reboot(机房电脑) , 然后问老师发现会格式化 然后发现Ctrl+Alt+Delete还存 ...
- Office文档WEB端在线浏览(转换成Html)
最近在做了一个项目,要求是对Office文档在线预览.下面给大家分享一下我的方法. 1.第一种方法(不建议使用)我是在网上搜了一个利用COM组件对office文档进行转换,但是此方法必须要装Offic ...
- 如何保存Keras模型
我们不推荐使用pickle或cPickle来保存Keras模型 你可以使用model.save(filepath)将Keras模型和权重保存在一个HDF5文件中,该文件将包含: 模型的结构,以便重构该 ...
- day50-线程-定时器
#1.定时器: from threading import Timer def func(): print('定时器') t = Timer(1,func) #定时一秒,开启func线程. t.sta ...
- mysql命令行操作大全
Mysql安装目录 数据库目录/var/lib/mysql/配置文件/usr/share/mysql(mysql.server命令及配置文件)相关命令/usr/bin(mysqladmin mysql ...
- << 和>> 的计算公式
在java中,一个数左移n位,就是将这个数乘以2的n次方,右移就是将这个数除以2的n次方. 如: 8>>2 = 2 (8/2^2) 15 << 3 = 120 (15*(2 ...
- 搭建WordPress个人博客
1. 准备LNMP环境 LNMP 是 Linux.Nginx.MySQL 和 PHP 的缩写,是 WordPress 博客系统依赖的基础运行环境.我们先来准备 LNMP 环境 安装Nginx 使用 y ...
- 11)const
const修饰一个 变量 为只读 : 然后 我再 a=: 这样写就是不行. 其实这个知识点主要考察 指针变量 指针指向的内存 是两个概念 char buf[]="dhasl ...