WinForm实现Rabbitmq官网6个案例-Hello World
先上代码
namespace RabbitMQDemo
{
public partial class HelloWorld : Form
{
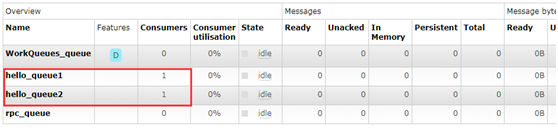
string queueName1 = "hello_queue1";//消费者1
string queueName2 = "hello_queue2";//消费者2
Action<string> SetText;
/// <summary>
/// 单线程实例
/// </summary>
private static readonly HelloWorld _helloWorld;
static HelloWorld()
{
_helloWorld = new HelloWorld();
}
/// <summary>
/// 单例模式
/// </summary>
public static HelloWorld SingleForm
{ get { return _helloWorld; } }
private HelloWorld()
{
CheckForIllegalCrossThreadCalls = false;
InitializeComponent();
ReseiveMsg(queueName1);
ReseiveMsg(queueName2);
SetText += OnSetText;
} private void btnSendMsg_Click(object sender, EventArgs e)
{
SendMsg();
}
/// <summary>
/// 发送消息
/// </summary>
private void SendMsg()
{
string message = txtPublisher.Text;
if (message.Trim().Length <= )
{
MessageBox.Show("请输入要发送的消息");
}
string queueName = cbBoxQueues.SelectedValue.ToString();
var factory = new ConnectionFactory() { HostName = "localhost" };
using (var connection = factory.CreateConnection())
using (var channel = connection.CreateModel())
{
channel.QueueDeclare(queue: queueName,
durable: false,
exclusive: false,
autoDelete: false,
arguments: null); var body = Encoding.UTF8.GetBytes(message); channel.BasicPublish(exchange: "",
routingKey: queueName,
basicProperties: null,
body: body);
}
} /// <summary>
/// 接收消息
/// </summary>
private void ReseiveMsg(string queueName)
{
//string queueName = cbBoxQueues.SelectedText;
try
{
var factory = new ConnectionFactory() { HostName = "localhost" }; //connection和channel不能使用using,否则会被dispose掉
var connection = factory.CreateConnection();
var channel = connection.CreateModel();
//声明队列 生产者和消费者都需要QueueDeclare
channel.QueueDeclare(queue: queueName,
durable: false,
exclusive: false,
autoDelete: false,
arguments: null); var consumer = new EventingBasicConsumer(channel);
consumer.Received += (model, ea) =>
{
var body = ea.Body;
var message = Encoding.UTF8.GetString(body); txtConsumer1.Invoke(SetText, message);
};
channel.BasicConsume(queue: queueName,
noAck: true,
consumer: consumer);
}
catch (Exception ex)
{
MessageBox.Show(ex.ToString());
}
} private void OnSetText(string txtContent)
{
string queueName = cbBoxQueues.SelectedValue.ToString();
if (queueName == queueName1)
txtConsumer1.Text += string.Format("{0}\r\n", txtPublisher.Text);
if (queueName == queueName2)
txtConsumer2.Text += string.Format("{0}\r\n", txtPublisher.Text);
} private void HelloWorld_Load(object sender, EventArgs e)
{
List<DataSource> lst = new List<DataSource>();
lst.Add(new DataSource("消费者1", "hello_queue1"));
lst.Add(new DataSource("消费者2", "hello_queue2")); cbBoxQueues.DataSource = lst;
cbBoxQueues.DisplayMember = "DisplayMember";
cbBoxQueues.ValueMember = "DisplayValue";
} private class DataSource
{
public DataSource(string displayMember,string displayValue)
{
DisplayMember = displayMember;
DisplayValue = displayValue;
}
public string DisplayMember { get; set; }
public string DisplayValue { get; set; }
}
}
}
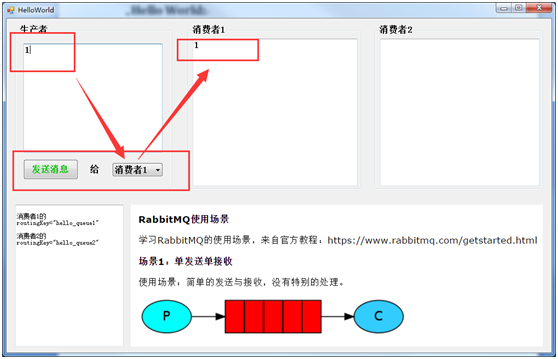
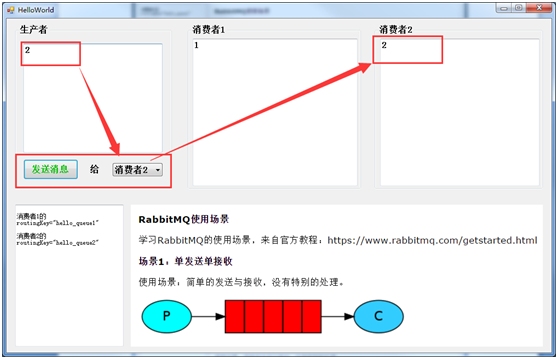
界面如下:
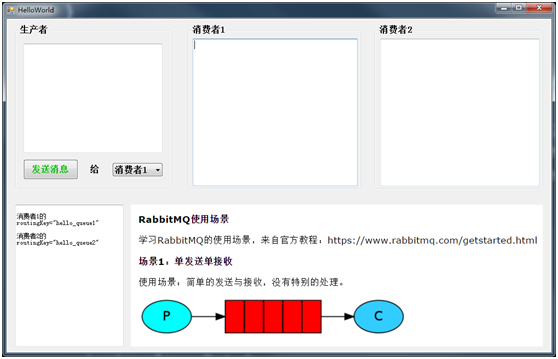
大致流程是
生产者发送消息到队列,然后队列(rabbitmq)把消息发送给消费者(消费者向rabbitmq索取消息)
两个消费者:
WinForm实现Rabbitmq官网6个案例-Hello World的更多相关文章
- WinForm实现Rabbitmq官网6个案例-RPC
获取源码 客户端代码: namespace RabbitMQDemo { public partial class RPC : Form { private readonly static RPC _ ...
- WinForm实现Rabbitmq官网6个案例-Publishe/Subscribe
代码: namespace RabbitMQDemo { public partial class PublishSubscribe : Form { private string exchangeN ...
- WinForm实现Rabbitmq官网6个案例-Work Queues
代码: namespace RabbitMQDemo { public partial class WorkQueues : Form { private string queueName = &qu ...
- WinForm实现Rabbitmq官网6个案例-Topics
代码: namespace RabbitMQDemo { public partial class Topics : Form { private string exchangeName = &quo ...
- WinForm实现Rabbitmq官网6个案例-Routing
代码: namespace RabbitMQDemo { public partial class Routing : Form { private string exchangeName = &qu ...
- 官网英文版学习——RabbitMQ学习笔记(一)认识RabbitMQ
鉴于目前中文的RabbitMQ教程很缺,本博主虽然买了一本rabbitMQ的书,遗憾的是该书的代码用的不是java语言,看起来也有些不爽,且网友们不同人学习所写不同,本博主看的有些地方不太理想,为此本 ...
- 2022年官网下安装RabbitMQ最全版与官网查阅方法
目录 一.Erlang环境部署 1.百度搜索"Erlang",或者访问网址:https://www.erlang.org/,找到DOWNLOAD双击进入. 2.找到支持的windo ...
- Yeoman 官网教学案例:使用 Yeoman 构建 WebApp
STEP 1:设置开发环境 与yeoman的所有交互都是通过命令行.Mac系统使用terminal.app,Linux系统使用shell,windows系统可以使用cmder/PowerShell/c ...
- MXNet官网案例分析--Train MLP on MNIST
本文是MXNet的官网案例: Train MLP on MNIST. MXNet所有的模块如下图所示: 第一步: 准备数据 从下面程序可以看出,MXNet里面的数据是一个4维NDArray. impo ...
随机推荐
- vue 在 html 中自定义 tag
v-if,v-for,:key,:style,v-text,@click,:src,:poster,:class,:href
- 算法图解学习笔记01:二分查找&大O表示法
二分查找 二分查找又称折半查找,其输入的必须是有序的元素列表.二分查找的基本思想是将n个元素分成大致相等的两部分,取a[n/2]与x做比较,如果x=a[n/2],则找到x,算法中止:如果x<a[ ...
- 四、OE 中添加对供应商名称的唯一限制
最初的思路是利用sql_constraints 来限制重复的供应商名称,但后来想到在OE中供应商.客户乃至员工都隶属于Partner,sql_constrainst实际上是通过限制partner来限制 ...
- Android开发不可或缺的十大网站及工具
1. Google 做开发前完全是小白,真心不知道有Google这东西,只晓得百度,遇到问题直接百度,不是黑百度,百度在娱乐八卦方面确实靠谱,但是技术方面查出来的东西基本千篇一律,有些答案甚至还会起到 ...
- C#原生压缩和解压缩方法
string path = AppDomain.CurrentDomain.BaseDirectory; string startPath = @"c:\Client"; stri ...
- Java源码安全审查
最近业务需要出一份Java Web应用源码安全审查报告, 对比了市面上数种工具及其分析结果, 基于结果总结了一份规则库. 本文目录结构如下: 检测工具 FindSecurityBugs 基于class ...
- orcale 之sql/plus set 命令
set 命令用于设置系统变量的值.通过set 命令设置的系统变量有很多,下面把最常用的罗列出来: 1. arraysize 用于从数据库中一次提取的行数,其默认为 15. SQL> show a ...
- Linux下iptables 禁止端口和开放端口
1.关闭所有的 INPUT FORWARD OUTPUT 只对某些端口开放.下面是命令实现: iptables -P INPUT DROP iptables -P FORWARD DROP iptab ...
- 向已有的table中插入数据
table: <table id="seleted-table" class="table table-bordered table-hover" sty ...
- mysql-5.6.31安装(单实例 Linux)
安装版本:mysql-5.6.31 安装环境:Linux RHEL6.5.x86 安装要求:单实例,端口为默认:3306 (1) 要求安装Mysql数据库版本号及包名为:my ...