Spring Security(一) —— Architecture Overview
摘要: 原创出处 https://www.cnkirito.moe/spring-security-1/ 「老徐」欢迎转载,保留摘要,谢谢!
一直以来我都想写一写Spring Security系列的文章,但是整个Spring Security体系强大却又繁杂。陆陆续续从最开始的guides接触它,到项目中看了一些源码,到最近这个月为了写一写这个系列的文章,阅读了好几遍文档,最终打算尝试一下,写一个较为完整的系列文章。
较为简单或者体量较小的技术,完全可以参考着demo直接上手,但系统的学习一门技术则不然。以我的认知,一般的文档大致有两种风格:Architecture First和Code First。前者致力于让读者先了解整体的架构,方便我们对自己的认知有一个宏观的把控,而后者以特定的demo配合讲解,可以让读者在解决问题的过程中顺便掌握一门技术。关注过我博客或者公众号的朋友会发现,我之前介绍技术的文章,大多数是Code First,提出一个需求,介绍一个思路,解决一个问题,分析一下源码,大多如此。而学习一个体系的技术,我推荐Architecture First,正如本文标题所言,这篇文章是我Spring Security系列的第一篇,主要是根据Spring Security文档选择性翻译整理而成的一个架构概览,配合自己的一些注释方便大家理解。写作本系列文章时,参考版本为Spring Security 4.2.3.RELEASE。
1 核心组件
这一节主要介绍一些在Spring Security中常见且核心的Java类,它们之间的依赖,构建起了整个框架。想要理解整个架构,最起码得对这些类眼熟。
1.1 SecurityContextHolder
SecurityContextHolder用于存储安全上下文(security context)的信息。当前操作的用户是谁,该用户是否已经被认证,他拥有哪些角色权限…这些都被保存在SecurityContextHolder中。SecurityContextHolder默认使用ThreadLocal 策略来存储认证信息。看到ThreadLocal 也就意味着,这是一种与线程绑定的策略。Spring Security在用户登录时自动绑定认证信息到当前线程,在用户退出时,自动清除当前线程的认证信息。但这一切的前提,是你在web场景下使用Spring Security,而如果是Swing界面,Spring也提供了支持,SecurityContextHolder的策略则需要被替换,鉴于我的初衷是基于web来介绍Spring Security,所以这里以及后续,非web的相关的内容都一笔带过。
获取当前用户的信息
因为身份信息是与线程绑定的,所以可以在程序的任何地方使用静态方法获取用户信息。一个典型的获取当前登录用户的姓名的例子如下所示:
Object principal = SecurityContextHolder.getContext().getAuthentication().getPrincipal();

if (principal instanceof UserDetails) {

    String username = ((UserDetails)principal).getUsername();

} else {

    String username = principal.toString();

}
1.2 AuthenticationgetAuthentication()返回了认证信息,再次getPrincipal()返回了身份信息,UserDetails便是Spring对身份信息封装的一个接口。Authentication和UserDetails的介绍在下面的小节具体讲解,本节重要的内容是介绍SecurityContextHolder这个容器。
先看看这个接口的源码长什么样:
package org.springframework.security.core;// <1>

public interface Authentication extends Principal, Serializable { // <1>

    Collection<? extends GrantedAuthority> getAuthorities(); // <2>

    Object getCredentials();// <2>

    Object getDetails();// <2>

    Object getPrincipal();// <2>

    boolean isAuthenticated();// <2>

    void setAuthenticated(boolean var1) throws IllegalArgumentException;

}
<2> 由这个顶级接口,我们可以得到用户拥有的权限信息列表,密码,用户细节信息,用户身份信息,认证信息。<1> Authentication是spring security包中的接口,直接继承自Principal类,而Principal是位于java.security包中的。可以见得,Authentication在spring security中是最高级别的身份/认证的抽象。
还记得1.1节中,authentication.getPrincipal()返回了一个Object,我们将Principal强转成了Spring Security中最常用的UserDetails,这在Spring Security中非常常见,接口返回Object,使用instanceof判断类型,强转成对应的具体实现类。接口详细解读如下:
- getAuthorities(),权限信息列表,默认是GrantedAuthority接口的一些实现类,通常是代表权限信息的一系列字符串。
- getCredentials(),密码信息,用户输入的密码字符串,在认证过后通常会被移除,用于保障安全。
- getDetails(),细节信息,web应用中的实现接口通常为 WebAuthenticationDetails,它记录了访问者的ip地址和sessionId的值。
- getPrincipal(),敲黑板!!!最重要的身份信息,大部分情况下返回的是UserDetails接口的实现类,也是框架中的常用接口之一。UserDetails接口将会在下面的小节重点介绍。
Spring Security是如何完成身份认证的?
1 用户名和密码被过滤器获取到,封装成Authentication,通常情况下是UsernamePasswordAuthenticationToken这个实现类。
2 AuthenticationManager 身份管理器负责验证这个Authentication
3 认证成功后,AuthenticationManager身份管理器返回一个被填充满了信息的(包括上面提到的权限信息,身份信息,细节信息,但密码通常会被移除)Authentication实例。
4 SecurityContextHolder安全上下文容器将第3步填充了信息的Authentication,通过SecurityContextHolder.getContext().setAuthentication(…)方法,设置到其中。
这是一个抽象的认证流程,而整个过程中,如果不纠结于细节,其实只剩下一个AuthenticationManager 是我们没有接触过的了,这个身份管理器我们在后面的小节介绍。将上述的流程转换成代码,便是如下的流程:
public class AuthenticationExample {

private static AuthenticationManager am = new SampleAuthenticationManager();

public static void main(String[] args) throws Exception {

    BufferedReader in = new BufferedReader(new InputStreamReader(System.in));

    while(true) {

    System.out.println("Please enter your username:");

    String name = in.readLine();

    System.out.println("Please enter your password:");

    String password = in.readLine();

    try {

        Authentication request = new UsernamePasswordAuthenticationToken(name, password);

        Authentication result = am.authenticate(request);

        SecurityContextHolder.getContext().setAuthentication(result);

        break;

    } catch(AuthenticationException e) {

        System.out.println("Authentication failed: " + e.getMessage());

    }

    }

    System.out.println("Successfully authenticated. Security context contains: " +

            SecurityContextHolder.getContext().getAuthentication());

}

}

class SampleAuthenticationManager implements AuthenticationManager {

static final List<GrantedAuthority> AUTHORITIES = new ArrayList<GrantedAuthority>();

static {

    AUTHORITIES.add(new SimpleGrantedAuthority("ROLE_USER"));

}

public Authentication authenticate(Authentication auth) throws AuthenticationException {

    if (auth.getName().equals(auth.getCredentials())) {

    return new UsernamePasswordAuthenticationToken(auth.getName(),

        auth.getCredentials(), AUTHORITIES);

    }

    throw new BadCredentialsException("Bad Credentials");

}

}
1.3 AuthenticationManager注意:上述这段代码只是为了让大家了解Spring Security的工作流程而写的,不是什么源码。在实际使用中,整个流程会变得更加的复杂,但是基本思想,和上述代码如出一辙。
初次接触Spring Security的朋友相信会被AuthenticationManager,ProviderManager ,AuthenticationProvider …这么多相似的Spring认证类搞得晕头转向,但只要稍微梳理一下就可以理解清楚它们的联系和设计者的用意。AuthenticationManager(接口)是认证相关的核心接口,也是发起认证的出发点,因为在实际需求中,我们可能会允许用户使用用户名+密码登录,同时允许用户使用邮箱+密码,手机号码+密码登录,甚至,可能允许用户使用指纹登录(还有这样的操作?没想到吧),所以说AuthenticationManager一般不直接认证,AuthenticationManager接口的常用实现类ProviderManager 内部会维护一个List<AuthenticationProvider>列表,存放多种认证方式,实际上这是委托者模式的应用(Delegate)。也就是说,核心的认证入口始终只有一个:AuthenticationManager,不同的认证方式:用户名+密码(UsernamePasswordAuthenticationToken),邮箱+密码,手机号码+密码登录则对应了三个AuthenticationProvider。这样一来四不四就好理解多了?熟悉shiro的朋友可以把AuthenticationProvider理解成Realm。在默认策略下,只需要通过一个AuthenticationProvider的认证,即可被认为是登录成功。
只保留了关键认证部分的ProviderManager源码:
 public class ProviderManager implements AuthenticationManager, MessageSourceAware,

         InitializingBean {

     // 维护一个AuthenticationProvider列表

     private List<AuthenticationProvider> providers = Collections.emptyList();

     public Authentication authenticate(Authentication authentication)

           throws AuthenticationException {

        Class<? extends Authentication> toTest = authentication.getClass();

        AuthenticationException lastException = null;

        Authentication result = null;

        // 依次认证

        for (AuthenticationProvider provider : getProviders()) {

           if (!provider.supports(toTest)) {

              continue;

           }

           try {

              result = provider.authenticate(authentication);

              if (result != null) {

                 copyDetails(authentication, result);

                 break;

              }

           }

           ...

           catch (AuthenticationException e) {

              lastException = e;

           }

        }

        // 如果有Authentication信息,则直接返回

        if (result != null) {

             if (eraseCredentialsAfterAuthentication

                     && (result instanceof CredentialsContainer)) {

                    //移除密码

                 ((CredentialsContainer) result).eraseCredentials();

             }

              //发布登录成功事件

             eventPublisher.publishAuthenticationSuccess(result);

             return result;

        }

        ...

        //执行到此,说明没有认证成功,包装异常信息

        if (lastException == null) {

           lastException = new ProviderNotFoundException(messages.getMessage(

                 "ProviderManager.providerNotFound",

                 new Object[] { toTest.getName() },

                 "No AuthenticationProvider found for {0}"));

        }

        prepareException(lastException, authentication);

        throw lastException;

     }

 }
到这里,如果不纠结于AuthenticationProvider的实现细节以及安全相关的过滤器,认证相关的核心类其实都已经介绍完毕了:身份信息的存放容器SecurityContextHolder,身份信息的抽象Authentication,身份认证器AuthenticationManager及其认证流程。姑且在这里做一个分隔线。下面来介绍下AuthenticationProvider接口的具体实现。ProviderManager 中的List,会依照次序去认证,认证成功则立即返回,若认证失败则返回null,下一个AuthenticationProvider会继续尝试认证,如果所有认证器都无法认证成功,则ProviderManager 会抛出一个ProviderNotFoundException异常。
1.4 DaoAuthenticationProvider
AuthenticationProvider最最最常用的一个实现便是DaoAuthenticationProvider。顾名思义,Dao正是数据访问层的缩写,也暗示了这个身份认证器的实现思路。由于本文是一个Overview,姑且只给出其UML类图:
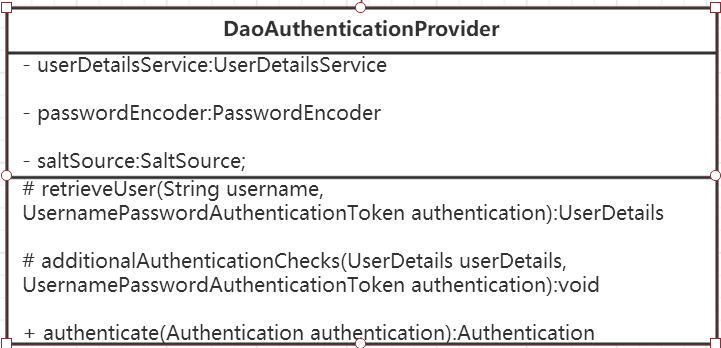 DaoAuthenticationProvider UML
按照我们最直观的思路,怎么去认证一个用户呢?用户前台提交了用户名和密码,而数据库中保存了用户名和密码,认证便是负责比对同一个用户名,提交的密码和保存的密码是否相同便是了。在Spring Security中。提交的用户名和密码,被封装成了UsernamePasswordAuthenticationToken,而根据用户名加载用户的任务则是交给了UserDetailsService,在DaoAuthenticationProvider中,对应的方法便是retrieveUser,虽然有两个参数,但是retrieveUser只有第一个参数起主要作用,返回一个UserDetails。还需要完成UsernamePasswordAuthenticationToken和UserDetails密码的比对,这便是交给additionalAuthenticationChecks方法完成的,如果这个void方法没有抛异常,则认为比对成功。比对密码的过程,用到了PasswordEncoder和SaltSource,密码加密和盐的概念相信不用我赘述了,它们为保障安全而设计,都是比较基础的概念。
如果你已经被这些概念搞得晕头转向了,不妨这么理解DaoAuthenticationProvider:它获取用户提交的用户名和密码,比对其正确性,如果正确,返回一个数据库中的用户信息(假设用户信息被保存在数据库中)。
1.5 UserDetails与UserDetailsService
上面不断提到了UserDetails这个接口,它代表了最详细的用户信息,这个接口涵盖了一些必要的用户信息字段,具体的实现类对它进行了扩展。
 public interface UserDetails extends Serializable {

    Collection<? extends GrantedAuthority> getAuthorities();

    String getPassword();

    String getUsername();

    boolean isAccountNonExpired();

    boolean isAccountNonLocked();

    boolean isCredentialsNonExpired();

    boolean isEnabled();

 }
public interface UserDetailsService { UserDetails loadUserByUsername(String username) throws UsernameNotFoundException; }
UserDetailsService和AuthenticationProvider两者的职责常常被人们搞混,关于他们的问题在文档的FAQ和issues中屡见不鲜。记住一点即可,敲黑板!!!UserDetailsService只负责从特定的地方(通常是数据库)加载用户信息,仅此而已,记住这一点,可以避免走很多弯路。UserDetailsService常见的实现类有JdbcDaoImpl,InMemoryUserDetailsManager,前者从数据库加载用户,后者从内存中加载用户,也可以自己实现UserDetailsService,通常这更加灵活。它和Authentication接口很类似,比如它们都拥有username,authorities,区分他们也是本文的重点内容之一。Authentication的getCredentials()与UserDetails中的getPassword()需要被区分对待,前者是用户提交的密码凭证,后者是用户正确的密码,认证器其实就是对这两者的比对。Authentication中的getAuthorities()实际是由UserDetails的getAuthorities()传递而形成的。还记得Authentication接口中的getUserDetails()方法吗?其中的UserDetails用户详细信息便是经过了AuthenticationProvider之后被填充的。
1.6 架构概览图
为了更加形象的理解上述我介绍的这些核心类,附上一张按照我的理解,所画出Spring Security的一张非典型的UML图
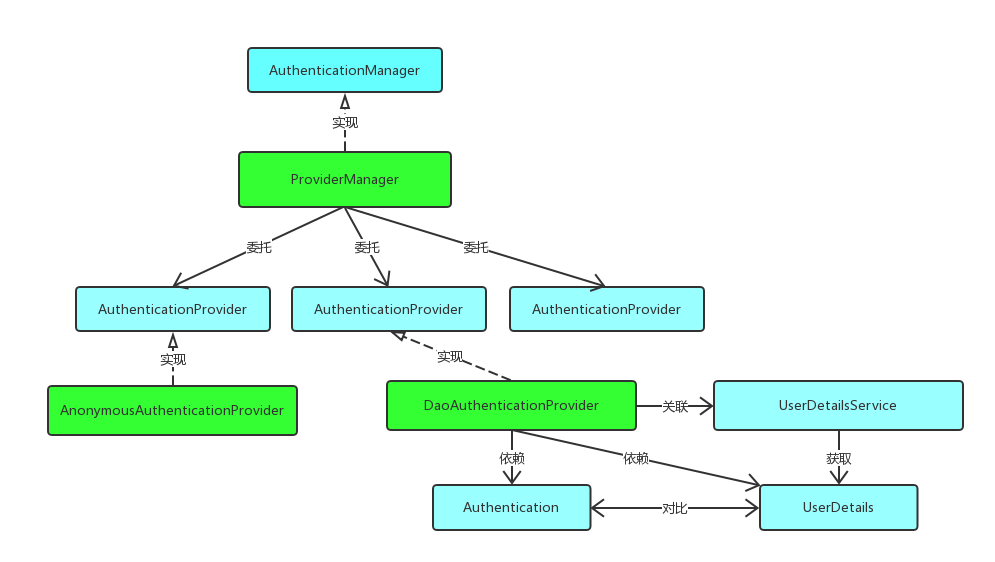 架构概览图
架构概览图
如果对Spring Security的这些概念感到理解不能,不用担心,因为这是Architecture First导致的必然结果,先过个眼熟。后续的文章会秉持Code First的理念,陆续详细地讲解这些实现类的使用场景,源码分析,以及最基本的:如何配置Spring Security,在后面的文章中可以不时翻看这篇文章,找到具体的类在整个架构中所处的位置,这也是本篇文章的定位。另外,一些Spring Security的过滤器还未囊括在架构概览中,如将表单信息包装成UsernamePasswordAuthenticationToken的过滤器,考虑到这些虽然也是架构的一部分,但是真正重写他们的可能性较小,所以打算放到后面的章节讲解。
Spring Security(一) —— Architecture Overview的更多相关文章
- SpringBoot + Spring Security 学习笔记(二)安全认证流程源码详解
用户认证流程 UsernamePasswordAuthenticationFilter 我们直接来看UsernamePasswordAuthenticationFilter类, public clas ...
- Spring Security(三) —— 核心配置解读
摘要: 原创出处 https://www.cnkirito.moe/spring-security-3/ 「老徐」欢迎转载,保留摘要,谢谢! 3 核心配置解读 上一篇文章<Spring Secu ...
- Spring Security(二) —— Guides
摘要: 原创出处 https://www.cnkirito.moe/spring-security-2/ 「老徐」欢迎转载,保留摘要,谢谢! 2 Spring Security Guides 上一篇文 ...
- Spring Security(二十七):Part II. Architecture and Implementation
Once you are familiar with setting up and running some namespace-configuration based applications, y ...
- Spring Security Architecture and Implementation(架构和实现)学习笔记
Spring Security 关于spring-security的官网文档学习笔记,主要是第8章 Architecture and Implementation(架构和实现)内容 参考: https ...
- Spring Security(三十二):10. Core Services
Now that we have a high-level overview of the Spring Security architecture and its core classes, let ...
- Spring Security(三):1、Getting Started
The later parts of this guide provide an in-depth discussion of the framework architecture and imple ...
- Cross Site Request Forgery (CSRF)--spring security -转
http://docs.spring.io/spring-security/site/docs/3.2.0.CI-SNAPSHOT/reference/html/csrf.html 13. Cross ...
- Spring Security验证流程剖析及自定义验证方法
Spring Security的本质 Spring Security本质上是一连串的Filter, 然后又以一个独立的Filter的形式插入到Filter Chain里,其名为FilterChainP ...
随机推荐
- Java实现 LeetCode 509 斐波那契数
509. 斐波那契数 斐波那契数,通常用 F(n) 表示,形成的序列称为斐波那契数列.该数列由 0 和 1 开始,后面的每一项数字都是前面两项数字的和.也就是: F(0) = 0, F(1) = 1 ...
- Java实现 LeetCode 1两数之和
1. 两数之和 给定一个整数数组 nums 和一个目标值 target,请你在该数组中找出和为目标值的那 两个 整数,并返回他们的数组下标. 你可以假设每种输入只会对应一个答案.但是,你不能重复利用这 ...
- excel表 更改后缀名 xlsx转成csv csv转换xlsx
excel 转成CSV 步骤: 1.打开你需要转换的Excel表格.这里特别介绍一下多个数字的现象,我们知道,像身份证这些多位数字,在正常表格里都是会加上一个'来使其显示的,或者换成"文本& ...
- Java实现 洛谷 P1208 [USACO1.3]混合牛奶 Mixing Milk
输入输出样例 输入 #1 100 5 5 20 9 40 3 10 8 80 6 30 输出 #1 630 import java.util.Arrays; import java.util.Scan ...
- 哦,Vendor
vendor踩坑笔记: 接过公司里面X平台golang部分的后端后,需要新添加一个业务功能,美滋滋~ 拿过项目一顿写之后后遇到事了. 报错的描述如下: 报错的大意说:方法的入参类型不匹配,我们不能把 ...
- TCP/IP三次握手协议
一.简介 三次握手协议指的是在发送数据的准备阶段,服务器端和客户端之间需要进行三次交互,OSI参考模型中的网络层,在TCP/IP协议中,TCP协议提供可靠的连接服务,采用三次握手建立一 ...
- mysql基础-数据库初始化操作必要步骤和客户端工具使用-记录(二)
0x01 mysql启动时,读取配置文件的顺序 Default options are read from the following files in the given order:/etc/my ...
- Kubernetes内部域名解析的那些事儿
前言 在kubernets环境中,服务发现大都是基于内部域名的方式.那么就涉及到内部域名的解析.从1.11版本开始,kubeadm已经使用第三方的CoreDNS替换官方的kubedns作为集群内部域名 ...
- pytorch入门2.2构建回归模型初体验(开始训练)
pytorch入门2.x构建回归模型系列: pytorch入门2.0构建回归模型初体验(数据生成) pytorch入门2.1构建回归模型初体验(模型构建) pytorch入门2.2构建回归模型初体验( ...
- EIGRP-11-弥散更新算法-EIGRP中的本地计算和弥散计算
至此,我们已经了解了诸多概念: RD (报告距离). CD (计算距离). FD (可行距 离)和FC (可行性条件) ,在此基础上继续了解EIGRP对于拓扑变化的应对方法想必是轻松愉快的.能够导致拓 ...