IDEA搭建一个SpringBoot项目——十分详细(web+mysql)
前排提示:
IDEA版本:IntelliJ IDEA 2021.1.1 专业版(是否为专业版影响不大)
搭建目的:前端web页面能够获取到MySQL数据库中的数据
详细步骤:
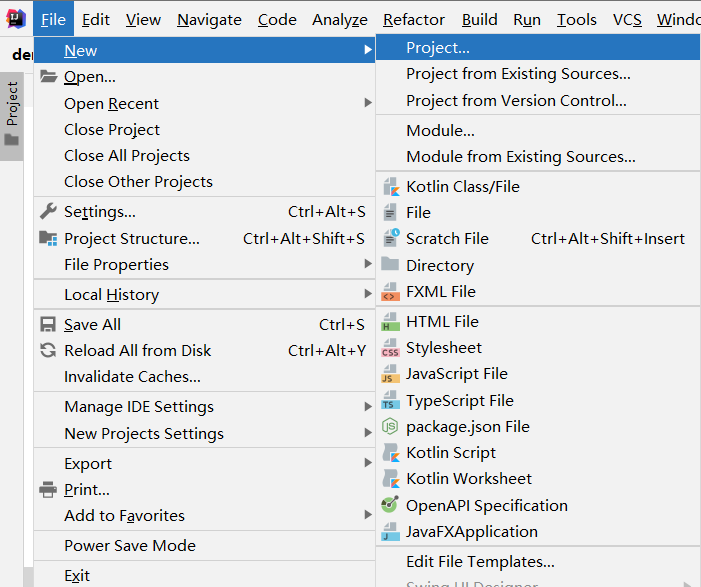
1. 创建一个新项目
File -> New -> Project...
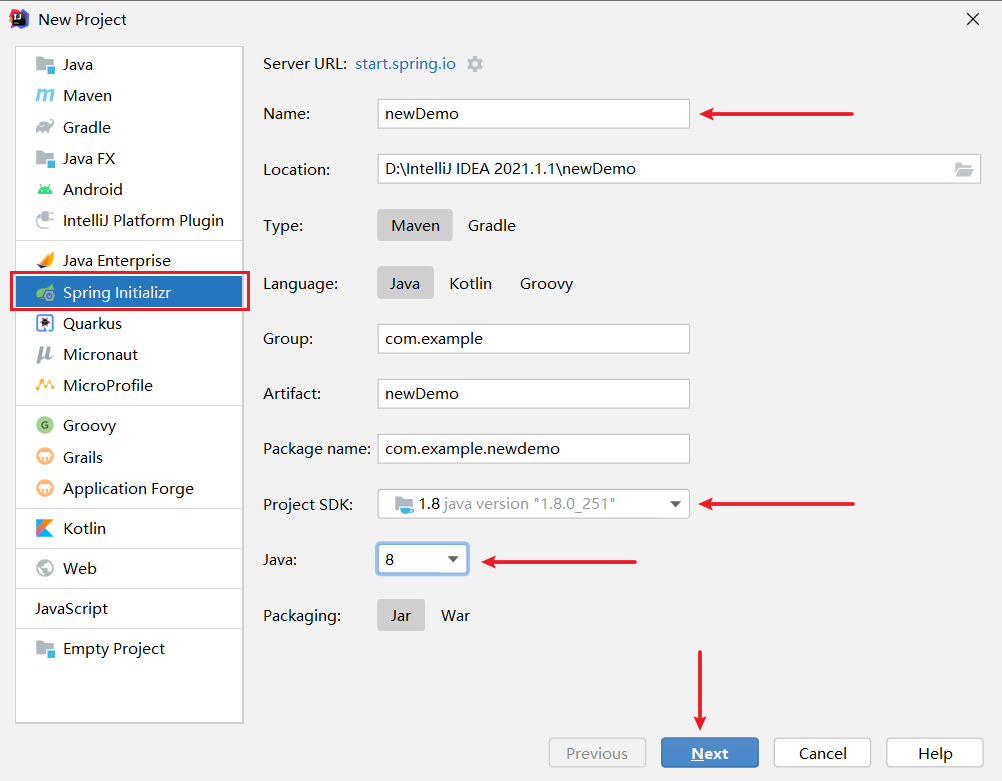
2. 项目环境配置
左侧选择Spring Initializr,右侧对项目一些属性进行配置。其中,包名Name为"newDemo",Project SDK默认1.8版本,java选择8(我的jdk是1.8),点击next;
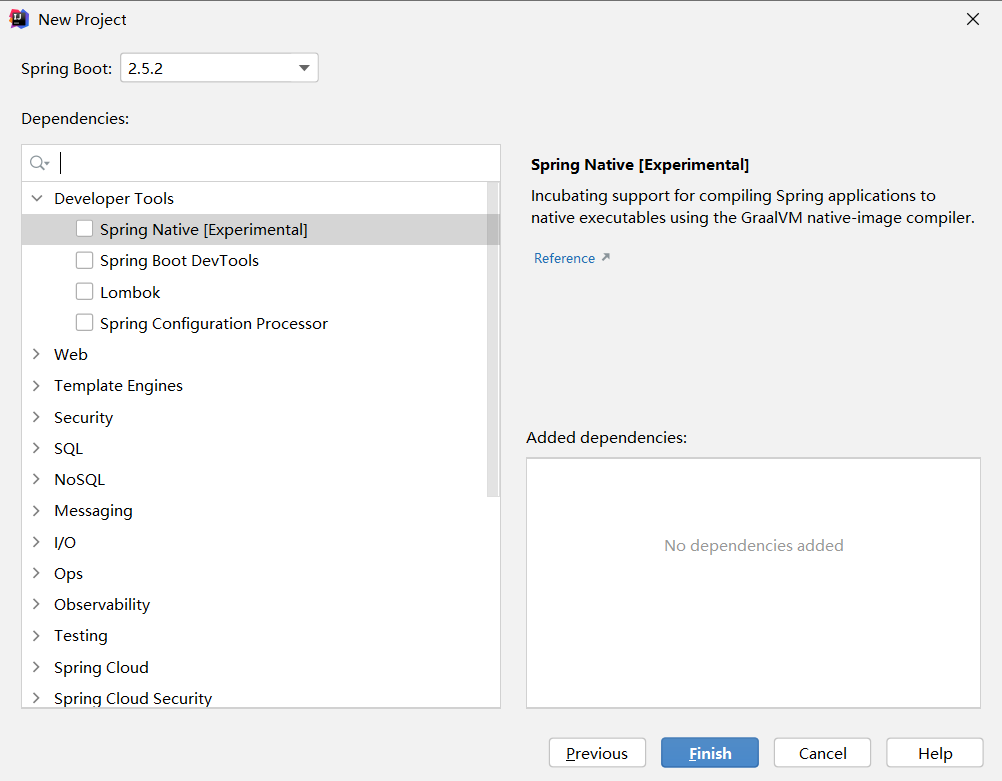
3. 添加依赖项
添加依赖项页面如下:
在添加依赖项环节中,我们添加Web下的Spring Web,SQL下的MyBatis Framework和MySQL Driver;
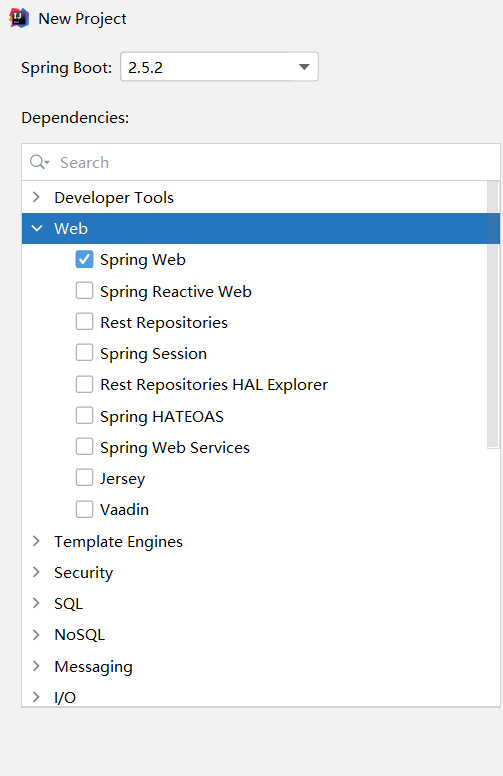
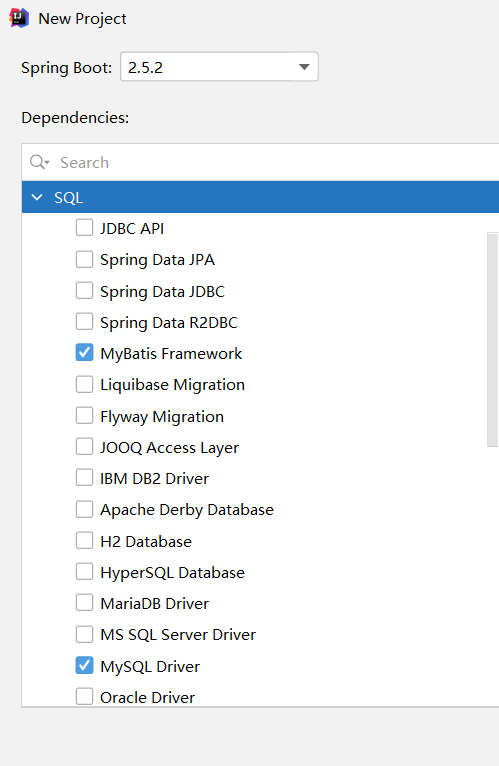
右侧可以看见已经选择的依赖;

点击Finish完成项目创建;
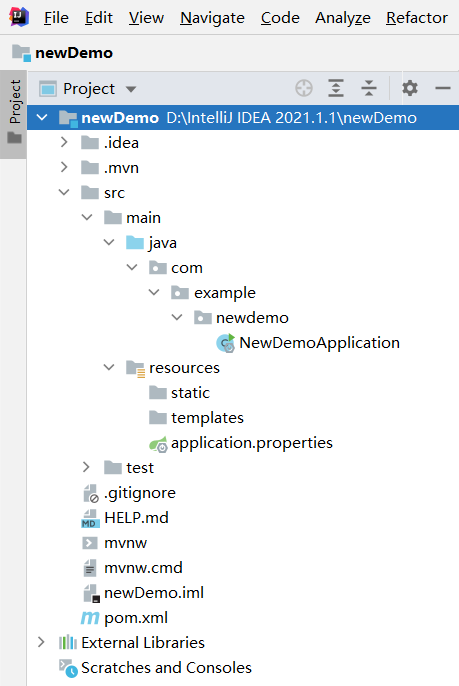
4. 创建好的项目结构
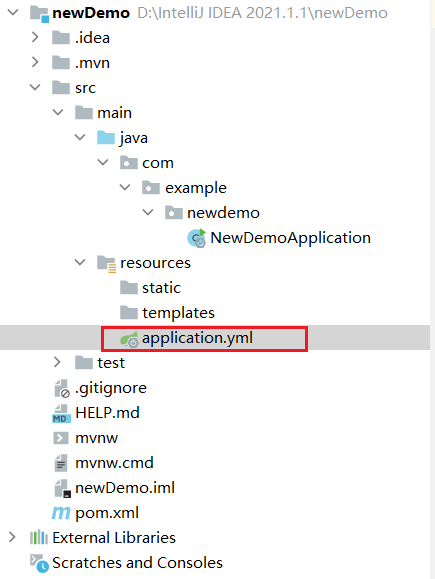
5. application.yml配置
将resources文件夹下的application.properties文件后缀名改为yml;
双击进入配置页面,进行端口、数据库和Mybatis的配置,我的配置结果如下;
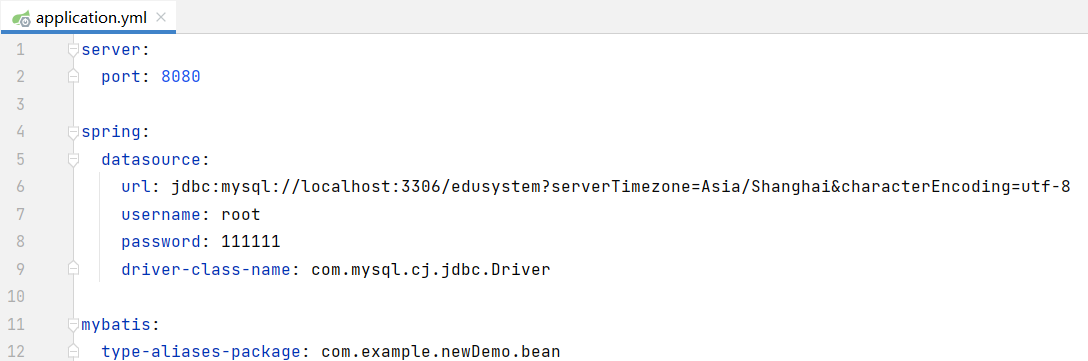
其中,需要注意的几个地方如下:
端口号设置为默认值:8080;
mysql数据库:edusystem,username:root,password:111111;
mybatis下的type-aliases-package:com.example.newDemo.bean(bean目录马上创建)
mysql数据库需要替换成自己的数据库、用户名和密码;
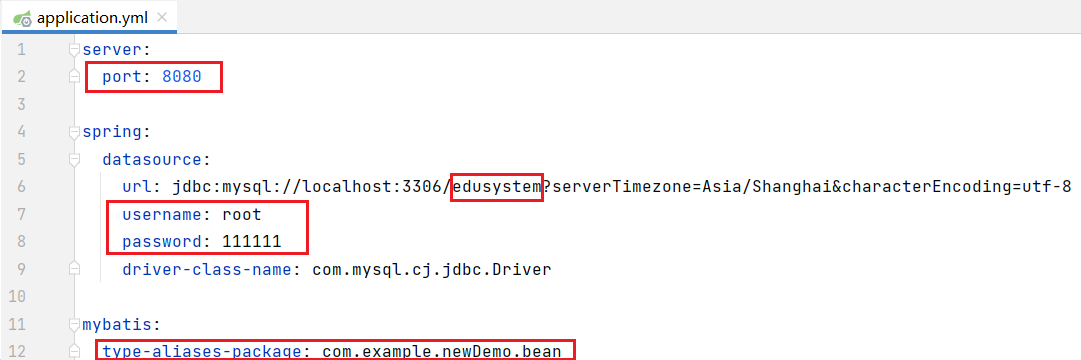
该部分代码如下(注意缩进):
server:

  port: 8080

spring:

  datasource:

    url: jdbc:mysql://localhost:3306/edusystem?serverTimezone=Asia/Shanghai&characterEncoding=utf-8

    username: root

    password: 111111

    driver-class-name: com.mysql.cj.jdbc.Driver

mybatis:

  type-aliases-package: com.example.newDemo.bean
6. web页面测试
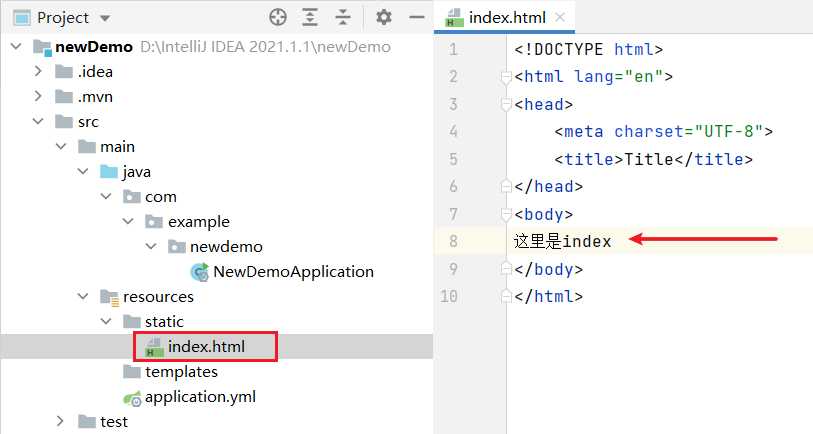
在resources的static目录下创建index.html,内容如下;
点击右上角运行按钮;

可见运行成功;

打开浏览器,在地址栏输入localhost:8080,回车;
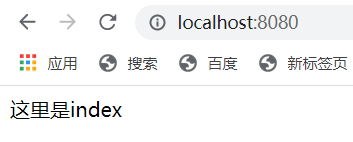
可见index.html的内容成功显示在页面上。至此,web环境搭建成功,接下来搭建mysql环境。
7. 创建bean、controller、mapper、service四层目录
在newdemo目录下创建bean、controller、mapper、service四层目录,目录结构如下所示;

8. 完善bean层
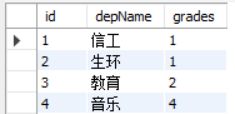
我的edusystem数据库下的departments表数据如下:
在bean层下建立Depart类,内容如下(属性要和数据表的列一一对应):
package com.example.newdemo.bean;

public class Depart {

    private String id;

    private String depName;

    private Integer grades;

    public String getId() {

        return id;

    }

    public void setId(String id) {

        this.id = id;

    }

    public String getDepName() {

        return depName;

    }

    public void setDepName(String depName) {

        this.depName = depName;

    }

    public Integer getGrades() {

        return grades;

    }

    public void setGrades(Integer grades) {

        this.grades = grades;

    }

}
9. 完善mapper层
在mapper层下建立DepartMapper接口,内容如下:
package com.example.newdemo.mapper;

import com.example.newdemo.bean.Depart;

import org.apache.ibatis.annotations.Mapper;

import org.apache.ibatis.annotations.Select;

import java.util.List;

@Mapper

public interface DepartMapper {

    @Select({

            "select",

            "id, depName, grades",

            "from departments"

    })

    List<Depart> selectAll();

}
10. 完善service层
在service层下建立DepartService接口和DepartServiceImpl实现类,内容分别如下;
DepartService接口:
package com.example.newdemo.service;

import com.example.newdemo.bean.Depart;

import java.util.List;

public interface DepartService {

    public List<Depart> selectAll();

}
DepartServiceImpl实现类:
package com.example.newdemo.service;

import com.example.newdemo.bean.Depart;

import com.example.newdemo.mapper.DepartMapper;

import org.springframework.beans.factory.annotation.Autowired;

import org.springframework.stereotype.Service;

import java.util.List;

@Service("departService")

public class DepartServiceImpl implements DepartService{

    @Autowired

    private DepartMapper departMapper;

    @Override

    public List<Depart> selectAll() {

        return departMapper.selectAll();

    }

}
11. 完善controller层
在controller层下建立DepartController类,内容如下:
package com.example.newdemo.controller;

import com.example.newdemo.bean.Depart;

import com.example.newdemo.service.DepartService;

import com.example.newdemo.service.DepartServiceImpl;

import org.springframework.web.bind.annotation.RequestMapping;

import org.springframework.web.bind.annotation.RequestMethod;

import org.springframework.web.bind.annotation.RestController;

import javax.annotation.Resource;

import java.util.List;

@RestController

@RequestMapping("/depart")

public class DepartController {

    @Resource

    private DepartService departService = new DepartServiceImpl();

    @RequestMapping(value = "/selectAll", method = RequestMethod.GET)

    public List<Depart> selectAll() {

        List<Depart> list = departService.selectAll();

        return list;

    }

}
12. 完善后的项目结构

13. 完善index.html以进行测试
对index.html的内容进行完善,用来获取数据表departments中的数据,内容如下:
<!DOCTYPE html>

<html lang="en">

<head>

    <meta charset="UTF-8">

    <title>Title</title>

    <style>

        *{

            margin: 0;

            padding: 0;

        }

        .result{

            position: fixed;

            width: 100%;

            bottom: 0;

            left: 0;

            height: 300px;

            background-color: rgba(0,0,0,.8);

            color: white;

            text-align: center;

            letter-spacing: 2px;

            padding-top: 20px;

            font-size: 18px;

            line-height: 28px;

            overflow: scroll;

        }

    </style>

</head>

<body>

<script src="https://code.jquery.com/jquery-3.1.1.min.js"></script>

<button style="display: block;margin: 20px auto;width: 160px;height: 60px;" onclick="getAll()">查看院系信息</button>

<div class="result" id="result"></div>

<script>

    function getAll(){

        $.ajax({

            type: "get",

            url: "depart/selectAll",

            data: {

            },

            success:function (data) {

                console.log(data)

                $("#result").empty()

                for(var i = 0;i < data.length;i++){

                    $("#result").append(JSON.stringify(data[i]) + "<br>")

                }

            },

        });

    }

</script>

</body>

</html>
14. 点击右上角的运行

15. 打开浏览器,输入localhost:8080
可以看见有一个“查看院系信息”按钮:
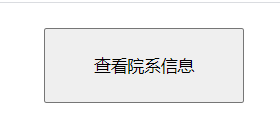
点击该按钮,在页面下方得到如下结果:
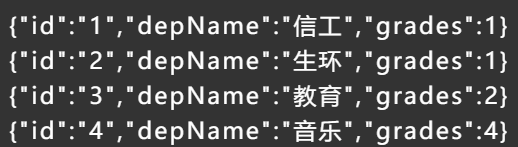
可见,departments表中的数据成功显示在index页面中,至此,web+mysql环境搭建完毕。
IDEA搭建一个SpringBoot项目——十分详细(web+mysql)的更多相关文章
- SpringBoot(一):使用IDEA快速搭建一个SpringBoot项目(详细)
环境: JDK1.8 Maven:3.5.4 1.打开IDEA,右上角选择File→New→Project 选择Spring Initializr(使用IDEA自带的插件创建需要电脑联网) 2.点 ...
- 搭建一个SpringBoot项目
1.创建项目 New->Spring Starter Project 2.添加支持 增加对mybatis plus的支持,修改pom.xml,增加如下内容: <dependency> ...
- 使用IDEA 搭建一个 SpringBoot + Hibernate + Gradle 项目
现在创建个项目: 勾上 自已 需要东西.(这里作为演示) maven{ url 'http://maven.aliyun.com/nexus/content/groups/public/'} 关闭项目 ...
- 使用idea创建第一个springboot项目
版权声明:版权归作者所有,转载请注明出处. https://blog.csdn.net/qq_34205356/article/details/81098354 前言:如今springboot越来越火 ...
- 从零开始的SpringBoot项目 ( 二 ) 使用IDEA创建一个SpringBoot项目
工欲善其事 , 必先利其器 . IntelliJ IDEA 2019.3.3 x64的安装与破解 下面详细说明下如何使用idea创建我们的第一个springboot项目: 首先打开idea主界面选择 ...
- springboot:快速构建一个springboot项目
前言: springboot作为springcloud的基础,springboot的热度一直很高,所以就有了这个springboot系列,花些时间来了解和学习为自己做技术储备,以备不时之需[手动滑稽] ...
- spting Boot 创建一个springBoot项目
spting Boot 创建一个springBoot项目 1)学习springBoot使用软件:IDEA软件(前面的文章有安装idea的过程). 也可以使用另一种方法在https://start.sp ...
- 【spring Boot】1.创建第一个springBoot项目
入手springBoot,搭建第一个springBoot项目. 看官方文档还是有点别扭. https://docs.spring.io/spring-boot/docs/current-SNAPSHO ...
- 使用IDEA创建一个springboot项目
工欲善其事,必先利其器. 不难发现,还是有很多小朋友在使用eclipse开发java项目.当你接触IDEA后,一切都变得美好了. 使用IDEA创建一个springboot项目是一件极其简单的事情.界面 ...
随机推荐
- Zoho创始人斯瑞达.温布获评“年度最佳CEO”
近日,权威研究和咨询机构Constellation Research公布了一系列奖项,Zoho创始人斯瑞达.温布获评"年度最佳CEO"(The Best Enterprise CE ...
- [刷题] 24 Swap Nodes in Paris
要求 给定一个链表,对于每两个相邻的节点,交换其位置 示例 1->2->3->4->NULL 2->1->4->3->NULL 实现 1 struct ...
- OpenStack常见面试题
现在,大多数公司都试图将它们的 IT 基础设施和电信设施迁移到私有云, 如 OpenStack.如果你打算面试 OpenStack 管理员这个岗位,那么下面列出的这些面试问题可能会帮助你通过面试. Q ...
- 002.Ansible之Inventory文件
一 简介 在使用Ansible来批量管理主机的时候,通常我们需要先定义要管理哪些主机或者主机组,而这个用于管理主机与主机组的文件就叫做Inventory,也叫主机清单.该文件默认位于/etc/ansi ...
- H5开发基础之像素、分辨率、DPI、PPI
H5开发基础之像素.分辨率.DPI.PPI html5 阅读约 4 分钟 2016-09-03于坝上草原 背景知识: 目前绝大部分显示器都是基于点阵的,通过一系列的小点排成一个大矩形,通过每个小 ...
- 归一化方法总结 | 又名“BN和它的后浪们“
前言: 归一化相关技术已经经过了几年的发展,目前针对不同的应用场合有相应的方法,在本文将这些方法做了一个总结,介绍了它们的思路,方法,应用场景.主要涉及到:LRN,BN,LN, IN, GN, FRN ...
- golang快速入门(六)特有程序结构
提示:本系列文章适合对Go有持续冲动的读者 阅前须知:在程序结构这章,更多会关注golang中特有结构,与其他语言如C.python中相似结构(命名.声明.赋值.作用域等)不再赘述. 一.golang ...
- Kubernetes认证入门指南
Kubernetes用来执行安全访问和权限的步骤有3个--认证(Authentication).授权(Authorization)和准入(Admission).在本文中,我们先开始了解认证(Authe ...
- 解决Caused by: org.apache.ibatis.exceptions.PersistenceException:
在mybatis-config核心配置文件中注册了xml以后出现了新的异常错误 Caused by: java.io.IOException: Could not find resource cn.d ...
- Pandas之:Pandas高级教程以铁达尼号真实数据为例
Pandas之:Pandas高级教程以铁达尼号真实数据为例 目录 简介 读写文件 DF的选择 选择列数据 选择行数据 同时选择行和列 使用plots作图 使用现有的列创建新的列 进行统计 DF重组 简 ...