[Python]爬虫获取知乎某个问题下所有图片并去除水印
获取URL
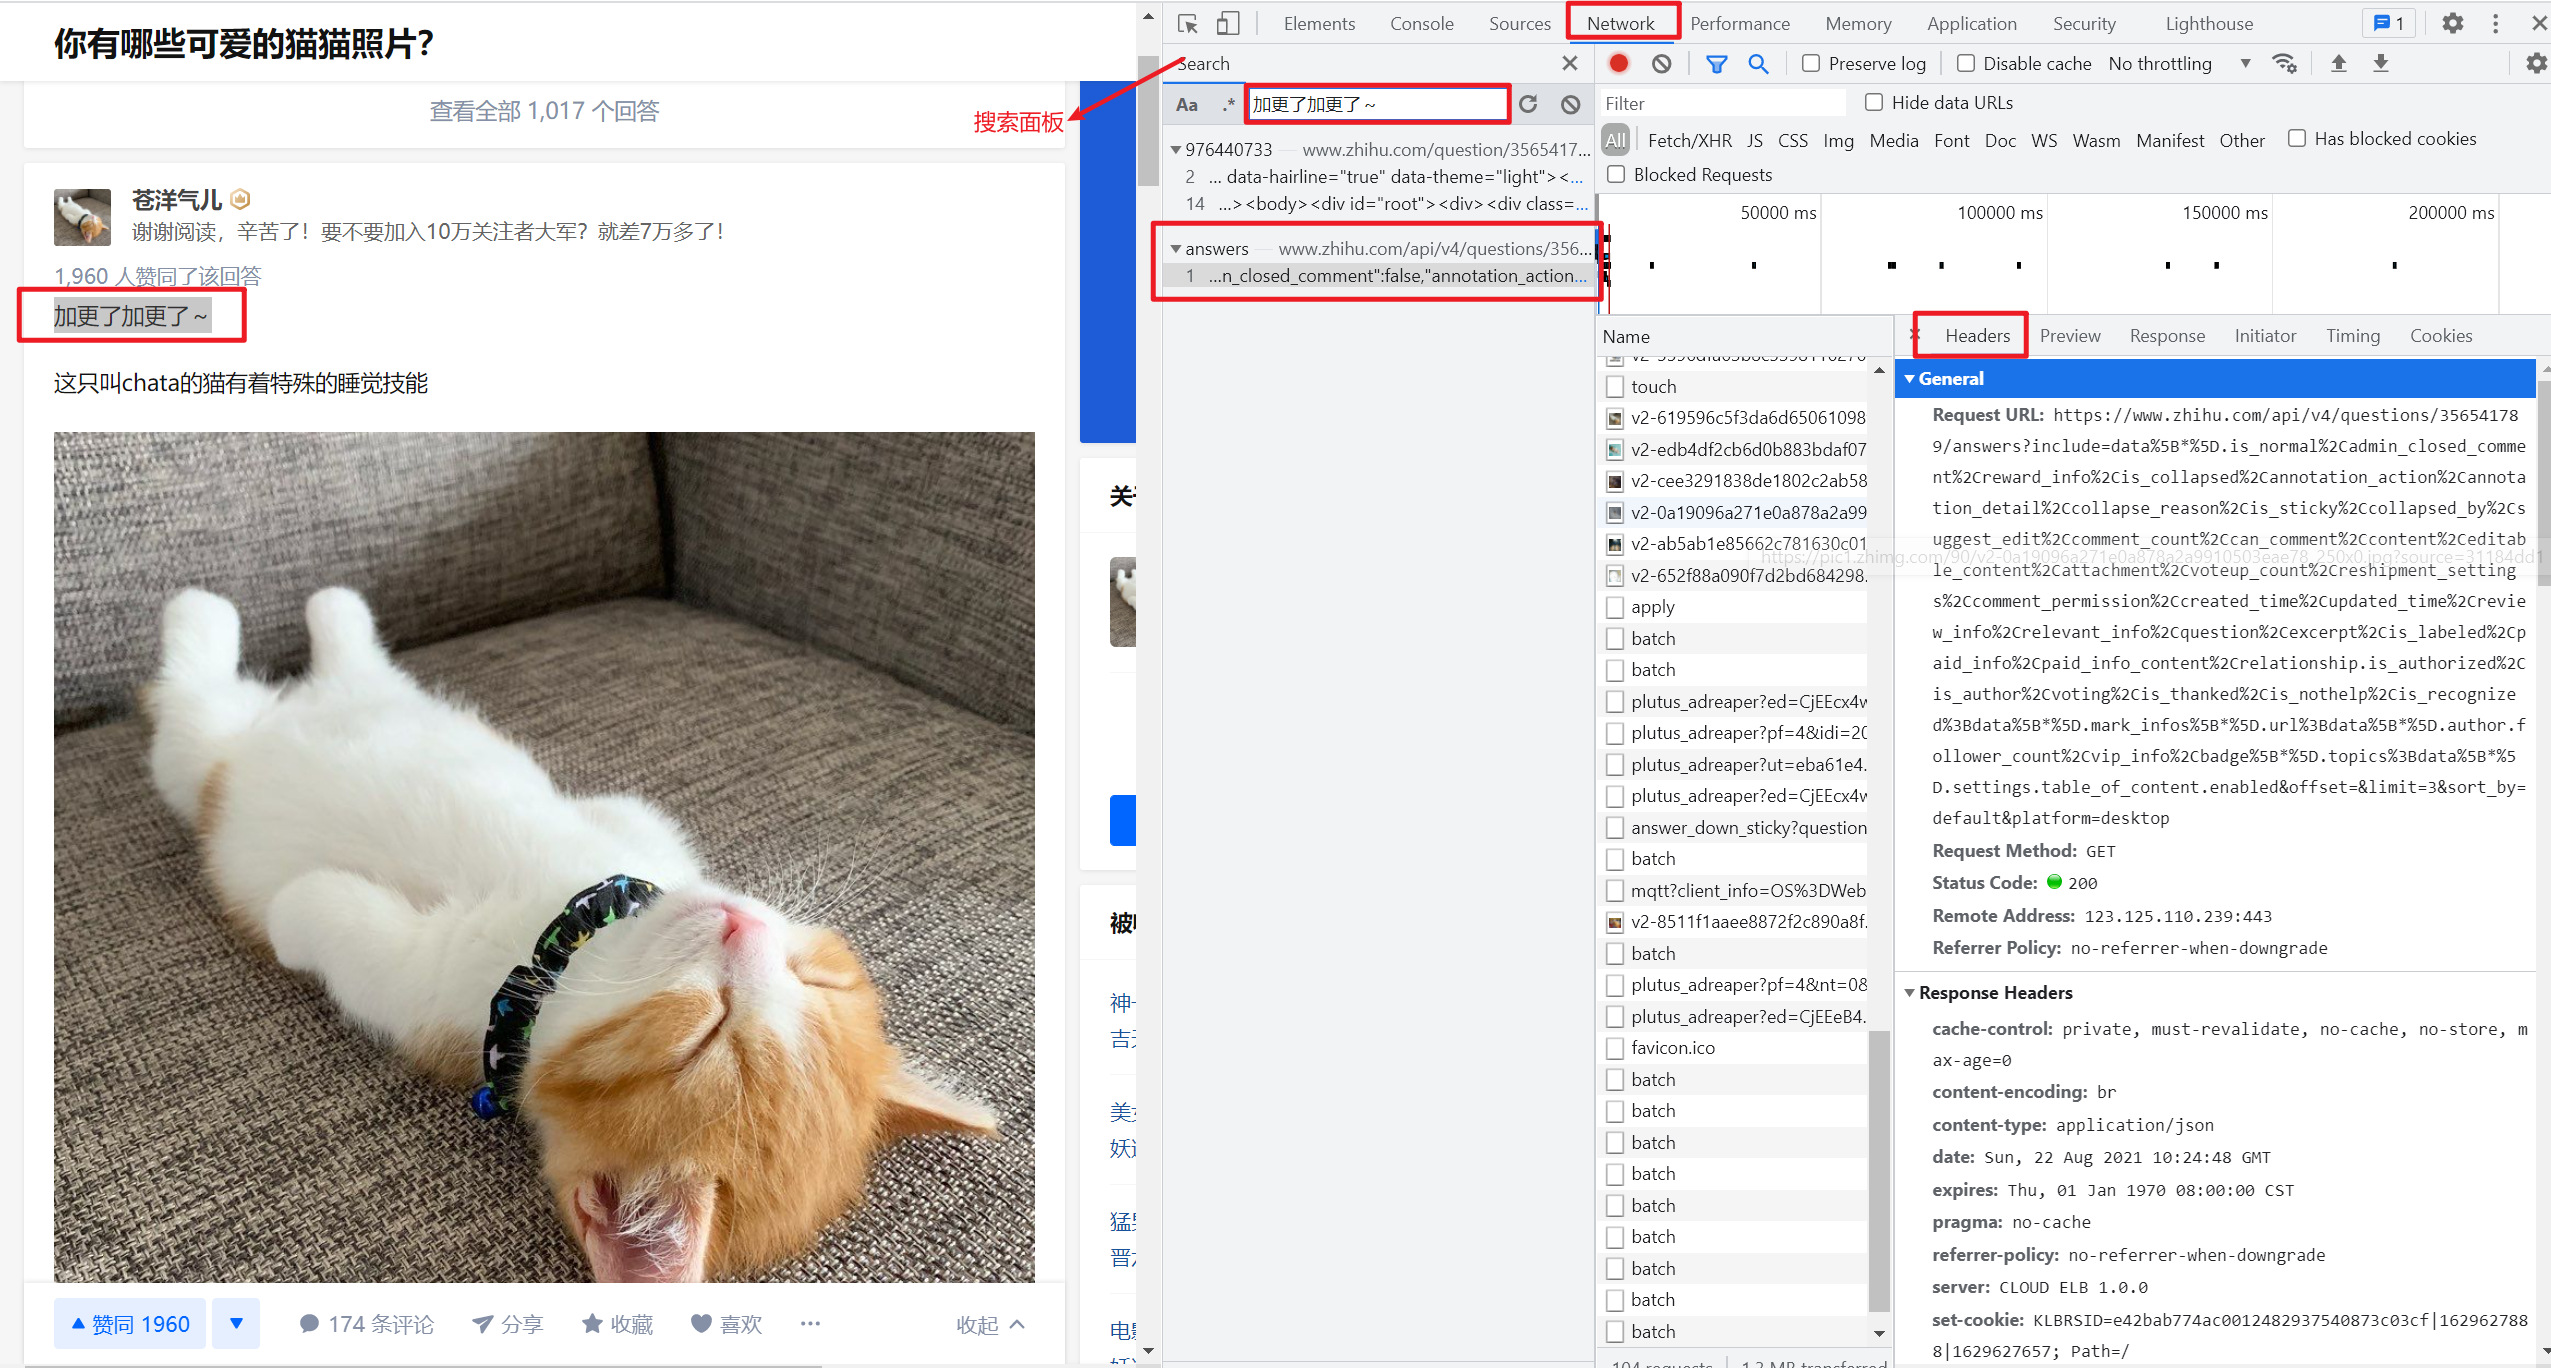
进入某个知乎问题的主页下,按F12打开开发者工具后查看network面板。
network面板可以查看页面向服务器请求的资源、资源的大小、加载资源花费的时间以及哪些资源加载失败等信息。还可以查看HTTP的请求头,返回内容等。
以“你有哪些可爱的猫猫照片?”问题为例,我们可以看到network面板如下:

按一下快捷键Ctrl + F在搜索面板中直接搜索对应的答案出现的文字,可以找到对应的目标url及其response:
安装对应的package,其他包都比较简单,需要注意的是python图像处理的包cv2安装命令如下:
pip install opencv-python
URL分析
1. 参数分析
我们刚才获取的URL如下:
https://www.zhihu.com/api/v4/questions/356541789/answers?include=data%5B*%5D.is_normal%2Cadmin_closed_comment%2Creward_info%2Cis_collapsed%2Cannotation_action%2Cannotation_detail%2Ccollapse_reason%2Cis_sticky%2Ccollapsed_by%2Csuggest_edit%2Ccomment_count%2Ccan_comment%2Ccontent%2Ceditable_content%2Cattachment%2Cvoteup_count%2Creshipment_settings%2Ccomment_permission%2Ccreated_time%2Cupdated_time%2Creview_info%2Crelevant_info%2Cquestion%2Cexcerpt%2Cis_labeled%2Cpaid_info%2Cpaid_info_content%2Crelationship.is_authorized%2Cis_author%2Cvoting%2Cis_thanked%2Cis_nothelp%2Cis_recognized%3Bdata%5B*%5D.mark_infos%5B*%5D.url%3Bdata%5B*%5D.author.follower_count%2Cvip_info%2Cbadge%5B*%5D.topics%3Bdata%5B*%5D.settings.table_of_content.enabled&offset=&limit=3&sort_by=default&platform=desktop
其中包含的参数为:
- limit: 一页显示的答案条数
- offset:页面的偏移量
- sort_by:答案的排序方式,支持默认排序或者按时间排序
2.解析Response
尝试着发一个请求并截获http response:
# python3

import requests

import json

if __name__ == '__main__':

    target_url = "https://www.zhihu.com/api/v4/questions/356541789/answers?include=data%5B*%5D.is_normal%2Cadmin_closed_comment%2Creward_info%2Cis_collapsed%2Cannotation_action%2Cannotation_detail%2Ccollapse_reason%2Cis_sticky%2Ccollapsed_by%2Csuggest_edit%2Ccomment_count%2Ccan_comment%2Ccontent%2Ceditable_content%2Cattachment%2Cvoteup_count%2Creshipment_settings%2Ccomment_permission%2Ccreated_time%2Cupdated_time%2Creview_info%2Crelevant_info%2Cquestion%2Cexcerpt%2Cis_labeled%2Cpaid_info%2Cpaid_info_content%2Crelationship.is_authorized%2Cis_author%2Cvoting%2Cis_thanked%2Cis_nothelp%2Cis_recognized%3Bdata%5B*%5D.mark_infos%5B*%5D.url%3Bdata%5B*%5D.author.follower_count%2Cvip_info%2Cbadge%5B*%5D.topics%3Bdata%5B*%5D.settings.table_of_content.enabled&offset=&limit=3&sort_by=default&platform=desktop"

    headers = {

        'user-agent': 'Mozilla/5.0 (Windows NT 10.0; Win64; x64) AppleWebKit/537.36 (KHTML, like Gecko) Chrome/72.0.3626.119 Safari/537.36',

    }

    response = requests.get(url = target_url, headers = headers)

    html = response.text

    print(html)
获取到的response如下,我们需要做的是找到所有图片对应的链接,使用Json工具解析后可以从http返回值json中找到图片所在的位置,后续就是通过爬虫解析到下载地址即可:

Tips:值得注意的是网站的返回值样式经常变动,而且不同网站返回值的组织样式也不一样,所以不可盲目借鉴。
3.获取所有答案url
仍然使用在“开发者工具中”查找答案关键字的方法,我们可以拿到多个答案对应的url,我们需要从这些url中找到规律:
https://www.zhihu.com/api/v4/questions/356541789/answers?include=data%5B%2A%5D.is_normal%2Cadmin_closed_comment%2Creward_info%2Cis_collapsed%2Cannotation_action%2Cannotation_detail%2Ccollapse_reason%2Cis_sticky%2Ccollapsed_by%2Csuggest_edit%2Ccomment_count%2Ccan_comment%2Ccontent%2Ceditable_content%2Cattachment%2Cvoteup_count%2Creshipment_settings%2Ccomment_permission%2Ccreated_time%2Cupdated_time%2Creview_info%2Crelevant_info%2Cquestion%2Cexcerpt%2Cis_labeled%2Cpaid_info%2Cpaid_info_content%2Crelationship.is_authorized%2Cis_author%2Cvoting%2Cis_thanked%2Cis_nothelp%2Cis_recognized%3Bdata%5B%2A%5D.mark_infos%5B%2A%5D.url%3Bdata%5B%2A%5D.author.follower_count%2Cvip_info%2Cbadge%5B%2A%5D.topics%3Bdata%5B%2A%5D.settings.table_of_content.enabled&limit=3&offset=3&platform=desktop&sort_by=default

https://www.zhihu.com/api/v4/questions/356541789/answers?include=data%5B%2A%5D.is_normal%2Cadmin_closed_comment%2Creward_info%2Cis_collapsed%2Cannotation_action%2Cannotation_detail%2Ccollapse_reason%2Cis_sticky%2Ccollapsed_by%2Csuggest_edit%2Ccomment_count%2Ccan_comment%2Ccontent%2Ceditable_content%2Cattachment%2Cvoteup_count%2Creshipment_settings%2Ccomment_permission%2Ccreated_time%2Cupdated_time%2Creview_info%2Crelevant_info%2Cquestion%2Cexcerpt%2Cis_labeled%2Cpaid_info%2Cpaid_info_content%2Crelationship.is_authorized%2Cis_author%2Cvoting%2Cis_thanked%2Cis_nothelp%2Cis_recognized%3Bdata%5B%2A%5D.mark_infos%5B%2A%5D.url%3Bdata%5B%2A%5D.author.follower_count%2Cvip_info%2Cbadge%5B%2A%5D.topics%3Bdata%5B%2A%5D.settings.table_of_content.enabled&limit=3&offset=0&platform=desktop&sort_by=default
尽管url的格式不尽相同,但是我发现基本都遵循如下格式,只需要变更offset参数即可
https://www.zhihu.com/api/v4/questions/356541789/answers?include=data%5B%2A%5D.is_normal%2Cadmin_closed_comment%2Creward_info%2Cis_collapsed%2Cannotation_action%2Cannotation_detail%2Ccollapse_reason%2Cis_sticky%2Ccollapsed_by%2Csuggest_edit%2Ccomment_count%2Ccan_comment%2Ccontent%2Ceditable_content%2Cattachment%2Cvoteup_count%2Creshipment_settings%2Ccomment_permission%2Ccreated_time%2Cupdated_time%2Creview_info%2Crelevant_info%2Cquestion%2Cexcerpt%2Cis_labeled%2Cpaid_info%2Cpaid_info_content%2Crelationship.is_authorized%2Cis_author%2Cvoting%2Cis_thanked%2Cis_nothelp%2Cis_recognized%3Bdata%5B%2A%5D.mark_infos%5B%2A%5D.url%3Bdata%5B%2A%5D.author.follower_count%2Cvip_info%2Cbadge%5B%2A%5D.topics%3Bdata%5B%2A%5D.settings.table_of_content.enabled&limit=3&offset=0&platform=desktop&sort_by=default
Code
1. 模拟请求
简单加上headers即可,知乎的校验没有其他网站来得严格,访问过于频繁时会限制访问一段时间,我这里简单使用随机请求头和代理IP来处理:
def get_http_content(number, offset):

    """读取知乎某问题下的答案url, 返回对应json

    Args:

        number: 知乎问题唯一标识

        offset: 偏移量

    """

    target_url = "https://www.zhihu.com/api/v4/questions/{number}/answers?include=data%5B*%5D.is_normal%2Cadmin_closed_comment%2" \

        "Creward_info%2Cis_collapsed%2Cannotation_action%2Cannotation_detail%2Ccollapse_reason%2Cis_sticky%2Ccollapsed_by%2" \

        "Csuggest_edit%2Ccomment_count%2Ccan_comment%2Ccontent%2Ceditable_content%2Cvoteup_count%2Creshipment_settings%2Ccomment_permission%2" \

        "Ccreated_time%2Cupdated_time%2Creview_info%2Crelevant_info%2Cquestion%2Cexcerpt%2Crelationship.is_authorized%2Cis_author%2Cvoting%2" \

        "Cis_thanked%2Cis_nothelp%2Cis_labeled%2Cis_recognized%2Cpaid_info%2Cpaid_info_content%3Bdata%5B*%5D.mark_infos%5B*%5D.url%3Bdata%5B*%5" \

        "D.author.follower_count%2Cbadge%5B*%5D.topics&offset={offset}&limit={limit}&sort_by=default&platform=desktop".format(

            number=number, offset=offset, limit=limit)

    logger.info("target_url:{}", target_url)

    headers = {

        'User-Agent': fake_useragent.get_random_useragent(),

    }

    ip = IPPool().get_random_key()

    proxies = {"http": "http://" + ip}

    response = requests.get(target_url, headers=headers, proxies=proxies)

    if (response is None) or (response.status_code != 200):

        logger.warning("http response is None, number={}, offset={}, status_code={}".format(

            number, offset, response.status_code))

        return None

    html = response.text

    return json.loads(html)
2. 解析出图片地址
def start_crawl():

    """开始爬虫获取图片

    """

    for i in range(0, max_pages):

        offset = limit * i

        logger.info("download pictures with offset {}". format(offset))

        # 获取html

        content_dict = get_http_content(number, offset)

        if content_dict is None:

            logger.error(

                "get http resp fail, number={} offset={}", number, offset)

            continue

        # content_dict['data']存储了答案列表

        if 'data' not in content_dict:

            logger.error("parse data from http resp fail, dict={}", dict)

            continue

        for answer_text in content_dict['data']:

            logger.info(

                "get pictures from answer: https://www.zhihu.com/question/{}/answer/{}", number, answer_text['id'])

            if 'content' not in answer_text:

                logger.error(

                    "parse content from answer text fail, text={}", answer_text)

                continue

            answer_content = pq(answer_text['content'])

            img_urls = answer_content.find('noscript').find('img')

            # 此篇问答不包含图片时打印对应信息, 方便debug

            if len(list(img_urls)) <= 0:

                logger.warning(

                    "this answer has no pictures, url:https://www.zhihu.com/question/{}/answer/{}", number, answer_text['id'])

                continue

            for img_url in img_urls.items():

                # src例子: https://pic2.zhimg.com/50/v2-c970108cd260ea095383627362c1d04f_720w.jpg?source=1940ef5c

                src = img_url.attr("src")

                # 解析出图片格式后缀: .jpeg 或者 .gif等

                source_index = src.rfind('?source')

                if source_index == -1:

                    logger.error("find source index fail, src:{} source_index{}",

                                 src, source_index)

                suffix = src[0:source_index]

                suffix_index = src.rfind('.')

                if source_index == -1:

                    logger.error("find suffix fail, src:{} suffix_index{}".format(

                        src, suffix_index))

                suffix = suffix[suffix_index:]

                logger.info("get picture url, src:{} suffix:{}", src, suffix)

                store_picture(src, suffix)

                time.sleep(1)
3. 将图片存储到本地
def store_picture(img_url, suffix):

    """将图片存储到文件夹中

    Args:

        img_url: 图片链接

        suffix: 图片后缀, 比如'.jpg', '.gif'等

    """

    headers = {

        'User-Agent': fake_useragent.get_random_useragent(),

    }

    ip = IPPool().get_random_key()

    proxies = {"http": "http://" + ip}

    http_resp = requests.get(img_url, headers=headers, proxies=proxies)

    if (http_resp is None) or (http_resp.status_code != 200):

        logger.warning("get http resp fail, url={} http_resp={}",

                       img_url, http_resp)

        return

    content = http_resp.content

    with open(f"{picture_path}/{uuid.uuid4()}{suffix}", 'wb') as f:

        f.write(content)
4. 去除图片水印
本来打算使用图像识别进行抠图去除水印的(因为知乎的水印比较简单而且样式统一),无奈最近需要处理的事情比较多,因此就简单通过opencv包进行裁剪:
def crop_watermark(ori_dir, adjusted_dir):

    """通过裁剪图片的方式来去除水印, 注意无法处理gif格式的图片

    Args:

        ori_dir: 图片所在的文件夹

        adjusted_dir: 去除水印后存放的文件夹

    """

    img_path_list = os.listdir(ori_dir)  # 获取目录下的所有文件

    total = len(img_path_list)

    cnt = 1

    for img_path in img_path_list:

        logger.info(

            "the overall process::{}/{}, now handle the picture:{}", cnt, total, img_path)

        img_abs_path = ori_dir + '/' + img_path

        img = cv2.imread(img_abs_path)

        if img is None:

            logger.error("cv2.imread fail, picture:{}", img_path)

            continue

        height, width = img.shape[0:2]

        cropped = img[0:height-40, 0:width]

        adjusted_img_abs_path = adjusted_dir + '/' + img_path

        cv2.imwrite(adjusted_img_abs_path, cropped)

        cnt += 1
写在最后
写这个程序主要还是为了学习html解析和锤炼一下python编程,虽然写完了之后回过头来看确实没啥值得称道的地方,就把代码放这里供大家一起参考了:
另外此程序的主要目的仅仅是将我搜集图片和剔除水印的过程自动化而已,还是再告诫大家一下不要因为爬虫给别人的服务器带来压力。
Reference
[1] https://www.cnblogs.com/jxlsblog/p/10445066.html
[Python]爬虫获取知乎某个问题下所有图片并去除水印的更多相关文章
- Python爬虫获取知乎图片
前段时间想抓点知乎问题中的图片,了解了下爬虫,发现还是Python的简单方便,于是做了点尝试. #coding=utf-8 import urllib import re def getHtml(ur ...
- python 爬虫必知必会
#python爬虫 #新闻数据 #机器学习:股票数据获取及分析 #网络搜索引擎的一个部件 #Http协议 #正则表达式 #多线程,分布式 #http报文展示 #Http 应答报文介绍 #1.应答码 # ...
- python爬虫获取下一页
from time import sleep import faker import requests from lxml import etree fake = faker.Faker() base ...
- 如何科学地蹭热点:用python爬虫获取热门微博评论并进行情感分析
前言:本文主要涉及知识点包括新浪微博爬虫.python对数据库的简单读写.简单的列表数据去重.简单的自然语言处理(snowNLP模块.机器学习).适合有一定编程基础,并对python有所了解的盆友阅读 ...
- Python爬虫获取异步加载站点pexels并下载图片(Python爬虫实战3)
1. 异步加载爬虫 对于静态页面爬虫很容易获取到站点的数据内容,然而静态页面需要全量加载站点的所有数据,对于网站的访问和带宽是巨大的挑战,对于高并发和大访问访问量的站点来说,需要使用AJAX相关的技术 ...
- Python爬取知乎单个问题下的回答
前言 本文的文字及图片来源于网络,仅供学习.交流使用,不具有任何商业用途,版权归原作者所有,如有问题请及时联系我们以作处理. 作者: 努力学习的渣渣哦 PS:如有需要Python学习资料的小伙伴可以加 ...
- 用 python 抓取知乎指定回答下的视频
前言 现在知乎允许上传视频,奈何不能下载视频,好气哦,无奈之下研究一下了,然后撸了代码,方便下载视频保存. 接下来以 猫为什么一点也不怕蛇? 回答为例,分享一下整个下载过程. 调试一下 打开 F12, ...
- python爬虫获取百度图片(没有精华,只为娱乐)
python3.7,爬虫技术,获取百度图片资源,msg为查询内容,cnt为查询的页数,大家快点来爬起来.注:现在只能爬取到百度的小图片,以后有大图片的方法,我会陆续发贴. #!/usr/bin/env ...
- Python爬虫获取迅雷会员帐号
代码如下: import re import urllib.request import urllib import time from collections import deque head = ...
随机推荐
- SpringCloud升级之路2020.0.x版-12.UnderTow 简介与内部原理
本系列代码地址:https://github.com/HashZhang/spring-cloud-scaffold/tree/master/spring-cloud-iiford 在我们的项目中,我 ...
- Linux从头学07:中断那么重要,它的本质到底是什么?
作 者:道哥,10+年的嵌入式开发老兵. 公众号:[IOT物联网小镇],专注于:C/C++.Linux操作系统.应用程序设计.物联网.单片机和嵌入式开发等领域. 公众号回复[书籍],获取 Linux. ...
- spring security整体流程
spring-security原理 图片中各个类的作用: 1JwtUser类:实现Springsecurity的UserDetails类,此类必须有三个属性 private String userna ...
- 【原创】深入分析Ubuntu本地提权漏洞CVE-2017-16995
*本文首发阿里云先知安全技术社区,原文链接https://xz.aliyun.com/t/2212 前言: 2018年3月中旬,Twitter 用户 @Vitaly Nikolenko 发布消息,称 ...
- Shellshock 破壳漏洞 Writeup
破壳漏洞 CVE编号:CVE-2014-6271 题目URL:http://www.whalwl.site:8029/ 提示:flag在服务器根目录 ShellShock (CVE-2014-6271 ...
- SSRF详解
上一篇说了XSS的防御与绕过的思路,这次来谈一下SSRF的防御,绕过,利用及危害 0x01 前置知识梳理 前置知识涉及理解此漏洞的方方面面,所以这部分要说的内容比较多 SSRF(Server-Side ...
- F与Q查询 事务 choices参数
F与Q查询 F查询 当我们需要将两个字段对应的数据进行比较时就需要用到F查询. select * from book where sold > stock 1.例如需要将售出部分数据和库存数据进 ...
- Kafka 与 RabbitMQ 如何选择使用哪个?
目录 前言 如何选择? 开发语言 延迟队列 消息顺序性 优先级队列 消息留存 消息过滤 可伸缩行 小结 推荐阅读 前言 我们在工作中经常会用到异步消息,主要使用两种消息模式: 消息队列 发布/订阅 消 ...
- 阿里云rds分区
SELECT PARTITION_NAME,TABLE_ROWS FROM INFORMATION_SCHEMA.PARTITIONS WHERE TABLE_NAME = 'xw_user_appl ...
- wpf中INotifyPropertyChanged的用法
using System;using System.Collections.Generic;using System.ComponentModel;using System.Linq;using Sy ...