
Centos7中安装elasticsearch
第一步:必须要有jre支持
elasticsearch是用Java实现的,跑elasticsearch必须要有jre支持,所以必须先安装jre
第二步:下载elasticsearch
进入官方下载 https://www.elastic.co/downloads/elasticsearch
因为是centos中运行 所以我们选 tar.gz压缩包;
下载后 用ftp上传到centos里 我们把这个文件上传到 /home/data/下
第三步:安装和配置elasticsearch
进入data目录 解压
[root@bogon ~]# cd /home/data/
[root@bogon data]# tar -zxvf elasticsearch-5.5.2.tar.gz
新建目录 剪切文件到新目录
[root@bogon data]# cd
[root@bogon ~]# mkdir /home/es/
[root@bogon ~]# mv /home/data/elasticsearch-5.5.2 /home/es/
我们执行,来启动 elasticsearch
[root@bogon ~]# sh /home/es/elasticsearch-5.5.2/bin/elasticsearch
报错了:
[2017-09-07T19:43:10,628][WARN ][o.e.b.ElasticsearchUncaughtExceptionHandler] [] uncaught exception in thread [main]
org.elasticsearch.bootstrap.StartupException: java.lang.RuntimeException: can not run elasticsearch as root
at org.elasticsearch.bootstrap.Elasticsearch.init(Elasticsearch.java:127) ~[elasticsearch-5.5.2.jar:5.5.2]
at org.elasticsearch.bootstrap.Elasticsearch.execute(Elasticsearch.java:114) ~[elasticsearch-5.5.2.jar:5.5.2]
at org.elasticsearch.cli.EnvironmentAwareCommand.execute(EnvironmentAwareCommand.java:67) ~[elasticsearch-5.5.2.jar:5.5.2]
at org.elasticsearch.cli.Command.mainWithoutErrorHandling(Command.java:122) ~[elasticsearch-5.5.2.jar:5.5.2]
at org.elasticsearch.cli.Command.main(Command.java:88) ~[elasticsearch-5.5.2.jar:5.5.2]
at org.elasticsearch.bootstrap.Elasticsearch.main(Elasticsearch.java:91) ~[elasticsearch-5.5.2.jar:5.5.2]
at org.elasticsearch.bootstrap.Elasticsearch.main(Elasticsearch.java:84) ~[elasticsearch-5.5.2.jar:5.5.2]
Caused by: java.lang.RuntimeException: can not run elasticsearch as root
at org.elasticsearch.bootstrap.Bootstrap.initializeNatives(Bootstrap.java:106) ~[elasticsearch-5.5.2.jar:5.5.2]
at org.elasticsearch.bootstrap.Bootstrap.setup(Bootstrap.java:194) ~[elasticsearch-5.5.2.jar:5.5.2]
at org.elasticsearch.bootstrap.Bootstrap.init(Bootstrap.java:351) ~[elasticsearch-5.5.2.jar:5.5.2]
at org.elasticsearch.bootstrap.Elasticsearch.init(Elasticsearch.java:123) ~[elasticsearch-5.5.2.jar:5.5.2]
... 6 more
意思是不能用root用户来启动,那我们新建一个用户来启动
[root@bogon ~]# useradd elastic
[root@bogon ~]# chown -R elastic:elastic /home/es/elasticsearch-5.5.2/
新建elastic用户 并且把目录权限赋予给elastic
我们切换成elastic用户,然后执行
[root@bogon ~]# su elastic
[elastic@bogon root]$ sh /home/es/elasticsearch-5.5.2/bin/elasticsearch
出来一大串info 说明成功了,但是这种方式是前台运行,不方便我们操作其他的 我们加下 -d 后台运行
先ctrl+c退出执行;
[elastic@bogon root]$ sh /home/es/elasticsearch-5.5.2/bin/elasticsearch -d
我们来检查下是否启动成功
[elastic@bogon root]$ ps -ef | grep elasticsearch
elastic 2962 1 23 19:48 pts/1 00:00:02 /home/java/jdk1.8.0_144/bin/java -Xms2g -Xmx2g -XX:+UseConcMarkSweepGC -XX:CMSInitiatingOccupancyFraction=75 -XX:+UseCMSInitiatingOccupancyOnly -XX:+AlwaysPreTouch -server -Xss1m -Djava.awt.headless=true -Dfile.encoding=UTF-8 -Djna.nosys=true -Djdk.io.permissionsUseCanonicalPath=true -Dio.netty.noUnsafe=true -Dio.netty.noKeySetOptimization=true -Dio.netty.recycler.maxCapacityPerThread=0 -Dlog4j.shutdownHookEnabled=false -Dlog4j2.disable.jmx=true -Dlog4j.skipJansi=true -XX:+HeapDumpOnOutOfMemoryError -Des.path.home=/home/es/elasticsearch-5.5.2 -cp /home/es/elasticsearch-5.5.2/lib/* org.elasticsearch.bootstrap.Elasticsearch -d
elastic 2977 2849 0 19:48 pts/1 00:00:00 grep --color=auto elasticsearch
注意 有朋友经常出现 如下错误
ERROR: [2] bootstrap checks failed
[1]: max file descriptors [4096] for elasticsearch process is too low, increase to at least [65536]
[2]: max virtual memory areas vm.max_map_count [65530] is too low, increase to at least [262144]
解决方案:
ERROR: [2] bootstrap checks failed
[1]: max file descriptors [4096] for elasticsearch process is too low, increase to at least [65536]
[2]: max virtual memory areas vm.max_map_count [65530] is too low, increase to at least [262144]
启动报这个错误;
问题1 [1]: max file descriptors [4096] for elasticsearch process is too low, increase to at least [65536]
修改/etc/security/limits.conf文件,添加或修改如下行: (请切换到root用户 然后强制修改文件)
* hard nofile 65536
* soft nofile 65536
问题2 [2]: max virtual memory areas vm.max_map_count [65530] is too low, increase to at least [262144]
$ sudo sysctl -w vm.max_map_count=2621441
或者修改 /etc/sysctl.conf 文件,添加 “vm.max_map_count”设置 永久改变(sudo sysctl -p /etc/sysctl.conf生效)。
/sbin/sysctl -p 执行下 让/etc/sysctl.conf 立即生效
设置后,可以使用
我们来验证下服务是否正常运行 curl http://localhost:9200
[elastic@bogon root]$ curl http://localhost:9200
{
"name" : "K22mJd5",
"cluster_name" : "elasticsearch",
"cluster_uuid" : "R2qfXKtrQl2PwKdJMmPuMA",
"version" : {
"number" : "5.5.2",
"build_hash" : "b2f0c09",
"build_date" : "2017-08-14T12:33:14.154Z",
"build_snapshot" : false,
"lucene_version" : "6.6.0"
},
"tagline" : "You Know, for Search"
}
出来这个 说明配置OK。
第四步:允许外网连接配置
前面我们配置的仅仅是本机使用 但是我们比如集群以及其他机器连接 ,则需要配置下。
可以修改 /home/es/elasticsearch/config/elasticsearch.yml 文件
把 network.host 和 http.port 前面的 备注去掉 然后Host改成你的局域网IP即可
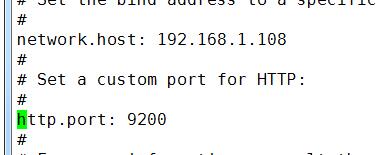
修改后 保存退出
然后我们把防火墙也关了
systemctl stop firewalld.service
systemctl disable firewalld.service 禁止防火墙开机启动
Elasticsearch6.3 max number of threads [2048] for user [*] is too low, increase to at least [4096]异常
根据linux系统差异,有时候需要来点终极解决方案
新建: /etc/security/limits.d/test-limits.conf
cat>>test-limits.conf
然后加下内容:
* soft nofile 65536
* hard nofile 131072
* soft nproc 4096
* hard nproc 4096
ctrl+d保存即可;
然后重启服务器即可;
最后我们重启下elasticsearch服务
ps -ef | grep elasticsearch 找到进程号
然后kill -9 进程号
再启动下elasticsearch
我们用谷歌浏览器请求下 http://192.168.1.108:9200/
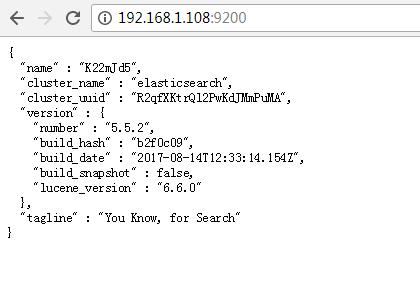
OK 出现这东西 才算配置完成;
Centos7中安装elasticsearch的更多相关文章
- Centos7 中安装Elasticsearch
1.下载安装包 1.1 下载elasticsearch 7.13.3 curl -L -O https://artifacts.elastic.co/downloads/elasticsearch/e ...
- 在Centos7中安装elasticsearch5.5
在Centos7中安装elasticsearch5.5 第一步:必须要有jre支持 elasticsearch是用Java实现的,跑elasticsearch必须要有jre支持,所以必须先安装jre ...
- 在centos7中安装Robot Framework
安装前景介绍: 最初,我们是在Windows环境下搭建Robot Framework来对我们的服务进行接口测试的(想知道如何在Windows下安装Robot Framework,可以参考我同事的博客h ...
- centos7中安装、配置、验证、卸载redis
本文介绍在centos7中安装.配置.验证.卸载redis等操作,以及在使用redis中的一些注意事项. 一 安装redis 1 创建redis的安装目录 利用以下命令,切换到/usr/local路径 ...
- centos7中安装mongodb3.6
centos7中安装mongodb3.6 首先更新系统 yum -y update 1.安装Mongodb 编辑Mongodb安装源 vim /etc/yum.repos.d/mongodb-org- ...
- centos7中安装mysql
centos7中安装mysql网上已经很多资源了,我就不在赘述了.我这里只是记录下我安装的时候出现的一些问题. 原文:https://www.cnblogs.com/bigbrotherer/p/72 ...
- Centos7下安装Elasticsearch 5.6.6
环境 因为elasticsearch是用java编写的,所以需要先安装JDK ES 5,安装需要 JDK 8 以上ES 6.5,安装需要 JDK 11 以上ES 7.2.1,内置了 JDK 12 安装 ...
- CentOS7中安装MySQL(简便)及 网站的搭建
一.首先,我们需要配置CentOS7中网络环境的搭建,物理机IP为192.168.100.39,虚拟机IP为192.168.100.139,网络模式设置为桥接模式 ,再进入系统挂载光盘.输入命令 ...
- CentOS7中安装redis5.0
1. 环境介绍 CentOS7 (未安装Development Tools) 2. 下载Redis5.0-rc3 wget -O redis-5.0-rc3.tar.gz https://github ...
随机推荐
- Lua中的元表与元方法学习总结
前言 元表对应的英文是metatable,元方法是metamethod.我们都知道,在C++中,两个类是无法直接相加的,但是,如果你重载了"+"符号,就可以进行类的加法运算.在Lu ...
- INFJ名言
财富是由什么构成的? 按世俗的观点,就是占有金钱和财宝. 但如果我们用除金钱之外的其他方式来衡量财富, 那么许多在物质上匮乏的人在精神上却是富有的, 许多在物质上富有的人在精神上却是匮乏的. The ...
- Windows 10 版本 21H1 发布,百度网盘下载
请访问原文链接:https://sysin.org/article/windows-10/,查看最新版.原创作品,转载请保留出处. Windows 10, version 21H1, all edit ...
- IAP 订阅后端踩坑总结之 Google 篇
前言: 本文利用 python 作为后端服务器, 且接入的 Google Cloud Pub/Sub 服务作为实时开发者通知, 未记录具体支付流程的代码,只记录了再开发过程中较为耗时,个人认为比较麻烦 ...
- THINKPHP_(4)_TP模型中with、withJoin和多层关联的深入分析
1.个人之前博文: TP模型的多表关联查询和多表字段的关键字搜索 TP6中实现多层关联,第一个表关联第二个表查询出的数据,再关联第三个表 2.withJoin的特性 2.1 第一个特性 在TP模型的多 ...
- Camera噪声问题
Camera噪声问题 Camera RGB 域的噪声 以上部分属于sensor processing,接下来的部分属于color.luminance processing. gamma gamma是在 ...
- BEP 7:CUDA外部内存管理插件(上)
BEP 7:CUDA外部内存管理插件(上) 背景和目标 在CUDA阵列接口使得能够共享不同的Python之间的数据库的访问CUDA设备.但是,每个库都与其它库区别对待.例如: Numba在内部管理内存 ...
- NVIDIA安培架构
NVIDIA安培架构 NVIDIA Ampere Architecture In-Depth 在2020年英伟达GTC主题演讲中,英伟达创始人兼首席执行官黄仁勋介绍了基于新英伟达安培GPU架构的新英伟 ...
- macOS 下使用命令行进行用户(组)管理,就是这么简单! dscl 你很有必要了解一下!!
大家好,我是@小猿来也... Command-line interface to Directory Services. 在 linux 系统中我们习惯了使用 useradd,userdel,user ...
- Task05:SQL高级处理
5.1 窗口函数 5.1.1 窗口函数概念及基本的使用方法 窗口函数也称为OLAP函数.OLAP 是OnLine AnalyticalProcessing 的简称,意思是对数据库数据进行实时分析处理. ...