Drawable实战解析:Android XML shape 标签使用详解(apk瘦身,减少内存好帮手)
Android XML shape 标签使用详解
一个android开发者肯定懂得使用 xml 定义一个 Drawable,比如定义一个 rect 或者 circle 作为一个 View 的背景。但是,也肯定也有人在能使用 Drawable 的地方选择使用一张 png 图(或者是一张 .9 图)作为 View 的背景,因为后者把问题交给 UI 设计人员去了,省事。当然,使用图片这种在项目中也很常见,如果不考虑 apk 大小,内存占用问题的话,是没有任何问题的。如果要给 apk 瘦身,减少内存占用,那么本文 Drawable 的价值就提现出来了。首先提出几个问题?
备注:本文所说的 Drawable 都特指 shape 标签定义的 Drawable
- shape 标签定义的 Drawable 是哪种类型的 Drawable?
- 使用 Drawable 有什么好处?
- 什么情况下选择使用 Drawable,而不是使用一张图,反之呢?
- shape 标签能定义多少种类型的 Drawable?(这是本文的重点,方便我这种懒惰的程序员直接拷贝代码修改)
本文需要先了解shape标签的基本用法,关于Android shape标签的各个属性详解请移步:
Android GradientDrawable(shape标签定义) 静态使用和动态使用(圆角,渐变实现)
首先给出GitHub地址,后续有新的内容会持续加入
Github地址:https://github.com/PopFisher/AndroidDrawClassic
下面依次回答上面几个问题
shape标签定义的Drawable是哪种类型的Drawable?
shape 标签定义的 Drawable 类型对应 GradientDrawable
这里可能会认为是 ShapeDrawale ,我一开始也是这样认为的,因为我看到官方文档上说 ShapeDrawable 也是使用 shape 标签定义的,可是去看 GradientDrawable 的时候也是同样的解释,简直懵逼了,后面经过代码实际检验,shape 标签定义的 Drawable 能直接强制转换为 GradientDrawable,而不能转换为 ShapeDrawable,这个时候只能认为是 ShapeDrawable 的文档解释有点问题了,可能文档错了吧。
ShapeDrawable 与 GradientDrawale 确实有很多相似之处,具体情况后续单独写文章来说明,本文不涉及 ShapeDrawable 的其他内容。
使用Drawable有什么好处?
- 很方便得到一个矩形,圆,椭圆,圆环,很容易维护和修改
- 很方便实现圆角,渐变(线性渐变,径向渐变,扫描渐变)
- 代替图片作为 View 的背景,减少 apk 的体积(减少 apk 体积最明显最有效的步骤就是去掉图片)
- 大图片耗内存,使用 Drawable 节省内存,Android 本身对 Drawable 做了很好的优化(内存优化需要考虑)
什么情况下选择使用Drawable,而不是使用一张图,反之呢?
- 理论上能用 Drawable 的地方就用 Drawable
- 如果能够通过 shape 标签就能定义的几何图形就能满足需求,就不用图片来表示
- 渐变类型的背景也尽量使用 shape 来实现
- 不规则的,复杂的图形还是只能使用图片,比如要一个表示手机的图标,一个人的头像
- 有些特殊拉升效果需要使用 .9.png 图片(尽可能的小吧,越小越省内存)
shape标签能定义多少种类型的Drawable?
shape 可以定义四种类型的几何图形,由 android:shape 属性指定
line --> 线
rectangle --> 矩形(圆角矩形)
oval --> 椭圆,圆
ring --> 圆环
shape 可以定义边框属性
有边框,无边框,虚线边框,实线边框
shape 可以实现矩形圆角效果
可以指定其中一个角或者多个角设置圆角效果
指定圆角半径设置圆角的大小
shape 可以实现三种渐变,由子标签 gradient 实现
linear --> 线性渐变(水平,垂直,对角线三个渐变)
sweep --> 扫描渐变(只支持顺时针方向,其实颜色反过来就跟逆时针一样的了)
radial --> 径向渐变(由指定的中心点开始向外渐变,指定半径)
xml 实现只支持三个颜色,startColor,CenterColor,endColor
更多更详细关于 shape 的介绍请移步 Android GradientDrawable(shape标签定义) 静态使用和动态使用(圆角,渐变实现)
由上面的组合可以定义很多 Drawable,下面依次进行介绍:
线(实线+虚线)
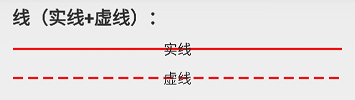
实线:line_solid.xml
<?xml version="1.0" encoding="utf-8"?>

<!-- 实线 -->

<shape xmlns:android="http://schemas.android.com/apk/res/android"

	android:shape="line"

	android:useLevel="true">

<stroke

    android:width="2dp"

    android:color="#ffff0000" />

</shape>
虚线:line_dashed.xml
<?xml version="1.0" encoding="utf-8"?>

<!--虚线

    设置类型会line

    需要关闭硬件加速虚线才能绘制出来,布局文件中使用的时候需要设置android:layerType="software"

    android:width 线宽,布局文件中的View的高度需要比这个值大才可以绘制出来

    android:dashWidth 每段破折线的长度

    android:dashGap="5dp"每段破折线之间的间隔-->

<shape xmlns:android="http://schemas.android.com/apk/res/android"

    android:shape="line"

    android:useLevel="true">

    <stroke

        android:width="2dp"

        android:dashGap="5dp"

        android:dashWidth="10dp"

        android:color="#ffff0000" />

</shape>
矩形(边框+填充)
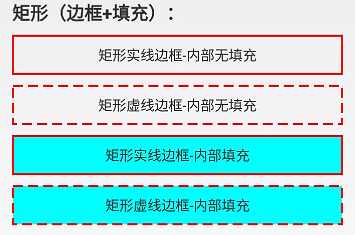
矩形实线边框内部无填充:rect_solid_border.xml
<?xml version="1.0" encoding="utf-8"?>

<!-- 实线边框 -->

<shape xmlns:android="http://schemas.android.com/apk/res/android"

    android:shape="rectangle"

    android:useLevel="true">

    <stroke

        android:width="2dp"

        android:color="#ffff0000" />

</shape>
矩形虚线边框内部无填充:rect_dashed_border.xml
<?xml version="1.0" encoding="utf-8"?>

<!-- 虚线边框 -->

<shape xmlns:android="http://schemas.android.com/apk/res/android"

    android:shape="rectangle"

    android:useLevel="true">

    <stroke

        android:width="2dp"

        android:color="#ffff0000"

        android:dashGap="5dp"

        android:dashWidth="10dp" />

</shape>
矩形实线边框-内部填充:rect_solid_border_and_fill.xml
<?xml version="1.0" encoding="utf-8"?>

<!-- 实线边框+内部填充 -->

<shape xmlns:android="http://schemas.android.com/apk/res/android"

    android:shape="rectangle"

    android:useLevel="true">

    <stroke

        android:width="2dp"

        android:color="#ffff0000" />

    <solid android:color="#ff00ffff" />

</shape>
矩形虚线边框-内部填充:rect_dashed_border_and_fill.xml
<?xml version="1.0" encoding="utf-8"?>

<!-- 虚线边框+内部填充 -->

<shape xmlns:android="http://schemas.android.com/apk/res/android"

    android:shape="rectangle"

    android:useLevel="true">

    <stroke

        android:width="2dp"

        android:color="#ffff0000"

        android:dashGap="5dp"

        android:dashWidth="10dp" />

    <solid android:color="#ff00ffff" />

</shape>
圆角矩形
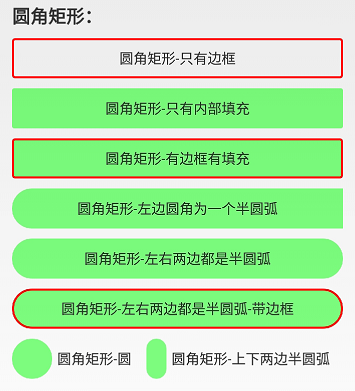
圆角矩形-只有边框:rect_rounded_border.xml
<?xml version="1.0" encoding="utf-8"?>

<!-- 矩形边框圆角 -->

<shape xmlns:android="http://schemas.android.com/apk/res/android"

    android:shape="rectangle"

    android:useLevel="true">

    <size android:height="100dp"

        android:width="100dp"/>

    <stroke

        android:width="2dp"

        android:color="#ffff0000" />

    <corners android:bottomLeftRadius="2dp"

        android:bottomRightRadius="2dp"

        android:topLeftRadius="2dp"

        android:topRightRadius="2dp" />

</shape>
圆角矩形-只有内部填充:rect_rounded_fill.xml
<?xml version="1.0" encoding="utf-8"?>

<!-- 圆角矩形 -->

<shape xmlns:android="http://schemas.android.com/apk/res/android"

    android:shape="rectangle"

    android:useLevel="true">

    <size android:height="100dp"

        android:width="100dp"/>

    <solid android:color="#8000ff00" />

    <corners android:bottomLeftRadius="2dp"

        android:bottomRightRadius="2dp"

        android:topLeftRadius="2dp"

        android:topRightRadius="2dp" />

</shape>
圆角矩形-有边框有填充:rect_rounded_border_and_fill.xml
<?xml version="1.0" encoding="utf-8"?>

<!-- 矩形边框+填充 圆角 -->

<shape xmlns:android="http://schemas.android.com/apk/res/android"

    android:shape="rectangle"

    android:useLevel="true">

    <size android:height="100dp"

        android:width="100dp"/>

    <stroke

        android:width="2dp"

        android:color="#ffff0000" />

    <solid android:color="#8000ff00" />

    <corners android:bottomLeftRadius="2dp"

        android:bottomRightRadius="2dp"

        android:topLeftRadius="2dp"

        android:topRightRadius="2dp" />

</shape>
圆角矩形-左边圆角为一个半圆弧:rect_rounded_left_arc.xml
<?xml version="1.0" encoding="utf-8"?>

<!-- 矩形圆角+左右两边为一个圆弧 -->

<shape xmlns:android="http://schemas.android.com/apk/res/android"

    android:shape="rectangle"

    android:useLevel="true">

    <size

        android:width="50dp"

        android:height="10dp" />

    <solid android:color="#8000ff00" />

    <!-- 圆角半径是高度的一般就是一个圆弧了 -->

    <corners

        android:bottomLeftRadius="20dp"

        android:topLeftRadius="20dp" />

</shape>
圆角矩形-左右两边都是半圆弧:rect_rounded_left_right_arc.xml
<?xml version="1.0" encoding="utf-8"?>

<!-- 矩形圆角+左右两边为一个圆弧 -->

<shape xmlns:android="http://schemas.android.com/apk/res/android"

    android:shape="rectangle"

    android:useLevel="true">

    <size

        android:width="50dp"

        android:height="10dp" />

    <solid android:color="#8000ff00" />

    <!-- 圆角半径是高度的一般就是一个圆弧了 -->

    <corners android:radius="20dp" />

</shape>
圆角矩形-左右两边都是半圆弧-带边框:rect_rounded_left_right_arc_border.xml
<?xml version="1.0" encoding="utf-8"?>

<!-- 矩形圆角+左右两边为一个圆弧 -->

<shape xmlns:android="http://schemas.android.com/apk/res/android"

    android:shape="rectangle"

    android:useLevel="true">

    <size

        android:width="50dp"

        android:height="10dp" />

    <stroke android:color="#ffff0000"

        android:width="2dp"/>

    <solid android:color="#8000ff00" />

    <!-- 圆角半径是高度的一般就是一个圆弧了 -->

    <corners android:radius="20dp" />

</shape>
圆角矩形-圆:rect_rounded_arc.xml
<?xml version="1.0" encoding="utf-8"?>

<!-- 矩形圆角+圆出一个圆弧 -->

<shape xmlns:android="http://schemas.android.com/apk/res/android"

    android:shape="rectangle"

    android:useLevel="true">

    <size android:height="10dp"

        android:width="10dp"/>

    <solid android:color="#8000ff00" />

    <corners android:radius="20dp" />

</shape>
圆角矩形-上下两边半圆弧:rect_rounded_top_bottom_arc.xml
<?xml version="1.0" encoding="utf-8"?>

<!-- 矩形圆角+左右两边为一个圆弧 -->

<shape xmlns:android="http://schemas.android.com/apk/res/android"

    android:shape="rectangle"

    android:useLevel="true">

    <size

        android:width="10dp"

        android:height="60dp" />

    <solid android:color="#8000ff00" />

    <!-- 圆角半径是高度的一般就是一个圆弧了 -->

    <corners android:radius="10dp" />

</shape>
渐变效果(以矩形为例)
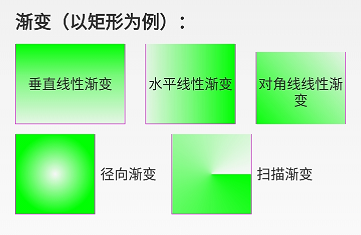
垂直线性渐变:rect_gradient_linear_vertical.xml
<?xml version="1.0" encoding="utf-8"?>

<!-- 矩形内部填充-线性垂直渐变 -->

<shape xmlns:android="http://schemas.android.com/apk/res/android"

    android:shape="rectangle"

    android:useLevel="true">

    <size

        android:width="@dimen/shape_size"

        android:height="@dimen/shape_size" />

    <stroke

        android:width="1px"

        android:color="#ffff00ff" />

    <!-- 调整angle实现水平渐变,垂直渐变或者对角渐变 -->

    <gradient

        android:angle="-45"

        android:centerX="0.5"

        android:centerY="0.4"

        android:centerColor="#8000ff00"

        android:endColor="#1000ff00"

        android:startColor="#ff00ff00"

        android:type="linear" />

</shape>
水平线性渐变:rect_gradient_linear_horizon.xml
<?xml version="1.0" encoding="utf-8"?>

<!-- 矩形内部填充-线性水平渐变 -->

<shape xmlns:android="http://schemas.android.com/apk/res/android"

    android:shape="rectangle"

    android:useLevel="true">

    <size

        android:width="@dimen/shape_size"

        android:height="@dimen/shape_size" />

    <stroke

        android:width="1px"

        android:color="#ffff00ff" />

    <!-- 调整angle实现水平渐变,垂直渐变或者对角渐变 -->

    <gradient

        android:angle="0"

        android:centerX="0.5"

        android:centerY="0.5"

        android:centerColor="#8000ff00"

        android:endColor="#ff00ff00"

        android:startColor="#1000ff00"

        android:type="linear" />

</shape>
对角线线性渐变:rect_gradient_linear_diagonal.xml
<?xml version="1.0" encoding="utf-8"?>

<!-- 矩形内部填充-线性对角线渐变 -->

<shape xmlns:android="http://schemas.android.com/apk/res/android"

    android:shape="rectangle"

    android:useLevel="true">

    <size

        android:width="@dimen/shape_size"

        android:height="@dimen/shape_size" />

    <stroke

        android:width="1px"

        android:color="#ffff00ff" />

    <!-- 调整angle实现水平渐变,垂直渐变或者对角渐变 -->

    <gradient

        android:angle="45"

        android:centerX="0.5"

        android:centerY="0.5"

        android:centerColor="#8000ff00"

        android:endColor="#1000ff00"

        android:startColor="#ff00ff00"

        android:type="linear" />

</shape>
径向渐变:rect_gradient_radial.xml
<?xml version="1.0" encoding="utf-8"?>

<!-- 矩形内部填充-径向渐变,一般不用在rect上,用到圆或者椭圆上 -->

<shape xmlns:android="http://schemas.android.com/apk/res/android"

    android:shape="rectangle"

    android:useLevel="true">

    <size

        android:width="@dimen/shape_size"

        android:height="@dimen/shape_size" />

    <stroke

        android:width="1px"

        android:color="#ffff00ff" />

    <!-- 径向渐变angle无效 -->

    <gradient

        android:angle="0"

        android:centerX="0.5"

        android:centerY="0.5"

        android:startColor="#0000ff00"

        android:endColor="#ff00ff00"

        android:gradientRadius="40dp"

        android:type="radial" />

</shape>
扫描渐变:rect_gradient_sweep.xml
<?xml version="1.0" encoding="utf-8"?>

<!-- 矩形内部填充-扫描渐变 -->

<shape xmlns:android="http://schemas.android.com/apk/res/android"

    android:shape="rectangle"

    android:useLevel="true">

    <!--如果布局中没有设置View的大小,会size设置的大小为默认值-->

    <size

        android:width="20dp"

        android:height="20dp" />

    <stroke

        android:width="1px"

        android:color="#ffff00ff" />

    <!--调整angle不能实现角度变化

        centerX,centerY是中心点的位置,这里用的是百分比值(0-1)

        在rect中gradientRadius无效-->

    <gradient

        android:angle="0"

        android:centerX="0.5"

        android:centerY="0.5"

        android:startColor="#ff00ff00"

        android:gradientRadius="20dp"

        android:type="sweep" />

</shape>
圆(边框+填充+渐变)
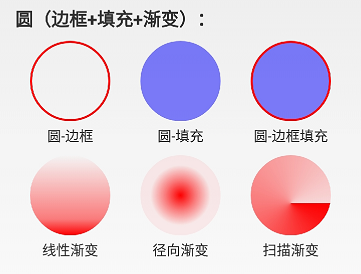
圆-边框:circle_border.xml
<?xml version="1.0" encoding="utf-8"?>

<!-- 圆形边框 -->

<shape xmlns:android="http://schemas.android.com/apk/res/android"

    android:shape="oval"

    android:useLevel="true">

    <size

        android:width="80dp"

        android:height="80dp" />

    <stroke

        android:width="2dp"

        android:color="#ffff0000" />

</shape>
圆-填充:circle_fill.xml
<?xml version="1.0" encoding="utf-8"?>

<!-- 圆形边框 + 填充 -->

<shape xmlns:android="http://schemas.android.com/apk/res/android"

    android:shape="oval"

    android:useLevel="true">

    <size

        android:width="80dp"

        android:height="80dp" />

    <solid android:color="#800000ff" />

</shape>
圆-边框填充:circle_border_and_fill.xml
<?xml version="1.0" encoding="utf-8"?>

<!-- 圆形边框 + 填充 -->

<shape xmlns:android="http://schemas.android.com/apk/res/android"

    android:shape="oval"

    android:useLevel="true">

    <size

        android:width="80dp"

        android:height="80dp" />

    <stroke

        android:width="2dp"

        android:color="#ffff0000" />

    <solid android:color="#800000ff" />

</shape>
线性渐变:circle_gradient_linear.xml
<?xml version="1.0" encoding="utf-8"?>

<!-- 圆形内部填充-线性渐变 -->

<shape xmlns:android="http://schemas.android.com/apk/res/android"

    android:shape="oval"

    android:useLevel="true">

    <size

        android:width="@dimen/shape_size"

        android:height="@dimen/shape_size" />

    <!-- angle调整渐变角度,只能是45的倍数,centerX, centerY是百分百(0-1) -->

    <gradient

        android:angle="-90"

        android:centerX="0.5"

        android:centerY="0.8"

        android:centerColor="#80ff0000"

        android:endColor="#ffff0000"

        android:startColor="#00ff0000"

        android:type="linear" />

</shape>
径向渐变:circle_gradient_radial.xml
<?xml version="1.0" encoding="utf-8"?>

<!-- 圆形内部填充-径向渐变 -->

<shape xmlns:android="http://schemas.android.com/apk/res/android"

    android:shape="oval"

    android:useLevel="true">

    <size

        android:width="40dp"

        android:height="40dp" />

    <!-- centerX, centerY是百分百(0-1) -->

    <gradient

        android:centerX="0.5"

        android:centerY="0.5"

        android:startColor="#ffff0000"

        android:centerColor="#80ff0000"

        android:endColor="#10ff0000"

        android:gradientRadius="30dp"

        android:type="radial" />

</shape>
扫描渐变:circle_gradient_sweep.xml
<?xml version="1.0" encoding="utf-8"?>

<!-- 圆形内部填充-扫描渐变 -->

<shape xmlns:android="http://schemas.android.com/apk/res/android"

    android:shape="oval"

    android:useLevel="true">

    <size

        android:width="@dimen/shape_size"

        android:height="@dimen/shape_size" />

    <!-- sweep类型angle,gradientRadius无效,centerX, centerY是百分百(0-1) -->

    <gradient

        android:centerX="0.5"

        android:centerY="0.6"

        android:startColor="#ffff0000"

        android:centerColor="#80ff0000"

        android:endColor="#20ff0000"

        android:gradientRadius="20dp"

        android:type="sweep" />

</shape>
椭圆(边框+填充+渐变)
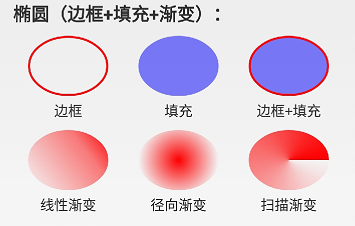
边框:oval_border.xml
<?xml version="1.0" encoding="utf-8"?>

<!-- 椭圆边框 -->

<shape xmlns:android="http://schemas.android.com/apk/res/android"

    android:shape="oval"

    android:useLevel="true">

    <stroke

        android:width="2dp"

        android:color="#ffff0000" />

</shape>
填充:oval_fill.xml
<?xml version="1.0" encoding="utf-8"?>

<!-- 椭圆填充-->

<shape xmlns:android="http://schemas.android.com/apk/res/android"

    android:shape="oval"

    android:useLevel="true">

    <solid android:color="#800000ff" />

</shape>
边框+填充:oval_border_and_fill.xml
<?xml version="1.0" encoding="utf-8"?>

<!-- 椭圆边框 + 填充-->

<shape xmlns:android="http://schemas.android.com/apk/res/android"

    android:shape="oval"

    android:useLevel="true">

    <stroke

        android:width="2dp"

        android:color="#ffff0000" />

    <solid android:color="#800000ff" />

</shape>
线性渐变:oval_gradient_linear.xml
<?xml version="1.0" encoding="utf-8"?>

<!-- 椭圆内部填充-线性渐变 -->

<shape xmlns:android="http://schemas.android.com/apk/res/android"

    android:shape="oval"

    android:useLevel="true" >

    <size

        android:width="80dp"

        android:height="60dp" />

    <gradient

        android:angle="45"

        android:centerX="0.5"

        android:centerY="0.7"

        android:centerColor="#80ff0000"

        android:endColor="#ffff0000"

        android:startColor="#00ff0000"

        android:type="linear" />

</shape>
径向渐变:oval_gradient_radial.xml
<?xml version="1.0" encoding="utf-8"?>

<!-- 椭圆内部填充-径向渐变 -->

<shape xmlns:android="http://schemas.android.com/apk/res/android"

    android:shape="oval"

    android:useLevel="true" >

    <size

        android:width="80dp"

        android:height="60dp" />

    <gradient

        android:centerX="0.5"

        android:centerY="0.5"

        android:centerColor="#80ff0000"

        android:endColor="#00ff0000"

        android:startColor="#ffff0000"

        android:gradientRadius="40dp"

        android:type="radial" />

</shape>
扫描渐变:oval_gradient_sweep.xml
<?xml version="1.0" encoding="utf-8"?>

<!-- 椭圆内部填充-扫描渐变 -->

<shape xmlns:android="http://schemas.android.com/apk/res/android"

    android:shape="oval"

    android:useLevel="true" >

    <size

        android:width="80dp"

        android:height="60dp" />

    <gradient

        android:centerX="0.5"

        android:centerY="0.5"

        android:centerColor="#80ff0000"

        android:endColor="#ffff0000"

        android:startColor="#00ff0000"

        android:type="sweep" />

</shape>
圆环(边框+填充+渐变)
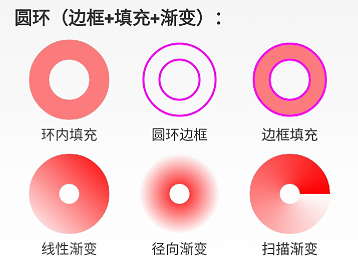
环内填充:ring_fill.xml
<?xml version="1.0" encoding="utf-8"?><!-- 圆环 -->

<shape xmlns:android="http://schemas.android.com/apk/res/android"

    android:innerRadiusRatio="4"

    android:shape="ring"

    android:thicknessRatio="4"

    android:useLevel="false">

    <!--android:useLevel="false"必须是false-->

    <size

        android:width="80dp"

        android:height="80dp" />

    <solid android:color="#80ff0000" />

</shape>
圆环边框:ring_border.xml
<?xml version="1.0" encoding="utf-8"?>

<!-- 圆环-仅有边框 -->

<shape xmlns:android="http://schemas.android.com/apk/res/android"

    android:innerRadius="20dp"

    android:shape="ring"

    android:thickness="16dp"

    android:useLevel="false">

    <!--android:useLevel="false"必须是false-->

    <size

        android:width="80dp"

        android:height="80dp" />

    <stroke

        android:width="2dp"

        android:color="#ffff00ff" />

</shape>
边框+填充:ring_border_and_fill.xml
<?xml version="1.0" encoding="utf-8"?>

<!-- 圆环 -->

<shape xmlns:android="http://schemas.android.com/apk/res/android"

    android:innerRadius="20dp"

    android:shape="ring"

    android:thickness="16dp"

    android:useLevel="false">

    <!--android:useLevel="false"必须是false-->

    <size

        android:width="80dp"

        android:height="80dp" />

    <solid android:color="#80ff0000" />

    <stroke

        android:width="2dp"

        android:color="#ffff00ff" />

</shape>
线性渐变:ring_gradient_linear.xml
<?xml version="1.0" encoding="utf-8"?>

<!-- 圆环-线性渐变 -->

<shape xmlns:android="http://schemas.android.com/apk/res/android"

    android:shape="ring"

    android:innerRadius="10dp"

    android:thickness="30dp"

    android:useLevel="false">

    <!--android:useLevel="false"必须是false-->

    <size

        android:width="80dp"

        android:height="80dp" />

    <gradient

        android:angle="45"

        android:centerColor="#80ff0000"

        android:endColor="#ffff0000"

        android:startColor="#00ff0000"

        android:type="linear" />

</shape>
径向渐变:ring_gradient_radial.xml
<?xml version="1.0" encoding="utf-8"?>

<!-- 圆环-径向渐变渐变 -->

<shape xmlns:android="http://schemas.android.com/apk/res/android"

    android:shape="ring"

    android:innerRadius="10dp"

    android:thickness="30dp"

    android:useLevel="false">

    <!--android:useLevel="false"必须是false-->

    <size

        android:width="80dp"

        android:height="80dp" />

    <!--设置径向渐变半径,渐变从圆心开始-->

    <gradient

        android:centerX="0.5"

        android:centerY="0.5"

        android:centerColor="#80ff0000"

        android:endColor="#00ff0000"

        android:startColor="#ffff0000"

        android:gradientRadius="40dp"

        android:type="radial" />

</shape>
扫描渐变:ring_gradient_sweep.xml
<?xml version="1.0" encoding="utf-8"?>

<!-- 圆环-线性渐变 -->

<shape xmlns:android="http://schemas.android.com/apk/res/android"

    android:shape="ring"

    android:innerRadius="10dp"

    android:thickness="30dp"

    android:useLevel="false">

    <!--android:useLevel="false"必须是false-->

    <size

        android:width="80dp"

        android:height="80dp" />

    <!--扫描渐变shape不能设置角度-->

    <gradient

        android:centerColor="#80ff0000"

        android:endColor="#ffff0000"

        android:startColor="#00ff0000"

        android:type="sweep" />

</shape>
总结
熟练掌握好 shape 标签的使用,能够构建出多种多样的 Drawable,这些 Drawable 可以直接作为背景设置给 View,代码通过 R.drawable 方式使用,xml 文件通过 @drawable/name 使用。跟图片的使用一模一样,关键是使用系统 Drawable 可以减少 apk 的体积,减少内存占用等好处,所以,不要觉得简单就不系统学习,越简单的东西越要熟练掌握。后面还会陆续出一些 Drawable 的文章,比如除了shape标签定义的 Drawable,其他还有哪些 xml 标签能定义 Drawable? Drawable怎么通过代码的方式创建并使用?
Drawable实战解析:Android XML shape 标签使用详解(apk瘦身,减少内存好帮手)的更多相关文章
- Android XML shape 标签使用详解(apk瘦身,减少内存好帮手)
Android XML shape 标签使用详解 一个android开发者肯定懂得使用 xml 定义一个 Drawable,比如定义一个 rect 或者 circle 作为一个 View 的背景. ...
- android中include标签使用详解
android中include标签是为了便于控件的覆用的一个很好解决方案. 但是也有一些需要注意的地方,下面是本人在项目中碰到过的一个问题,做此记录,便于以后查看. include标签用法. ...
- JSP web.xml <jsp-config>标签使用详解
<jsp-config> 包括 <taglib> 和 <jsp-property-group> 两个子元素.其中<taglib> 元素在JSP 1.2 ...
- Android GradientDrawable(shape标签定义) 静态使用和动态使用(圆角,渐变实现)
Android GradientDrawable使用优势: 1. 快速实现一些基本图形(线,矩形,圆,椭圆,圆环) 2. 快速实现一些圆角,渐变,阴影等效果 3. 代替图片设置为View的背景 4. ...
- android shape的使用详解以及常用效果(渐变色、分割线、边框、半透明阴影效果等)
shape使用.渐变色.分割线.边框.半透明.半透明阴影效果. 首先简单了解一下shape中常见的属性.(详细介绍参看 api文档 ) 转载请注明:Rflyee_大飞: http://blog.cs ...
- Android APK 瘦身 - JOOX Music项目实战
导语 JOOX Music是腾讯海外布局的一个音乐产品,2014年发布以来已经成为5个国家和地区排名第一的音乐App.东南亚是JOOX Music的主要发行地区,由于JOOX Music所面对的市场存 ...
- HTML标签----图文详解
国庆节快乐,还在加班的童鞋,良辰必有重谢! 本文主要内容 头标签 排版标签:<p> <br> <hr> <center> ...
- Android高效率编码-第三方SDK详解系列(一)——百度地图,绘制,覆盖物,导航,定位,细腻分解!
Android高效率编码-第三方SDK详解系列(一)--百度地图,绘制,覆盖物,导航,定位,细腻分解! 这是一个系列,但是我也不确定具体会更新多少期,最近很忙,主要还是效率的问题,所以一些有效的东西还 ...
- Android注解支持Support Annotations详解
###注解支持(Support Annotations)Android support library从19.1版本开始引入了一个新的注解库,它包含很多有用的元注解,你能用它们修饰你的代码,帮助你发现 ...
随机推荐
- .NET Core中的认证管理解析
.NET Core中的认证管理解析 0x00 问题来源 在新建.NET Core的Web项目时选择“使用个人用户账户”就可以创建一个带有用户和权限管理的项目,已经准备好了用户注册.登录等很多页面,也可 ...
- Ajax及跨域
概念 Ajax Ajax,Asynchronous JavaScript and XML,字面意思:异步的 JavaScript 和 XML,是指一种创建交互式网页应用的网页开发技术. 用于异步地去获 ...
- 利用SQLServer数据库发送邮件
汇总篇:http://www.cnblogs.com/dunitian/p/4822808.html#tsql 这个应用案例很多,一般都是预警,比如异常连接的时候,或者数据库报错的时候.等等,,, 先 ...
- HTML块级元素
前面的话 在HTML5出现之前,人们一般把元素分为块级.内联和内联块元素.本文将详细介绍HTML块级元素 h 标题(Heading)元素有六个不同的级别,<h1>是最高级的,而&l ...
- C++的内存泄漏检测
C++大量的手动分配.回收内存是存在风险的,也许一个函数中一小块内存泄漏被重复放大之后,最后掏空内存. 这里介绍一种在debug模式下测试内存泄漏的方法. 首先在文件的开头以确定的顺序写下这段代码: ...
- Android Studio —— 重装 HAXM
Android Studio -- 重装 HAXM 版权声明:本文为博主原创文章,未经博主允许不得转载. 微博:厉圣杰 文中如有纰漏,欢迎大家留言指出. Android SDK 自带模拟器一直以慢.卡 ...
- [WARNING] Using platform encoding (GBK actually) to copy filtered resources, i.e. build is platform
eclipse maven clean install 报错 1. 修改properties-->resource-->utf-8仍然报错 2.修改项目pom.xml文件,增加: < ...
- C++标准库实现WAV文件读写
在上一篇文章RIFF和WAVE音频文件格式中对WAV的文件格式做了介绍,本文将使用标准C++库实现对数据为PCM格式的WAV文件的读写操作,只使用标准C++库函数,不依赖于其他的库. WAV文件结构 ...
- 编写高质量代码:改善Java程序的151个建议(第8章:多线程和并发___建议126~128)
建议126:适时选择不同的线程池来实现 Java的线程池实现从根本上来说只有两个:ThreadPoolExecutor类和ScheduledThreadPoolExecutor类,这两个类还是父子关系 ...
- 网站里加入QQ在线客服
1.开启"QQ在线状态"服务 http://jingyan.baidu.com/article/b24f6c823425a586bfe5da1f.html http://www. ...