
从零用VitePress搭建博客教程(5) - 如何自定义页面模板、给页面添加独有的className和使页面标题变成侧边目录?
接上一节:从零用VitePress搭建博客教程(4) – 如何自定义首页布局和主题样式修改?
上一节其实我们也简单说了自定义页面模板,这一节更加详细一点说明,开始之前我们要知道在vitePress中,.md的文件是可以直接编写vue的代码的。
比如我们现在来自定义一个前端网址导航页面
八、自定义一些页面模板
1、编写组件代码
想自定义页面模板样式,该如何做呢?
我们先在theme/components下新建siteList.vue文件,编写模板,代码如下:
<template>

  <!-- 网址分类模块 -->

  <section class="site-section">

     <!-- 标题 -->

    <h2 class="title">{{ props.title }}</h2>

    <!-- 网址列表 -->

    <ul class="list">

      <li class="item" v-for="(v, index) in props.data" :key="v.name">

        <a class="link" :href="v.link" target="_blank">

          <span class="num">{{ index + 1 }}</span>

          <h4 class="name">{{ v.name }}</h4>

          <p class="desc">{{ v.desc }}</p>

        </a>

      </li>

    </ul>

  </section>

</template>

<script setup>

const props = defineProps({

  title: String,

  data: {

    type: Array,

    default: [],

  },

});

</script>

<style lang="scss" scoped>

/*单行文本省略号*/

@mixin single-ellipsis {

  overflow: hidden;

  word-wrap: normal;

  white-space: nowrap;

  text-overflow: ellipsis;

}

.site-section {

  .title {

    color: #222;

  }

  .list {

    display: flex;

    flex-wrap: wrap;

    list-style: none;

    padding-left: 0;

    .item {

      width: 212px;

      margin: 15px 15px 0 0px;

      background: #fff;

      position: relative;

      .link {

        width: 210px;

        display: block;

        border: 1px solid #e3e3e3;

        padding-bottom: 8px;

        border-radius: 6px;

        .num {

          display: block;

          width: 24px;

          height: 18px;

          line-height: 18px;

          position: absolute;

          color: #666;

          font-size: 14px;

          text-align: center;

          right: 5px;

          top: 5px;

        }

        .name {

          width: 80%;

          height: 26px;

          padding-left: 10px;

          font-size: 16px;

          font-weight: 600;

          color: #06a4fa;

          margin-top: 15px;

          @include single-ellipsis;

        }

        .desc {

          font-size: 12px;

          margin: 10px 10px 0;

          color: #b1b1b1;

          height: 36px;

          line-height: 18px;

          @include single-ellipsis;

        }

        &:hover {

          text-decoration: none;

          border: 1px solid var(--vp-c-brand);

          filter: brightness(1.15);

          box-shadow: 0 15px 30px rgba(0, 0, 0, 0.1);

          transform: rotateY(-0.1deg) scale(1.001) translateZ(0);

          transition: all 0.24s ease;

          .name {

            color: var(--vp-c-brand);

          }

          .num {

            background: var(--vp-c-brand);

            color: #fff;

          }

        }

      }

    }

  }

}

</style>
2、注册组件
上面我们写好组件代码后,需注册为全局组件,如下theme/index.js的配置,把SiteList注册为全局组件,然后在页面引用即可。
// https://vitepress.dev/guide/custom-theme

import { h } from "vue";

import siteList from "./components/siteList.vue";

import DefaultTheme from "vitepress/theme";

import "./styles/custom.scss";

import "./styles/site.scss";

import "./styles/rainbow.css";

export default {

  ...DefaultTheme,

  NotFound: () => "404", // <- this is a Vue 3 functional component

  enhanceApp({ app, router, siteData }) {

    // app is the Vue 3 app instance from createApp()

    // router is VitePress' custom router (see `lib/app/router.js`)

    // siteData is a ref of current site-level metadata.

    app.component("SiteList", siteList);

  },

};
3、如何给页面添加自定义类className
官方就有最简单的配置方法,向特定页面添加额外的类名pageClass:比如给page.md页面配置,只需如下即可
---

pageClass: site-layout

---
然后在下面写样式即可
.site-layout {

  ...

}
当然还有一种方法是:我们还可以在theme/index.js,通过js添加(Layout配置),这个一个页面可以添加多个className了。
// https://vitepress.dev/guide/custom-theme

import { useData } from "vitepress";

import siteList from "./components/siteList.vue";

import DefaultTheme from "vitepress/theme";

import "./styles/custom.scss";

import "./styles/site.scss";

import "./styles/rainbow.css";

export default {

  ...DefaultTheme,

  NotFound: () => "404", // <- this is a Vue 3 functional component

  enhanceApp({ app, router, siteData }) {

    // app is the Vue 3 app instance from createApp()

    // router is VitePress' custom router (see `lib/app/router.js`)

    // siteData is a ref of current site-level metadata.

    // 注册全局组件

    app.component("SiteList", siteList);

  },

  // 自定义布局配置

  Layout: () => {

    const props = {};

    // 获取 frontmatter

    const { frontmatter } = useData();

    /* 添加自定义 class */

    if (frontmatter.value?.layoutClass) {

      props.class = frontmatter.value.layoutClass;

    }

  },

};
然后同样的page.md页面,我们可以通过layoutClass设置另一个className了,如下
---

layoutClass: site-page

pageClass: site-layout

---
4、页面使用组件
同样还是上面的page.md,我们使用组件如下
---

pageClass: site-layout

---

<SiteList v-for="model in siteData" :key="model.title" :title="model.title" :data="model.items" />

<script setup>

// 网址导航页面的数据

import siteData from "./data/page.js";

</script>
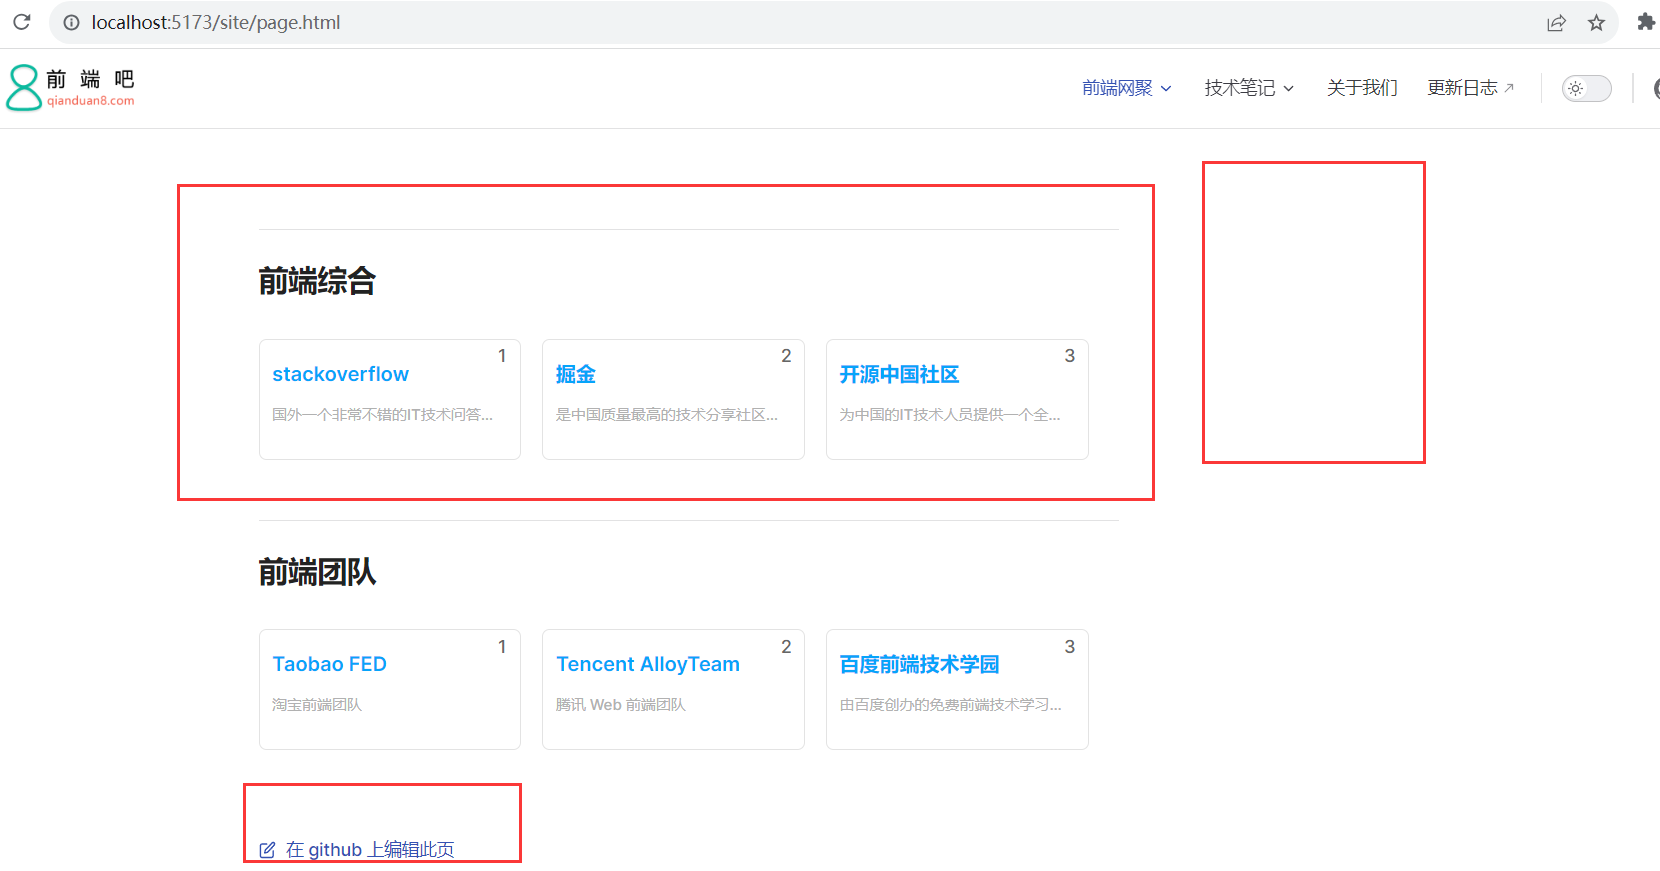
效果
5、如何使页面标题变成侧边目录呢?
从上面图中可以看出,我们发现右边没有侧边导航,那么如何使页面标题变成侧边目录呢?
这个时候需要用到@mdit-vue/shared,siteList.vue组件修改代码如下
<template>

  <!-- 网址分类模块 -->

  <!-- <backTop></backTop> -->

  <section class="site-section">

    <!-- 瞄点标题 -->

    <h2 class="title" :id="createTitle">

      {{ props.title }}

      <a class="anchor" :href="`#${createTitle}`" aria-hidden="true"></a>

    </h2>

    <!-- 网址列表 -->

    <ul class="list">

      <li class="item" v-for="(v, index) in props.data" :key="v.name">

        <a class="link" :href="v.link" target="_blank">

          <span class="num">{{ index + 1 }}</span>

          <h4 class="name">{{ v.name }}</h4>

          <p class="desc">{{ v.desc }}</p>

        </a>

      </li>

    </ul>

  </section>

</template>

<script setup>

import { computed } from "vue";

import { slugify } from "@mdit-vue/shared";

const props = defineProps({

  title: String,

  data: {

    type: Array,

    default: [],

  },

});

// 生成侧边栏markdown的目录

const createTitle = computed(() => {

  return slugify(props.title);

});

</script>
发现目录已经有了,效果如下:
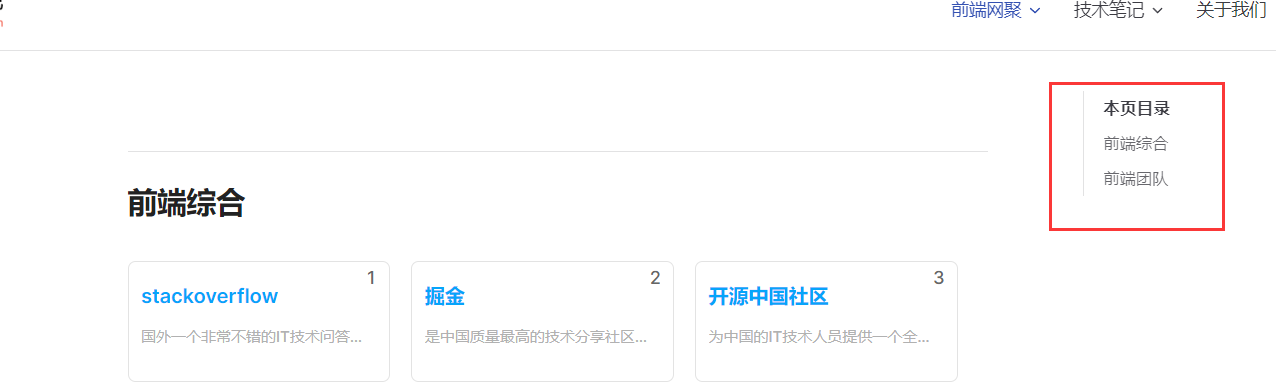
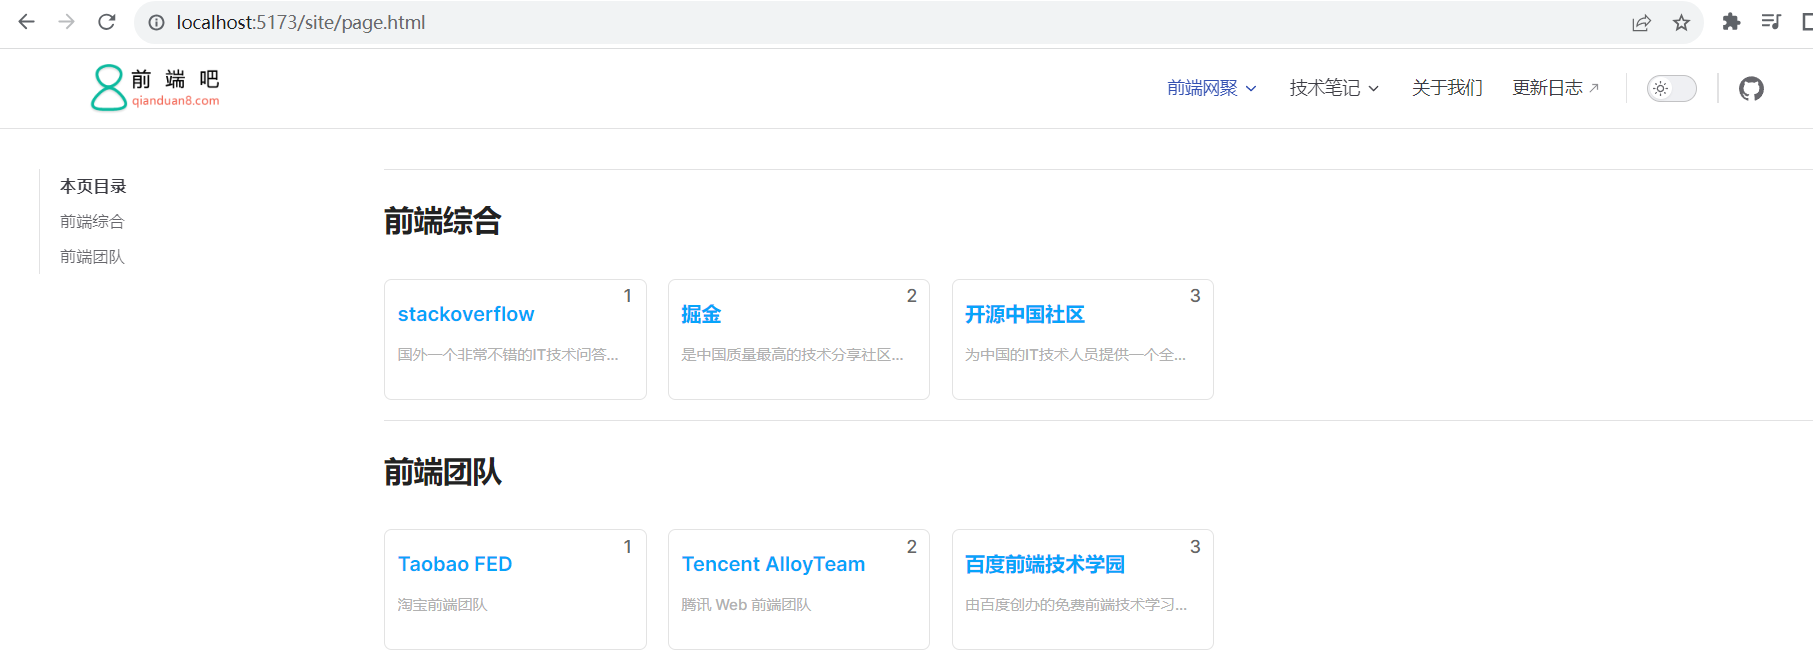
这个时候目录是在页面右边的,那么如何变成在左侧边栏呢?我们通过样式调整即可,site.scss
/**

  网址导航页面样式

**/

.site-layout {

  /*布局调整*/

  .VPDoc {

    .container {

      max-width: 100% !important;

      justify-content: flex-start !important;

      .aside {

        order: 1;

      }

      .content {

        order: 2;

        max-width: 100% !important;

        .content-container {

          max-width: 100% !important;

        }

      }

      .main {

        height: auto;

        overflow: hidden;

        .vp-doc h2 {

          margin: 0;

        }

      }

    }

  }

  /* 隐藏底部的在 github 上编辑此页模块*/

  .VPDocFooter {

    display: none;

  }

}
6、如何自定义页面的底部?
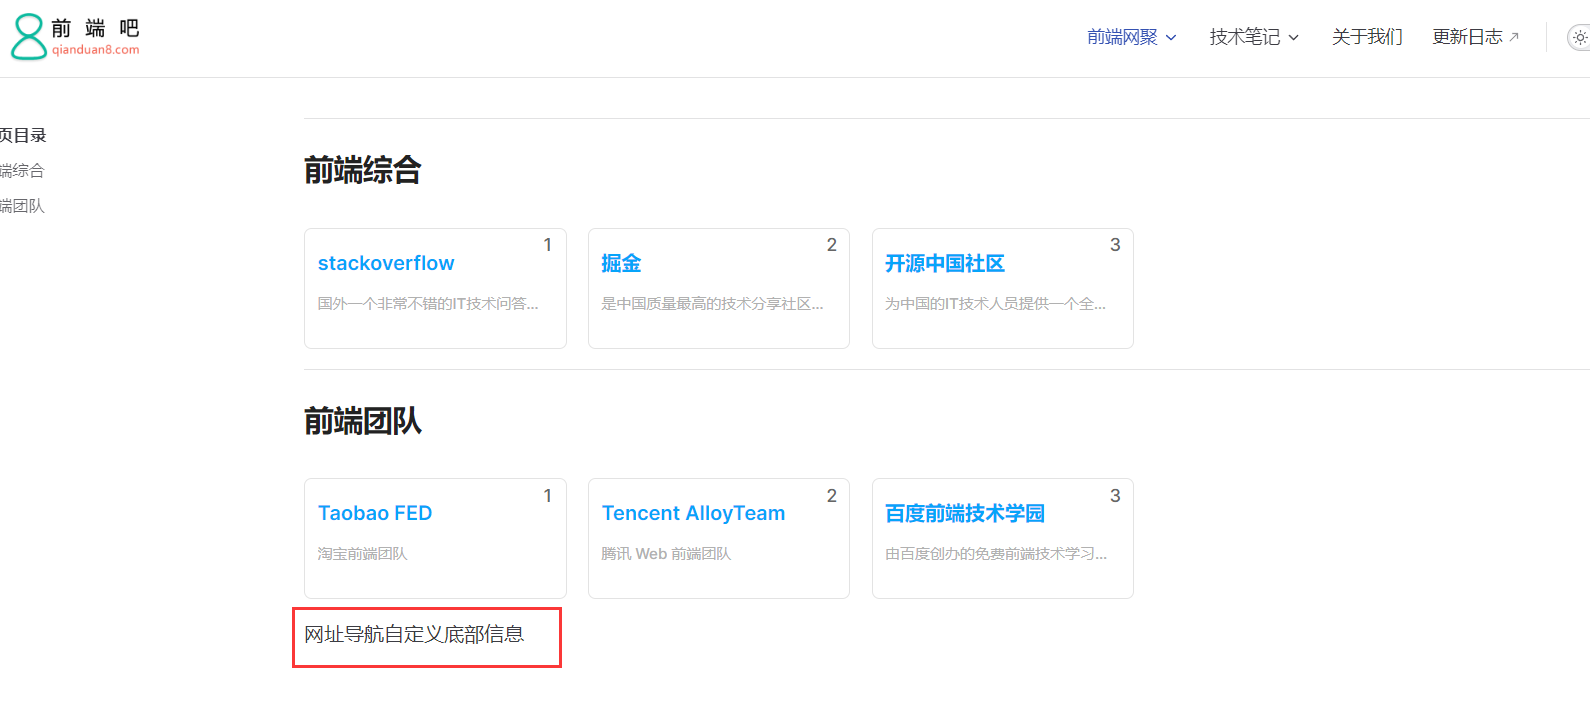
我们新建一个siteFooter.vue组件,然后在theme/index.js通过h函数配置即可,这里使用到doc-after插槽,
默认主题布局中可用插槽的完整列表:https://process1024.github.io/vitepress/guide/theme-introduction
<template>

  <div class="site-footer">

    网址导航自定义底部信息

  </div>

</template>
mport { h } from "vue";

import siteFooter from "./components/siteFooter.vue";

import DefaultTheme from "vitepress/theme";

export default {

  ...DefaultTheme,

  NotFound: () => "404", // <- this is a Vue 3 functional component

  enhanceApp({ app, router, siteData }) {

    // app is the Vue 3 app instance from createApp()

    // router is VitePress' custom router (see `lib/app/router.js`)

    // siteData is a ref of current site-level metadata.

    // 注册全局组件

  },

  // 自定义布局配置

  Layout: () => {

    return h(DefaultTheme.Layout, props, {

      // 自定义文档底部,使用doc-after插槽

      "doc-after": () => h(siteFooter),

    });

  },

};
从零用VitePress搭建博客教程(5) - 如何自定义页面模板、给页面添加独有的className和使页面标题变成侧边目录?的更多相关文章
- 手把手教从零开始在GitHub上使用Hexo搭建博客教程(四)-使用Travis自动部署Hexo(2)
前言 前面一篇文章介绍了Travis自动部署Hexo的常规使用教程,也是个人比较推荐的方法. 前文最后也提到了在Windows系统中可能会有一些小问题,为了在Windows系统中也可以实现使用Trav ...
- 手把手教从零开始在GitHub上使用Hexo搭建博客教程(三)-使用Travis自动部署Hexo(1)
前言 前面两篇文章介绍了在github上使用hexo搭建博客的基本环境和hexo相关参数设置等. 基于目前,博客基本上是可以完美运行了. 但是,有一点是不太好,就是源码同步问题,如果在不同的电脑上写文 ...
- 手把手教从零开始在GitHub上使用Hexo搭建博客教程(二)-Hexo参数设置
前言 前文手把手教从零开始在GitHub上使用Hexo搭建博客教程(一)-附GitHub注册及配置介绍了github注册.git相关设置以及hexo基本操作. 本文主要介绍一下hexo的常用参数设置. ...
- 手把手教从零开始在GitHub上使用Hexo搭建博客教程(一)-附GitHub注册及配置
前言 有朋友问了我关于博客系统搭建相关的问题,由于是做开发相关的工作,我给他推荐的是使用github的gh-pages服务搭建个人博客. 推荐理由: 免费:github提供gh-pages服务是免费的 ...
- Hexo搭建博客教程(1) - 安装环境与本地搭建
前言 搭建个人博客一般有两种选择,一个是使用WordPress,但是需要将博客搭建在服务器上,不过搭建好后写文章方便,适合没有程序基础的人使用.另一个是使用Hexo,相对简洁高效,不需要服务器,既可以 ...
- Hexo+NexT(零):最全Hexo+Next搭建博客教程
快速.简洁且高效的博客框架 有位大神说,喜欢写博客的人的人,折腾博客会经历三个阶段.找到一个免费空间,搭建一个博客,很欣喜,很有成就感,此为一阶段:受限免费空间各种限制,自己买空间和域名,实现对博客的 ...
- Hexo搭建博客教程(2) - 博客的简单个性化配置
本章主要讲博客的个性化,譬如站点的基本配置(语言.头像.站点图标等).安装新的Hexo主题(NexT主题)以及主题的配置. 1. 修改站点配置 打开站点配置文件 ,找到: # Site title: ...
- Hexo搭建博客教程(3) - 远程部署到GitHub Pages
本章讲的是如何将本地的个人项目远程部署到 GitHub Pages,涉及到GitHub的项目仓库.Git的使用,以及Hexo的远程部署等. 1. 安装 hexo-deployer-git 插件 想要将 ...
- 用 Sphinx 搭建博客时,如何自定义插件?
之前有不少同学看过我的个人博客(http://python-online.cn),也根据我写的教程完成了自己个人站点的搭建. 点此:使用 Python 30分钟 教你快速搭建一个博客 为防有的同学不清 ...
- 转载一遍比较好的,django2.1搭建博客教程
非常感谢这位博主,找了几个星期终于找到了 https://www.dusaiphoto.com/article/article-detail/4/
随机推荐
- Task Execution and Scheduling In SpringBoot
开天辟地 Task Execution and Scheduling In the absence of an Executor bean in the context, Spring Boot au ...
- CPU性能指标介绍及分析
CPU是计算机系统中最核心的组件之一,对系统性能起着至关重要的作用.以下是一些常见的CPU性能指标及其分析: 1. %user(用户态)和 %system(内核态) %user:表示CPU花费在用户进 ...
- Java扩展Nginx之一:你好,nginx-clojure
欢迎访问我的GitHub 这里分类和汇总了欣宸的全部原创(含配套源码):https://github.com/zq2599/blog_demos 关于Nginx扩展 以欣宸自己为例,对一个java程序 ...
- 使用LabVIEW实现 DeepLabv3+ 语义分割含源码
前言 图像分割可以分为两类:语义分割(Semantic Segmentation)和实例分割(Instance Segmentation),前面已经给大家介绍过两者的区别,并就如何在labview上实 ...
- 百度Amis+React低代码实践
背景 在项目中有集成低代码平台的想法,经过多方对比最后选择了 amis,主要是需要通过 amis 进行页面配置,导出 json 供移动端和 PC 端进行渲染,所以接下来讲一下近两周研究 amis 的新 ...
- Web网页音视频通话之基于Sipjs
简述 本文是以FreeSwitch作为信令服务器,通过sipjs(基于webRtc) 进行媒体协商,网络协商后,进行P2P媒体传输. 参考知识: sip.js https://sipjs.com/ w ...
- 十分钟学会angular
首先笔者有一定的vue基础,但是遇到了含有angular的应用,因此需要学习angular的应用,在学习过程中将自己的学习步骤给一一记录下来,因此假设读者也是具有html及js的基础,在此基础上可以跟 ...
- Redis和Mysql保持数据一致性
1.简述 在高并发的场景下,大量的请求直接访问Mysql很容易造成性能问题.所以,我们都会用Redis来做数据的缓存,削减对数据库的请求.但是,Mysql和Redis是两种不同的数据库,如何保证不 ...
- 王道oj/problem7(判断数字是否为对称数)
网址:http://oj.lgwenda.com/problem/7 思路:用temp保存原数: 不断对原数进行/10及取余运算,并加到num2中: 最后判断num2是否与temp相等. 代码: #d ...
- 【译】通过 GitHub Copilot Chat 简化代码优化和调试(AI 辅助编程)
今年3月,我们宣布了 Visual Studio 2022 的 GitHub Copilot Chat.通过 Chat, Copilot 已经超越了代码补全,提供了对代码工作原理的深入分析和解释.它支 ...