[libgdx游戏开发教程]使用Libgdx进行游戏开发(8)-粒子系统
没有美工的程序员,能够依赖的还有粒子系统。
这一章我们将使用libGDX的粒子系统线性插值以及其他的方法来增加一些特效。
你也可以使用自己编辑的粒子效果,比如这个粒子文件dust:http://files.cnblogs.com/mignet/particles.zip
这个灰尘的特效用在兔子头在地面跑的时候,啪啪的一溜烟。
线性插值可以让我们的摄像机在移动的时候更平滑。
当然,之前提到的背景上的山要实现视差移动效果也要实现。
白云会用随机的速度从右向左飘。
GUI的部分也要增加些效果比如掉了命,得了分等。
粒子系统通常用来模拟复杂的特效:比如fire, smoke, explosions等等.
ParticleEffect简介:
• start(): This starts the animation of the particle effect
• reset(): This resets and restarts the animation of the particle effect
• update(): This must be called to let the particle effect act in accordance to time
• draw(): This renders the particle effect at its current position
• allowCompletion(): This allows emitters to stop smoothly even if particle effects are set to play continuously
• setDuration(): This sets the overall duration the particle effect will run
• setPosition(): This sets the position to where it will be drawn
• setFlip(): This sets horizontal and vertical flip modes
• save(): This saves a particle effect with all its settings to a file
• load(): This loads a particle effect with all its settings from a saved file
• dispose(): This frees all resources allocated by the particle effect
粒子效果通常需要一个粒子发射器ParticleEmitter:
ParticleEffect effect = new ParticleEffect();

ParticleEmitter emitter = new ParticleEmitter();

effect.getEmitters().add(emitter);

emitter.setAdditive(true);

emitter.getDelay().setActive(true);

emitter.getDelay().setLow(0.5f);

// ... more code for emitter initialization ...
当然,不建议在代码里初始化例子发射器。因为发射器有20多个属性,要是在代码里初始化会很杂乱并且不容易维护。我们使用Libgdx的编辑器来编辑想要的粒子。
https://github.com/libgdx/libgdx/wiki/Particle-editor
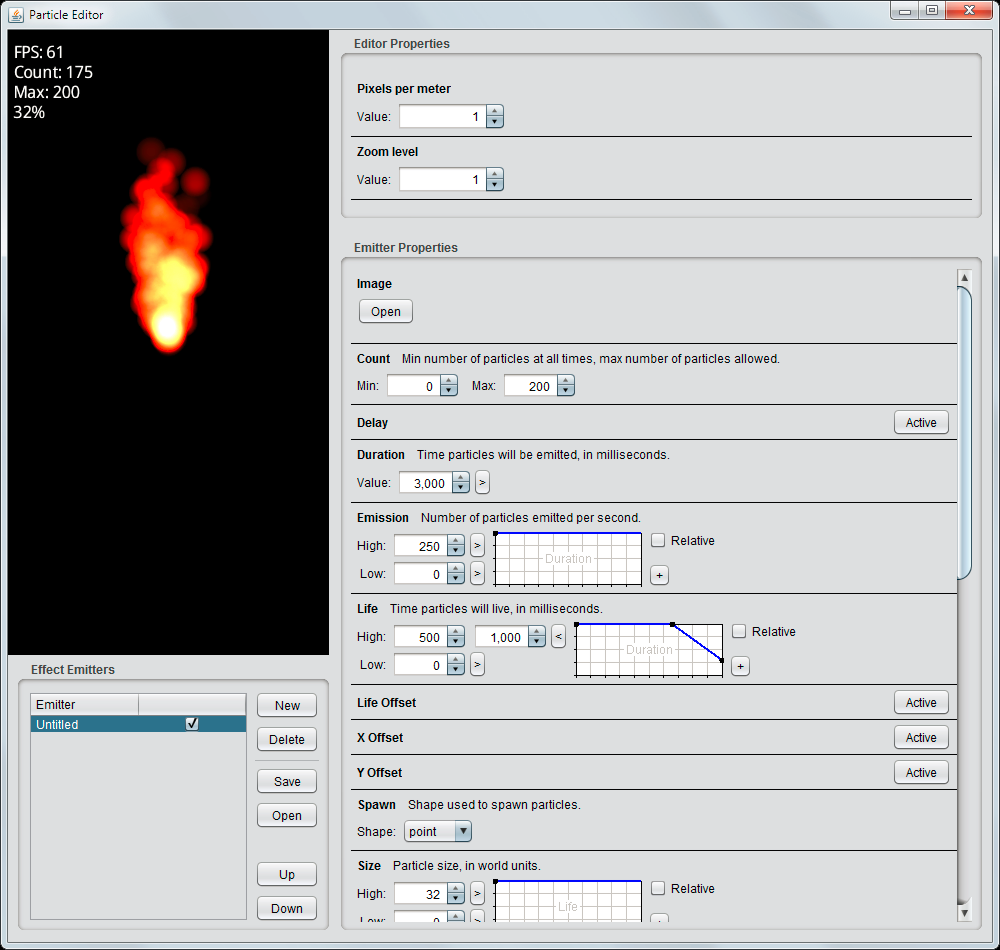
我们来调个灰尘特效吧:

保存文件到CanyonBunny-android/assets/particles/dust.pfx
虽然并没有规定粒子文件要用什么文件后缀,但是我们统一叫pfx。记得把图片https://github.com/libgdx/libgdx/blob/master/extensions/gdx-tools/assets/particle.png
也保存到相同的文件夹。
首先在兔子头BunnyHead里添加代码:
public ParticleEffect dustParticles = new ParticleEffect();

public void init () {

...

// Power-ups

hasFeatherPowerup = false;

timeLeftFeatherPowerup = 0;

// Particles

dustParticles.load(Gdx.files.internal("particles/dust.pfx"),

Gdx.files.internal("particles"));

}
@Override
public void update (float deltaTime) {
    super.update(deltaTime);
    ...
    dustParticles.update(deltaTime);
}
@Override
public void render (SpriteBatch batch) {
    TextureRegion reg = null;
    // Draw Particles
    dustParticles.draw(batch);
    // Apply Skin Color
    ...
}
让灰尘跟着兔子:
    protected void updateMotionY(float deltaTime) {

        switch (jumpState) {

        case GROUNDED:

            jumpState = JUMP_STATE.FALLING;

            if (velocity.x != 0) {

                dustParticles.setPosition(position.x + dimension.x / 2,

                        position.y);

                dustParticles.start();

            }

            break;

。。。

    if (jumpState != JUMP_STATE.GROUNDED){

            dustParticles.allowCompletion();

            super.updateMotionY(deltaTime);

        }

    }

}
ok,跑起..
接下来,让云飘起来:
private Cloud spawnCloud() {

        Cloud cloud = new Cloud();

        cloud.dimension.set(dimension);

        // select random cloud image

        cloud.setRegion(regClouds.random());

        // position

        Vector2 pos = new Vector2();

        pos.x = length + 10; // position after end of level

        pos.y += 1.75; // base position

        // random additional position

        pos.y += MathUtils.random(0.0f, 0.2f)

                * (MathUtils.randomBoolean() ? 1 : -1);

        cloud.position.set(pos);

        // speed

        Vector2 speed = new Vector2();

        speed.x += 0.5f; // base speed

        // random additional speed

        speed.x += MathUtils.random(0.0f, 0.75f);

        cloud.terminalVelocity.set(speed);

        speed.x *= -1; // move left

        cloud.velocity.set(speed);

        return cloud;

    }

    @Override

    public void update(float deltaTime) {

        for (int i = clouds.size - 1; i >= 0; i--) {

            Cloud cloud = clouds.get(i);

            cloud.update(deltaTime);

            if (cloud.position.x < -10) {

                // cloud moved outside of world.

                // destroy and spawn new cloud at end of level.

                clouds.removeIndex(i);

                clouds.add(spawnCloud());

            }

        }

    }
线性插值,让摄像机平滑移动到跟随的目标(Libgdx已经实现了lerp)CameraHelper:
    private final float FOLLOW_SPEED = 4.0f;

    public void update(float deltaTime) {

        if (!hasTarget())

            return;

        position.lerp(target.position, FOLLOW_SPEED * deltaTime);

        // Prevent camera from moving down too far

        position.y = Math.max(-1f, position.y);

    }
让岩石浮在水面上Rocks:
    private final float FLOAT_CYCLE_TIME = 2.0f;

    private final float FLOAT_AMPLITUDE = 0.25f;

    private float floatCycleTimeLeft;

    private boolean floatingDownwards;

    private Vector2 floatTargetPosition;

    private void init() {

        dimension.set(1, 1.5f);

        regEdge = Assets.instance.rock.edge;

        regMiddle = Assets.instance.rock.middle;

        // Start length of this rock

        setLength(1);

        floatingDownwards = false;

        floatCycleTimeLeft = MathUtils.random(0, FLOAT_CYCLE_TIME / 2);

        floatTargetPosition = null;

    }

    @Override

    public void update(float deltaTime) {

        super.update(deltaTime);

        floatCycleTimeLeft -= deltaTime;

        if (floatTargetPosition == null)

            floatTargetPosition = new Vector2(position);

        if (floatCycleTimeLeft <= 0) {

            floatCycleTimeLeft = FLOAT_CYCLE_TIME;

            floatingDownwards = !floatingDownwards;

            floatTargetPosition.y += FLOAT_AMPLITUDE

                    * (floatingDownwards ? -1 : 1);

        }

        position.lerp(floatTargetPosition, deltaTime);

    }
让山随着兔子视差Mountains:
public void updateScrollPosition(Vector2 camPosition) {

        position.set(camPosition.x, position.y);

    }

    private void drawMountain(SpriteBatch batch, float offsetX, float offsetY,

            float tintColor, float parallaxSpeedX) {

        TextureRegion reg = null;

        batch.setColor(tintColor, tintColor, tintColor, 1);

        float xRel = dimension.x * offsetX;

        float yRel = dimension.y * offsetY;

        // mountains span the whole level

        int mountainLength = 0;

        mountainLength += MathUtils.ceil(length / (2 * dimension.x)

                * (1 - parallaxSpeedX));

        mountainLength += MathUtils.ceil(0.5f + offsetX);

        for (int i = 0; i < mountainLength; i++) {

            // mountain left

            reg = regMountainLeft;

            batch.draw(reg.getTexture(), origin.x + xRel + position.x

                    * parallaxSpeedX, origin.y + yRel + position.y, origin.x,

                    origin.y, dimension.x, dimension.y, scale.x, scale.y,

                    rotation, reg.getRegionX(), reg.getRegionY(),

                    reg.getRegionWidth(), reg.getRegionHeight(), false, false);

            xRel += dimension.x;

            // mountain right

            reg = regMountainRight;

            batch.draw(reg.getTexture(), origin.x + xRel + position.x

                    * parallaxSpeedX, origin.y + yRel + position.y, origin.x,

                    origin.y, dimension.x, dimension.y, scale.x, scale.y,

                    rotation, reg.getRegionX(), reg.getRegionY(),

                    reg.getRegionWidth(), reg.getRegionHeight(), false, false);

            xRel += dimension.x;

        }

        // reset color to white

        batch.setColor(1, 1, 1, 1);

    }

    @Override

    public void render(SpriteBatch batch) {

        // 80% distant mountains (dark gray)

        drawMountain(batch, 0.5f, 0.5f, 0.5f, 0.8f);

        // 50% distant mountains (gray)

        drawMountain(batch, 0.25f, 0.25f, 0.7f, 0.5f);

        // 30% distant mountains (light gray)

        drawMountain(batch, 0.0f, 0.0f, 0.9f, 0.3f);

    }
把这个加到worldcontroller里:
public void update(float deltaTime) {

        handleDebugInput(deltaTime);

        if (isGameOver()) {

            timeLeftGameOverDelay -= deltaTime;

            if (timeLeftGameOverDelay < 0)

                backToMenu();

        } else {

            handleInputGame(deltaTime);

        }

        level.update(deltaTime);

        testCollisions();

        cameraHelper.update(deltaTime);

        if (!isGameOver() && isPlayerInWater()) {

            lives--;

            if (isGameOver())

                timeLeftGameOverDelay = Constants.TIME_DELAY_GAME_OVER;

            else

                initLevel();

        }

        level.mountains.updateScrollPosition(cameraHelper.getPosition());

    }
现在,增加GUI的特效。
首先是掉了命:
在worldcontroller里加public float livesVisual;
private void init() {

        Gdx.input.setInputProcessor(this);

        cameraHelper = new CameraHelper();

        lives = Constants.LIVES_START;

        livesVisual = lives;

        timeLeftGameOverDelay = 0;

        initLevel();

    }

    public void update(float deltaTime) {

        handleDebugInput(deltaTime);

        if (isGameOver()) {

            timeLeftGameOverDelay -= deltaTime;

            if (timeLeftGameOverDelay < 0)

                backToMenu();

        } else {

            handleInputGame(deltaTime);

        }

        level.update(deltaTime);

        testCollisions();

        cameraHelper.update(deltaTime);

        if (!isGameOver() && isPlayerInWater()) {

            lives--;

            if (isGameOver())

                timeLeftGameOverDelay = Constants.TIME_DELAY_GAME_OVER;

            else

                initLevel();

        }

        level.mountains.updateScrollPosition(cameraHelper.getPosition());

        if (livesVisual > lives)

            livesVisual = Math.max(lives, livesVisual - 1 * deltaTime);

    }
同时,在WorldRenderer里相应的修改:
private void renderGuiExtraLive(SpriteBatch batch) {

        float x = cameraGUI.viewportWidth - 50 - Constants.LIVES_START * 50;

        float y = -15;

        for (int i = 0; i < Constants.LIVES_START; i++) {

            if (worldController.lives <= i)

                batch.setColor(0.5f, 0.5f, 0.5f, 0.5f);

            batch.draw(Assets.instance.bunny.head, x + i * 50, y, 50, 50, 120,

                    100, 0.35f, -0.35f, 0);

            batch.setColor(1, 1, 1, 1);

        }

        if (worldController.lives >= 0

                && worldController.livesVisual > worldController.lives) {

            int i = worldController.lives;

            float alphaColor = Math.max(0, worldController.livesVisual

                    - worldController.lives - 0.5f);

            float alphaScale = 0.35f * (2 + worldController.lives - worldController.livesVisual) * 2;

            float alphaRotate = -45 * alphaColor;

            batch.setColor(1.0f, 0.7f, 0.7f, alphaColor);

            batch.draw(Assets.instance.bunny.head, x + i * 50, y, 50, 50, 120,

                    100, alphaScale, -alphaScale, alphaRotate);

            batch.setColor(1, 1, 1, 1);

        }

    }
数字增涨效果:
WorldController增加:public float scoreVisual;在initLevel中添加scoreVisual = score;
在update的最后增加
if (scoreVisual < score)

scoreVisual = Math.min(score, scoreVisual+ 250 * deltaTime);
在WorldRenderer里修改:
private void renderGuiScore(SpriteBatch batch) {

        float x = -15;

        float y = -15;

        float offsetX = 50;

        float offsetY = 50;

        if (worldController.scoreVisual < worldController.score) {

            long shakeAlpha = System.currentTimeMillis() % 360;

            float shakeDist = 1.5f;

            offsetX += MathUtils.sinDeg(shakeAlpha * 2.2f) * shakeDist;

            offsetY += MathUtils.sinDeg(shakeAlpha * 2.9f) * shakeDist;

        }

        batch.draw(Assets.instance.goldCoin.goldCoin, x, y, offsetX, offsetY,

                100, 100, 0.35f, -0.35f, 0);

        Assets.instance.fonts.defaultBig.draw(batch, ""

                + (int) worldController.scoreVisual, x + 75, y + 37);

    }
在下一章,我们将使用转场动画来平滑的过渡场景
[libgdx游戏开发教程]使用Libgdx进行游戏开发(8)-粒子系统的更多相关文章
- [libGDX游戏开发教程]使用libGDX进行游戏开发(12)-Action动画
前文章节列表: 使用libGDX进行游戏开发(11)-高级编程技巧 使用libGDX进行游戏开发(10)-音乐音效不求人,程序员也可以DIY 使用libGDX进行游戏开发(9)-场景过渡 ...
- [libGDX游戏开发教程]使用libGDX进行游戏开发(1)-游戏设计
声明:<使用Libgdx进行游戏开发>是一个系列,文章的原文是<Learning Libgdx Game Development>,大家请周知.后续的文章连接在这里 使用Lib ...
- 使用Html5+C#+微信 开发移动端游戏详细教程: (四)游戏中层的概念与设计
众所周知,网站的前端页面结构一般是由div组成,父div包涵子div,子div包涵各种标签和项, 同理,游戏中我们也将若干游戏模块拆分成层,在后续的代码维护和游戏程序逻辑中将更加清晰和便于控制. We ...
- 微信小程序开发教程 #043 - 在小程序开发中使用 npm
本文介绍了如何在微信小程序开发中使用 npm 中包的功能,大大提高微信小程序的开发效率,同时也是微信小程序系列教程的视频版更新. 微信小程序在发布之初没有对 npm 的支持功能,这也是目前很多前端开发 ...
- PythonWeb开发教程(一),开发之前需要准备什么
什么是web开发呢,其实就是开发一个网站了.那开发网站需要用到哪些知识呢 1.python基础,因为用python开发的,所以python指定要会,最起码你也得会条件判断,循环,函数,类这些知识: 2 ...
- [libgdx游戏开发教程]使用Libgdx进行游戏开发(11)-高级编程技巧 Box2d和Shader
高级编程技巧只是相对的,其实主要是讲物理模拟和着色器程序的使用. 本章主要讲解利用Box2D并用它来实现萝卜雨,然后是使用单色着色器shader让画面呈现单色状态:http://files.cnblo ...
- [libgdx游戏开发教程]使用Libgdx进行游戏开发(10)-音乐和音效
本章音效文件都来自于公共许可: http://files.cnblogs.com/mignet/sounds.zip 在游戏中,播放背景音乐和音效是基本的功能. Libgdx提供了跨平台的声音播放功能 ...
- [libgdx游戏开发教程]使用Libgdx进行游戏开发(2)-游戏框架搭建
让我们抛开理论开始code吧. 入口类CanyonBunnyMain的代码: package com.packtpub.libgdx.canyonbunny; import com.badlogic. ...
- [libgdx游戏开发教程]使用Libgdx进行游戏开发(9)-场景过渡
本章主要讲解场景过渡效果的使用.这里将用到Render to Texture(RTT)技术. Libgdx提供了一个类,实现了各种常见的插值算法,不仅适合过渡效果,也适合任意特定行为. 在本游戏里面, ...
- [libgdx游戏开发教程]使用Libgdx进行游戏开发(7)-屏幕布局的最佳实践
管理多个屏幕 我们的菜单屏有2个按钮,一个play一个option.option里就是一些开关的设置,比如音乐音效等.这些设置将会保存到Preferences中. 多屏幕切换是游戏的基本机制,Libg ...
随机推荐
- SQLErrorCodes loaded: [DB2, Derby, H2, HSQL, Informix, MS-SQL, MySQL, Oracle, PostgreSQL, Sybase
sqlserver 插入数据的时候 插入失败,报错内容为 “SQLErrorCodes loaded: [DB2, Derby, H2, HSQL, Informix, MS-SQL, MySQL, ...
- IntellIJ IDEA 配置 Git,顺带解决Git Push rejected问题
1.下载便携版本git https://git-scm.com/download/win 弹出的下载取消,重新选择 2.解压自压缩文件. 3.配置IDEA 4.测试 5.配置终端环境shell为bas ...
- IIS注册asp.net4.0
1. 运行->cmd 2. cd C:\Windows\Microsoft.NET\Framework64\v4.0.30319 3. aspnet_regiis.exe -i
- [bzoj4071] [Apio2015]巴邻旁之桥
Description 一条东西走向的穆西河将巴邻旁市一分为二,分割成了区域 A 和区域 B. 每一块区域沿着河岸都建了恰好 1000000001 栋的建筑,每条岸边的建筑都从 0 编号到 10000 ...
- Linux相关——关于文件调用
本文主要记录几个常见文件调用(表示为了造数据试了n种方法,,,发现了一些神奇的东西,会在下面一一说明. 首先在程序中我们可以打开和关闭程序. 常见的freopen用法简单,但是只能使用一次,如果在程序 ...
- 分享一些JavaScript简易小技巧
特性检测而非浏览器检测 因为某某特性某浏览器不支持,我们经常的做法是在代码中直接先做浏览器判断如: 1 if(Broswer.isFirfox){ 2 //do something 3 } 其 ...
- java常用的时间格式
年月日时分秒毫秒:yyyyMMddHHmmssSSS 毫秒用SSS表示.
- 有关spring的各种下载资料的网站
spring的文件和jar包下载的网站: https://repo.spring.io/release/org/springframework/spring/ spring 各个版本源码下载的资料: ...
- ansible 批量修改root密码
[root@sz_fy_virt_encrypt_33_239 fetch]# cat /opt/passwd.yml - hosts: web vars: path: /home/opsadmin ...
- java过滤器和监听器详解
过滤器 1.Filter工作原理(执行流程) 当客户端发出Web资源的请求时,Web服务器根据应用程序配置文件设置的过滤规则进行检查,若客户请求满足过滤规则,则对客户请求/响应进行拦截,对请求头和请求 ...