Spring Cloud Config 分布式配置管理 5.3
Spring Cloud Config简介
在传统的单体式应用系统中,我们通常会将配置文件和代码放在一起,但随着系统越来越大,需要实现的功能越来越多时,我们又不得不将系统升级为分布式系统,同时也会将系统的功能进行更加细化的拆分。拆分后,所有的服务应用都会有自己的配置文件,当需要修改某个服务的配置时,我们可能需要修改很多处,并且为了某一项配置的修改,可能需要重启这个服务相关的所有服务,这显然是非常麻烦的。
Spring Cloud Config是Spring Cloud团队创建的一个全新的项目,该项目主要用来为分布式系统中的外部配置提供服务器(Config Server)和客户端(Config Client)支持。
·服务器端(Config Server):也被称之为分布式配置中心,它是一个独立的微服务应用,主要用于集中管理应用程序各个环境下的配置,默认使用Git存储配置文件内容,也可以使用SVN存储,或者是本地文件存储。
·客户端(Config Client):是Config Server的客户端,即微服务架构中的各个微服务应用。它们通过指定的配置中心(Config Server)来管理应用资源以及与业务相关的配置内容,并在启动时从配置中心获取和加载配置信息。
Spring Cloud Config的工作流程如图5-17所示。
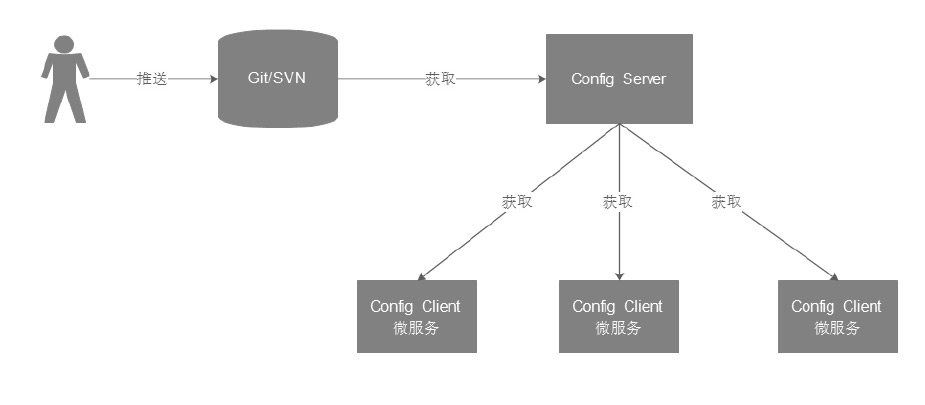

在图5-17中,用户会先将配置文件推送到Git或SVN中,然后在微服务应用(Config Client)启动时,会从配置中心(Config Server)中获取配置信息,而配置中心会根据配置从Git或SVN中获取相应的配置信息。
使用本地存储的方式实现配置管理
1. 搭建Config Server
(1)创建配置中心工程microservice-config-server,并在其pom.xml中引入Config Server的依赖,如文件5-12所示。
文件5-12 pom.xml
<?xml version="1.0" encoding="UTF-8"?>

<project xmlns="http://maven.apache.org/POM/4.0.0" xmlns:xsi="http://www.w3.org/2001/XMLSchema-instance"

         xsi:schemaLocation="http://maven.apache.org/POM/4.0.0 http://maven.apache.org/xsd/maven-4.0.0.xsd">

    <modelVersion>4.0.0</modelVersion>

    <parent>

        <groupId>com.xc</groupId>

        <artifactId>xcservice-springcloud</artifactId>

        <version>0.0.1-SNAPSHOT</version>

    </parent>

    <groupId>com.xc</groupId>

    <artifactId>xcservice-config-server</artifactId>

    <version>0.0.1-SNAPSHOT</version>

    <name>xcservice-config-server</name>

    <description>配置管理</description>

    <properties>

        <java.version>1.8</java.version>

    </properties>

    <dependencies>

        <dependency><!--Config Server的依赖-->

            <groupId>org.springframework.cloud</groupId>

            <artifactId>spring-cloud-config-server</artifactId>

        </dependency>

        <dependency>

            <groupId>org.springframework.boot</groupId>

            <artifactId>spring-boot-starter-test</artifactId>

            <scope>test</scope>

        </dependency>

    </dependencies>

    <build>

        <plugins>

            <plugin>

                <groupId>org.springframework.boot</groupId>

                <artifactId>spring-boot-maven-plugin</artifactId>

            </plugin>

        </plugins>

    </build>

</project>
(2)编写配置文件application.yml,添加服务端口号和存储属性等信息,如文件5-13所示。
文件5-13 application.yml
server:

  port: 8888

spring:

  application:

    name: xcservice-config-server # 指定应用名称

  profiles:

    active: native # 使用本地文件系统的存储方式来保存配置信息
(3)在src/main/resources目录下创建3个分别用于表示开发、预发布和测试的资源配置文件,并在文件中编写如下内容。
·application-dev.yml中编写内容:clientParam:native-dev-1.0
·application-prod.yml中编写内容:clientParam:native-prod-1.0
·application-test.yml中编写内容:clientParam:native-test-1.0
上述资源文件是按照“应用名+环境名+格式”的规范来命名的,其常见文件的命名方式如下:
/{application}/{profile}[/{label}]

/{application}-{profile}.yml

/{label}/{application}-{profile}.yml

/{application}-{profile}.properties

/{label}/{application}-{profile}.properties
其中application表示的是应用名称,profile表示变化的文件,而label是可选的,表示Git的分支,默认是master。
(4)创建启动类,并在类上增加@EnableConfigServer注解以开启服务端功能,如文件5-14所示。
文件5-14 Application.java
package com.xc.xcserviceconfigserver;

import org.springframework.boot.SpringApplication;

import org.springframework.boot.autoconfigure.SpringBootApplication;

import org.springframework.cloud.config.server.EnableConfigServer;

/**

 * http://localhost:8888/microservice-config-server/dev

 * http://localhost:8888/application-dev.yml

 */

@EnableConfigServer

@SpringBootApplication

public class XcserviceConfigServerApplication {

    public static void main(String[] args) {

        SpringApplication.run(XcserviceConfigServerApplication.class, args);

    }

}
(5)启动工程,测试应用。应用启动成功后,按照如下格式的URL发起请求:
http://localhost:8888/{applicationname}/{env}/{label}本应用中的访问地址为http://localhost:8888/microservice-config-server/dev,浏览器中的JSON信息显示出了应用名microservice-config-server、环境名dev,以及资源文件路径和文件内容等信息。
除此之外,我们也可以直接访问资源文件,来查看资源文件内的配置信息。通过浏览器访问地址http://localhost:8888/ap-plication-dev.yml
2. 搭建Config Client
(1)创建客户端工程microservice-config-client,并在其pom.xml中添加Config和Web的依赖,如文件5-15所示。
文件5-15 pom.xml
<?xml version="1.0" encoding="UTF-8"?>

<project xmlns="http://maven.apache.org/POM/4.0.0" xmlns:xsi="http://www.w3.org/2001/XMLSchema-instance"

         xsi:schemaLocation="http://maven.apache.org/POM/4.0.0 http://maven.apache.org/xsd/maven-4.0.0.xsd">

    <modelVersion>4.0.0</modelVersion>

    <parent>

        <groupId>com.xc</groupId>

        <artifactId>xcservice-springcloud</artifactId>

        <version>0.0.1-SNAPSHOT</version>

    </parent>

    <groupId>com.xc</groupId>

    <artifactId>xcservice-config-client</artifactId>

    <version>0.0.1-SNAPSHOT</version>

    <name>xcservice-config-client</name>

    <description>Config Client</description>

    <properties>

        <java.version>1.8</java.version>

    </properties>

    <dependencies>

        <dependency>

            <groupId>org.springframework.cloud</groupId>

            <artifactId>spring-cloud-starter-config</artifactId>

        </dependency>

        <dependency>

            <groupId>org.springframework.boot</groupId>

            <artifactId>spring-boot-starter-web</artifactId>

        </dependency>

        <dependency>

            <groupId>org.springframework.boot</groupId>

            <artifactId>spring-boot-starter-test</artifactId>

            <scope>test</scope>

        </dependency>

    </dependencies>

    <build>

        <plugins>

            <plugin>

                <groupId>org.springframework.boot</groupId>

                <artifactId>spring-boot-maven-plugin</artifactId>

            </plugin>

        </plugins>

    </build>

</project>
(2)编写配置文件bootstrap.yml,在其中配置应用名称、服务中心地址、需要访问的文件和端口号等信息,如文件5-16所示。
文件5-16 bootstrap.yml
server:

  port: 8801

spring:

  application:

    name: xcservice-config-client

  cloud:

    config:

      profile: test # 配置服务中的{profile}

      uri: http://localhost:8888/  # 配置中心的地址
需要注意的是,上述配置文件的名称必须为bootstrap.yml或bootstrap.properties,只有这样配置中心才能够正常加载(虽然application.yml也可以被Spring Boot加载,但是boot-strap.yml会优先加载)。
(3)创建启动类,并在类上添加@RestController注解,编辑后如文件5-17所示。
文件5-17 Application.java
package com.xc.xcserviceconfigclient;

import org.springframework.beans.factory.annotation.Value;

import org.springframework.boot.SpringApplication;

import org.springframework.boot.autoconfigure.SpringBootApplication;

import org.springframework.stereotype.Repository;

import org.springframework.web.bind.annotation.RequestMapping;

import org.springframework.web.bind.annotation.RestController;

/**

 * http://localhost:8801/client-Param

 */

@SpringBootApplication

@RestController

public class XcserviceConfigClientApplication {

    @Value("${clientParam}")

    private String clientParam;

    @RequestMapping("/clientParam")

    public String getParam() {

        return this.clientParam;

    }

    /**

     * http://localhost:8801/hello

     *

     * @return

     */

    @RequestMapping("/hello")

    public String hello() {

        return "hello world";

    }

    public static void main(String[] args) {

        SpringApplication.run(XcserviceConfigClientApplication.class, args);

    }

}
(4)启动工程,测试应用。应用启动成功后,可以通过地址http://localhost:8801/hello测试应用是否能够正常访问
此时通过浏览器访问地址http://localhost:8801/clientParam,即可获取配置文件中的信息
当我们需要访问其他配置文件的信息时,只需修改bootstrap.yml中的profile的属性值即可。
使用Git存储的方式实现配置管理
掌握了本地存储方式的使用后,Git存储方式的使用就很容易掌握了。下面我们同样以上一小节的案例为例,来讲解如何通过Spring Cloud Config的客户端从服务端获取Git仓库中不同版本配置信息。
(1)配置Git。在Git上创建xcservice-study-config目录,并在目录中增加开发、预发布和测试的配置文件,分别编辑三个文件中的内容如下:
·application-dev.yml中编写内容:clientParam:git-dev-1.0
·application-prod.yml中编写内容:clientParam:git-prod-1.0
·application-test.yml中编写内容:clientParam:git-test-1.0
(2)修改服务端配置文件。将xcservice-config-server工程的配置文件中本地文件存储方式的配置删除(或注释),并添加git的配置信息,如文件5-18所示。
文件5-18 application.yml
server:

  port: 8888

spring:

  application:

    name: xcservice-config-server # 指定应用名称

  #profiles:

  #  active: native # 使用本地文件系统的存储方式来保存配置信息

  cloud:

    config:

      server:

        git: # 使用git的方式

          uri: https://gitee.com/secret8/microservice-study-config.git
在上述配置中,spring.cloud.config.server.git.uri属性用来指定Git仓库的网络地址。由于这里配置的是公共仓库,所以不需要填写用户名和密码信息。如果是私有仓库,则需要填写账号信息,此时可以在git属性下增加username和password属性。
(3)修改客户端配置文件。在xcservice-config-client工程的配置文件中添加属性label,并将其属性值设置为mas-ter(label属性表示Git中的分支,其属性默认值为master),编辑后如文件5-19所示。
文件5-19 bootstrap.yml
server:

  port: 8801

spring:

  application:

    name: xcservice-config-client

  cloud:

    config:

      profile: test # 配置服务中的{profile}

      label: master # 对应git中的分支,默认为master

      uri: http://localhost:8888/  # 配置中心的地址的地址
(4)启动工程,测试应用。分别启动Spring Cloud Config的服务端和客户端工程,通过访问地址http://localhost:8801/clientParam,发现已经可以获取Git中的配置信息了
手动更新运行中的配置文件
以上一小节的案例为例,要实现配置文件的实时更新,需要执行以下几步。
(1)在客户端的pom.xml中添加依赖spring-boot-starter-actuator。该依赖可以监控程序在运行时的状态,其中包括/refresh的功能。pom.xml中添加的依赖信息如下:
<dependency><!--监控程序在运行时的状态-->

    <groupId>org.springframework.boot</groupId>

    <artifactId>spring-boot-starter-actuator</artifactId>

</dependency>
(2)在启动类上添加@RefreshScope注解,开启refresh机制。添加此注解后,在执行/refresh时会更新该注解标注类下的所有变量值,包括Config Client从Git仓库中所获取的配置。
(3)在配置文件中将安全认证信息的enabled属性设置为false,其代码如下:
management:

  security:

    enabled: false # 是否开启actuator安全认证
执行完上述3步后,下面来检测应用是否可以实现更新运行中的配置文件。启动应用并访问http://localhost:8801/clientParam
此时修改Git中的配置文件application-prod.yml,将其内容clientParam:git-prod-1.0,修改为clientParam:git-prod-2.0后,再次通过浏览器访问上述地址,会发现浏览器的内容并没有变化,但通过地址 http://localhost:8888/application/prod访问时,会发现服务器端已经获取到了Git中的更新配置信息
使用POST请求访问地址http://localhost:8801/refresh后,此时再次通过浏览器访问http://localhost:8801/clientParam时,浏览器中已成功显示了更新后的配置文件内容,这也就说明我们已成功实现了手动更新运行中的配置文件。
Spring Cloud Config 分布式配置管理 5.3的更多相关文章
- 使用spring cloud实现分布式配置管理
<7天学会spring cloud系列>之创建配置管理服务器及实现分布式配置管理应用. 本文涉及到的项目: 开源项目:http://git.oschina.net/zhou666/spri ...
- Spring Cloud Config 分布式配置中心使用教程
一.简介 在分布式系统中,由于服务数量巨多,为了方便服务配置文件统一管理,实时更新,所以需要分布式配置中心组件.在Spring Cloud中,有分布式配置中心组件spring cloud config ...
- Spring Cloud Config 分布式配置中心【Finchley 版】
一. 介绍 1,为什么需要配置中心? 当服务部署的越来越多,规模越来越大,对应的机器数量也越来越庞大,靠人工来管理和维护服务的配置信息,变得困难,容易出错. 因此,需要一个能够动态注册和获取服务信息的 ...
- spring cloud config —— git配置管理
目录 talk is cheep, show your the code Server端 pom.xml server的application.yml 配置文件 测试Server client端 po ...
- Spring Cloud Config采用数据库存储配置内容
在之前的<Spring Cloud构建微服务架构:分布式配置中心>一文中,我们介绍的Spring Cloud Server配置中心采用了Git的方式进行配置信息存储.这一设计巧妙的利用Gi ...
- spring cloud学习(六)Spring Cloud Config
Spring Cloud Config 参考个人项目 参考个人项目 : (希望大家能给个star~) https://github.com/FunriLy/springcloud-study/tree ...
- Spring Cloud config之一:分布式配置中心入门介绍
Spring Cloud Config为服务端和客户端提供了分布式系统的外部化配置支持.配置服务器为各应用的所有环境提供了一个中心化的外部配置.它实现了对服务端和客户端对Spring Environm ...
- 【SpringCloud】第七篇: 高可用的分布式配置中心(Spring Cloud Config)
前言: 必需学会SpringBoot基础知识 简介: spring cloud 为开发人员提供了快速构建分布式系统的一些工具,包括配置管理.服务发现.断路器.路由.微代理.事件总线.全局锁.决策竞选. ...
- 【SpringCloud】第六篇: 分布式配置中心(Spring Cloud Config)
前言: 必需学会SpringBoot基础知识 简介: spring cloud 为开发人员提供了快速构建分布式系统的一些工具,包括配置管理.服务发现.断路器.路由.微代理.事件总线.全局锁.决策竞选. ...
随机推荐
- TCP/IP 协议栈及 OSI 参考模型详解
OSI参考模型 OSI RM:开放系统互连参考模型(open systeminterconnection reference model) OSI参考模型具有以下优点: 简化了相关的网络操作: 提供设 ...
- Java - 框架之 Hibernate
一:hibernate.cfg.xml 配置 <!-- 1.配置数据库连接的4个参数 --> <property name="hibernate.connection.dr ...
- Backpack III
Description Given n kinds of items, and each kind of item has an infinite number available. The i-th ...
- Linux sudo权限绕过(CVE-2019-14287)
2019年10月14日,Sudo官方发布了Sudo 1.8.28版本,其中包含sudo root权限绕过漏洞的补丁修复. 此漏洞编号是CVE-2019-14287,当sudo配置为允许用户以任意方式运 ...
- C# 函数参数中的this
先看下面的代码: public static class StringExtension { public static void Foo(this string s) { Console.Write ...
- YAML_04 用user模块添加用户,并修改密码
ansible]# vim user.yml --- - hosts: cache remote_user: root vars: username: lisi tasks: ...
- 洛谷 P2872 [USACO07DEC]道路建设Building Roads 题解
P2872 [USACO07DEC]道路建设Building Roads 题目描述 Farmer John had just acquired several new farms! He wants ...
- [golang]golang如何覆盖输出console,实现进度条;golang一个骚气的进度提示库
[golang]golang如何覆盖输出console,实现进度条 package main import( "fmt" "os" "time&quo ...
- ORA-01578: ORACLE 数据块损坏 (文件号 13, 块号 2415081) ORA-01110: 数据文件XXXXXX
1.使用DBV检查数据文件,在cmd执行:dbv file='E:\APP\ADMINISTRATOR\ORADATA\ORCL\USERS01.DBF' blocksize=8192:然后等待检测结 ...
- (3)Go运算符
运算符 Go 语言内置的运算符有: 算术运算符 关系运算符 逻辑运算符 位运算符 赋值运算符 算数运算符 运算符 描述 + 相加 - 相减 * 相乘 / 相除 % 求余 注意: ++(自增)和--(自 ...