SpringBoot + SwaggerUI
后台写接口,由于要提供接口文档给前台使用,所有研究了一下swagger,看到网上有篇文章写得不错,就直接拿过来了。
swagger用于定义API文档。
好处:
- 前后端分离开发
- API文档非常明确
- 测试的时候不需要再使用URL输入浏览器的方式来访问Controller
- 传统的输入URL的测试方式对于post请求的传参比较麻烦(当然,可以使用postman这样的浏览器插件)
- spring-boot与swagger的集比较成简单
1、项目结构
和上一节一样,没有改变。
2、pom.xml
引入了两个jar。
        <dependency>

           <groupId>io.springfox</groupId>

           <artifactId>springfox-swagger2</artifactId>

           <version>2.2.2</version>

        </dependency>

        <dependency>

           <groupId>io.springfox</groupId>

           <artifactId>springfox-swagger-ui</artifactId>

           <version>2.2.2</version>

        </dependency>
3、Application.java
package com.xxx.firstboot;

import org.springframework.boot.SpringApplication;

import org.springframework.boot.autoconfigure.SpringBootApplication;

import springfox.documentation.swagger2.annotations.EnableSwagger2;

@SpringBootApplication        //same as @Configuration+@EnableAutoConfiguration+@ComponentScan

@EnableSwagger2             //启动swagger注解

public class Application {

    public static void main(String[] args) {

        SpringApplication.run(Application.class, args);

    }

}
说明:
引入了一个注解@EnableSwagger2来启动swagger注解。(启动该注解使得用在controller中的swagger注解生效,覆盖的范围由@ComponentScan的配置来指定,这里默认指定为根路径"com.xxx.firstboot"下的所有controller)
4、UserController.java
package com.xxx.firstboot.web;

import org.springframework.beans.factory.annotation.Autowired;

import org.springframework.web.bind.annotation.RequestHeader;

import org.springframework.web.bind.annotation.RequestMapping;

import org.springframework.web.bind.annotation.RequestMethod;

import org.springframework.web.bind.annotation.RequestParam;

import org.springframework.web.bind.annotation.RestController;

import com.xxx.firstboot.domain.User;

import com.xxx.firstboot.service.UserService;

import io.swagger.annotations.Api;

import io.swagger.annotations.ApiImplicitParam;

import io.swagger.annotations.ApiImplicitParams;

import io.swagger.annotations.ApiOperation;

import io.swagger.annotations.ApiResponse;

import io.swagger.annotations.ApiResponses;

@RestController

@RequestMapping("/user")

@Api("userController相关api")

public class UserController {

    @Autowired

    private UserService userService;

//    @Autowired

//    private MyRedisTemplate myRedisTemplate;

    @ApiOperation("获取用户信息")

    @ApiImplicitParams({

        @ApiImplicitParam(paramType="header",name="username",dataType="String",required=true,value="用户的姓名",defaultValue="zhaojigang"),

        @ApiImplicitParam(paramType="query",name="password",dataType="String",required=true,value="用户的密码",defaultValue="wangna")

    })

    @ApiResponses({

        @ApiResponse(code=400,message="请求参数没填好"),

        @ApiResponse(code=404,message="请求路径没有或页面跳转路径不对")

    })

    @RequestMapping(value="/getUser",method=RequestMethod.GET)

    public User getUser(@RequestHeader("username") String username, @RequestParam("password") String password) {

        return userService.getUser(username,password);

    }

//    @RequestMapping("/testJedisCluster")

//    public User testJedisCluster(@RequestParam("username") String username){

//        String value =  myRedisTemplate.get(MyConstants.USER_FORWARD_CACHE_PREFIX, username);

//        if(StringUtils.isBlank(value)){

//            myRedisTemplate.set(MyConstants.USER_FORWARD_CACHE_PREFIX, username, JSON.toJSONString(getUser()));

//            return null;

//        }

//        return JSON.parseObject(value, User.class);

//    }

}
说明:
- @Api:用在类上,说明该类的作用
- @ApiOperation:用在方法上,说明方法的作用
- @ApiImplicitParams:用在方法上包含一组参数说明
- @ApiImplicitParam:用在@ApiImplicitParams注解中,指定一个请求参数的各个方面
- paramType:参数放在哪个地方
- header-->请求参数的获取:@RequestHeader
- query-->请求参数的获取:@RequestParam
- path(用于restful接口)-->请求参数的获取:@PathVariable
- body(不常用)
- form(不常用)
- name:参数名
- dataType:参数类型
- required:参数是否必须传
- value:参数的意思
- defaultValue:参数的默认值
- paramType:参数放在哪个地方
- @ApiResponses:用于表示一组响应
- @ApiResponse:用在@ApiResponses中,一般用于表达一个错误的响应信息
- code:数字,例如400
- message:信息,例如"请求参数没填好"
- response:抛出异常的类
- @ApiModel:描述一个Model的信息(这种一般用在post创建的时候,使用@RequestBody这样的场景,请求参数无法使用@ApiImplicitParam注解进行描述的时候)
- @ApiModelProperty:描述一个model的属性
以上这些就是最常用的几个注解了。
需要注意的是:
- ApiImplicitParam这个注解不只是注解,还会影响运行期的程序,例子如下:
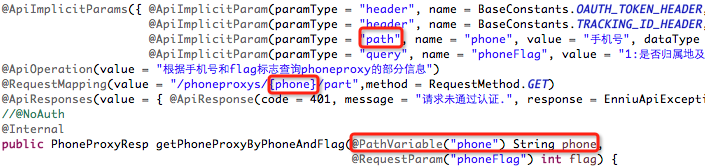
如果ApiImplicitParam中的phone的paramType是query的话,是无法注入到rest路径中的,而且如果是path的话,是不需要配置ApiImplicitParam的,即使配置了,其中的value="手机号"也不会在swagger-ui展示出来。
具体其他的注解,查看:
https://github.com/swagger-api/swagger-core/wiki/Annotations#apimodel
测试:
启动服务,浏览器输入"http://localhost:8080/swagger-ui.html"
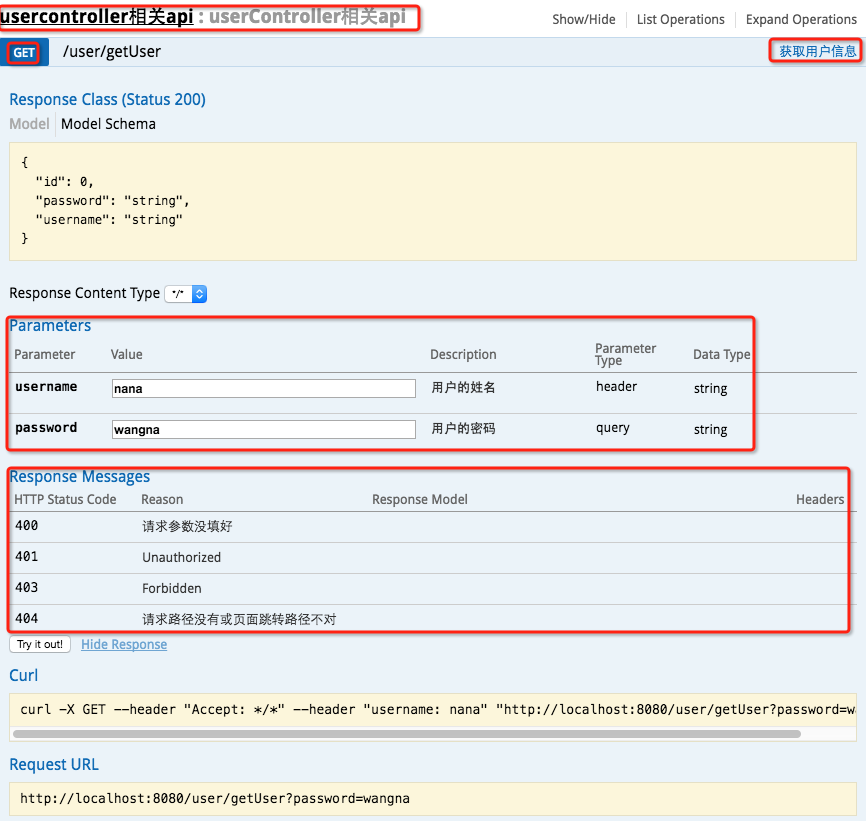
最上边一个红框:@Api
GET红框:method=RequestMethod.GET
右边红框:@ApiOperation
parameter红框:@ApiImplicitParams系列注解
response messages红框:@ApiResponses系列注解
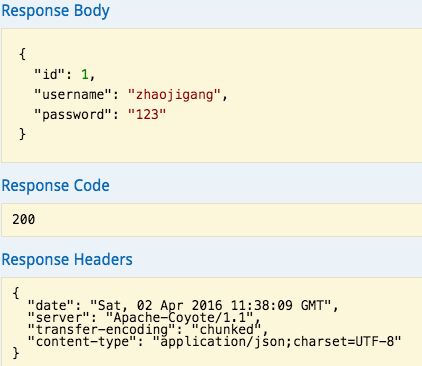
输入参数后,点击"try it out!",查看响应内容:
本文转载自:http://www.cnblogs.com/java-zhao/p/5348113.html
SpringBoot + SwaggerUI的更多相关文章
- SpringBoot swagger-ui.html 配置类继承 WebMvcConfigurationSupport 类后 请求404
1 .SpringBoot启动类加上 注解 @EnableWebMvc @SpringBootApplication@EnableWebMvc public class Application { ...
- springboot swagger-ui结合
随着移动互联的发展,前后端的分离已经是趋势.前后端已不是传统部门的划分,而是它们各有一套的生态系统,包括不同的开发语言.不同的开发流程.构建方式.测试流程等.做前端的不需要会maven作为构建工具,后 ...
- Spring Boot项目简单上手+swagger配置+项目发布(可能是史上最详细的)
Spring Boot项目简单上手+swagger配置 1.项目实践 项目结构图 项目整体分为四部分:1.source code 2.sql-mapper 3.application.properti ...
- springboot中swaggerUI的使用
demo地址:demo-swagger-springboot springboot中swaggerUI的使用 1.pom文件中添加swagger依赖 2.从github项目中下载swaggerUI 然 ...
- springboot项目中配置swagger-ui
Git官方地址:https://github.com/SpringForAll/spring-boot-starter-swagger Demo:https://github.com/dyc87112 ...
- Springboot 4.Springboot 集成SwaggerUi
SwaggerUi就是自动生成接口文档的这么一个类似于插件的工具,可以直接访问接口. 首先打开pom文件,将插件引进来,然后增加一个属性<properties>,用来设置版本号的,然后直接 ...
- springboot 整合swagger-ui
一.添加maven依赖 <dependency> <groupId>io.springfox</groupId> <artifactId>springf ...
- SpringBoot整合Swagger-ui
SpringBoot整合Swagger-ui 引入依赖 <dependency> <groupId>org.springframework.boot</groupId&g ...
- SpringBoot(十八):SpringBoot2.1.1引入SwaggerUI工具
Swagger是一个有用web界面的提供实体模型结构展示,接口展示,调测等的一个工具,使用它可以提高开发者开发效率,特别是前后端配合开发时,大大省去了沟通接口耗费的时间:服务端开发完接口发布后,UI端 ...
随机推荐
- ios framework 开发实战 之 参考
WWDC2014之iOS使用动态库 iOS开发——创建你自己的Framework 使用CocoaPods开发并打包静态库 iOS Framework 和CocoaPods TDD的iOS开发初步以及K ...
- VS2010中出现无法嵌入互操作类型(转)
针对word或excel操作时,出现VS2010中,无法嵌入互操作类型“……”,请改用适用的接口的解决方法问了度娘,解决方法如出一辙:选中项目中引入的dll,鼠标右键,选择属性,把“嵌入互操作类型”设 ...
- iOS 专题 之 界面开发 之 控件
iOS 之 UIViewController iOS 之 Navagation Button iOS 之 UIButton iOS 之 UITextField iOS 之 UIStackView iO ...
- 2.2. 添加托管对象模型(Core Data 应用程序实践指南)
右键分组Grocery Dude > New Group > Data Model New File > Core Data > 创建新的模板文件
- ui-router---$stateProvider
转自:http://blog.csdn.net/violet_day/article/details/17515157 $stateProvider $stateProvider.state(stat ...
- iOS 登陆之使用ShareSDK
0. 概述 登陆要使用ShareSDK,可以实现多社交平台账号登陆,短信验证,并且都是永久免费的. 网址:www.mob.com 1.iOS 登陆之界面设置
- C# winform ListView+CheckBox的做法
1.设置ListView的属性:CheckBoxs=true 2.ListView字段第一列文本框为空,把工具箱里面的CheckBox控件拖到ListView的第一个字段做全选/全不选的控件. 3.C ...
- Spring aop:decare-parent 为类增加新的方法
Spring aop:decare-parent 为类增加新的方法: 使用XML配置的方式: XML: <?xml version="1.0" encoding=" ...
- 前端自动化构建工具-yoman浅谈
如今随着前端技术的飞速发展,前端项目也变得越来越复杂. 快速的搭建一个集成多种工具和框架的复杂前端项目也越来越成为一种需求. 当然如果你要自己从0开始完全自己diy,绝对可以,只不过需要耗费一些不少的 ...
- HDU5477(模拟)
A Sweet Journey Time Limit: 2000/1000 MS (Java/Others) Memory Limit: 65536/65536 K (Java/Others)T ...