
SpringBoot配置ActiveMQ
1、添加依赖
<!-- activeMQ -->

<dependency>

    <groupId>org.springframework.boot</groupId>

    <artifactId>spring-boot-starter-activemq</artifactId>

</dependency>

<!-- activeMQ的连接池 -->

<dependency>

    <groupId>org.apache.activemq</groupId>

    <artifactId>activemq-pool</artifactId>

</dependency>
2、application.properties配置
spring.activemq.broker-url=tcp://localhost:61616

spring.activemq.user=admin

spring.activemq.password=admin

#queue和topic不能同时使用(我不会同时使用),使用topic的时候,把下面这行解除注释

#spring.jms.pub-sub-domain=true

spring.activemq.pool.enabled=false

spring.activemq.pool.max-connections=
3、生产者
import javax.jms.Destination;

import javax.jms.Queue;

import javax.jms.Topic;

import org.springframework.beans.factory.annotation.Autowired;

import org.springframework.jms.core.JmsMessagingTemplate;

import org.springframework.web.bind.annotation.RequestMapping;

import org.springframework.web.bind.annotation.RestController;

@RestController

public class ProducerController {

    @Autowired

    private JmsMessagingTemplate jmsMessagingTemplate;

    @Autowired

    private Queue queue;

    @Autowired

    private Topic topic;

    /*

     * 消息生产者

     */

    @RequestMapping("/sendQueueMsg")

    public void sendQueueMsg(String msg) {

        this.jmsMessagingTemplate.convertAndSend(this.queue, msg);

    }

    @RequestMapping("/sendTopicMsg")

    public void sendTopicMsg(String msg) {

        // 指定消息发送的目的地及内容

        System.out.println("@@@@@@@@@@@@@@" + msg);

        this.jmsMessagingTemplate.convertAndSend(this.topic, msg);

    }

}
4、消费者
import org.springframework.jms.annotation.JmsListener;

import org.springframework.web.bind.annotation.RestController;

@RestController

public class ConsumerController {

    /**

     * 监听和读取queue消息

     * @param message

     */

    @JmsListener(destination="active.queue")

    public void readActiveQueue(String message) {

        System.out.println("接受到:" + message);

        //TODO something

    }

    /**

     * 监听和读取topic消息

     * @param message

     */

    @JmsListener(destination="active.topic")

    public void readActiveTopic(String message) {

        System.out.println("接受到:" + message);

        //TODO something

    }

}
5、发布/订阅的主题名称
import javax.jms.Queue;

import javax.jms.Topic;

import org.apache.activemq.command.ActiveMQQueue;

import org.apache.activemq.command.ActiveMQTopic;

import org.springframework.context.annotation.Bean;

import org.springframework.context.annotation.Configuration;

import org.springframework.jms.annotation.EnableJms;

@Configuration

@EnableJms

public class JmsConfig {

    private static final String QUEUE_NAME = "active.queue";

    private static final String TOPIC_NAME = "active.topic";

    @Bean

    public Queue queue(){

        return new ActiveMQQueue(QUEUE_NAME);

    }

    @Bean

    public Topic topic(){

        return new ActiveMQTopic(TOPIC_NAME);

    }

}
测试
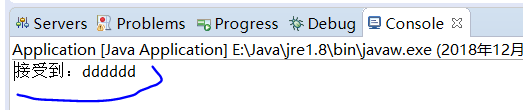
浏览器输入:
http://localhost:8080/sendQueueMsg?msg=dddddd
SpringBoot配置ActiveMQ的更多相关文章
- springBoot配置activeMq点对点模式消费信息以及独占模式消费如何设置
1.在pom文件中引入对应jar包 <!--activeMQ start--> <dependency> <groupId>org.springframework. ...
- SpringBoot配置activemq消息队列
1.配置pom相关依赖 <dependency> <groupId>org.springframework.boot</groupId> <artifactI ...
- SpringBoot JMS(ActiveMQ) 使用实践
ActiveMQ 1. 下载windows办的activeMQ后,在以下目录可以启动: 2. 启动后会有以下提示 3. 所以我们可以通过http://localhost:8161访问管理页面,通过tc ...
- Web项目容器集成ActiveMQ & SpringBoot整合ActiveMQ
集成tomcat就是随项目启动而启动tomcat,最简单的方法就是监听器监听容器创建之后以Broker的方式启动ActiveMQ. 1.web项目中Broker启动的方式进行集成 在这里采用Liste ...
- springboot与ActiveMQ整合
前言 很多项目, 都不是一个系统就做完了. 而是好多个系统, 相互协作来完成功能. 那, 系统与系统之间, 不可能完全独立吧? 如: 在学校所用的管理系统中, 有学生系统, 资产系统, 宿舍系统等等. ...
- SpringBoot配置(1) 配置文件application&yml
SpringBoot配置(1) 配置文件application&yml 一.配置文件 1.1 配置文件 SpringBoot使用一个全局的配置文件,配置文件名是固定的. application ...
- SpringBoot集成ActiveMQ
前面提到了原生API访问ActiveMQ和Spring集成ActiveMQ.今天讲一下SpringBoot集成ActiveMQ.SpringBoot就是为了解决我们的Maven配置烦恼而生,因此使用S ...
- SpringBoot配置属性之MQ
SpringBoot配置属性系列 SpringBoot配置属性之MVC SpringBoot配置属性之Server SpringBoot配置属性之DataSource SpringBoot配置属性之N ...
- SpringBoot系列八:SpringBoot整合消息服务(SpringBoot 整合 ActiveMQ、SpringBoot 整合 RabbitMQ、SpringBoot 整合 Kafka)
声明:本文来源于MLDN培训视频的课堂笔记,写在这里只是为了方便查阅. 1.概念:SpringBoot 整合消息服务 2.具体内容 对于异步消息组件在实际的应用之中会有两类: · JMS:代表作就是 ...
随机推荐
- loj 6008 餐巾计划 - 费用流
题目传送门 传送门 题目大意 (经典题还不知道题意?) 容易想到需要把未使用的餐巾和已经使用的餐巾分开. 设$X_i$表示第$i$天已经的使用餐巾的点,设$Y_i$表示第$i$天还未使用的餐巾的点 我 ...
- PKUWC 2017 Day 2 简要题解
*注意:题面请移步至loj查看. 从这里开始 Problem A 随机算法 Problem B 猎人杀 Problem C 随机游走 怎么PKU和THU都编了一些假算法,然后求正确率[汗]. 之前听说 ...
- Mac剪切AVI视频
命令行执行 brew install ffmpeg ffmpeg -i video.avi -c:v copy -c:a copy -ss 00:01:30 -t 0:0:20 output.avi
- allure --version 异常io.airlift.airline.ParseArgumentsUnexpectedException: Found unexpected parameter
执行allure --version时,有时会出现如下异常: io.airlift.airline.ParseArgumentsUnexpectedException: Found unexpecte ...
- JS(JavaScript)的进一步了解4(更新中···)
基类Object的子类有 Function Array Number Boolean String Date Math RegExp 函数 数组 数字 布尔 字符串 日期 算数 正则 都 ...
- 论文笔记:SiamRPN++: Evolution of Siamese Visual Tracking with Very Deep Networks
SiamRPN++: Evolution of Siamese Visual Tracking with Very Deep Networks 2019-04-02 12:44:36 Paper:ht ...
- Linux常用命令——关机重启命令
Linux常用命令--关机重启命令 Linux shutdown 语法:shutdown [选项] 时间 -c 取消前一个关机命令 -h 关机 -r 重启 示例:shutdown -r now 其它 ...
- 初学者易上手的SSH-hibernate04 一对一 一对多 多对多
这章我们就来学习下hibernate的关系关联,即一对一(one-to-one),一对多(one-to-many),多对多(many-to-many).这章也将是hibernate的最后一章了,用于初 ...
- Maven项目下的Mybatis逆向工程
IDEA Maven项目的Mybatis逆向工程 1.配置.pom 如果是在多模块开发下,该文件逆向工程要生成的那个模块下的pom文件. <build> <plugins> & ...
- NGS概念大科普(转)
NGS又称为下一代测序技术,高通量测序技术 以高输出量和高解析度为主要特色,能一次并行对几十万到几百万条DNA分子进行序列读取,在提供丰富的遗传学信息的同时,还可大大降低测序费用.缩短测序时间的测序技 ...