Sentiment analysis in nlp
Sentiment analysis in nlp
The goal of the program is to analysis the article title is Sarcasm or not, i use tensorflow 2.5 to solve this problem.
Dataset download url: https://www.kaggle.com/rmisra/news-headlines-dataset-for-sarcasm-detection/home
a sample of the dataset:
{

  "article_link": "https://www.huffingtonpost.com/entry/versace-black-code_us_5861fbefe4b0de3a08f600d5",

  "headline": "former versace store clerk sues over secret 'black code' for minority shoppers",

  "is_sarcastic": 0

}
we want to depend on headline to predict the is_sarcastic, 1 means True,0 means False.
preprocessing
use pandas to read json file.
import pandas as pd

# lines = True means headle the json for each line

df = pd.read_json("Sarcasm_Headlines_Dataset_v2.json" ,lines="True")

df

'''

   is_sarcastic      headline                     article_link

0      1         thirtysomething sci...         https://www.theonion.co...

1      0             dem rep. totally ...       https://www.huffingtonpos..

'''
build list for each column
labels = []

sentences = []

urls = []

# a tips for convert series to list

'''

    type(df['is_sarcastic'])

    # Series

    type(df['is_sarcastic'].values)

    # ndarray

    type(df['is_sarcastic'].values.tolist())

    # list

'''

labels = df['is_sarcastic'].values.tolist()

sentences = df['headline'].values.tolist()

urls = df['article_link'].values.tolist()

len(labels) # 28619

len(sentences) # 28619
split dataset into train set and test set
# train size is the 2/3 of the all dataset.

train_size = int(len(labels) / 3 * 2)

train_sentences = sentences[0: train_size]

test_sentences = sentences[train_size:]

train_y = labels[0:train_size]

test_y = labels[train_size:]
init some parameter
# some parameter

vocab_size = 10000

# input layer to embedding

embedding_dim = 16

# each input sentence length

max_length = 100

# padding method

trunc_type='post'

padding_type='post'

# token the unfamiliar word

oov_tok = "<OOV>"
preprocessing on train set and test set
# processing on train set and test set

import numpy as np

from tensorflow.keras.preprocessing.text import Tokenizer

from tensorflow.keras.preprocessing.sequence import pad_sequences

tokenizer = Tokenizer(oov_token = oov_tok)

tokenizer.fit_on_texts(train_sentences)

train_X = tokenizer.texts_to_sequences(train_sentences)

# padding the data

train_X = pad_sequences(train_X,

                       maxlen = max_length,

                       truncating = trunc_type,

                       padding = padding_type)

train_X[:2]

# convery the list to nparray

train_y = np.array(train_y)

# same operator to test set

test_X = tokenizer.texts_to_sequences(test_sentences)

test_X = pad_sequences(test_X ,

                      maxlen = max_length,

                      truncating = trunc_type,

                      padding = padding_type)

test_y = np.array(test_y)
build the model
some important functions and args:
tf.keras.layers.Dense # Dense
implements the operation:output = activation(dot(input, kernel) + bias) , a NN layeractivation # Activation function to use. If you don't specify anything, no activation is applied (ie. "linear" activation:
a(x) = x).use_bias # Boolean, whether the layer uses a bias vector.
tf.keras.Sequential # contain a linear stack of layer into a
tf.keras.Model.tf.keras.Model # to train and predict
config the model with losses and metrics with
model.compile(args)optimizer
some args
AdamRMSpropSGDAdagrad
loss # The loss value that will be minimized by the model will then be the sum of all individual losses.
metrices # List of metrics to be evaluated by the model during training and testing.
train the model with
model.fit(x=None,y=None)batch_size # Number of samples per gradient update. If unspecified,
batch_sizewill default to 32.epochs # Number of epochs to train the model
verbose # Verbosity mode. 0 = silent, 1 = progress bar, 2 = one line per epoch,verbose=2 is recommended when not running interactively
validation_data #( valid_X, valid_y )
tf.keras.layers.Embedding # Turns positive integers (indexes) into dense vectors of fixed size. as shown in following figure
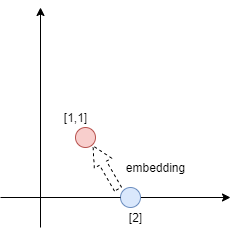
the purpose of the embedding is making the 1-dim integer proceed the muti-dim vectors add. can find the hide feature and connect to predict the labels. in this program ,every word's emotion direction can be trained many times.
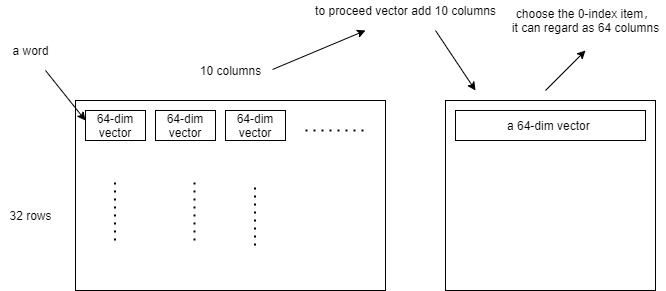
tf.keras.layer.GlobalAveragePooling1D # add all muti-dim vectors ,if the output layer shape is (32, 10, 64), after the pooling, the shape will be changed as (32,64), as shown in following figure
-
code is more simple then theory
# build the model

model = tf.keras.Sequential(

        [

            # make a word became a 64-dim vector

            tf.keras.layers.Embedding(vocab_size, embedding_dim, input_length = max_length),

            # add all word vector

            tf.keras.layers.GlobalAveragePooling1D(),

            # NN

            tf.keras.layers.Dense(24, activation = 'relu'),

            tf.keras.layers.Dense(1, activation = 'sigmoid')

        ]

)

model.compile(loss = 'binary_crossentropy', optimizer = 'adam' , metrics = ['accuracy'])
train the model
num_epochs = 30

history = model.fit(train_X, train_y, epochs = num_epochs,

                   validation_data = (test_X, test_y),

                   verbose = 2)
after the 30 epochs
Epoch 30/30

597/597 - 8s - loss: 1.8816e-04 - accuracy: 1.0000 - val_loss: 1.2858 - val_accuracy: 0.8216
predict our sentence
mytest_sentence = ["you are so cute", "you are so cute but looks like stupid"]
mytest_X = tokenizer.texts_to_sequences(mytest_sentence)
mytest_X = pad_sequences(mytest_X ,
maxlen = max_length,
truncating = trunc_type,
padding = padding_type)
mytest_y = model.predict(mytest_X)
# if result is bigger then 0.5 ,it means the title is Sarcasm
print(mytest_y > 0.5)
'''
[[False]
[ True]]
'''
reference:
tensorflow API: https://www.tensorflow.org/api_docs/python/tf/keras/Sequential
colab: bit.ly/tfw-sarcembed
Sentiment analysis in nlp的更多相关文章
- Sentiment Analysis resources
Wikipedia: Sentiment analysis (also known as opinion mining) refers to the use of natural language p ...
- NAACL 2013 Paper Mining User Relations from Online Discussions using Sentiment Analysis and PMF
中文简单介绍:本文对怎样基于情感分析和概率矩阵分解从网络论坛讨论中挖掘用户关系进行了深入研究. 论文出处:NAACL'13. 英文摘要: Advances in sentiment analysis ...
- 【Deep Learning Nanodegree Foundation笔记】第 10 课:Sentiment Analysis with Andrew Trask
In this lesson, Andrew Trask, the author of Grokking Deep Learning, will walk you through using neur ...
- 论文阅读:Multi-task Learning for Multi-modal Emotion Recognition and Sentiment Analysis
论文标题:Multi-task Learning for Multi-modal Emotion Recognition and Sentiment Analysis 论文链接:http://arxi ...
- 使用RNN进行imdb影评情感识别--use RNN to sentiment analysis
原创帖子,转载请说明出处 一.RNN神经网络结构 RNN隐藏层神经元的连接方式和普通神经网路的连接方式有一个非常明显的区别,就是同一层的神经元的输出也成为了这一层神经元的输入.当然同一时刻的输出是不可 ...
- Deep Learning for NLP 文章列举
Deep Learning for NLP 文章列举 原文链接:http://www.xperseverance.net/blogs/2013/07/2124/ 大部分文章来自: http://w ...
- 转 Deep Learning for NLP 文章列举
原文链接:http://www.xperseverance.net/blogs/2013/07/2124/ 大部分文章来自: http://www.socher.org/ http://deepl ...
- Standford CoreNLP--Sentiment Analysis初探
Stanford CoreNLP功能之一是Sentiment Analysis(情感分析),可以标识出语句的正面或者负面情绪,包括:Positive,Neutral,Negative三个值. 运行有两 ...
- Java自然语言处理NLP工具包
1. Java自然语言处理 LingPipe LingPipe是一个自然语言处理的Java开源工具包.LingPipe目前已有很丰富的功能,包括主题分类(Top Classification).命名实 ...
随机推荐
- Java实现平滑加权轮询算法--降权和提权
上一篇讲了普通轮询.加权轮询的两种实现方式,重点讲了平滑加权轮询算法,并在文末留下了悬念:节点出现分配失败时降低有效权重值:成功时提高有效权重值(但不能大于weight值). 本文在平滑加权轮询算法的 ...
- MySQL事务提交流程详解
MySQL事务的提交采用两阶段提交协议, 前些日子和同事聊的时候发现对提交的细节还是有些模糊,这里对照MySQL源码详细记录一下,版本是MySQL5.7.36. 一. 事务的提交流程. 1. 获取 M ...
- Java语言学习day27--8月02日
今日内容介绍1.Eclipse常用快捷键操作2.Eclipse文档注释导出帮助文档3.Eclipse项目的jar包导出与使用jar包4.不同修饰符混合使用细节5.辨析何时定义变量为成员变量6.类.抽象 ...
- 2021.08.16 P1300 城市街道交通费系统(dfs)
2021.08.16 P1300 城市街道交通费系统(dfs) P1300 城市街道交通费系统 - 洛谷 | 计算机科学教育新生态 (luogu.com.cn) 题意: 城市街道交费系统最近创立了.一 ...
- 人机验证reCAPTCHA v3使用完备说明
v2简介 相信大家都碰到过下面的展示的 人机验证界面: reCaptcha 是 Google 公司的验证码服务,方便快捷,改变了传统验证码需要输入n位失真字符的特点. reCaptcha 在使用的时候 ...
- Jqgrid 动态设置cell disabled
$($(grid2.jqGrid("getGridRowById", i + 1))[0].children).each(function (childI, childO) { i ...
- Typora实现云同步
Typora很好用,但是不自带同步功能,最近找到个简便的实现Typora同步的方法. step1. 下载"坚果云": step2. 在本地创建一个"坚果云"的同 ...
- 车辆跟随滑模控制的python实现
上一篇文章一个汽车跟踪问题的滑模控制实例,已经从理论上证明了可以使用滑模变结构控制策略来解决汽车跟踪问题. 下面分别采用指数趋近律.等速趋近律.准滑模控制的方法完成车辆跟随问题的仿真 import m ...
- 10 分钟看懂 Docker 和 K8S!
2010年,几个搞IT的年轻人,在美国旧金山成立了一家名叫"dotCloud"的公司. 这家公司主要提供基于PaaS的云计算技术服务.具体来说,是和LXC有关的容器技术. LXC, ...
- django基础--02基于数据库的小项目
摘要:简单修改.增加部分页面,了解django开发的过程.(Python 3.9.12,django 4.0.4 ) 接前篇,通过命令: django-admin startproject myWeb ...