
.NET5 API 网关Ocelot+Consul服务注册
1|0网关介绍
网关其实就是将我们写好的API全部放在一个统一的地址暴露在公网,提供访问的一个入口。在 .NET Core下可以使用Ocelot来帮助我们很方便的接入API 网关。与之类似的库还有ProxyKit,微软也发布了一个反向代理的库YARP。
关于网关的介绍不多说了,网上文章也挺多的,这些都是不错的选择,听说后期Ocelot将会使用YARP来重写。本篇主要实践一下在.NET Core环境下使用Ocelot。
- Ocelot官网:https://threemammals.com/ocelot
- Ocelot文档:https://ocelot.readthedocs.io
- GitHub:https://github.com/ThreeMammals/Ocelot
- Ocelot资源汇总:https://www.cnblogs.com/shanyou/p/10363360.html
2|0接入使用
2|1接口示例
先创建几个项目用于测试,创建两个默认的API项目,Api_A和Api_B,在创建一个网关项目Api_Gateway,网关项目可以选择空的模板。
现在分别在Api_A和Api_B中写几个api,将默认的WeatherForecastController中返回模型WeatherForecast添加一个字段Source,用于区分是哪个API返回的数据。
using System;

namespace Api_A

{

    public class WeatherForecast

    {

        public string Source { get; set; } = "Api_A";

        public DateTime Date { get; set; }

        public int TemperatureC { get; set; }

        public int TemperatureF => 32 + (int)(TemperatureC / 0.5556);

        public string Summary { get; set; }

    }

}

using System;

namespace Api_B

{

    public class WeatherForecast

    {

        public string Source { get; set; } = "Api_B";

        public DateTime Date { get; set; }

        public int TemperatureC { get; set; }

        public int TemperatureF => 32 + (int)(TemperatureC / 0.5556);

        public string Summary { get; set; }

    }

}
直接使用WeatherForecastController默认方法,在路由中添加api前缀。
using Microsoft.AspNetCore.Mvc;

using System;

using System.Collections.Generic;

using System.Linq;

namespace Api_A.Controllers

{

    [ApiController]

    [Route("api/[controller]")]

    public class WeatherForecastController : ControllerBase

    {

        private static readonly string[] Summaries = new[]

        {

            "Freezing", "Bracing", "Chilly", "Cool", "Mild", "Warm", "Balmy", "Hot", "Sweltering", "Scorching"

        };

        [HttpGet]

        public IEnumerable<WeatherForecast> Get()

        {

            var rng = new Random();

            return Enumerable.Range(1, 5).Select(index => new WeatherForecast

            {

                Date = DateTime.Now.AddDays(index),

                TemperatureC = rng.Next(-20, 55),

                Summary = Summaries[rng.Next(Summaries.Length)]

            }).ToArray();

        }

    }

}

using Microsoft.AspNetCore.Mvc;

using System;

using System.Collections.Generic;

using System.Linq;

namespace Api_B.Controllers

{

    [ApiController]

    [Route("api/[controller]")]

    public class WeatherForecastController : ControllerBase

    {

        private static readonly string[] Summaries = new[]

        {

            "Freezing", "Bracing", "Chilly", "Cool", "Mild", "Warm", "Balmy", "Hot", "Sweltering", "Scorching"

        };

        [HttpGet]

        public IEnumerable<WeatherForecast> Get()

        {

            var rng = new Random();

            return Enumerable.Range(1, 5).Select(index => new WeatherForecast

            {

                Date = DateTime.Now.AddDays(index),

                TemperatureC = rng.Next(-20, 55),

                Summary = Summaries[rng.Next(Summaries.Length)]

            }).ToArray();

        }

    }

}
再分别在Api_A和Api_B中添加两个控制器:ApiAController、ApiBController,然后加上几个简单的restful api。
using Microsoft.AspNetCore.Mvc;

using System.Collections.Generic;

namespace Api_A.Controllers

{

    [Route("api/[controller]")]

    [ApiController]

    public class ApiAController : ControllerBase

    {

        [HttpGet]

        public IEnumerable<string> Get()

        {

            return new string[] { "value1", "value2" };

        }

        [HttpGet("{id}")]

        public string Get(int id)

        {

            return $"Get:{id}";

        }

        [HttpPost]

        public string Post([FromForm] string value)

        {

            return $"Post:{value}";

        }

        [HttpPut("{id}")]

        public string Put(int id, [FromForm] string value)

        {

            return $"Put:{id}:{value}";

        }

        [HttpDelete("{id}")]

        public string Delete(int id)

        {

            return $"Delete:{id}";

        }

    }

}

using Microsoft.AspNetCore.Mvc;

using System.Collections.Generic;

namespace Api_B.Controllers

{

    [Route("api/[controller]")]

    [ApiController]

    public class ApiBController : ControllerBase

    {

        [HttpGet]

        public IEnumerable<string> Get()

        {

            return new string[] { "value1", "value2" };

        }

        [HttpGet("{id}")]

        public string Get(int id)

        {

            return $"Get:{id}";

        }

        [HttpPost]

        public string Post([FromForm] string value)

        {

            return $"Post:{value}";

        }

        [HttpPut("{id}")]

        public string Put(int id, [FromForm] string value)

        {

            return $"Put:{id}:{value}";

        }

        [HttpDelete("{id}")]

        public string Delete(int id)

        {

            return $"Delete:{id}";

        }

    }

}


方便查看接口,这里添加一下swagger组件,这样我们Api_A和Api_B项目分别就有了6个接口。
接着打包docker镜像,放在docker中运行这两个api项目。这一步可以用任何你熟悉的方式,run起来即可。
build成功后,指定两个端口运行api项目。
Api_A指定了5050端口,通过 http://localhost:5050/swagger打开可以看到swagger文档界面,Api_B指定了5051端口,通过 http://localhost:5051/swagger打开可以看到swagger文档界面,这样就大功告成了,接下来才是重点将两个api项目配置到Api_Gateway网关项目中。
2|2配置网关
在网关项目Api_Gateway中都添加Ocelot组件包。
Ocelot中最关键的就是配置路由信息,新建一个ocelot.json配置文件,将我们的两个API接口匹配规则放进去。
{

  "Routes": [

    //ApiA

    {

      "DownstreamPathTemplate": "/api/WeatherForecast",

      "DownstreamScheme": "http",

      "DownstreamHostAndPorts": [

        {

          "Host": "localhost",

          "Port": 5050

        }

      ],

      "UpstreamPathTemplate": "/ApiA/WeatherForecast",

      "UpstreamHttpMethod": [ "Get" ]

    },

    {

      "DownstreamPathTemplate": "/api/ApiA",

      "DownstreamScheme": "http",

      "DownstreamHostAndPorts": [

        {

          "Host": "localhost",

          "Port": 5050

        }

      ],

      "UpstreamPathTemplate": "/ApiA",

      "UpstreamHttpMethod": [ "Get", "POST" ]

    },

    {

      "DownstreamPathTemplate": "/api/ApiA/{id}",

      "DownstreamScheme": "http",

      "DownstreamHostAndPorts": [

        {

          "Host": "localhost",

          "Port": 5050

        }

      ],

      "UpstreamPathTemplate": "/ApiA/{id}",

      "UpstreamHttpMethod": [ "Get", "Put", "Delete" ]

    },

    //ApiB

    {

      "DownstreamPathTemplate": "/api/WeatherForecast",

      "DownstreamScheme": "http",

      "DownstreamHostAndPorts": [

        {

          "Host": "localhost",

          "Port": 5051

        }

      ],

      "UpstreamPathTemplate": "/ApiB/WeatherForecast",

      "UpstreamHttpMethod": [ "Get" ]

    },

    {

      "DownstreamPathTemplate": "/api/ApiB",

      "DownstreamScheme": "http",

      "DownstreamHostAndPorts": [

        {

          "Host": "localhost",

          "Port": 5051

        }

      ],

      "UpstreamPathTemplate": "/ApiB",

      "UpstreamHttpMethod": [ "Get", "POST" ]

    },

    {

      "DownstreamPathTemplate": "/api/ApiB/{id}",

      "DownstreamScheme": "http",

      "DownstreamHostAndPorts": [

        {

          "Host": "localhost",

          "Port": 5051

        }

      ],

      "UpstreamPathTemplate": "/ApiB/{id}",

      "UpstreamHttpMethod": [ "Get", "Put", "Delete" ]

    }

  ],

  "GlobalConfiguration": {

    "BaseUrl": "https://localhost:44335"

  }

}
关于配置文件中的各项具体含义,可以参考官方文档中的介绍。主要就是将DownstreamPathTemplate模板内容转换为UpstreamPathTemplate模板内容进行接口的访问,同时可以指定HTTP请求的方式等等。GlobalConfiguration中的BaseUrl为我们暴漏出去的网关地址。
设置好ocelot.json后,需要在代码中使用它,在Program.cs中添加配置文件。
using Microsoft.AspNetCore.Hosting;

using Microsoft.Extensions.Configuration;

using Microsoft.Extensions.Hosting;

namespace Api_Gateway

{

    public class Program

    {

        public static void Main(string[] args)

        {

            CreateHostBuilder(args).Build().Run();

        }

        public static IHostBuilder CreateHostBuilder(string[] args) =>

            Host.CreateDefaultBuilder(args)

                .ConfigureAppConfiguration((context, config) =>

                {

                    config.AddJsonFile("ocelot.json", optional: false, reloadOnChange: true);

                })

                .ConfigureWebHostDefaults(webBuilder =>

                {

                    webBuilder.UseStartup<Startup>();

                });

    }

}
在Startup.cs中使用Ocelot。
using Microsoft.AspNetCore.Builder;

using Microsoft.AspNetCore.Hosting;

using Microsoft.AspNetCore.Http;

using Microsoft.Extensions.DependencyInjection;

using Microsoft.Extensions.Hosting;

using Ocelot.DependencyInjection;

using Ocelot.Middleware;

namespace Api_Gateway

{

    public class Startup

    {

        public void ConfigureServices(IServiceCollection services)

        {

            services.AddOcelot();

        }

        public void Configure(IApplicationBuilder app, IWebHostEnvironment env)

        {

            if (env.IsDevelopment())

            {

                app.UseDeveloperExceptionPage();

            }

            app.UseRouting();

            app.UseEndpoints(endpoints =>

            {

                endpoints.MapGet("/", async context =>

                {

                    await context.Response.WriteAsync("Hello World!");

                });

            });

            app.UseOcelot().Wait();

        }

    }

}
完成以上操作后,我们试着去调用接口看看能否正确获取预期数据。
curl -X GET "https://localhost:44335/ApiA"

curl -X GET "https://localhost:44335/ApiB"

curl -X POST "https://localhost:44335/ApiA" -H "Content-Type: multipart/form-data" -F "value=ApiA"

curl -X POST "https://localhost:44335/ApiB" -H "Content-Type: multipart/form-data" -F "value=ApiB"

curl -X GET "https://localhost:44335/ApiA/12345"

curl -X GET "https://localhost:44335/ApiB/12345"

curl -X PUT "https://localhost:44335/ApiA/12345" -H "Content-Type: multipart/form-data" -F "value=ApiA"

curl -X PUT "https://localhost:44335/ApiB/12345" -H "Content-Type: multipart/form-data" -F "value=ApiB"

curl -X DELETE "https://localhost:44335/ApiA/12345"

curl -X DELETE "https://localhost:44335/ApiB/12345"

curl -X GET "https://localhost:44335/ApiA/WeatherForecast"

curl -X GET "https://localhost:44335/ApiB/WeatherForecast"

可以看到,两个项目中的接口全部可以通过网关项目暴露的地址进行中转,是不是很方便?
本篇只是简单的应用,对于Ocelot的功能远不止于此,它非常强大,还可以实现请求聚合、服务发现、认证、鉴权、限流熔断、并内置了负载均衡器,而且这些功能都是只需要简单的配置即可完成。就不一一描述了,如有实际开发需求和问题,可以查看官方文档和示例。
Consul服务注册
Consul是一个用来实现分布式系统服务发现与配置的开源工具。它内置了服务注册与发现框架、分布一致性协议实现、健康检查、Key/Value存储、多数据中心方案,不再需要依赖其他工具,使用起来也较为简单。
Consul官网:https://www.consul.io
开源地址:https://github.com/hashicorp/consul、https://github.com/G-Research/consuldotnet
Consul支持各种平台的安装,安装文档:https://www.consul.io/downloads
Consul+Ocelot
Ocelot是一个用.NET Core实现的开源API网关,它功能强大,包括了:路由、请求聚合、服务发现、认证、鉴权、限流熔断,缓存等。
接下来,会使用ocelot 结合consul ,polly ,cachemanager 实现负载均衡,服务发现,限流熔断和缓存功能。(本文只做记录,就直接贴完整代码,不分别测试了)
新建ApiGateWay项目,nuget安装Ocelot,Ocelot.Provider.Consul,Ocelot.Provider.Polly,Ocelot.Cache.CacheManager
新增ocelot.json,配置相关参数

{

  // 转发路由,数组中的每个元素都是某个服务的一组路由转发规则

  "ReRoutes": [

    {

      "ServiceName": "Summer.Webapi", //对应consul配置的ServiceName

      // Uri方案,http、https

      "DownstreamScheme": "http",

      // 下游(服务提供方)服务路由模板

      "DownstreamPathTemplate": "/api/{path}",

      // 上游(客户端,服务消费方)请求路由模板

      "UpstreamPathTemplate": "/Summer/{path}",

      "UpstreamHttpMethod": [ "Get", "Post" ],

      "LoadBalancerOptions": {

        "Type": "RoundRobin" //轮询

      },

      "UseServiceDiscovery": true,

      "RateLimitOptions": {

        "ClientWhitelist": [ "admin" ], // 白名单

        "EnableRateLimiting": true, // 是否启用限流

        "Period": "1m", // 统计时间段:1s, 5m, 1h, 1d

        "PeriodTimespan": 15, // 多少秒之后客户端可以重试

        "Limit": 2 // 在统计时间段内允许的最大请求数量

      },

      "QoSOptions": {

        "ExceptionsAllowedBeforeBreaking": 2, // 允许多少个异常请求

        "DurationOfBreak": 15000, // 熔断的时间,单位为毫秒

        "TimeoutValue": 5000 // 如果下游请求的处理时间超过多少则视如该请求超时

      },

      "FileCacheOptions": { // cache response data - ttl: 10s   10秒内相同url请求直接返回缓存数据

        "TtlSeconds": 10,

        "Region": ""

      }

    }

  ],

  // 全局配置,此节点的配置会覆盖ReRoutes,可以在这里设置一些通用的配置

  "GlobalConfiguration": {

    "ReRouteIsCaseSensitive": false,

    "ServiceDiscoveryProvider": {

      "Host": "localhost",

      "Port": 8500,

      "Type": "Consul" //由Consul提供服务发现

    },

    "RateLimitOptions": {

      "DisableRateLimitHeaders": false, // Http头  X-Rate-Limit 和 Retry-After 是否禁用

      "QuotaExceededMessage": "Too many requests, are you OK?", // 当请求过载被截断时返回的消息

      "HttpStatusCode": 999, // 当请求过载被截断时返回的http status

      "ClientIdHeader": "client_id" // 用来识别客户端的请求头,默认是 ClientId

    }

  }

}
在Startup.cs 中新增如下代码:
public void ConfigureServices(IServiceCollection services)

        {

            var config = new ConfigurationBuilder().AddJsonFile("ocelot.json").Build();

            services.AddOcelot(config)

                .AddCacheManager(x =>

                {

                    x.WithDictionaryHandle();

                })

                .AddConsul().AddPolly();

        }

public void Configure(IApplicationBuilder app, IWebHostEnvironment env)

        {

            app.UseOcelot().Wait();

        }
配置完ApiGateway,接下来配置Webapi,每个Webapi都新增服务注册,通过consul服务发现并定时做健康检测
新增consul服务注册扩展类库 ConsulBuilder,方便各个项目引用,接下来直接贴代码:
// consul服务注册扩展类

    public static class ConsulRegistrationExtensions

    {

        public static void AddConsul(this IServiceCollection service)

        {

            // 读取服务配置文件

            var config = new ConfigurationBuilder().AddJsonFile("consulconfig.json").Build();

            service.Configure<ConsulServiceOptions>(config);

        }

        public static IApplicationBuilder UseConsul(this IApplicationBuilder app)

        {

            // 获取主机生命周期管理接口

            var lifetime = app.ApplicationServices.GetRequiredService<IHostApplicationLifetime>();

            // 获取服务配置项

            var serviceOptions = app.ApplicationServices.GetRequiredService<IOptions<ConsulServiceOptions>>().Value;

            // 服务ID必须保证唯一

            serviceOptions.ServiceId = Guid.NewGuid().ToString();

            var consulClient = new ConsulClient(configuration =>

            {

                //服务注册的地址,集群中任意一个地址

                configuration.Address = new Uri(serviceOptions.ConsulAddress);

            });

            // 获取当前服务地址和端口,配置方式

            var uri = new Uri(serviceOptions.ServiceAddress);

            // 节点服务注册对象

            var registration = new AgentServiceRegistration()

            {

                ID = serviceOptions.ServiceId,

                Name = serviceOptions.ServiceName,// 服务名

                Address = uri.Host,

                Port = uri.Port, // 服务端口

                Check = new AgentServiceCheck

                {

                    // 注册超时

                    Timeout = TimeSpan.FromSeconds(5),

                    // 服务停止多久后注销服务

                    DeregisterCriticalServiceAfter = TimeSpan.FromSeconds(5),

                    // 健康检查地址

                    HTTP = $"{uri.Scheme}://{uri.Host}:{uri.Port}{serviceOptions.HealthCheck}",

                    // 健康检查时间间隔

                    Interval = TimeSpan.FromSeconds(10),

                }

            };

            // 注册服务

            consulClient.Agent.ServiceRegister(registration).Wait();

            // 应用程序终止时,注销服务

            lifetime.ApplicationStopping.Register(() =>

            {

                consulClient.Agent.ServiceDeregister(serviceOptions.ServiceId).Wait();

            });

            return app;

        }

    }
// Consul配置模型类

    public class ConsulServiceOptions

    {

        // 服务注册地址(Consul的地址)

        public string ConsulAddress { get; set; }

        // 服务ID

        public string ServiceId { get; set; }

        // 服务名称

        public string ServiceName { get; set; }

        // 健康检查地址

        public string HealthCheck { get; set; }

        //站点地址

        public string ServiceAddress { get; set; }

    }
在Webapi 项目中引用ConsulBuilder类库,然后在Startup.cs 中新增如下代码:
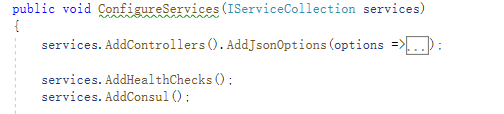
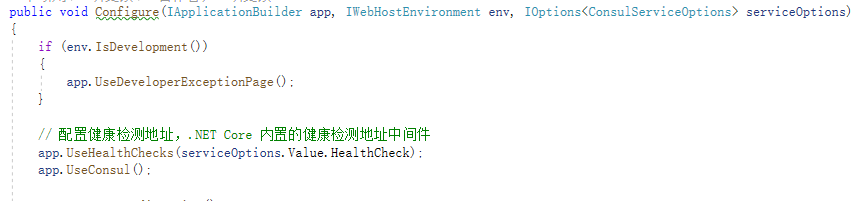
新增consulconfig.json ,属性设置为始终复制
{

  "ConsulAddress": "http://127.0.0.1:8500", //consul 服务器地址

  "ServiceName": "Summer.Webapi", //服务名称,ApiGateway中配置的ServiceName对应这里

  "HealthCheck": "/Health", //健康检查地址

  "ServiceAddress": "http://localhost:58420"  //webapi 地址

}
假如要启动多个webapi,拷贝代码,将ServiceAddress 改为不同的端口,然后使用命令行启动
PS D:\work\demo\core\SummerCore3.1\Summer.WebApi\bin\Debug\netcoreapp3.1> dotnet .\Summer.Webapi.dll --urls "http://loca
lhost:58420"
配置好后,开始运行,
先开启consul: consul.exe agent -dev
然后启动多个webapi
访问localhost:8500 ,可以看到已经服务发现两个webapi

测试一下是否正常运行,访问http://localhost:58420/api/user/userlist

运行ApiGateway
PS D:\work\demo\core\SummerCore3.1\Summer.ApiGateway\bin\Debug\netcoreapp3.1> dotnet .\Summer.ApiGateway.dll --urls "htt
p://localhost:7000"
访问http://localhost:7000/Summer/user/userlist

可以看到,API网关已经正常映射到localhost:58420的Webapi
其他效果,例如负载均衡,限流熔断可以自行结合配置参数做测试
.NET5 API 网关Ocelot+Consul服务注册的更多相关文章
- 微服务(入门三):netcore ocelot api网关结合consul服务发现
简介 api网关是提供给外部调用的统一入口,类似于dns,所有的请求统一先到api网关,由api网关进行指定内网链接. ocelot是基于netcore开发的开源API网关项目,功能强大,使用方便,它 ...
- (8)ASP.NET Core3.1 Ocelot Consul服务注册与发现
1.服务注册与发现(Service Discovery) ●服务注册:我们通过在每个服务实例写入注册代码,实例在启动的时候会先去注册中心(例如Consul.ZooKeeper.etcd.Eureka) ...
- Consul+Ocelot+Polly在.NetCore中使用(.NET5)-网关Ocelot+Consul
相关文章 Consul+Ocelot+Polly在.NetCore中使用(.NET5)-Consul服务注册,服务发现 Consul+Ocelot+Polly在.NetCore中使用(.NET5)-网 ...
- .NET Core 微服务—API网关(Ocelot) 教程 [一]
前言: 最近在关注微服务,在 eShop On Containers 项目中存在一个API网关项目,引起想深入了解下它的兴趣. 一.API网关是什么 API网关是微服务架构中的唯一入口,它提供一个单独 ...
- .NET Core 微服务—API网关(Ocelot) 教程 [二]
上篇文章(.NET Core 微服务—API网关(Ocelot) 教程 [一])介绍了Ocelot 的相关介绍. 接下来就一起来看如何使用,让它运行起来. 环境准备 为了验证Ocelot 网关效果,我 ...
- .NET Core 微服务—API网关(Ocelot) 教程 [三]
前言: 前一篇文章<.NET Core 微服务—API网关(Ocelot) 教程 [二]>已经让Ocelot和目录api(Api.Catalog).订单api(Api.Ordering)通 ...
- .Net Core的API网关Ocelot使用 (一)
1.什么是API网关 API网关是微服务架构中的唯一入口,它提供一个单独且统一的API入口用于访问内部一个或多个API.它可以具有身份验证,监控,负载均衡,缓存,请求分片与管理,静态响应处理等.API ...
- 微服务系列(二):使用 API 网关构建微服务
编者的话|本文来自 Nginx 官方博客,是微服务系列文章的第二篇,本文将探讨:微服务架构是如何影响客户端到服务端的通信,并提出一种使用 API 网关的方法. 作者介绍:Chris Richardso ...
- 0102-使用 API 网关构建微服务
一.移动客户端如何访问这些服务 1.1.客户端与微服务直接通信[很少使用] 从理论上讲,客户端可以直接向每个微服务发送请求.每个微服务都有一个公开的端点(https ://.api.company.n ...
随机推荐
- Goland 2020.2.x 激活码永久破解教程 (最新Goland激活码!2020.11.26亲测可用!)
在2020.11.26 Goland的用户们又迎来了一次更新,这就导致很多软件打开时候就提示Goland激活码已经失效,码小辫第一时间给各位分享了关于最新Goland激活破解教程! goland已经更 ...
- CARDS主题 & 导航栏样式修改
每个人对于主题样式的感觉是不一样的,譬如字体大小,间距,高宽,距离,颜色等,我们可以一定程度内很直观地去修改主题的某些样式. 首先,在浏览器中利用开发者工具进行调试,找到我们所要改动的那部分结构,写入 ...
- dubbo源码学习(二)dubbo容器启动流程简略分析
dubbo版本2.6.3 继续之前的dubbo源码阅读,从com.alibaba.dubbo.container.Main.main(String[] args)作为入口 简单的数据一下启动的流程 1 ...
- Python函数独立星号(*)分隔的命名关键字参数
如果需要限制关键字参数的输入名字,就需要使用到命名关键字参数的形式,所谓命名关键字参数就是给关键字参数限定指定的名字,输入其他名字不能识别.命名关键字参数和位置参数之间使用独立的星号(*)分隔,星号后 ...
- 第15.22节 PyQt(Python+Qt)入门学习:Model/View架构详解
老猿Python博文目录 专栏:使用PyQt开发图形界面Python应用 老猿Python博客地址 一.简介 在PyQt和Qt中,Model/View架构是图形界面开发时用于管理数据和界面展现方式的关 ...
- 分别使用python和java练习冒泡排序
冒泡排序算法的运作如下:(从小到大) 比较相邻的元素.如果第一个比第二个大,就交换他们两个. 对每一对相邻元素作同样的工作,从开始第一对到结尾的最后一对.在这一点,最后的元素应该会是最大的数. 针 ...
- 精品工具【音乐下载器(可下载VIP音乐)】
工具信息 更新时间:2020年5月26日00点07分更新内容:1. 增加快捷键2. 细分下载列表清除功能一款可以下载付费音乐的音乐下载器 下载链接:https://nitian1207.lanzous ...
- Scrum 冲刺 第四篇
Scrum 冲刺 第四篇 每日会议照片 昨天已完成工作 队员 昨日完成任务 黄梓浩 初步完成app项目架构搭建 黄清山 完成部分个人界面模块数据库的接口 邓富荣 完成部分后台首页模块数据库的接口 钟俊 ...
- jxl导出excel小demo
1.首先在pom文件加入jar包 <dependency> <groupId>net.sourceforge.jexcelapi</groupId> <art ...
- AcWing 345. 牛站 Cow Relays
由于我太菜了,不会矩阵乘法,所以给同样不会矩阵乘法同学的福利 首先发现这题点很多边很少,实际上有用的点 \(<= 2 * T\)(因为每条边会触及两个点嘛) 所以我们可以把点的范围缩到 \(2 ...