TensorFlow、numpy、matplotlib、基本操作
一、常量的定义
import tensorflow as tf

#类比  语法  api  原理

#基础数据类型  运算符  流程 字典 数组

data1 = tf.constant(2,dtype=tf.int32)

data2 = tf.Variable(10,name='var')

print(data1)

print(data2)

#shape 维度 const长度 shape维度 dtype 数据类型

sess = tf.Session()

print(sess.run(data1))

init = tf.global_variables_initializer()

sess.run(init)

print(sess.run(data2))
必须通过session来操作对象
二、tensorflow运行实质
tensorflow运算实质是由 tensor + 计算图
tensor 数据
op operation 赋值,运算
graphs 数据操作的过程
session 是执行的核心
import tensorflow as tf

#类比  语法  api  原理

#基础数据类型  运算符  流程 字典 数组

data1 = tf.constant(2,dtype=tf.int32)

data2 = tf.Variable(10,name='var')

print(data1)

print(data2)

#shape 维度 const长度 shape维度 dtype 数据类型

'''

sess = tf.Session()

print(sess.run(data1))

init = tf.global_variables_initializer()

sess.run(init)

print(sess.run(data2))

'''

init = tf.global_variables_initializer()

sess = tf.Session()

with sess:

    sess.run(init)

    print(sess.run(data2))
四则运算:
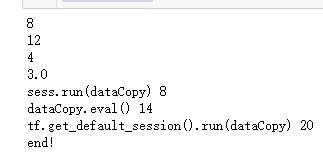
import tensorflow as tf

data1 = tf.constant(6)

data2 = tf.Variable(2)

dataAdd = tf.add(data1,data2)

dataCopy = tf.assign(data2,dataAdd)  #先把 6 和2进行计算

dataMul = tf.multiply(data1,data2)

dataSub = tf.subtract(data1,data2)

dataDiv = tf.divide(data1,data2)

init = tf.global_variables_initializer()

with tf.Session() as sess:

    sess.run(init)

    print(sess.run(dataAdd))

    print(sess.run(dataMul))

    print(sess.run(dataSub))

    print(sess.run(dataDiv))

    print('sess.run(dataCopy)',sess.run(dataCopy))

    print('dataCopy.eval()',dataCopy.eval())#eval的用法与下行一样

    print('tf.get_default_session().run(dataCopy)',tf.get_default_session().run(dataCopy))

print("end!")
运行结果:
3、矩阵
placehold 预定义变量
#placehold 预定义

import tensorflow as tf

data1 = tf.placeholder(tf.float32)

data2 = tf.placeholder(tf.float32)

dataAdd = tf.add(data1,data2)

with tf.session() as sess:

    print(sess.run(dataAdd,feed_dict=(data1:6,data2:2)))

    # 1 dataAdd 2 data (feed_dict = {1:6 2})

print('end')
基本操作
import tensorflow as tf

data1 = tf.constant([[6,6]])

data2 = tf.constant([[2],

                    [2]])

data3 = tf.constant([[3,3]])

data4 = tf.constant([[1,2],[3,4],[5,6]])

print(data4.shape)#打印维度

with tf.Session() as sess:

    print(sess.run(data4))#打印整体内容

    print(sess.run(data4[0]))#打印某一行

    print(sess.run(data4[:,1]))#打印某一列

    print(sess.run(data4[1,1]))#打印第一行第一列
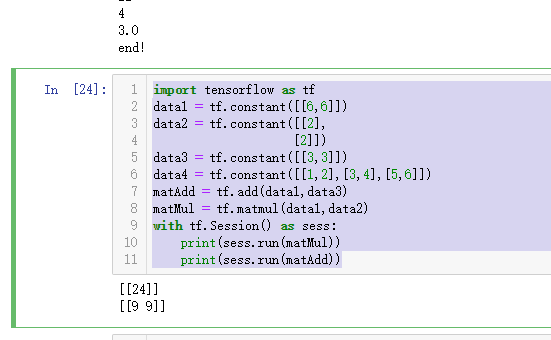
基本操作
import tensorflow as tf

data1 = tf.constant([[6,6]])

data2 = tf.constant([[2],

                    [2]])

data3 = tf.constant([[3,3]])

data4 = tf.constant([[1,2],[3,4],[5,6]])

matAdd = tf.add(data1,data3)

matMul = tf.matmul(data1,data2)

with tf.Session() as sess:

    print(sess.run(matMul))

    print(sess.run(matAdd))
import tensorflow as tf

mat0 = tf.constant([[0,0,0],[0,0,0]])

mat1 = tf.zeros([2,3])

mat2 = tf.ones([3,2])

mat3 = tf.fill([2,3],15)

with tf.Session() as sess:

    #print(sess.run(mat0))

    print(sess.run(mat1))

    print(sess.run(mat2))

    print(sess.run(mat3))
运行结果:

import tensorflow as tf

mat1 = tf.constant([[2],[3],[4]])

mat2 = tf.zeros_like(mat1)

mat3 = tf.linspace(0.0,2.0,11)

mat4 = tf.random_uniform([2,3],-1,2)

with tf.Session() as sess:

    print(sess.run(mat2))

    print(sess.run(mat3))

    print(sess.run(mat4))

四、Numpy的使用
#CRUD

import numpy as np

data1 = np.array([1,2,3,4,5])

print(data1)

data2 = np.array([[1,2],

                 [3,4]])

print(data2)

#维度

print(data1.shape,data2.shape)

#zero ones 单位矩阵

print(np.zeros([2,3]),np.ones([2,2]))

#改查

data2[1,0] = 5

print(data2)

print(data2[1,1])

#加减乘除

data3 = np.ones([2,3])

print(data3*2)

print(data3/3)

print(data3+2)

print(data3-3)

#矩阵的加法和乘法

data4 = np.array([[1,2,3],[4,5,6]])

print(data3+data4)

#
五、matplotlib的使用
绘制折线图
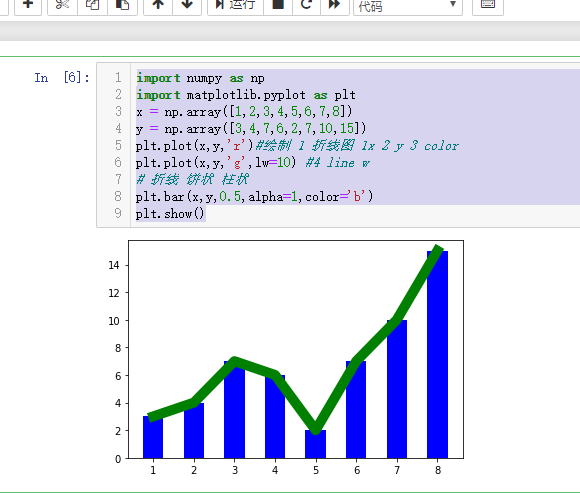
import numpy as np

import matplotlib.pyplot as plt

x = np.array([1,2,3,4,5,6,7,8])

y = np.array([3,4,7,6,2,7,10,15])

plt.plot(x,y,'r')#绘制 1 折线图 1x 2 y 3 color

柱状图:
import numpy as np

import matplotlib.pyplot as plt

x = np.array([1,2,3,4,5,6,7,8])

y = np.array([3,4,7,6,2,7,10,15])

plt.plot(x,y,'r')#绘制 1 折线图 1x 2 y 3 color

plt.plot(x,y,'g',lw=10) #4 line w

# 折线 饼状 柱状

plt.bar(x,y,0.5,alpha=1,color='b')

plt.show()
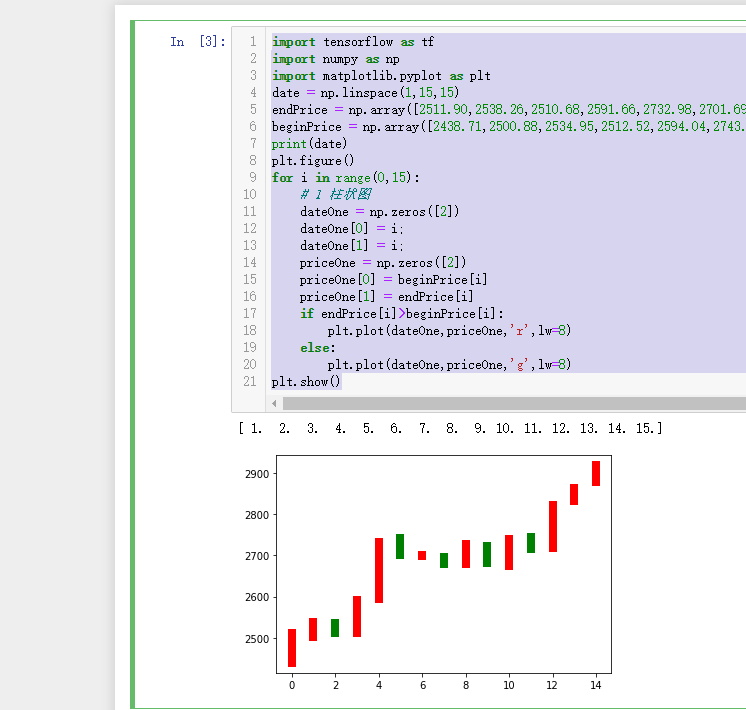
神经网络逼近股票收盘价格
首先绘制K线
import tensorflow as tf

import numpy as np

import matplotlib.pyplot as plt

date = np.linspace(1,15,15)

endPrice = np.array([2511.90,2538.26,2510.68,2591.66,2732.98,2701.69,2701.29,2678.67,2726.50,2681.50,2739.17,2715.07,2823.58,2864.90,2919.08])

beginPrice = np.array([2438.71,2500.88,2534.95,2512.52,2594.04,2743.26,2697.47,2695.24,2678.23,2722.13,2674.93,2744.13,2717.46,2832.73,2877.40])

print(date)

plt.figure()

for i in range(0,15):

    # 1 柱状图

    dateOne = np.zeros([2])

    dateOne[0] = i;

    dateOne[1] = i;

    priceOne = np.zeros([2])

    priceOne[0] = beginPrice[i]

    priceOne[1] = endPrice[i]

    if endPrice[i]>beginPrice[i]:

        plt.plot(dateOne,priceOne,'r',lw=8)

    else:

        plt.plot(dateOne,priceOne,'g',lw=8)

plt.show()
实现人工神经网络:
分为三层:
1、输入层
2、中间层(隐藏层)
3、输出层
在这里面 输入矩阵为15 x 1
隐藏层矩阵 1x10的矩阵
输出层 输出矩阵
15 x 1
实现的功能:
通过天数输入 输出每天对应的股价
隐藏层
A*W1+b1 = B
B*w2+b2 = C
A:输入层 B:隐藏层 C:输出层 W1 1x10 B1 1x10偏移矩阵
代码如下:
# layer1:激励函数+乘加运算

import tensorflow as tf

import numpy as np

import matplotlib.pyplot as plt

date = np.linspace(1,15,15)

endPrice = np.array([2511.90,2538.26,2510.68,2591.66,2732.98,2701.69,2701.29,2678.67,2726.50,2681.50,2739.17,2715.07,2823.58,2864.90,2919.08]

)

beginPrice = np.array([2438.71,2500.88,2534.95,2512.52,2594.04,2743.26,2697.47,2695.24,2678.23,2722.13,2674.93,2744.13,2717.46,2832.73,2877.40])

print(date)

plt.figure()

for i in range(0,15):

    # 1 柱状图

    dateOne = np.zeros([2])

    dateOne[0] = i;

    dateOne[1] = i;

    priceOne = np.zeros([2])

    priceOne[0] = beginPrice[i]

    priceOne[1] = endPrice[i]

    if endPrice[i]>beginPrice[i]:

        plt.plot(dateOne,priceOne,'r',lw=8)

    else:

        plt.plot(dateOne,priceOne,'g',lw=8)

#plt.show()

# A(15x1)*w1(1x10)+b1(1*10) = B(15x10)

# B(15x10)*w2(10x1)+b2(15x1) = C(15x1)

# 1 A B C

dateNormal = np.zeros([15,1])

priceNormal = np.zeros([15,1])

for i in range(0,15):

    dateNormal[i,0] = i/14.0;

    priceNormal[i,0] = endPrice[i]/3000.0;

x = tf.placeholder(tf.float32,[None,1])

y = tf.placeholder(tf.float32,[None,1])

# B

w1 = tf.Variable(tf.random_uniform([1,10],0,1))

b1 = tf.Variable(tf.zeros([1,10]))

wb1 = tf.matmul(x,w1)+b1

layer1 = tf.nn.relu(wb1) # 激励函数

# C

w2 = tf.Variable(tf.random_uniform([10,1],0,1))

b2 = tf.Variable(tf.zeros([15,1]))

wb2 = tf.matmul(layer1,w2)+b2

layer2 = tf.nn.relu(wb2)

loss = tf.reduce_mean(tf.square(y-layer2))#y 真实 layer2 计算

train_step = tf.train.GradientDescentOptimizer(0.1).minimize(loss)

with tf.Session() as sess:

    sess.run(tf.global_variables_initializer())

    for i in range(0,10000):

        sess.run(train_step,feed_dict={x:dateNormal,y:priceNormal})

    # w1w2 b1b2  A + wb -->layer2

    pred = sess.run(layer2,feed_dict={x:dateNormal})

    predPrice = np.zeros([15,1])

    for i in range(0,15):

        predPrice[i,0]=(pred*3000)[i,0]

    plt.plot(date,predPrice,'b',lw=1)

plt.show()
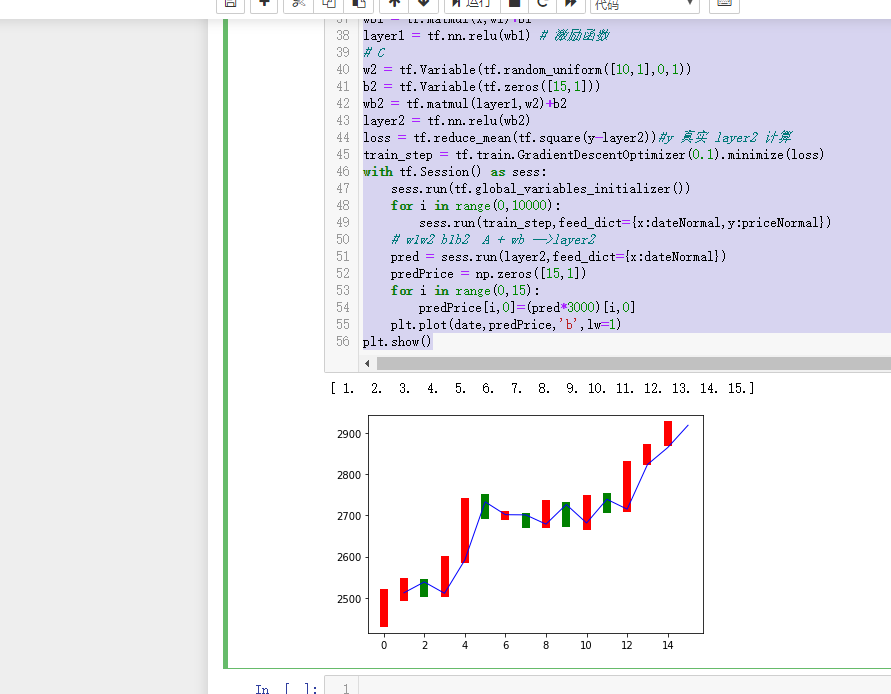
预计结果基本上吻合
TensorFlow、numpy、matplotlib、基本操作的更多相关文章
- 在mac安装numpy matplotlib scipy
p.p1 { margin: 0.0px 0.0px 0.0px 0.0px; font: 11.0px Menlo; color: #000000; background-color: #fffff ...
- Ubuntu-Python2.7安装 scipy,numpy,matplotlib 和pip
一. scipy,numpy,matplotlib sudo apt-get install python-scipy sudo apt-get install python-numpy sudo a ...
- NumPy Matplotlib库
NumPy - Matplotlib Matplotlib 是 Python 的绘图库. 它可与 NumPy 一起使用,提供了一种有效的 MatLab 开源替代方案. 它也可以和图形工具包一起使用,如 ...
- 21、numpy—Matplotlib
NumPy Matplotlib Matplotlib 是 Python 的绘图库. 它可与 NumPy 一起使用,提供了一种有效的 MatLab 开源替代方案. 它也可以和图形工具包一起使用,如 P ...
- 【学习总结】GirlsInAI ML-diary day-21-初识 Numpy, Matplotlib, Seanborn [柱状图、折线图、箱图]
[学习总结]GirlsInAI ML-diary 总 原博github链接-day21 初识 Numpy, Matplotlib, Seanborn [柱状图.折线图.箱图] 一.Titanic练习赛 ...
- Windows系统在Python2.7环境下安装numpy, matplotlib, scipy - Lichanghao Blog
numpy, matplotlib, scipy三个包是科学计算和绘图的利器.安装它们既可以在网上下载exe安装包,也可以用python内置的包管理工具来下载安装,后者较为方便. 这几天做美赛要用到, ...
- NumPy的基本操作
1 简介 NumPy 是用于处理数组的 python 库,部分用 Python 编写,但是大多数需要快速计算的部分都是用 C 或 C ++ 编写的.它还拥有在线性代数.傅立叶变换和矩阵领域中工作的函数 ...
- (零)机器学习入门与经典算法之numpy的基本操作
1.根据索引来获取元素* 创建一个索引列表ind,用来装载索引,当numpy数据是一维数据时:一个索引对应的是一个元素具体的例子如下: import numpy as np # 数据是一维数据时:索引 ...
- 利用numpy+matplotlib绘图的基本操作教程
简述 Matplotlib是一个基于python的2D画图库,能够用python脚本方便的画出折线图,直方图,功率谱图,散点图等常用图表,而且语法简单.具体介绍见matplot官网. Numpy(Nu ...
- numpy&matplotlib读书笔记
Matplotlib matplotlib是Python优秀的数据可视化第三方库 matplotlib库的效果可参考 http://matplotlib.org/gallery.html matplo ...
随机推荐
- Junit4模板
模板 MallApplicationTests import org.junit.runner.RunWith; import org.springframework.boot.test.contex ...
- react-native 标题随页面滚动显示和隐藏
效果图如下: 代码实现: import React, {Component} from 'react'; import { ScrollView, Text, View, FlatList, } fr ...
- 一文解读DevOps工具链 (转)
在列出DevOps 工具链之前,介绍一下什么是DevOps,虽然DevOps这个概念现在还没有标准的定义,但我们可以追溯一下其过去九年的历史发展过程(从2009年-2017年),列出几个相对明确又有所 ...
- mysql使用命令
1.创建用户 create user 'name'@'host' identified by 'psssword'; 2.授权 grant select, updata,insert (all) on ...
- CodeForces - 1251C (思维+贪心+归并排序)
题意 https://vjudge.net/problem/CodeForces-1251C 一个字符串,相邻的偶数奇数不能交换位置,其他相邻的情况可以交换,问字符串代表的数最小是多少. 思路 相邻的 ...
- C学习笔记(3)---作用域,数组, (少量指针入门)
1. 作用域(scope):任何一种编程中,作用域是程序中定义的变量所存在的区域,超过该区域变量就不能被访问.C 语言中有三个地方可以声明变量. a. 在函数或块内部的局部变量 - 在某个函数或块的内 ...
- 7、zabbix自定义监控阈值-前端页面报警
找个值监控一下: #监控passwd #默认是间隔是1小时,我们改成10秒,下面我们要把报警打开 #我们在被监控上的主机上创建一个新用户,过10秒,界面上就会报警了 ----------------- ...
- 攻防世界web之ics-05
本文借鉴以下两篇文章的指导 https://www.jianshu.com/p/5a502873635b https://blog.csdn.net/about23/article/details/9 ...
- C++标准库删除字符串中指定字符,比如空格
参见:https://zh.cppreference.com/w/cpp/algorithm/remove 使用 erase 和 remove 配合. #include <algorithm&g ...
- 关于join的使用
一.join的作用 join() 定义在Thread.java中.join() 的作用:让“主线程”等待“子线程”结束之后才能继续运行. // 主线程 public class Father exte ...