安装rancher以及使用rancher倒入kubernetes集群和添加及管理集群
1.docker安装rancher
[root@rancher ~]# docker run -d --name rancher --restart=unless-stopped -p : -p : -v /opt/rancher:/var/lib/rancher rancher/rancher:v2.2.4

Unable to find image 'rancher/rancher:v2.2.4' locally

Trying to pull repository docker.io/rancher/rancher ...

v2.0.0: Pulling from docker.io/rancher/rancher

68393378db12: Pull complete

9e3366501e0e: Pull complete

156ec05da9a5: Pull complete

281cba1133d9: Pull complete

0acdc2cc8ed1: Pull complete

a8cef3d8a877: Pull complete

3e968117f1c2: Pull complete

cf62fef10dfd: Pull complete

098edd097869: Pull complete

77a837c0bf2d: Pull complete

Digest: sha256:38839bb19bdcac084a413a4edce7efb97ab99b6d896bda2f433dfacfd27f8770

Status: Downloaded newer image for docker.io/rancher/rancher:v2.0.0

215f26faeda5d32f18a25c23cfac4c2ea4d99643f0499163bdc0e06e3ca96336

[root@rancher  ~]# docker ps

CONTAINER ID        IMAGE                    COMMAND                  CREATED             STATUS              PORTS                                      NAMES

215f26faeda5        rancher/rancher:v2.2.4   "rancher --http-li..."    seconds ago       Up  seconds        0.0.0.0:->/tcp, 0.0.0.0:->/tcp   rancher
2.倒入集群
浏览器访问本机的ip,然后设置密码登陆上去,点击add cluster,选择import倒入现有集群

复制上面的其中一个到现有集群的master节点去执行
这里我们单独下载来执行
[root@master rancher]# wget --no-check-certificate https://10.0.1.186/v3/import/8xhq4r95ptgghqbwx2sgf8t8vlvt5sg6wcqmvspwmn72dh4r7mp9lg.yaml

---- ::--  https://10.0.1.186/v3/import/8xhq4r95ptgghqbwx2sgf8t8vlvt5sg6wcqmvspwmn72dh4r7mp9lg.yaml

Connecting to 10.0.1.186:... connected.

WARNING: cannot verify 10.0.1.186's certificate, issued by ‘/O=the-ranch/CN=cattle-ca’:

  Unable to locally verify the issuer's authority.

HTTP request sent, awaiting response...  OK

Length: unspecified [text/plain]

Saving to: ‘8xhq4r95ptgghqbwx2sgf8t8vlvt5sg6wcqmvspwmn72dh4r7mp9lg.yaml’

    [ <=>                                                                                                          ] ,       --.-K/s   in 0s

-- :: (56.1 MB/s) - ‘8xhq4r95ptgghqbwx2sgf8t8vlvt5sg6wcqmvspwmn72dh4r7mp9lg.yaml’ saved []

[root@master rancher]# mv  8xhq4r95ptgghqbwx2sgf8t8vlvt5sg6wcqmvspwmn72dh4r7mp9lg.yaml rancher-import.yaml

[root@master rancher]# kubectl apply -f rancher-import.yaml

namespace/cattle-system created

serviceaccount/cattle created

clusterrolebinding.rbac.authorization.k8s.io/cattle created

secret/cattle-credentials-db8ed0c created

deployment.extensions/cattle-cluster-agent created

daemonset.extensions/cattle-node-agent created

[root@master rancher]# kubectl get pod -n cattle-system

NAME                                    READY   STATUS              RESTARTS   AGE

cattle-cluster-agent-5b98f69764-cmhwt   /     ContainerCreating             2m14s

cattle-node-agent-4gxlt                 /     ContainerCreating             2m14s

cattle-node-agent-l2zmg                 /     ContainerCreating             2m14s
等待一段时间,镜像下载完毕
[root@master rancher]# kubectl get pod -n cattle-system -owide

NAME                                    READY   STATUS    RESTARTS   AGE   IP            NODE     NOMINATED NODE   READINESS GATES

cattle-cluster-agent-5b98f69764-cmhwt   /     Running             18m   10.244.2.41   node01   <none>           <none>

cattle-node-agent-4gxlt                 /     Running             18m   10.0.1.229    node01   <none>           <none>

cattle-node-agent-l2zmg                 /     Running             18m   10.0.1.7      node02   <none>           <none>
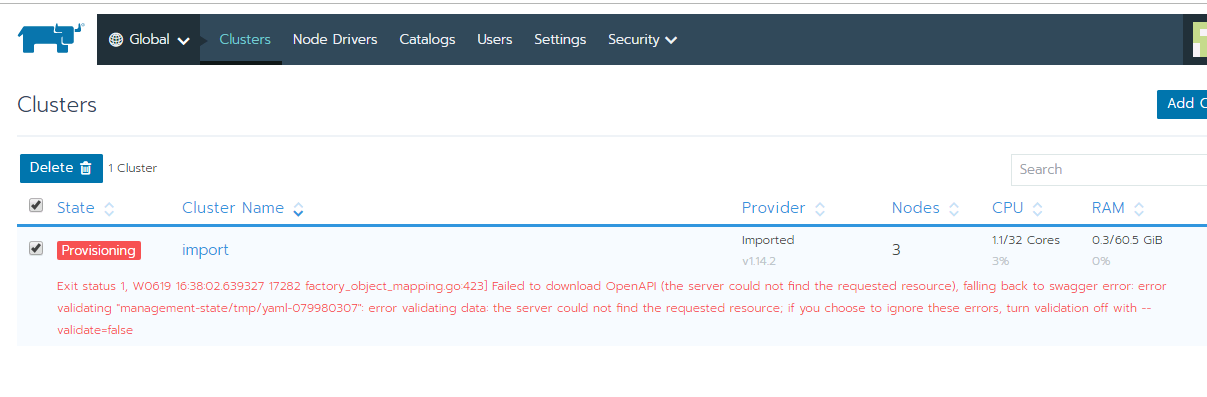
回到浏览器发现集群已经倒入,集群能正常使用,但是还有报以下错误,有待研究
Exit status 1, W0619 16:36:49.951709 16814 factory_object_mapping.go:423] Failed to download OpenAPI (the server could not find the requested resource), falling back to swagger error: error validating "management-state/tmp/yaml-787242553": error validating data: the server could not find the requested resource; if you choose to ignore these errors, turn validation off with --validate=false
安装rancher以及使用rancher倒入kubernetes集群和添加及管理集群的更多相关文章
- redis 与java的连接 和集群环境下Session管理
redis 的安装与设置开机自启(https://www.cnblogs.com/zhulina-917/p/11746993.html) 第一步: a) 搭建环境 引入 jedis jar包 co ...
- Ubuntu 18 使用docker安装rancher/server:stable并运行kubernetes
1.安装docker sudo apt-get install docker.io docker的版本:Docker version 17.12.1-ce 2.安装virtualbox-qt,因为vi ...
- rancher导入k8s集群后添加监控无数据
1.日志报错 rancher导入k8s集群后添加监控无数据,rancher日志报错: k8s.io/kube-state-metrics/pkg/collectors/builder.go:: Fai ...
- rancher 笔记 之 rancher应用中心
rancher应用中心 rancher 的应用中心 可以 自定义,在 admin -> catlog 中 指定路劲 rancher的应用中心 就是一个git项目 指定git的路劲的时候 填写的是 ...
- zookeeper安装和应用场合(名字,配置,锁,队列,集群管理)
安装和配置详解 本文介绍的 Zookeeper 是以 3.2.2 这个稳定版本为基础,最新的版本可以通过官网http://hadoop.apache.org/zookeeper/ 来获取,Zookee ...
- [转帖]安装prometheus+grafana监控mysql redis kubernetes等
安装prometheus+grafana监控mysql redis kubernetes等 https://www.cnblogs.com/sfnz/p/6566951.html plug 的模式进行 ...
- Dubbo入门到精通学习笔记(十四):ActiveMQ集群的安装、配置、高可用测试,ActiveMQ高可用+负载均衡集群的安装、配置、高可用测试
文章目录 ActiveMQ 高可用集群安装.配置.高可用测试( ZooKeeper + LevelDB) ActiveMQ高可用+负载均衡集群的安装.配置.高可用测试 准备 正式开始 ActiveMQ ...
- k8s笔记0528-基于KUBERNETES构建企业容器云手动部署集群记录-2
三.ETCD集群部署 类似于走zookeeper集群分布式协调服务,可做以key v形式存储在ETCD中. 官方链接:https://github.com/coreos/etcd 分布式kv存储,为分 ...
- ASP.NET Core在Azure Kubernetes Service中的部署和管理
目录 ASP.NET Core在Azure Kubernetes Service中的部署和管理 目标 准备工作 注册 Azure 账户 AKS文档 进入Azure门户(控制台) 安装 Azure Cl ...
随机推荐
- Shell 编程综合案例
Shell编程综合案例 Shell也学习了大概的知识,现在这篇文章就大概讲述下如何使用shell编写一个脚本呢?下面就展示一个大家常用的数据库备份案例来进行展示. 需求分析 1)每天凌晨2:10分备份 ...
- struts2类型转换1
概述 从一个 HTML 表单到一个 Action 对象, 类型转换是从字符串到非字符串. HTTP 没有 “类型” 的概念. 每一项表单输入只可能是一个字符串或一个字符串数组. 在服务器端, 必须把 ...
- 读书笔记一、numpy基础--创建数组
创建ndarray (1)使用array函数 接受一切序列型的对象(包括其他数组),然后产生一个新的含有传入数据的numpy数组. import numpy as np #将一个由数值组成列表作为 ...
- winfrom设置webBrowser框架默认的IE内核版本
要实现设置webBrowser框架默认的IE内核版本的功能需要三个方法 1:修改注册表信息来兼容当前程序 /// <summary> /// 修改注册表信息来兼容当前程序 /// /// ...
- OpenGL glfw
{ https://github.com/glfw/glfw }
- Ruby 命令行选项
Ruby 命令行选项 Ruby 一般是从命令行运行,方式如下: $ ruby [ options ] [.] [ programfile ] [ arguments ... ] 解释器可以通过下列选项 ...
- 全球首个开放应用模型 OAM 开源
业界要闻 全球首个开放应用模型 OAM 开源 2019 年 10 月 17 日,阿里巴巴合伙人.阿里云智能基础产品事业部总经理蒋江伟(花名:小邪)在 Qcon 上海重磅宣布,阿里云与微软联合推出开放应 ...
- kafka-manager监控工具的安装和使用
kafka-manager监控工具的使用 第一步:对kafkamanager进行下载并编译 此步骤略:可参照成功与否不详,https://www.jianshu.com/p/174b6eb10d9d ...
- NX二次开发-UFUN查询对象的类型和子类型UF_OBJ_ask_type_and_subtype
NX9+VS2012 #include <uf.h> #include <uf_obj.h> #include <uf_modl.h> #include <u ...
- NX二次开发-UFUN工程图表格注释设置单元格首选项UF_TABNOT_set_cell_prefs
NX9+VS2012 #include <uf.h> #include <uf_tabnot.h> #include <NXOpen/Part.hxx> #incl ...