【Python】Python实现Excel用例直接导入testlink-UI界面小工具
1.写在前面
testlink上传用例一种方法是excel转换为xml,然后再用xml上传,还有一种是调用api进行上传。
最开始写了个转换工具,是将excel转换为xml,然后在testlink里上传,最后发现当模块变多以后xml太多,一个一个上传太麻烦,所以尝试用调用api的方式来上传用例,并且打包成exe小工具。
2.环境
python3.7.4
testlink1.9.14 ( 1.9.14和19都测试通过 )
3.用到的库
tkinter :python自带,用于编写简易的界面
xlrd:第三方库,需要pip安装,读取excel的库,也可以使用pandas代替
TestLink-API-Python-client:第三方库,需要pip安装,提供python和testlink交互的api
4.完成效果图
4.1 用模板写好用例

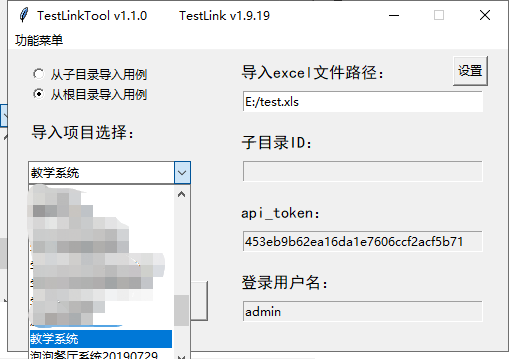
4.2 选择好上传项目和根目录导入或者子目录导入(这里用的是testlink中文网的演示地址)
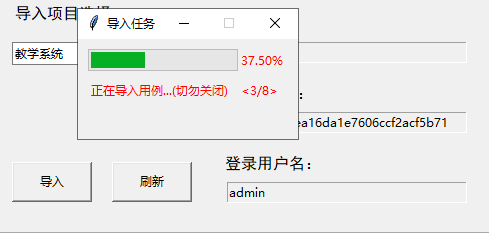
4.3 点击导入后弹出导入进度条
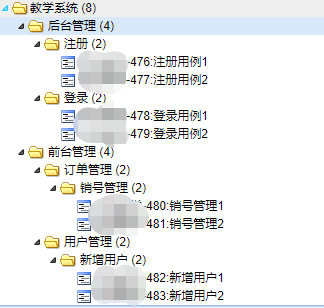
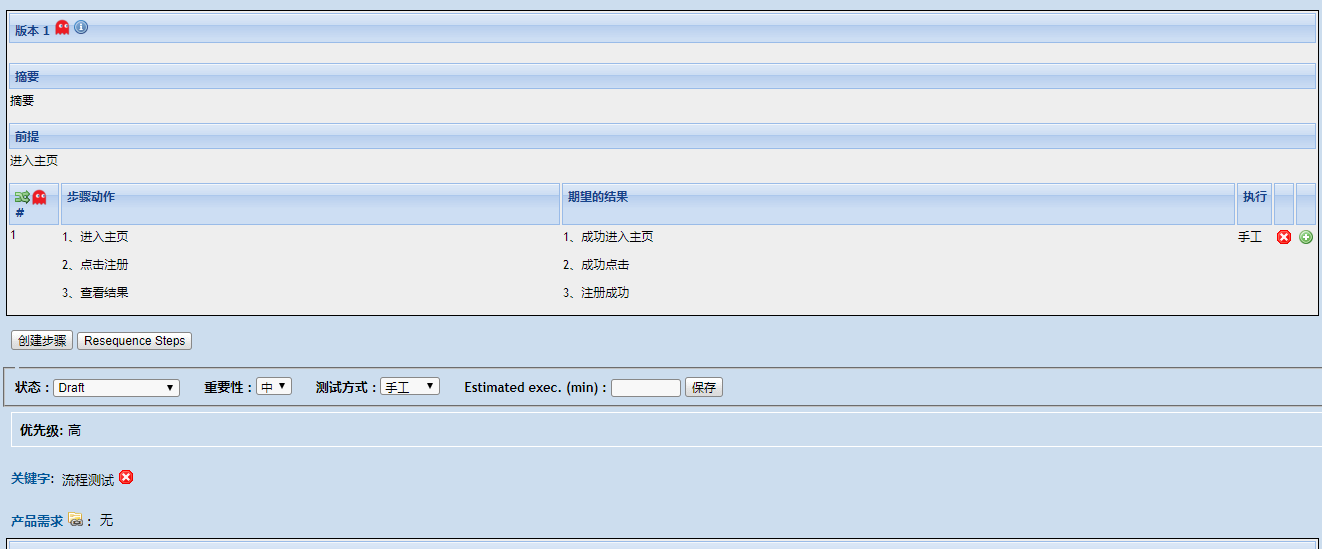
4.4 导入成功,查看testlink里的用例
5.部分代码
5.1 testlink方法二次封装
 @dataclass

 class ClientTestLink:

     """

     testlink二次封装

     """

     user_api_pwd: str

     client_url: str = "http://你的testlink地址/testlink/lib/api/xmlrpc/v1/xmlrpc.php"

     def __post_init__(self):

         self.tlc = TestlinkAPIClient(self.client_url, self.user_api_pwd)

     def get_projects(self):

         """获取testLink内所有项目"""

         project_list = []

         for project in self.tlc.getProjects():

             project_list.append([project.get("id"), project.get("name")])

         return project_list

     def get_project_id_by_name(self, project_name):

         """获取项目id根据项目名称"""

         return self.tlc.getProjectIDByName(project_name)

     def get_test_suites(self, project_id):

         """获取指定项目里(需要项目id)的测试用例集"""

         test_suite_list = []

         test_suites = self.tlc.getFirstLevelTestSuitesForTestProject(project_id)

         for test_suite in test_suites:

             test_suite_list.append([test_suite.get("id"), test_suite.get("name")])

         return test_suite_list

     def get_test_suite_id(self, project_id, test_suite_name):

         """查询一级目录"""

         all_suites = self.get_test_suites(project_id)

         for i in all_suites:

             if i[1] == test_suite_name:

                 return i[0]

             else:

                 pass

         return False

     def get_test_suite_for_test_suite(self, test_suite_id):

         """查询用例集下是否含有某用例集"""

         try:

             test_suite_id = self.tlc.getTestSuitesForTestSuite(test_suite_id)

             return test_suite_id

         except Exception:

             return False

     def create_test_suite(self, project_id: int, test_suite_name: str, parent_id: int = None):

         """判断是否拥有测试用例集,如果没有就创建测试用例集"""

         suite_data = self.tlc.createTestSuite(project_id, test_suite_name, test_suite_name, parentid=parent_id)

         cheak_bool = isinstance(suite_data, list)

         if cheak_bool:

             return suite_data[0].get("id")

         else:

             if parent_id is None:

                 return self.get_test_suite_id(project_id=project_id, test_suite_name=test_suite_name)

             else:

                 for k, v in self.get_test_suite_for_test_suite(parent_id).items():

                     if isinstance(v, dict):

                         if v.get("name") == test_suite_name:

                             return v.get("id")

                         else:

                             pass

                     else:

                         return self.get_test_suite_for_test_suite(parent_id).get("id")

     def create_test_case(self, project_id: int, test_suite_id: int, test_case_name, summary, preconditions,

                          step, result, author_login):

         """创建测试用例"""

         self.tlc.initStep(step, result, 1)

         return self.tlc.createTestCase(testprojectid=project_id,

                                        testsuiteid=test_suite_id,

                                        testcasename=test_case_name,

                                        summary=summary,

                                        preconditions=preconditions,

                                        authorlogin=author_login

                                        )

     def update_project_keywords(self, project_id, test_case_id, keyword_value):

         """加关键字"""

         test_case = self.tlc.getTestCase(testcaseid=test_case_id)[0]

         args = {

             'testprojectid': project_id,

             'testcaseexternalid': test_case['full_tc_external_id'],

             'version': int(test_case['version'])

         }

         keyword = self.tlc.addTestCaseKeywords({args['testcaseexternalid']: [keyword_value]})

         return keyword

     def update_custom_field(self, project_id, test_case_id, custom_fields: dict):

         """更新自定义字段"""

         test_case = self.tlc.getTestCase(testcaseid=test_case_id)[0]

         args = {

             'testprojectid': project_id,

             'testcaseexternalid': test_case['full_tc_external_id'],

             'version': int(test_case['version'])

         }

         custom = self.tlc.updateTestCaseCustomFieldDesignValue(

             args['testcaseexternalid'], args['version'], args['testprojectid'], custom_fields)

         return custom
5.2 从根目录上传用例
 def run_root(excel_file_name, project_id, username, api_token):

     """

     创建用例

     """

     case_num = get_all_case_num(excel_file_name)

     win2 = tk.Tk()

     # 设置标题

     win2.title("导入任务")

     # 设置大小和位置

     win2.geometry("220x100")

     # 禁止改变窗口大小

     win2.resizable(0, 0)

     mpb = ttk.Progressbar(win2, orient="horizontal", length=150, mode="determinate")

     mpb.place(x="", y="")

     mpb["maximum"] = case_num

     mpb["value"] = 0

     upload_label = tk.Label(win2, text='正在导入用例...(切勿关闭)', fg='red')

     upload_label.place(x="", y="")

     upload_label_text = tk.Label(win2, text='', fg='red')

     upload_label_text.place(x="", y="")

     upload_per_label = tk.Label(win2, text='', fg='red')

     upload_per_label.place(x="", y="")

     # 读取excel,获取数据

     datacases = xlrd.open_workbook(excel_file_name)

     sheets = datacases.sheet_names()

     for sheet in sheets:

         sheet_1 = datacases.sheet_by_name(sheet)

         # ====================测试用例功能模块==============================

         row_num = sheet_1.nrows

         for i in range(1, row_num):

             # 定义默认步骤编号第一步

             catalog_1 = sheet_1.cell_value(i, 0)  # 一级目录

             catalog_2 = sheet_1.cell_value(i, 1)  # 二级目录

             catalog_3 = sheet_1.cell_value(i, 2)  # 三级目录

             test_case_name = sheet_1.cell_value(i, 3)  # 用例名称

             summary = sheet_1.cell_value(i, 4)  # 摘要

             key_words = sheet_1.cell_value(i, 5)  # 关键字

             test_case_level = sheet_1.cell_value(i, 6)  # 用例级别

             preconditions = sheet_1.cell_value(i, 7)  # 预置条件

             step = sheet_1.cell_value(i, 8)  # 操作步骤

             step_list = []

             # 处理换行

             for i_step in step.split('\n'):

                 step_list.append("<p>" + i_step + "</p>")

             step = ''.join(step_list)

             expected_results = sheet_1.cell_value(i, 9)  # 预期结果

             expected_results_list = []

             # 处理换行

             for i_expected_results in expected_results.split('\n'):

                 expected_results_list.append("<p>" + i_expected_results + "</p>")

             expected_results = ''.join(expected_results_list)

             # 创建一级目录

             test_suite_id = ClientTestLink(api_token).create_test_suite(project_id=project_id,

                                                                         test_suite_name=catalog_1)

             # 创建二级目录

             if catalog_2:

                 test_suite_id = ClientTestLink(api_token).create_test_suite(project_id=project_id,

                                                                             test_suite_name=catalog_2,

                                                                             parent_id=test_suite_id)

                 # 创建三级目录

                 if catalog_3:

                     test_suite_id = ClientTestLink(api_token).create_test_suite(project_id=project_id,

                                                                                 test_suite_name=catalog_3,

                                                                                 parent_id=test_suite_id)

             result = ClientTestLink(api_token).create_test_case(

                 project_id=project_id,

                 test_suite_id=test_suite_id,

                 test_case_name=test_case_name,

                 summary=summary,

                 preconditions=preconditions,

                 step=step,

                 result=expected_results,

                 author_login=username)

             test_case_id = result[0].get("id")

             # 添加关键字

             ClientTestLink(api_token).update_project_keywords(project_id=project_id,

                                                               test_case_id=test_case_id,

                                                               keyword_value=key_words)

             # 添加自定义字段

             ClientTestLink(api_token).update_custom_field(project_id=project_id,

                                                           test_case_id=test_case_id,

                                                           custom_fields={"优先级": test_case_level})

             mpb["value"] = i

             upload_label_text.config(text=f"<{i}/{case_num}>")

             upload_per_label.config(text=f"{((i / case_num) * 100):.2f}%")

             win.update()

             print(f"{test_case_id}-上传用例成功")

     win2.destroy()
6.写在最后
等稍后整理好后会把整个源码放出来,因为写的比较着急,很多代码逻辑没考虑到,欢迎指出,指出必改。
【Python】Python实现Excel用例直接导入testlink-UI界面小工具的更多相关文章
- 快速读取csv平面文件,并导入数据库,简单小工具
using DataToDeal; using LumenWorks.Framework.IO.Csv; using Microsoft.Win32; using System; using Syst ...
- 用Python写个自动ssh登录远程服务器的小工具
很多时候我们喜欢在自己电脑的终端直接ssh连接Linux服务器,而不喜欢使用那些有UI界面的工具区连接我们的服务器.可是在终端使用ssh我们每次都需要输入账号和密码,这也是一个烦恼,所以我们可以简单的 ...
- testlink用例转换小工具(excel转为xml,python版)
前面文章记录了testlink的安装方法(CentOS 7下安装xampp和testlink),由于testlink仅支持xml格式的用例导入,研究了下excel转xml的方法, 从网上其他网友那里借 ...
- 使用Python将xmind脑图转成excel用例(一)
最近接到一个领导需求,将xmind脑图直接转成可以导入的excel用例,并且转换成gui可执行的exe文件,方便他人使用. 因为对Python比较熟悉,所以就想使用Python来实现这个功能,先理一下 ...
- 使用Python将Excel中的数据导入到MySQL
使用Python将Excel中的数据导入到MySQL 工具 Python 2.7 xlrd MySQLdb 安装 Python 对于不同的系统安装方式不同,Windows平台有exe安装包,Ubunt ...
- python制作简单excel统计报表3之将mysql数据库中的数据导入excel模板并生成统计图
python制作简单excel统计报表3之将mysql数据库中的数据导入excel模板并生成统计图 # coding=utf-8 from openpyxl import load_workbook ...
- Python实现XMind测试用例快速转Excel用例
转载请注明出处️ 作者:测试蔡坨坨 原文链接:caituotuo.top/c2d10f21.html 你好,我是测试蔡坨坨. 今天分享一个Python编写的小工具,实现XMind测试用例转Excel用 ...
- python读取excel一例-------从工资表逐行提取信息
在工作中经常要用到python操作excel,比如笔者公司中一个人事MM在发工资单的时候,需要从几百行的excel表中逐条的粘出信息,然后逐个的发送到员工的邮箱中.人事MM对此事不胜其烦,终于在某天请 ...
- 使用Python操作Office——EXCEL
首先介绍下office win32 com接口,这个是MS为自动化提供的操作接口,比如我们打开一个EXCEL文档,就可以在里面编辑VB脚本,实现我们自己的效果.对于这种一本万利的买卖,Python怎么 ...
随机推荐
- ReentrantReadWriteLock实现原理
在java并发包java.util.concurrent中,除了重入锁ReentrantLock外,读写锁ReentrantReadWriteLock也很常用.在实际开发场景中,在使用共享资源时,可能 ...
- xftp xshell 个人下载官网
https://www.netsarang.com/zh/xftp-download/
- 2018-08-15-weekly
Algorithm 5. Longest Palindromic Substring What 给定一个字符串s,找到s中最长的回文子字符串. 给定s的最大长度为1000. How 这是一道比较经典的 ...
- $LCT$维护子树信息学习笔记
\(LCT\)维护子树信息学习笔记 昨天\(FDF\)好题分享投了 \([ZJOI2018]\)历史 这题. 然后我顺势学学这个姿势. 结果调了一年...于是写个笔记记录一下. 基本原理 比较显然地, ...
- 破坏双亲委托机制的一些情况---Tomcat和JDBC,破坏后的安全问题
采用双亲委托机制的原因 类加载器就是将字节码搬进jvm方法区的组件.我们知道,JVM识别加载进来的类是通过类加载器+类全名完成的,也就是说同一个类由不同类加载器加载进去的话就会被视为不同的类.jdk提 ...
- 对Promise的研究2
3.Promise.prototype.then() Promise 实例具有then方法,也就是说,then方法是定义在原型对象Promise.prototype上的.它的作用是为 Promise ...
- 转Oracle、MySql、SQLServer 数据分页查询
最近简单的对oracle,mysql,sqlserver2005的数据分页查询作了研究,把各自的查询的语句贴出来供大家学习..... (一). mysql的分页查询 mysql的分页查询是最简单的,借 ...
- linux nginx管理
1.添加 Nginx 服务 vim /lib/systemd/system/nginx.service 添加如下内容: [Unit]Description=nginxAfter=network.tar ...
- C# windows窗口应用程序切换主界面的显示内容
不知道说清楚没有?就是我的窗口分为两部分,左边,控制部分,由一些按钮组成右边,显示部分,由些控件(如下拉,文本等等组成) 左边的每个按钮对应显示部分的页面,也就是说,左边换一个按钮点,那么右边就显示其 ...
- 攻防世界 | string
#encoding=utf-8 #!usr/bin/python from pwn import * io = remote('111.198.29.45',42643) io.recvuntil(& ...