
iOS开发tips-神奇的UITableView
概述
UITableView是iOS开发中使用频率最高的UI控件,在前面的文章中对于UITableView的具体用法有详细的描述,今天主要看一些UITableView开发中的常见一些坑,这些坑或许不深,但是如果开发中注意不到的话往往比较浪费时间。
神奇的section header
事情的起因是一个网友说要实现一个类似下图界面,但是不管是设置sectionHeaderHeight还是代理方法中实现func tableView(_ tableView: UITableView, heightForHeaderInSection section: Int)都无法调整Section Header的默认高度。而且他还试过通过func tableView(_ tableView: UITableView, viewForHeaderInSection section: Int) -> UIView?自定义一个header也是无济于事。
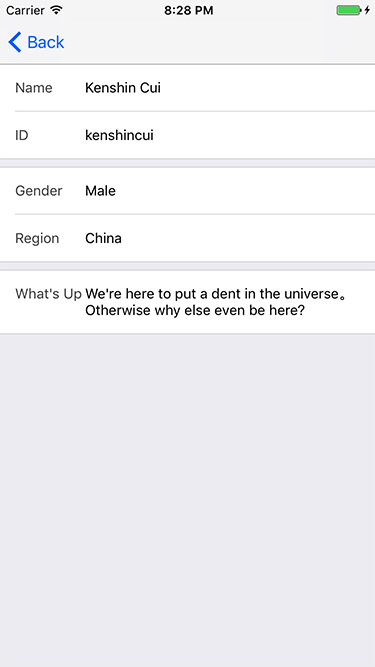 

其实这个问题解决起来并不复杂,只要设置sectionFooterHeight为0即可(当然对应通过代理方法也是可以的)。默认情况下分组样式UITableView的section header和section footer是由一个默认高度的,并不为0。
import UIKit

private let ProfileTableViewControllerCellReuseIdentifier = "ProfileTableViewCell"

class ProfileTableViewController: UIViewController {

    // MARK: - Nested type

    struct ProfileData {

        var title:String!

        var content:String!

    }

    // MARK: - TableView life cycle

    override func viewDidLoad() {

        super.viewDidLoad()

        self.setup()

        self.loadData()

    }

    // MARK: - Private method

    private func setup() {

        self.view.backgroundColor = UIColor.gray

        self.tableView.register(ProfileTableViewCell.self, forCellReuseIdentifier: ProfileTableViewControllerCellReuseIdentifier)

        self.tableView.dataSource = self

        self.tableView.delegate = self

        self.view.addSubview(self.tableView)

        self.tableView.snp.makeConstraints { (make) in

            make.edges.equalTo(0.0)

        }

    }

    private func loadData() {

        self.data.removeAll()

        let row1 = ProfileData(title: "Name", content: "Kenshin Cui")

        let row2 = ProfileData(title: "ID", content: "kenshincui")

        let section1 = [row1,row2]

        let row3 = ProfileData(title: "Gender", content: "Male")

        let row4 = ProfileData(title: "Region", content: "China")

        let section2 = [row3,row4]

        let row5 = ProfileData(title: "What's Up", content: "We're here to put a dent in the universe。 Otherwise why else even be here?")

        let section3 = [row5]

        self.data.append(section1)

        self.data.append(section2)

        self.data.append(section3)

        self.tableView.reloadData()

    }

    // MARK: - Private property

    private lazy var tableView:UITableView = {

        let temp = UITableView(frame: CGRect.zero, style: .grouped)

        temp.estimatedRowHeight = 50

        temp.sectionFooterHeight = 0

        return temp

    }()

    fileprivate var data = [[ProfileData]]()

}

extension ProfileTableViewController:UITableViewDataSource, UITableViewDelegate{

    // MARK: - Table view data source

    func numberOfSections(in tableView: UITableView) -> Int {

        return self.data.count

    }

    func tableView(_ tableView: UITableView, numberOfRowsInSection section: Int) -> Int {

        let sectionData = self.data[section]

        return sectionData.count

    }

    func tableView(_ tableView: UITableView, cellForRowAt indexPath: IndexPath) -> UITableViewCell {

        if let cell = tableView.dequeueReusableCell(withIdentifier: ProfileTableViewControllerCellReuseIdentifier, for: indexPath) as? ProfileTableViewCell {

            let dataItem = self.data[indexPath.section][indexPath.row]

            cell.title = dataItem.title

            cell.content = dataItem.content

            return cell

        }

        return UITableViewCell()

    }

    // MARK: - Table view delegate

    func tableView(_ tableView: UITableView, heightForHeaderInSection section: Int) -> CGFloat {

        if section == 0 {

            return CGFloat.leastNormalMagnitude

        }

        return 8.0

    }

}
数据源和代理方法的自动调用
同样是上面的代码,如果去掉loadData()方法后面的reloadData()调用你会发现整个界面不会有任何异常现象,数据可以照样加载,也就是说数据源方法和代理方法会正常调用加载对应的数据。这是为什么呢?
事实上类似于func numberOfSections(in tableView: UITableView) -> Int等方法并不是只有reloadData()等方法刷新的时候才会调用,而是在已经设置了dataSource和delegate后布局变化后就会调用。因此即使注释掉上面的reloadData()方法界面仍然不会有变化。
要验证这个结论可以延迟设置数据源和代理(注意:手动更新界面布局setNeedsLayout、layoutIfNeeded),或者最简单的方式就是旋转屏幕会发现func numberOfSections(in tableView: UITableView) -> Int、func tableView(_ tableView: UITableView, heightForRowAt indexPath: IndexPath) -> CGFloat等方法都会调用。除此之外,你也会发现func numberOfSections(in tableView: UITableView) -> Int其实并不止一次调用,系统内部为了确定整个布局本身对它就存在着调用。
分割线左侧对齐
貌似苹果的设计分割就建议你将分割线左侧留出一定的间距,但在实际开发过程中却很少见设计师会这么做。要让分割线左侧对齐对于当前iOS 10来说应该是再简单不过,只要设置UITableView的separatorInset = UIEdgeInsets.zero即可(如果仅仅想要控制器某个UITableViewCell的分割线则直接设置UITableViewCell的separatorInset,当然这种方式对于.grouped风格的UITableView而言无法修改Section顶部和底部分割线)。不过低版本的iOS就要复杂一些,例如iOS 7除了以上设置还要设置UITableViewCell的separatorInset;而iOS 8、9还要再设置UITableView的layoutMargins等。
当然,如果你希望控制右侧的间距,仍然可以调整separatorInset的right即可,不过调整top、bottom应该不会生效。
移除多余的行
不妨将上面代码修改为.plain风格的UITableView,此时会发现由于数据后面多了很多多余的空行。移除这些空行的方法也很简单,那就是设置tableFooterView = UIView()即可(如果设置view的高度为CGFloat.leastNormalMagnitude则不显示最后面的一条分割线)。当然,默认情况下style为.plain则每个section的上下均不存在分割线。
注意:.plain风格的UITableView设置sectionFooterHeight不起作用,必须通过func tableView(_ tableView: UITableView, heightForFooterInSection section: Int) -> CGFloat代理方法设置。
.plain下禁用section header悬停
有时候你不得不用.plain Style,因为这样一来默认Section Header就有悬停效果,但是有时候你只是想要使用.plain样式却不想显示悬停效果,这时你必须禁用这个效果。
当然可以使用很多黑科技来禁用悬停效果,但是最简单的方式应该是直接将header隐藏起来:通过设置tableViewHeader高度等同于section header的高度,然后设置tableView的contentInset让它偏移到上方,这样一来当滚动到section header悬浮时出现的位置不是0而是被隐藏起来的偏移位置。
import UIKit

private let ProfileTableViewControllerCellReuseIdentifier = "ProfileTableViewCell"

class ProfileTableViewControllerWithPlain: UIViewController {

    // MARK: - Nested type

    struct ProfileData {

        var title:String!

        var content:String!

    }

    // MARK: - TableView life cycle

    override func viewDidLoad() {

        super.viewDidLoad()

        self.setup()

        self.loadData()

    }

    // MARK: - Private method

    private func setup() {

        self.view.backgroundColor = UIColor.gray

        self.tableView.register(ProfileTableViewCell.self, forCellReuseIdentifier: ProfileTableViewControllerCellReuseIdentifier)

        self.tableView.estimatedRowHeight = 50

        self.tableView.dataSource = self

        self.tableView.delegate = self

        self.view.addSubview(self.tableView)

        self.tableView.snp.makeConstraints { (make) in

            make.edges.equalTo(0.0)

        }

        // disable section header sticky

        let headerView = UIView(frame: CGRect(x: 0, y: 0, width: 375, height: 8.0))

        self.tableView.tableHeaderView = headerView

        self.tableView.contentInset.top = -8.0

    }

    private func loadData() {

        self.data.removeAll()

        let row1 = ProfileData(title: "Name", content: "Kenshin Cui")

        let row2 = ProfileData(title: "ID", content: "kenshincui")

        let section1 = [row1,row2]

        let row3 = ProfileData(title: "Gender", content: "Male")

        let row4 = ProfileData(title: "Region", content: "China")

        let section2 = [row3,row4]

        let row5 = ProfileData(title: "What's Up", content: "We're here to put a dent in the universe。 Otherwise why else even be here?")

        let section3 = [row5]

        self.data.append(section1)

        self.data.append(section2)

        self.data.append(section3)

//        self.tableView.reloadData()

    }

    // MARK: - Private property

    fileprivate lazy var tableView:UITableView = {

        let temp = UITableView(frame: CGRect.zero, style: .plain)

        temp.estimatedRowHeight = 50

        temp.tableFooterView = UIView()

        return temp

    }()

    fileprivate var data = [[ProfileData]]()

}

extension ProfileTableViewControllerWithPlain:UITableViewDataSource, UITableViewDelegate{

    // MARK: - Table view data source

    func numberOfSections(in tableView: UITableView) -> Int {

        return self.data.count

    }

    func tableView(_ tableView: UITableView, numberOfRowsInSection section: Int) -> Int {

        let sectionData = self.data[section]

        return sectionData.count

    }

    func tableView(_ tableView: UITableView, cellForRowAt indexPath: IndexPath) -> UITableViewCell {

        if let cell = tableView.dequeueReusableCell(withIdentifier: ProfileTableViewControllerCellReuseIdentifier, for: indexPath) as? ProfileTableViewCell {

            let dataItem = self.data[indexPath.section][indexPath.row]

            cell.title = dataItem.title

            cell.content = dataItem.content

            return cell

        }

        return UITableViewCell()

    }

    // MARK: - Table view delegate

    func tableView(_ tableView: UITableView, heightForHeaderInSection section: Int) -> CGFloat {

        if section == 0 {

            return CGFloat.leastNormalMagnitude

        }

        return 8.0

    }

}
调整tableHeaderView的高度
如果你的UITableView设置了tableHeaderView的话,有事你可能喜欢动态调整tableHeaderView的高度,但是怎么修改这个view的高度都不会生效。正确的修改方法是受限修改view的高度,然后将这个view重新设置给UITableView的tableHeaderView属性。下面的demo演示了这一过程,通过这个demo可以看到一个有趣的事实:如果你设置了tableHeaderView但是没有指定高度的话,UITableView会自动给他提供一个默认高度。这在低版本的iOS系统中即使不指定tableHeaderView也会有这个一个默认高度,解决方式就是设置view的高度为一个极小值,当然iOS 10中如果不指定则默认没有tableHeaderView。
import UIKit

private let ProfileTableViewControllerCellReuseIdentifier = "ProfileTableViewCell"

class ProfileTableViewControllerWithHeader: UIViewController {

    // MARK: - Nested type

    struct ProfileData {

        var title:String!

        var content:String!

    }

    // MARK: - TableView life cycle

    override func viewDidLoad() {

        super.viewDidLoad()

        self.setup()

        self.loadData()

        self.loadHeaderData()

    }

    // MARK: - Private method

    private func setup() {

        self.view.backgroundColor = UIColor.gray

        self.tableView.tableHeaderView = self.headerView

        self.tableView.register(ProfileTableViewCell.self, forCellReuseIdentifier: ProfileTableViewControllerCellReuseIdentifier)

        //        self.tableView.separatorInset = UIEdgeInsets.zero

        self.tableView.dataSource = self

        self.tableView.delegate = self

        self.view.addSubview(self.tableView)

        self.tableView.snp.makeConstraints { (make) in

            make.edges.equalTo(0.0)

        }

    }

    private func loadData() {

        self.data.removeAll()

        let row1 = ProfileData(title: "Name", content: "Kenshin Cui")

        let row2 = ProfileData(title: "ID", content: "kenshincui")

        let section1 = [row1,row2]

        let row3 = ProfileData(title: "Gender", content: "Male")

        let row4 = ProfileData(title: "Region", content: "China")

        let section2 = [row3,row4]

        let row5 = ProfileData(title: "What's Up", content: "We're here to put a dent in the universe。 Otherwise why else even be here?")

        let section3 = [row5]

        self.data.append(section1)

        self.data.append(section2)

        self.data.append(section3)

    }

    private func loadHeaderData() {

        DispatchQueue.main.asyncAfter(

        deadline: DispatchTime.now() + Double(Int64(2.0 * Double(NSEC_PER_SEC))) / Double(NSEC_PER_SEC)) {

            () -> Void in

            // set header data

            self.headerView.avatarURL = "avatar.jpg"

            self.headerView.introduction = "即使是别人看不见的地方,对其工艺也应该尽心尽力!"

            self.headerView.frame.size.height = self.headerView.systemLayoutSizeFitting(UILayoutFittingCompressedSize).height

            self.tableView.tableHeaderView = self.headerView

        }

    }

    // MARK: - Private property

    private lazy var tableView:UITableView = {

        let temp = UITableView(frame: CGRect.zero, style: .grouped)

        temp.estimatedRowHeight = 50

        temp.sectionFooterHeight = 0

        return temp

    }()

    private lazy var headerView:ProfileHeaderView = {

        let temp = ProfileHeaderView()

        return temp

    }()

    fileprivate var data = [[ProfileData]]()

}

extension ProfileTableViewControllerWithHeader:UITableViewDataSource, UITableViewDelegate{

    // MARK: - Table view data source

    func numberOfSections(in tableView: UITableView) -> Int {

        return self.data.count

    }

    func tableView(_ tableView: UITableView, numberOfRowsInSection section: Int) -> Int {

        let sectionData = self.data[section]

        return sectionData.count

    }

    func tableView(_ tableView: UITableView, cellForRowAt indexPath: IndexPath) -> UITableViewCell {

        if let cell = tableView.dequeueReusableCell(withIdentifier: ProfileTableViewControllerCellReuseIdentifier, for: indexPath) as? ProfileTableViewCell {

            let dataItem = self.data[indexPath.section][indexPath.row]

            cell.title = dataItem.title

            cell.content = dataItem.content

            return cell

        }

        return UITableViewCell()

    }

    // MARK: - Table view delegate

    func tableView(_ tableView: UITableView, heightForHeaderInSection section: Int) -> CGFloat {

        if section == 0 {

            return CGFloat.leastNormalMagnitude

        }

        return 8.0

    }

}
iOS开发tips-神奇的UITableView的更多相关文章
- iOS开发UI篇—实现UItableview控件数据刷新
iOS开发UI篇—实现UItableview控件数据刷新 一.项目文件结构和plist文件 二.实现效果 1.说明:这是一个英雄展示界面,点击选中行,可以修改改行英雄的名称(完成数据刷新的操作). 运 ...
- iOS开发UI篇—使用UItableview完成一个简单的QQ好友列表(一)
iOS开发UI篇—使用UItableview完成一个简单的QQ好友列表(一) 一.项目结构和plist文件 二.实现代码 1.说明: 主控制器直接继承UITableViewController // ...
- iOS开发UI篇—在UITableview的应用中使用动态单元格来完成app应用程序管理界面的搭建
iOS开发UI篇—在UITableview的应用中使用动态单元格来完成app应用程序管理界面的搭建 一.实现效果 说明:该示例在storyboard中使用动态单元格来完成. 二.实现 1.项目文件结构 ...
- IOS开发之表视图(UITableView)
IOS开发之表视图(UITableView)的基本介绍(一) (一):UITableView的基本概念 1.在IOS开发中,表视图的应用十分广泛和普及.因此掌握表视图的用法显得非常重要.一般情况下对于 ...
- iOS开发tips总结
tip 1 : 给UIImage添加毛玻璃效果 func blurImage(value:NSNumber) -> UIImage { let context = CIContext(opti ...
- iOS开发UI篇—在UItableview中实现加载更多功能
一.实现效果 点击加载更多按钮,出现一个加载图示,三秒钟后添加两条新的数据. 二.实现代码和说明 当在页面(视图部分)点击加载更多按钮的时候,主页面(主控制器 ...
- iOS开发UI篇—使用UItableview完成一个简单的QQ好友列表(二)
一.实现效果 二.实现代码 1.数据模型部分 YYQQGroupModel.h文件 // // YYQQGroupModel.h // 02-QQ好友列表(基本数据的加载) / ...
- iOS 开发 Tips
1.MVVM 的优点 MVVM 兼容 MVC,可以先创建一个简单的 View Model,再慢慢迁移. MVVM 使得 app 更容易测试,因为 View Model 部分不涉及 UI. MVVM 最 ...
- iOS开发- iOS7显示偏差(UITableView下移)解决的方法
之前碰到过一个问题. 就是利用storyboard拖动出来的控件, 在iOS7上跑老是莫名的下移. 比方这样(红色区域为多余的) 解决的方法: iOS7在Conttoller中新增了这个属性: aut ...
随机推荐
- iOS回顾笔记(03) -- 自定义View的封装和xib文件的使用详解
iOS回顾笔记(03) -- 自定义View的封装和xib文件的使用详解 iOS开发中,我们常常将一块View封装起来,以便于统一管理内部的子控件.如iOS回顾笔记(02)中的"书" ...
- Host文件修改后无效的解决办法
什么是hosts文件? 简单的说,hosts文件是用于本地dns服务(相关主题:什么是DNS缓存,如何清除DNS缓存?)的,采用ip 域名的格式写在一个文本文件当中,Hosts是一个没有扩展名的系统文 ...
- DOM基础(三)
对于DOM来说,知识点其实并不多,要理解DOM并不难,难的是会用.可能有的人看见DOM获取元素要这么长一串单词就觉得生无可恋了.不过说实在的,如果你能理解他的意思跟用法.而且稍微再有点英语基础的话,D ...
- 用stm32f0x建立新的工程重要步骤
stm32f10x系列新建空的工程主要原理: 1.添加启动文件 不同的芯片类型的启动文件的容量是不同的,选择适合该芯片的容量作为启动文件. 注意:启动文件是汇编语言编写的,所以文件的后缀名为.s 2. ...
- shell笔记整理1---vim编译器基础应用(参考鸟哥)
1.linux中的配置文件都已是以ASCII的纯文本的形式存在 2.vim文本编译器. 一般模式:用vi打开的一个文件直接进入的就是一般模式,这个模式可以移动光标和删除字符,复制粘贴等,但是不能比那几 ...
- 有关ospf抓包
有关ospf抓包 1.相关的路由器为这样子的: 路由器都运行了ospf: 抓包的链路为GE0/0/2 , 2.抓包图: 从图上我们可以看到,protocol info 这一栏里面出现了: hello ...
- HTML5学习笔记<六>: HTML5框架, 背景和实体
HTML5框架 1. 框架标签(frame): 框架对于页面的设计有着很大的作用 2. 框架集标签(<frameset>): 框架集标签定义如何将窗口分割为框架 每个frameset定义一 ...
- [笔记]LibSVM源码剖析(java版)
之前学习了SVM的原理(见http://www.cnblogs.com/bentuwuying/p/6444249.html),以及SMO算法的理论基础(见http://www.cnblogs.com ...
- 《连载 | 物联网框架ServerSuperIO教程》- 16.OPC Server的使用步骤。附:3.3 发布与版本更新说明。
1.C#跨平台物联网通讯框架ServerSuperIO(SSIO)介绍 <连载 | 物联网框架ServerSuperIO教程>1.4种通讯模式机制. <连载 | 物联网框架Serve ...
- 免安装版Tomcat配置内存
去安装目录下 找 bin 目录找到这个文件 catalina.bat在文件的头部加上 set JAVA_OPTS=-Xms512m -Xmx512m -Xss1024k具体大小自己调整