Material04 MdCardModule和MdButtonModule综合运用
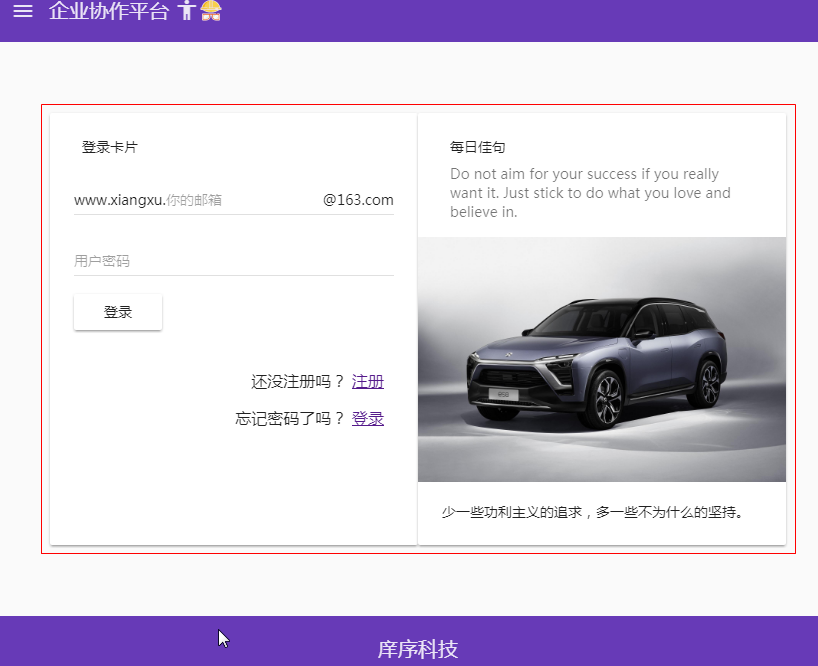
设计需求:设计一个登陆页面
1 模块导入
1.1 将MdCardModule和MdButtonModule模块导入到共享模块中
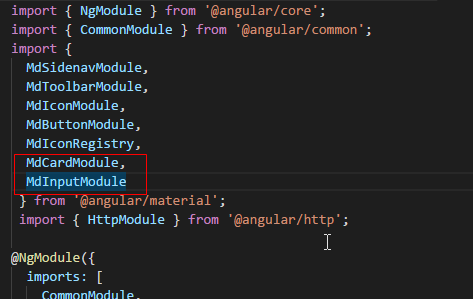
import { NgModule } from '@angular/core';

import { CommonModule } from '@angular/common';

import {

  MdSidenavModule,

  MdToolbarModule,

  MdIconModule,

  MdButtonModule,

  MdIconRegistry,

  MdCardModule,

  MdInputModule

 } from '@angular/material';

 import { HttpModule } from '@angular/http';

@NgModule({

  imports: [

    CommonModule,

    HttpModule,

    MdSidenavModule,

    MdToolbarModule,

    MdIconModule,

    MdButtonModule,

    MdCardModule,

    MdInputModule

  ],

  declarations: [],

  exports: [

    CommonModule,

    MdSidenavModule,

    MdToolbarModule,

    MdIconModule,

    MdButtonModule,

    HttpModule,

    MdCardModule,

    MdInputModule

  ]

})

export class SharedModule { }
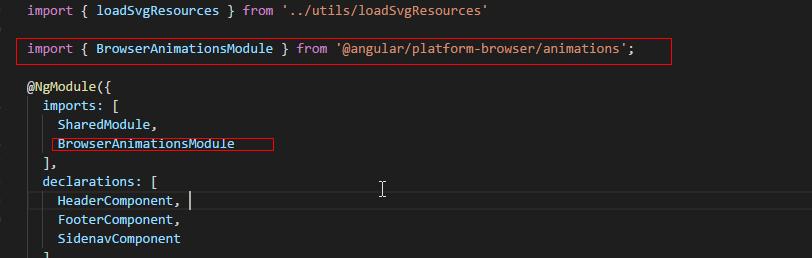
1.2 将material依赖的动画模块通过cnpm进行下载,并将动画模块导入到核心模块中
cnpm install --save @angular/animation
import { NgModule, Optional, SkipSelf } from '@angular/core';

import { SharedModule } from '../shared/shared.module';

import { HeaderComponent } from './header/header.component';

import { FooterComponent } from './footer/footer.component';

import { SidenavComponent } from './sidenav/sidenav.component';

import { DomSanitizer } from '@angular/platform-browser';

import { MdIconRegistry } from '@angular/material';

import { loadSvgResources } from '../utils/loadSvgResources'

import { BrowserAnimationsModule } from '@angular/platform-browser/animations';

@NgModule({

  imports: [

    SharedModule,

    BrowserAnimationsModule

  ],

  declarations: [

    HeaderComponent,

    FooterComponent,

    SidenavComponent

  ]

  ,

  exports: [

    HeaderComponent,

    FooterComponent,

    SidenavComponent

  ]

})

export class CoreModule {

  constructor(

    @Optional() @SkipSelf() parentModule: CoreModule,

    mdIconRegistry: MdIconRegistry,

    domSanitizer: DomSanitizer

  ) {

      if (parentModule) {

        throw new Error('CoreModule模块已经存在,请尽在主模块中进行引入。')

      }

      loadSvgResources(mdIconRegistry, domSanitizer);

  }

}
技巧01:其他模块如果需要用到MdCardModule和MdButtonModule时只需要导入共享模块即可
技巧02:核心模块在angualr应用只加载一次而且是在项目启动时加载的,共享模块可以加载多次
2 md-card组件详解
2.1 md-card组件主要结构
<md-card>

  <md-card-header>

    <md-card-title>主标题</md-card-title>

    <md-card-subtitle>副标题</md-card-subtitle>

  </md-card-header>

  <md-card-content>内容</md-card-content>

  <md-card-actions>行为</md-card-actions>

  <md-card-footer>页脚</md-card-footer>

</md-card>
3 MdButtonModule详解
3.1 MdButtonModule模块中按钮的形式
3.1.1 普通按钮:md-button md-raised-button md-icon-button
3.1.2 浮动按钮: md-fab md-mini-fab
3.2 MdButtonModule模块中按钮的使用规则
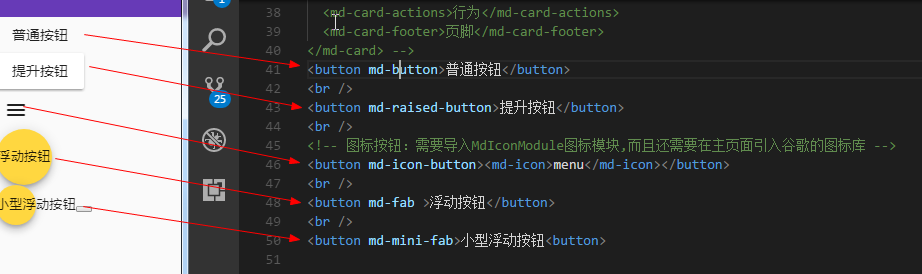
<button md-button>普通按钮</button>

<br />

<button md-raised-button>提升按钮</button>

<br />

<!-- 图标按钮:需要导入MdIconModule图标模块,而且还需要在主页面引入谷歌的图标库 -->

<button md-icon-button><md-icon>menu</md-icon></button>

<br />

<button md-fab >浮动按钮</button>

<br />

<button md-mini-fab>小型浮动按钮</button>
技巧02:谷歌字体图标库镜像引用 -> <link href="//lib.baomitu.com/material-design-icons/3.0.1/iconfont/material-icons.min.css" rel="stylesheet">
4 MdCardModule 、 MdButtonModule 、 MdInputModule综合应用
4.1 导入这三个模块
4.2 下载依赖的动画模块
4.3 在登录组件中使用者三个模块提供的组件完成设计
<form>
<md-card>
<md-card-header>
<md-card-title>登录模块</md-card-title>
<md-card-subtitle>登录信息录入并提交</md-card-subtitle>
</md-card-header>
<md-card-content>
<md-input-container class="full-width">
<span mdPrefix>XiangXu.</span>
<input mdInput type="text" placeholder="请输入你的邮箱" />
<span mdSuffix>@163.com</span>
</md-input-container>
<md-input-container class="full-width">
<input mdInput type="password" placeholder="请输入你的密码" />
</md-input-container>
<button md-raised-button type="button">登录</button>
</md-card-content>
<md-card-actions class="text-right">
<p>还未注册? <a href="">立即注册</a></p>
<p>忘记密码? <a href="">找回密码</a></p>
</md-card-actions>
<!-- <md-card-footer>页脚</md-card-footer> -->
</md-card> <md-card>
<md-card-header>
<md-card-title>每日佳句</md-card-title>
<md-card-subtitle>Do not aim for your success if you really want it. Just stick to do what you love and believe in.</md-card-subtitle>
</md-card-header>
<img md-card-image src="/assets/img/car.jpg" />
<md-card-content>少一些功利主义的追求,多一些不为什么的坚持。</md-card-content>
</md-card>
</form>
4.4 在全局CSS文件中设置
充满整行的样式
/* You can add global styles to this file, and also import other style files */

@import '~@angular/material/prebuilt-themes/deeppurple-amber.css'; // 导入material的内建主体

html, body, app-root, md-sidenav-container, .site {

    width: 100%;

    height: 100%;

    margin: 0;

}

.site {

    display: flex;

    flex-direction: column;

}

header {

    // background-color: skyblue;

}

main {

    flex: 1;

}

footer {

    // background-color: skyblue;

}

.fill-remaining-space { // flex项目自动填充多余空间

    flex: 1 1 auto;

}

.full-width {

    width: 100%;

}
4.5 在登录组件的CSS文件中设置
将form元素设置成flex容器
md-card组件宽度和高度
文本向右对齐

form {

    display: flex;

    flex-direction: row;

    justify-content: center;

    align-items: center;

    width: 100%;

    height: 100%    ;

}

md-card {

    height: 24em;

    flex: 0 0 20em;

}

.text-right {

   text-align: end;

   margin: 10px;

}

// form {

//     display: flex;

//     flex-direction: row;

//     justify-content: center;

//     align-items: center;

//     width: 100%;

//     height: 100%;

// }

// md-card {

//     height: 24em;

//     flex: 0 0 20em;

// }

// .text-right {

//     margin: 10px;

//     text-align: end;

// }
Material04 MdCardModule和MdButtonModule综合运用的更多相关文章
- Material使用04 MdCardModule和MdButtonModule综合运用
设计需求:设计一个登陆页面 1 模块导入 1.1 将MdCardModule和MdButtonModule模块导入到共享模块中 import { NgModule } from '@angular/c ...
- Material使用03 MdCardModule模块、MdInputModule模块
需求:先需要增加一个登录模块 1 创建登录模块 ng g m testLogin 1.1 将共享模块导入到登录模块中 import { NgModule } from '@angular/core'; ...
- Material04 MdListModule模块
1 在共享模块中导入MdListModule模块 import { NgModule } from '@angular/core'; import { CommonModule } from '@an ...
- AEAI DP V3.6.0 升级说明,开源综合应用开发平台
AEAI DP综合应用开发平台是一款扩展开发工具,专门用于开发MIS类的Java Web应用,本次发版的AEAI DP_v3.6.0版本为AEAI DP _v3.5.0版本的升级版本,该产品现已开源并 ...
- H5+JS+CSS3 综合应用
慕课网新教程H5+JS+CSS3 实现的七夕言情主题效果已经出炉了 从设计到实现到录制与编写用了快1个月的时间,说真的这个案例是慕课定制的,我之前也没有系统的做过这样的一个效果,在实现的时候自己也重新 ...
- [教程] [授权翻译] 使用补丁修改DSDT/SSDT [DSDT/SSDT综合教程]
[教程] [授权翻译] 使用补丁修改DSDT/SSDT [DSDT/SSDT综合教程] http://bbs.pcbeta.com/viewthread-1571455-1-1.html [教程] [ ...
- iOS--知识综合应用成就时髦小功能点
iOS--知识综合应用成就时髦小功能点
- Oracle 数据库基础学习 (七) SQL语句综合练习
一.多表查询综合练习 1. 列出高于在30部门工作的所有人员的薪金的员工的姓名.部门名称.部门编号.部门人数 分析: 需要的员工信息: |-emp表:姓名.部门编号 |-dept表:部门名称.部门编 ...
- C#综合揭秘——通过修改注册表建立Windows自定义协议
引言 本文主要介绍注册表的概念与其相关根项的功能,以及浏览器如何通过连接调用自定义协议并与客户端进行数据通信.文中讲及如何通过C#程序.手动修改.安装项目等不同方式对注册表进行修改.其中通过安装项目对 ...
随机推荐
- AngularJS学习篇(五)
AngularJS Scope(作用域) Scope(作用域) 是应用在 HTML (视图) 和 JavaScript (控制器)之间的纽带. Scope 是一个对象,有可用的方法和属性. Scope ...
- Grunt打包之seajs项目【转】
原文:http://www.cnblogs.com/accordion/p/4508154.html grunt与seajs grunt是前端流行的自定义任务的脚手架工具,我们可以使用grunt来为我 ...
- shiro实现无状态的会话,带源码分析
转载请在页首明显处注明作者与出处 朱小杰 http://www.cnblogs.com/zhuxiaojie/p/7809767.html 一:说明 在网上都找不到相关的信息,还是翻了大半天 ...
- JAVA提高十二:HashMap深入分析
首先想说的是关于HashMap源码的分析园子里面应该有很多,并且都是分析得很不错的文章,但是我还是想写出自己的学习总结,以便加深自己的理解,因此就有了此文,另外因为小孩过来了,因此更新速度可能放缓了, ...
- java 猜系统获取的随机数
int randomNumber=(int)(Math.random()*8)+1; 注释是:得到一个1到8之间的随机整数. /************************************ ...
- JavaScript面向对象(收集整理)
(1)封装 首先理解构造函数:所谓"构造函数",其实就是一个普通函数,但是内部使用了this变量.对构造函数使用new运算符,就能生成实例,并且this变量会绑定在实例对象上. f ...
- MongoDB安装(windows 10环境)
1. 下载 https://www.mongdb.com/ 选择版本:ws 2008 R2 64bit 2. 安装运行下载完成的MSI文件 安装时候选择自定义配置,选择安装路径,安装到E盘 等待2分钟 ...
- RabbitMQ之工作队列
工作队列 工作队列(又称:任务队列Task Queues)是为了避免等待一些占用大量资源.时间的操作,当我们把任务Task当做消息发送队列中,一个运行在后台的工作者worker进程就会取出任务然后处理 ...
- 五、VueJs 填坑日记之将接口用webpack代理到本地
上一篇博文,我们已经顺利的从cnodejs.org请求到了数据,但是大家可以注意到我们的/src/api/index.js的第一句就是: // 配置API接口地址 var root = 'https: ...
- app打包常用操作
1.修改appId android:打开build.gradle文件 找到defaultConfig{applicationId 'ceshi'} 修改测试.android studio会提示. Gr ...