Spring Cloud Gateway的断路器(CircuitBreaker)功能
欢迎访问我的GitHub
https://github.com/zq2599/blog_demos
内容:所有原创文章分类汇总及配套源码,涉及Java、Docker、Kubernetes、DevOPS等;
本篇概览
- 一起深入了解Spring Cloud Gateway的断路器(CircuitBreaker)功能:
- 先聊聊理论
- 再结合官方和大神的信息确定技术栈
- 再动手开发,先实现再验证
- 再趁热打铁,看看它的源码
- 最后,回顾一下有哪些不足(下一篇文章解决这些不足)
关于断路器(CircuitBreaker)
- 下图来自resilience4j官方文档,介绍了什么是断路器:
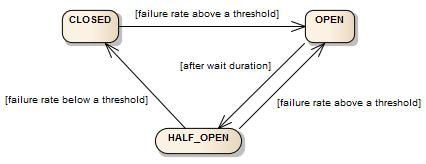
- CLOSED状态时,请求正常放行
- 请求失败率达到设定阈值时,变为OPEN状态,此时请求全部不放行
- OPEN状态持续设定时间后,进入半开状态(HALE_OPEN),放过部分请求
- 半开状态下,失败率低于设定阈值,就进入CLOSE状态,即全部放行
- 半开状态下,失败率高于设定阈值,就进入OPEN状态,即全部不放行
确认概念
- 有个概念先确认一下,即Spring Cloud断路器与Spring Cloud Gateway断路器功能不是同一个概念,Spring Cloud Gateway断路器功能还涉及过滤器,即在过滤器的规则下使用断路器:

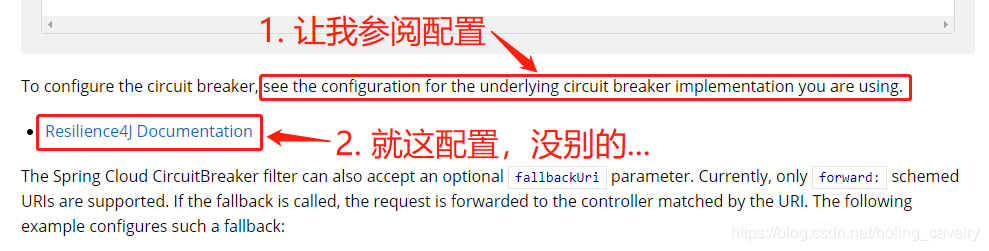
- 本篇的重点是Spring Cloud Gateway如何配置和使用断路器(CircuitBreaker),因此不会讨论Resilience4J的细节,如果您想深入了解Resilience4J,推荐资料是Spring Cloud Circuit Breaker
关于Spring Cloud断路器
- 先看Spring Cloud断路器,如下图,Hystrix、Sentinel这些都是熟悉的概念:
关于Spring Cloud Gateway的断路器功能
- 来看Spring Cloud Gateway的官方文档,如下图,有几个关键点稍后介绍:

- 上图透露了几个关键信息:
- Spring Cloud Gateway内置了断路器filter,
- 具体做法是使用Spring Cloud断路器的API,将gateway的路由逻辑封装到断路器中
- 有多个断路器的库都可以用在Spring Cloud Gateway(遗憾的是没有列举是哪些)
- Resilience4J对Spring Cloud 来说是开箱即用的
简单来说Spring Cloud Gateway的断路器功能是通过内置filter实现的,这个filter使用了Spring Cloud断路器;
官方说多个断路器的库都可以用在Spring Cloud Gateway,但是并没有说具体是哪些,这就郁闷了,此时咱们去了解一位牛人的观点:Piotr Mińkowski,就是下面这本书的作者:
- Piotr Mińkowski的博客对Spring Cloud Gateway的断路器功能做了详细介绍,如下图,有几个重要信息稍后会提到:
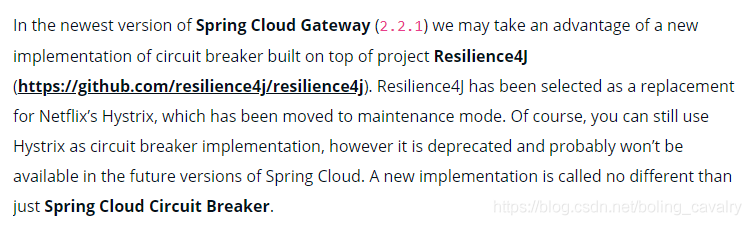
- 上图可以get到三个关键信息:
- 从2.2.1版本起,Spring Cloud Gateway集成了Resilience4J的断路器实现
- Netflix的Hystrix进入了维护阶段(能理解为即将退休吗?)
- Netflix的Hystrix依然可用,但是已废弃(deprecated),而且Spring Cloud将来的版本可能会不支持
- 再关联到官方文档也以resilience4为例(如下图),胆小的我似乎没有别的选择了,就Resilience4J吧:
- 理论分析就到此吧,接下来开始实战,具体的步骤如下:
- 准备工作:服务提供者新增一个web接口/account/{id},根据入参的不同,该接口可以立即返回或者延时500毫秒返回
- 新增名为circuitbreaker-gateway的子工程,这是个带有断路器功能的Spring Cloud Gateway应用
- 在circuitbreaker-gateway里面编写单元测试代码,用来验证断路器是否正常
- 运行单元测试代码,观察断路器是否生效
- 给断路器添加fallback并验证是否生效
- 做一次简单的源码分析,一为想深入了解断路器的同学捋清楚源码路径,二为检验自己以前了解的springboot知识在阅读源码时有么有帮助
源码下载
- 本篇实战中的完整源码可在GitHub下载到,地址和链接信息如下表所示(https://github.com/zq2599/blog_demos):
| 名称 | 链接 | 备注 |
|---|---|---|
| 项目主页 | https://github.com/zq2599/blog_demos | 该项目在GitHub上的主页 |
| git仓库地址(https) | https://github.com/zq2599/blog_demos.git | 该项目源码的仓库地址,https协议 |
| git仓库地址(ssh) | git@github.com:zq2599/blog_demos.git | 该项目源码的仓库地址,ssh协议 |
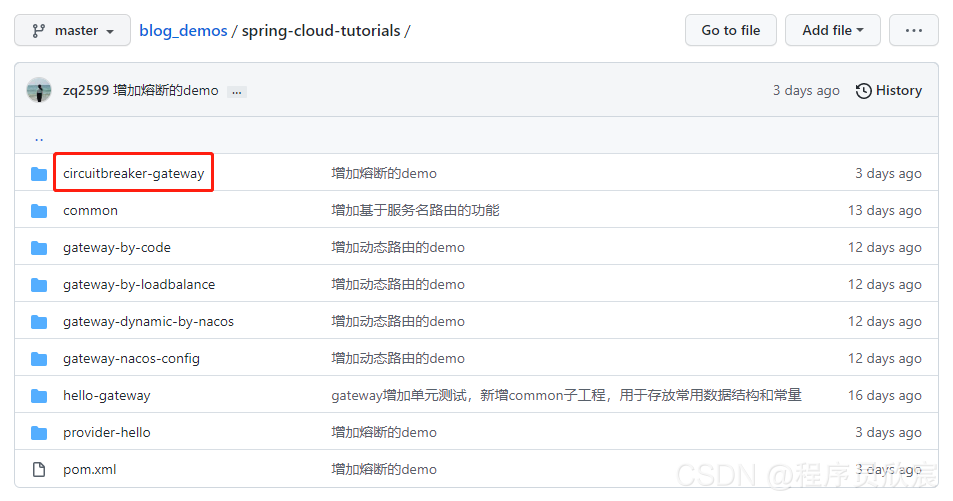
- 这个git项目中有多个文件夹,本篇的源码在spring-cloud-tutorials文件夹下,如下图红框所示:

- spring-cloud-tutorials文件夹下有多个子工程,本篇的代码是circuitbreaker-gateway,如下图红框所示:
准备工作
咱们要准备一个可控的web接口,通过参数控制它成功或者失败,这样才能触发断路器
本篇的实战中,服务提供者依旧是provider-hello,为了满足本次实战的需求,咱们在Hello.java文件中增加一个web接口,对应的源码如下:
    @RequestMapping(value = "/account/{id}", method = RequestMethod.GET)

    public String account(@PathVariable("id") int id) throws InterruptedException {

        if(1==id) {

            Thread.sleep(500);

        }

        return Constants.ACCOUNT_PREFIX + dateStr();

    }
上述代码很简单:就是接收id参数,如果等于1就延时五百毫秒,不等于1就立即返回
如果把断路器设置为超过两百毫秒就算失败,那么通过控制id参数的值,咱们就能模拟请求成功或者失败了,这是验证断路器功能的关键
准备完成,开始写代码
实战
在父工程spring-cloud-tutorials下面新增子工程circuitbreaker-gateway
增加以下依赖
<dependency>

	<groupId>org.springframework.cloud</groupId>

    <artifactId>spring-cloud-starter-circuitbreaker-reactor-resilience4j</artifactId>

</dependency>
- 配置文件application.yml如下:
server:

  #服务端口

  port: 8081

spring:

  application:

    name: circuitbreaker-gateway

  cloud:

    gateway:

      routes:

        - id: path_route

          uri: http://127.0.0.1:8082

          predicates:

            - Path=/hello/**

          filters:

            - name: CircuitBreaker

              args:

                name: myCircuitBreaker
- 启动类:
package com.bolingcavalry.circuitbreakergateway;

import org.springframework.boot.SpringApplication;

import org.springframework.boot.autoconfigure.SpringBootApplication;

@SpringBootApplication

public class CircuitbreakerApplication {

    public static void main(String[] args) {

        SpringApplication.run(CircuitbreakerApplication.class,args);

    }

}
- 配置类如下,这是断路器相关的参数配置:
package com.bolingcavalry.circuitbreakergateway.config;

import io.github.resilience4j.circuitbreaker.CircuitBreakerConfig;

import io.github.resilience4j.timelimiter.TimeLimiterConfig;

import org.springframework.cloud.circuitbreaker.resilience4j.ReactiveResilience4JCircuitBreakerFactory;

import org.springframework.cloud.circuitbreaker.resilience4j.Resilience4JConfigBuilder;

import org.springframework.context.annotation.Bean;

import org.springframework.context.annotation.Configuration;

import java.time.Duration;

@Configuration

public class CustomizeCircuitBreakerConfig {

    @Bean

    public ReactiveResilience4JCircuitBreakerFactory defaultCustomizer() {

        CircuitBreakerConfig circuitBreakerConfig = CircuitBreakerConfig.custom() //

                .slidingWindowType(CircuitBreakerConfig.SlidingWindowType.TIME_BASED) // 滑动窗口的类型为时间窗口

                .slidingWindowSize(10) // 时间窗口的大小为60秒

                .minimumNumberOfCalls(5) // 在单位时间窗口内最少需要5次调用才能开始进行统计计算

                .failureRateThreshold(50) // 在单位时间窗口内调用失败率达到50%后会启动断路器

                .enableAutomaticTransitionFromOpenToHalfOpen() // 允许断路器自动由打开状态转换为半开状态

                .permittedNumberOfCallsInHalfOpenState(5) // 在半开状态下允许进行正常调用的次数

                .waitDurationInOpenState(Duration.ofSeconds(5)) // 断路器打开状态转换为半开状态需要等待60秒

                .recordExceptions(Throwable.class) // 所有异常都当作失败来处理

                .build();

        ReactiveResilience4JCircuitBreakerFactory factory = new ReactiveResilience4JCircuitBreakerFactory();

        factory.configureDefault(id -> new Resilience4JConfigBuilder(id)

                .timeLimiterConfig(TimeLimiterConfig.custom().timeoutDuration(Duration.ofMillis(200)).build())

                .circuitBreakerConfig(circuitBreakerConfig).build());

        return factory;

    }

}
上述代码有一次需要注意:timeLimiterConfig方法设置了超时时间,服务提供者如果超过200毫秒没有响应,Spring Cloud Gateway就会向调用者返回失败
开发完成了,接下来要考虑的是如何验证
单元测试类
- 为了验证Spring Cloud Gateway的断路器功能,咱们可以用Junit单元测试来精确控制请求参数和请求次数,测试类如下,可见测试类会连续发一百次请求,在前五十次中,请求参数始终在0和1之间切换,参数等于1的时候,接口会有500毫秒延时,超过了Spring Cloud Gateway的200毫秒超时限制,这时候就会返回失败,等失败多了,就会触发断路器的断开:
package com.bolingcavalry.circuitbreakergateway;

import io.github.resilience4j.circuitbreaker.CircuitBreaker;

import org.junit.jupiter.api.RepeatedTest;

import org.junit.jupiter.api.Test;

import org.junit.jupiter.api.extension.ExtendWith;

import org.springframework.beans.factory.annotation.Autowired;

import org.springframework.boot.test.autoconfigure.web.reactive.AutoConfigureWebTestClient;

import org.springframework.boot.test.context.SpringBootTest;

import org.springframework.http.MediaType;

import org.springframework.test.context.junit.jupiter.SpringExtension;

import org.springframework.test.web.reactive.server.WebTestClient;

@SpringBootTest

@ExtendWith(SpringExtension.class)

@AutoConfigureWebTestClient

public class CircuitbreakerTest {

    // 测试的总次数

    private static int i=0;

    @Autowired

    private WebTestClient webClient;

    @Test

    @RepeatedTest(100)

    void testHelloPredicates() throws InterruptedException {

        // 低于50次时,gen在0和1之间切换,也就是一次正常一次超时,

        // 超过50次时,gen固定为0,此时每个请求都不会超时

        int gen = (i<50) ? (i % 2) : 0;

        // 次数加一

        i++;

        final String tag = "[" + i + "]";

        // 发起web请求

        webClient.get()

                .uri("/hello/account/" + gen)

                .accept(MediaType.APPLICATION_JSON)

                .exchange()

                .expectBody(String.class).consumeWith(result  -> System.out.println(tag + result.getRawStatusCode() + " - " + result.getResponseBody()));

        Thread.sleep(1000);

    }

}
验证
启动nacos(服务提供者依赖的)
启动子工程provider-hello
运行咱们刚才开发的单元测试类,控制台输入的内容截取部分如下,稍后会有分析:
[2]504 - {"timestamp":"2021-08-28T02:55:42.920+00:00","path":"/hello/account/1","status":504,"error":"Gateway Timeout","message":"","requestId":"594efed1"}

[3]200 - Account2021-08-28 10:55:43

[4]504 - {"timestamp":"2021-08-28T02:55:45.177+00:00","path":"/hello/account/1","status":504,"error":"Gateway Timeout","message":"","requestId":"427720b"}

[5]200 - Account2021-08-28 10:55:46

[6]503 - {"timestamp":"2021-08-28T02:55:47.227+00:00","path":"/hello/account/1","status":503,"error":"Service Unavailable","message":"","requestId":"6595d7f4"}

[7]503 - {"timestamp":"2021-08-28T02:55:48.250+00:00","path":"/hello/account/0","status":503,"error":"Service Unavailable","message":"","requestId":"169ae1c"}

[8]503 - {"timestamp":"2021-08-28T02:55:49.259+00:00","path":"/hello/account/1","status":503,"error":"Service Unavailable","message":"","requestId":"53b695a1"}

[9]503 - {"timestamp":"2021-08-28T02:55:50.269+00:00","path":"/hello/account/0","status":503,"error":"Service Unavailable","message":"","requestId":"4a072f52"}

[10]504 - {"timestamp":"2021-08-28T02:55:51.499+00:00","path":"/hello/account/1","status":504,"error":"Gateway Timeout","message":"","requestId":"4bdd96c4"}

[11]200 - Account2021-08-28 10:55:52

[12]504 - {"timestamp":"2021-08-28T02:55:53.745+00:00","path":"/hello/account/1","status":504,"error":"Gateway Timeout","message":"","requestId":"4e0e7eab"}

[13]200 - Account2021-08-28 10:55:54

[14]504 - {"timestamp":"2021-08-28T02:55:56.013+00:00","path":"/hello/account/1","status":504,"error":"Gateway Timeout","message":"","requestId":"27685405"}

[15]503 - {"timestamp":"2021-08-28T02:55:57.035+00:00","path":"/hello/account/0","status":503,"error":"Service Unavailable","message":"","requestId":"3e40c5db"}

[16]503 - {"timestamp":"2021-08-28T02:55:58.053+00:00","path":"/hello/account/1","status":503,"error":"Service Unavailable","message":"","requestId":"2bf2698b"}

[17]503 - {"timestamp":"2021-08-28T02:55:59.075+00:00","path":"/hello/account/0","status":503,"error":"Service Unavailable","message":"","requestId":"38cb1840"}

[18]503 - {"timestamp":"2021-08-28T02:56:00.091+00:00","path":"/hello/account/1","status":503,"error":"Service Unavailable","message":"","requestId":"21586fa"}

[19]200 - Account2021-08-28 10:56:01

[20]504 - {"timestamp":"2021-08-28T02:56:02.325+00:00","path":"/hello/account/1","status":504,"error":"Gateway Timeout","message":"","requestId":"4014d6d4"}

[21]200 - Account2021-08-28 10:56:03

[22]504 - {"timestamp":"2021-08-28T02:56:04.557+00:00","path":"/hello/account/1","status":504,"error":"Gateway Timeout","message":"","requestId":"173a3b9d"}

[23]200 - Account2021-08-28 10:56:05

[24]504 - {"timestamp":"2021-08-28T02:56:06.811+00:00","path":"/hello/account/1","status":504,"error":"Gateway Timeout","message":"","requestId":"aa8761f"}

[25]200 - Account2021-08-28 10:56:07

[26]504 - {"timestamp":"2021-08-28T02:56:09.057+00:00","path":"/hello/account/1","status":504,"error":"Gateway Timeout","message":"","requestId":"769bfefc"}

[27]200 - Account2021-08-28 10:56:10

[28]504 - {"timestamp":"2021-08-28T02:56:11.314+00:00","path":"/hello/account/1","status":504,"error":"Gateway Timeout","message":"","requestId":"2fbcb6c0"}

[29]503 - {"timestamp":"2021-08-28T02:56:12.332+00:00","path":"/hello/account/0","status":503,"error":"Service Unavailable","message":"","requestId":"58e4e70f"}

[30]503 - {"timestamp":"2021-08-28T02:56:13.342+00:00","path":"/hello/account/1","status":503,"error":"Service Unavailable","message":"","requestId":"367651c5"}
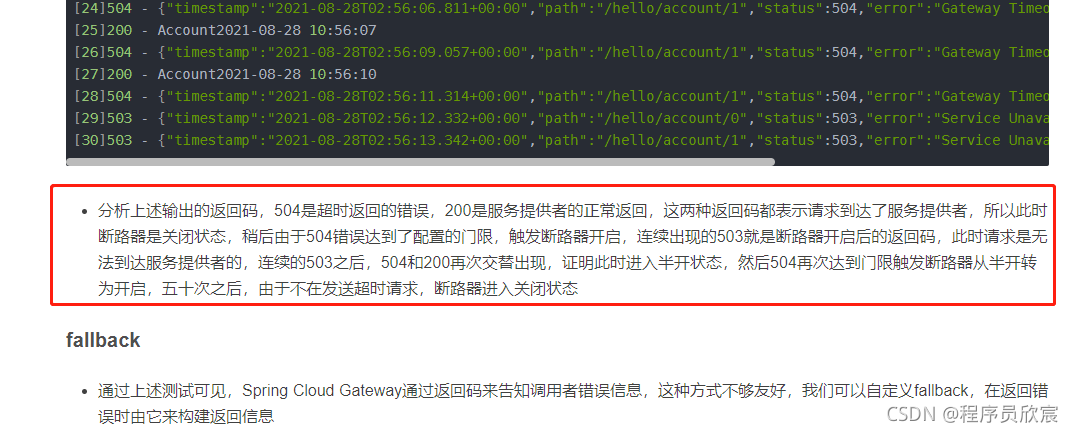
- 分析上述输出的返回码:
- 504是超时返回的错误,200是服务提供者的正常返回
- 504和200两种返回码都表示请求到达了服务提供者,所以此时断路器是关闭状态
- 多次504错误后,达到了配置的门限,触发断路器开启
- 连续出现的503就是断路器开启后的返回码,此时请求是无法到达服务提供者的
- 连续的503之后,504和200再次交替出现,证明此时进入半开状态,然后504再次达到门限触发断路器从半开转为开启,五十次之后,由于不在发送超时请求,断路器进入关闭状态
fallback
通过上述测试可见,Spring Cloud Gateway通过返回码来告知调用者错误信息,这种方式不够友好,我们可以自定义fallback,在返回错误时由它来构建返回信息
再开发一个web接口,没错,就是在circuitbreaker-gateway工程中添加一个web接口:
package com.bolingcavalry.circuitbreakergateway.controller;

import org.springframework.web.bind.annotation.GetMapping;

import org.springframework.web.bind.annotation.RestController;

import java.text.SimpleDateFormat;

import java.util.Date;

@RestController

public class Fallback {

    private String dateStr(){

        return new SimpleDateFormat("yyyy-MM-dd hh:mm:ss").format(new Date());

    }

    /**

     * 返回字符串类型

     * @return

     */

    @GetMapping("/myfallback")

    public String helloStr() {

        return "myfallback, " + dateStr();

    }

}
- application.yml配置如下,可见是给filter增加了fallbackUri属性:
server:

  #服务端口

  port: 8081

spring:

  application:

    name: circuitbreaker-gateway

  cloud:

    gateway:

      routes:

        - id: path_route

          uri: http://127.0.0.1:8082

          predicates:

            - Path=/hello/**

          filters:

            - name: CircuitBreaker

              args:

                name: myCircuitBreaker

                fallbackUri: forward:/myfallback
- 再运行单元测试,可见返回码全部是200,原来的错误现在全部变成了刚才新增的接口的返回内容:
[2]200 - myfallback, 2021-08-28 11:15:02

[3]200 - Account2021-08-28 11:15:03

[4]200 - myfallback, 2021-08-28 11:15:04

[5]200 - Account2021-08-28 11:15:05

[6]200 - myfallback, 2021-08-28 11:15:06

[7]200 - myfallback, 2021-08-28 11:15:08

[8]200 - myfallback, 2021-08-28 11:15:09

[9]200 - myfallback, 2021-08-28 11:15:10

[10]200 - myfallback, 2021-08-28 11:15:11

[11]200 - Account2021-08-28 11:15:12

[12]200 - myfallback, 2021-08-28 11:15:13

[13]200 - Account2021-08-28 11:15:14

[14]200 - myfallback, 2021-08-28 11:15:15
- 至此,咱们已完成了Spring Cloud Gateway的断路器功能的开发和测试,如果聪明好学的您并不满足这寥寥几行配置和代码,想要深入了解断路器的内部,那么请您接往下看,咱们聊聊它的源码;
源码分析
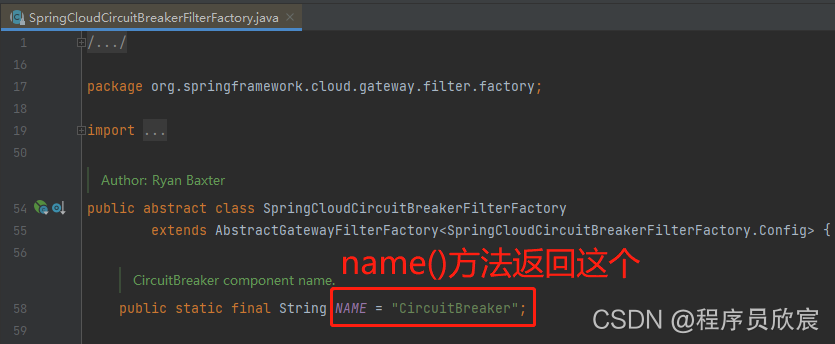
- RouteDefinitionRouteLocator的构造方法(bean注入)中有如下代码,将name和实例绑定:
gatewayFilterFactories.forEach(factory -> this.gatewayFilterFactories.put(factory.name(), factory));
然后会在loadGatewayFilters方法中使用这个map,找到上面put的bean;
最终的效果:路由配置中指定了name等于CircuitBreaker,即可对应SpringCloudCircuitBreakerFilterFactory类型的bean,因为它的name方法返回了"CircuitBreaker",如下图:
- 现在的问题:SpringCloudCircuitBreakerFilterFactory类型的bean是什么?如下图红框,SpringCloudCircuitBreakerResilience4JFilterFactory是SpringCloudCircuitBreakerFilterFactory唯一的子类:
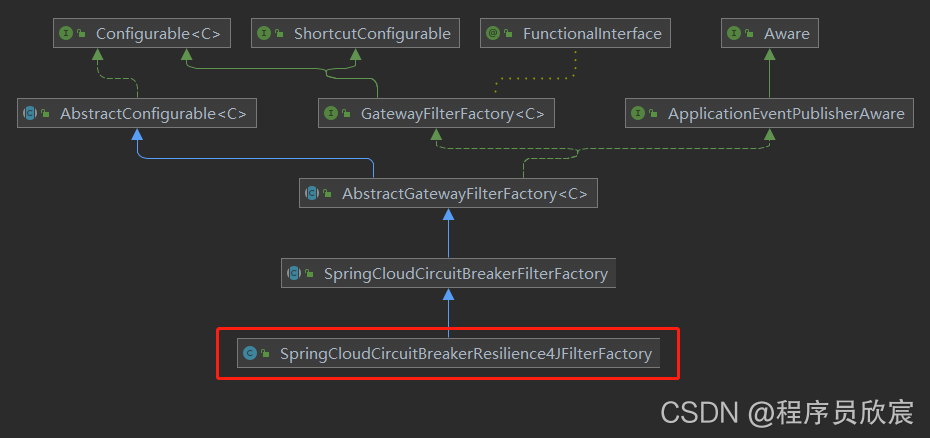
从上图来看,CircuitBreaker类型的filter应该是SpringCloudCircuitBreakerResilience4JFilterFactory,不过那只是从继承关系推断出来的,还差一个关键证据:在spring中,到底存不存在SpringCloudCircuitBreakerResilience4JFilterFactory类型的bean?
最终发现了GatewayResilience4JCircuitBreakerAutoConfiguration中的配置,可以证明SpringCloudCircuitBreakerResilience4JFilterFactory会被实例化并注册到spring:
@Bean

	@ConditionalOnBean(ReactiveResilience4JCircuitBreakerFactory.class)

	@ConditionalOnEnabledFilter

	public SpringCloudCircuitBreakerResilience4JFilterFactory springCloudCircuitBreakerResilience4JFilterFactory(

			ReactiveResilience4JCircuitBreakerFactory reactiveCircuitBreakerFactory,

			ObjectProvider<DispatcherHandler> dispatcherHandler) {

		return new SpringCloudCircuitBreakerResilience4JFilterFactory(reactiveCircuitBreakerFactory, dispatcherHandler);

	}
综上所述,当您配置了CircuitBreaker过滤器时,实际上是SpringCloudCircuitBreakerResilience4JFilterFactory类在为您服务,而关键代码都集中在其父类SpringCloudCircuitBreakerFilterFactory中;
所以,要想深入了解Spring Cloud Gateway的断路器功能,请阅读SpringCloudCircuitBreakerFilterFactory.apply方法
一点遗憾
- 还记得刚才分析控制台输出的那段内容吗?就是下图红框中的那段,当时咱们用返回码来推测断路器处于什么状态:
相信您在看这段纯文字时,对欣宸的分析还是存在疑惑的,根据返回码就把断路器的状态确定了?例如504的时候到底是关闭还是半开呢?都有可能吧,所以,这种推测只能证明断路器正在工作,但是无法确定某个时刻具体的状态
所以,咱们需要一种更准确的方式知道每个时刻断路器的状态,这样才算对断路器有了深刻了解
接下来的文章中,咱们在今天的成果上更进一步,在请求中把断路器状态打印出来,那就...敬请期待吧,欣宸原创,从未让您失望;
你不孤单,欣宸原创一路相伴
欢迎关注公众号:程序员欣宸
微信搜索「程序员欣宸」,我是欣宸,期待与您一同畅游Java世界...
https://github.com/zq2599/blog_demos
Spring Cloud Gateway的断路器(CircuitBreaker)功能的更多相关文章
- Spring Cloud Gateway自定义过滤器实战(观测断路器状态变化)
欢迎访问我的GitHub https://github.com/zq2599/blog_demos 内容:所有原创文章分类汇总及配套源码,涉及Java.Docker.Kubernetes.DevOPS ...
- 深入学习spring cloud gateway 限流熔断
前言 Spring Cloud Gateway 目前,Spring Cloud Gateway是仅次于Spring Cloud Netflix的第二个最受欢迎的Spring Cloud项目(就GitH ...
- spring cloud gateway自定义过滤器
在API网关spring cloud gateway和负载均衡框架ribbon实战文章中,主要实现网关与负载均衡等基本功能,详见代码.本节内容将继续围绕此代码展开,主要讲解spring cloud g ...
- 快速突击 Spring Cloud Gateway
认识 Spring Cloud Gateway Spring Cloud Gateway 是一款基于 Spring 5,Project Reactor 以及 Spring Boot 2 构建的 API ...
- 熬夜肝了这篇Spring Cloud Gateway的功能及综合使用
前言 SpringCloud 是微服务中的翘楚,最佳的落地方案. Spring Cloud Gateway 是 Spring Cloud 新推出的网关框架,之前是 Netflix Zuul.网关通常在 ...
- Spring Cloud Gateway原理
1.使用 compile 'org.springframework.cloud:spring-cloud-starter-gateway' 2.包结构 actuate中定义了一个叫GatewayCon ...
- Spring Cloud Gateway简单入门,强大的微服务网关
我最新最全的文章都在南瓜慢说 www.pkslow.com,欢迎大家来喝茶! 1 简介 见名知义,Spring Cloud Gateway是用于微服务场景的网关组件,它是基于Spring WebFlu ...
- Spring Cloud Gateway实战之五:内置filter
欢迎访问我的GitHub https://github.com/zq2599/blog_demos 内容:所有原创文章分类汇总及配套源码,涉及Java.Docker.Kubernetes.DevOPS ...
- Spring Cloud Gateway服务网关
原文:https://www.cnblogs.com/ityouknow/p/10141740.html Spring 官方最终还是按捺不住推出了自己的网关组件:Spring Cloud Gatewa ...
随机推荐
- MacOS Typora集成SM.SM图床 实现自动上传图片
MacOS Typora集成SM.SM图床 实现自动上传图片 此为PicGo-Core (Command line) (OpenSource)配置方法 参照官网 https://support.typ ...
- display:none、visibility:hidden,opacity:0三者区别
1. display:none 设置display:none,让这个元素消失 消失不占据原本任何位置 连带子元素一起消失 元素显示:display:block 2. visibility:hidden ...
- 《面试八股文》之 JVM 20卷
微信公众号:moon聊技术 关注选择" 星标 ", 重磅干货,第一 时间送达! [如果你觉得文章对你有帮助,欢迎关注,在看,点赞,转发] 大家好,我是 moon. <面试八股 ...
- MSSQL还原数据库,更改用户登陆权限
有的时候还原完数据库后,使用账号登陆不进去,报告没有这个用户的时候,可以使用以下sql解决: sp_change_users_login 'update_one','username','userna ...
- sql提示1055 不让你group by
是不是突然写好的sql语句 部署上去就 Expression #2 of SELECT list is not in GROUP BY clause and containsnonaggregated ...
- Powerful Number 学习笔记
定义 对于一个正整数 \(n\) ,若完全分解之后不存在指数 \(=1\) ,则称 \(n\) 为 \(\text{Powerful Number}\) . 可以发现的是,在 \([1,n]\) 中, ...
- 洛谷2805 [NOI2009]植物大战僵尸 (拓扑排序+最小割)
坚决抵制长题面的题目! 首先观察到这个题目中,我们会发现,我们对于原图中的保护关系(一个点右边的点对于这个点也算是保护) 相当于一种依赖. 那么不难看出这个题实际上是一个最大权闭合子图模型. 我们直接 ...
- 2020.5.4-ICPC Pacific Northwest Regional Contest 2019
A. Radio Prize All boring tree-shaped lands are alike, while all exciting tree-shaped lands are exci ...
- Go语言核心36讲(Go语言基础知识六)--学习笔记
06 | 程序实体的那些事儿 (下) 在上一篇文章,我们一直都在围绕着可重名变量,也就是不同代码块中的重名变量,进行了讨论.还记得吗? 最后我强调,如果可重名变量的类型不同,那么就需要引起我们的特别关 ...
- Manacher(马拉车)
Able was I ere I saw Elba. ----Napoléon Bonaparte(拿破仑) 一.回文串&回文子串 这个很好理解. 如果一个字符串正着读和反着读是一 ...