Python3+Selenium2完整的自动化测试实现之旅(六):Python单元测试模块Unittest运用
一、Unittest单元测试框架简介
Unitest是Python下的一个单元测试模块,是Python标准库模块之一,安装完Python后就可以直接import该模块,能在单元测试下编写具体的测试用例脚本,并调用模块封装好的方法,实现测试用例的执行、测试场景的恢复,甚至能批量采集测试用例脚本、批量运行测试脚本用例、控制执行顺序等,依托于Unittest模块,可以高效的组织测试用例编写、测试用例脚本的采集管理以及脚本运行的执行控制等。Unitest单元测试框架主要包含如下几个重要的逻辑单元:
1.测试固件(test fixture)
一个测试固件包括两部分,执行测试代码的前置条件和测试结束之后的场景恢复,这两部分一般用函数setUp()和tearDown()表示。简单说,就是平时手工测试一条具体的测试用例时,测试的前置环境和测试结束后的环境恢复。
2.测试用例(test case)
unittest中管理的最小单元是测试用例,就是一个测试用例,包括具体测试业务的函数或者方法,只是该test case 必须是以test开头的函数。unittest会自动化识别test开头的函数是测试代码,如果你写的函数不是test开头,unittest是不会执行这个函数里面的脚本,这个千万要记住,所有的测试函数都要test开头,记住是小写的哦。
3.测试套件 (test suite)
就是很多测试用例的集合,一个测试套件可以随意管理多个测试用例,该部分用来实现诸多测试用例的采集,形成一套测试用例集。
4.测试执行器 (test runner)
test runner是一个用来执行加载测试用例,并执行用例,且提供测试输出的一个逻辑单元。test runner可以加载test case或者test suite进行执行测试任务,并能控制用例集的执行顺序等。
从Unitest单元测试框架的基本逻辑单元设计来看,很明显可以看到它包含了用例的整个生命周期:用例的前置条件、用例的编写、用例的采集、用例的执行以及测试执行后的场景恢复。
二、首次使用Unittest模块
下面以打开百度,进行搜索,创建一个名为baidu_search.py的脚本文件,编写百度搜索分别python2和python3的测试用例,代码如下:
'''

  Code description:

  Create time:

  Developer:

'''

# -*- coding: utf-8 -*-

import time

import unittest

from selenium import webdriver

class Search(unittest.TestCase):

    def setUp(self):

        """

        测试前置条件,这里要搜索的话就是先得打开百度网站啦

        """

        self.driver = webdriver.Ie()

        self.driver.maximize_window()

        self.driver.implicitly_wait(5)

        self.driver.get("https://www.baidu.com")

    def tearDown():

        """

        测试结束后环境复原,这里就是浏览器关闭退出

        """

        self.driver.quit()

    def test_search1(self):

        """

        这里一定要test开头,把测试逻辑代码封装到一个test开头的方法里。

        """

        self.driver.find_element_by_id('kw').send_keys('python2')

        self.driver.find_element_by_id('su').click()

        time.sleep(1)

        try:

            assert 'python2' in self.driver.title

            print('检索python2完成')

        except Exception as e:

            print('检索失败', format(e))

    def test_search2(self):

        """

        这里一定要test开头,把测试逻辑代码封装到一个test开头的方法里。

        """

        self.driver.find_element_by_id('kw').send_keys('python3')

        self.driver.find_element_by_id('su').click()

        time.sleep(1)

        try:

            assert 'python3' in self.driver.title

            print('检索python3完成')

        except Exception as e:

            print('检索失败', format(e))

if __name__ == '__main__':

    unittest.main()
在PyCharm中运行上面代码,我们会发现浏览器打开关闭了两次,分别检索了python2关闭浏览器,然后检索python3关闭浏览器。
这个效果显然不是我们希望的,我们希望检索完python2后,不用关闭浏览器继续检索python3,Unittest有相关的设置吗?答案是肯定的,我们对以上代码做下调整修改,注意对比不同的地方,然后运行就达到我们想要的效果
'''

  Code description:

  Create time:

  Developer:

'''

# -*- coding: utf-8 -*-

import time

import unittest

from selenium import webdriver

class Search(unittest.TestCase):

    @classmethod

    def setUpClass(cls):

        """

        测试前置条件,这里要搜索的话就是先得打开百度网站啦

        """

        cls.driver = webdriver.Ie()

        cls.driver.maximize_window()

        cls.driver.implicitly_wait(5)

        cls.driver.get("https://www.baidu.com")

    @classmethod

    def tearDownClass(cls):

        """

        测试结束后环境复原,这里就是浏览器关闭退出

        """

        cls.driver.quit()

    def test_search1(self):

        """

        这里一定要test开头,把测试逻辑代码封装到一个test开头的方法里。

        """

        self.driver.find_element_by_id('kw').send_keys('python2')

        self.driver.find_element_by_id('su').click()

        time.sleep(1)

        try:

            assert 'python2' in self.driver.title

            print('检索python2完成')

        except Exception as e:

            print('检索失败', format(e))

    def test_search2(self):

        """

        这里一定要test开头,把测试逻辑代码封装到一个test开头的方法里。

        """

        self.driver.find_element_by_id('kw').clear()              # 清空之前输入的python2

        self.driver.find_element_by_id('kw').send_keys('python3')

        self.driver.find_element_by_id('su').click()

        time.sleep(1)

        try:

            assert 'python3' in self.driver.title

            print('检索python3完成')

        except Exception as e:

            print('检索失败', format(e))

if __name__ == '__main__':

    unittest.main()
三、Unittest模块批量加载和管理用例
以上对于Unittest框架,我们好像只用到了测试固件、测试用例两个逻辑单元的使用,接下来问题又来了:我们日常项目中的测试案例肯定不止一个,当案例越来越多时我们如何管理这些批量案例?如何保证案例不重复?如果案例非常多(成百上千,甚至更多)时如何保证案例执行的效率?
来看一下在unittest框架中如何管理批量用例:

手动添加采集指定的测试用例集用法:先在PyCharm中新建如下项目层级:
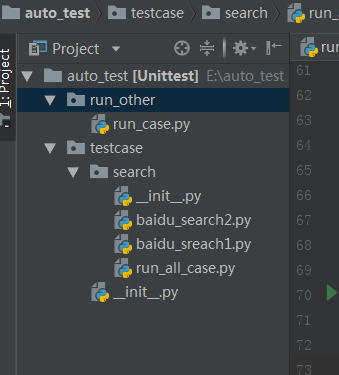
其中baidu_search1还是上面调整修改过的代码,然后编辑run_case.py文件,代码如下:
'''

  Code description: 执行add 的测试用例集

  Create time:

  Developer:

'''

# -*- coding: utf-8 -*-

from testcase.sreach.baidu_sreach1 import Search    # 将baidu_sreach.py模块导入进来

import unittest

suite = unittest.TestSuite()        # 构造测试用例集

# suite.addTest(Search("test_search1"))

suite.addTest(Search("test_search2"))     # 分别添加baidu_sreach1.py中的两个检索的测试用例

if __name__ == '__main__':

    runner = unittest.TextTestRunner()   # 实例化runner

    runner.run(suite)                   #执行测试
这样运行run_case.py,就只执行了在百度中搜索python3这条用例,手动添加指定用例到测试套件的方法是addTest(),但是很多时候我们写了很多测试脚本文件,每个脚本中有多个test,,如果还是使用addTest()方法就不行了,我们希望能获取所有的测试集,并全部执行。然后编辑run_all_case.py文件,编写如下代码:
'''

  Code description: TestLoader所有测试case

  Create time:

  Developer:

'''

# -*- coding: utf-8 -*-

import time

import os.path

import unittest

from selenium import webdriver

class Search(unittest.TestCase):

    @classmethod

    def setUpClass(cls):

        """

        测试前置条件,这里要搜索的话就是先得打开百度网站啦

        """

        cls.driver = webdriver.Ie()

        cls.driver.maximize_window()

        cls.driver.implicitly_wait(5)

        cls.driver.get("https://www.baidu.com")

    @classmethod

    def tearDownClass(cls):

        """

        测试结束后环境复原,这里就是浏览器关闭退出

        """

        cls.driver.quit()

    def test_search1(self):

        """

        这里一定要test开头,把测试逻辑代码封装到一个test开头的方法里。

        """

        self.driver.find_element_by_id('kw').send_keys('python2')

        self.driver.find_element_by_id('su').click()

        time.sleep(1)

        try:

            assert 'python2' in self.driver.title

            print('检索python2完成')

        except Exception as e:

            print('检索失败', format(e))

    def test_search2(self):

        """

        这里一定要test开头,把测试逻辑代码封装到一个test开头的方法里。

        """

        self.driver.find_element_by_id('kw').clear()              # 清空之前输入的python2

        self.driver.find_element_by_id('kw').send_keys('python3')

        self.driver.find_element_by_id('su').click()

        time.sleep(1)

        try:

            assert 'python3' in self.driver.title

            print('检索python3完成')

        except Exception as e:

            print('检索失败', format(e))

    def test_search3(self):

        """

        这里一定要test开头,把测试逻辑代码封装到一个test开头的方法里。

        """

        self.driver.find_element_by_id('kw').clear()  # 清空之前输入的python3

        self.driver.find_element_by_id('kw').send_keys('hello world')

        self.driver.find_element_by_id('su').click()

        time.sleep(1)

        try:

            assert 'hello world' in self.driver.title

            print('检索hello world完成')

        except Exception as e:

            print('检索失败', format(e))

case_path = os.path.join(os.getcwd())              #  在当前目录中采集测试用例

print(case_path)

all_case = unittest.defaultTestLoader.discover(case_path, pattern="test*.py", top_level_dir=None)  # 采集所有test开头的测试用例

print(all_case)

if __name__ == '__main__':

    runner = unittest.TextTestRunner()  # 实例化runner

    runner.run(all_case)  # 执行测试
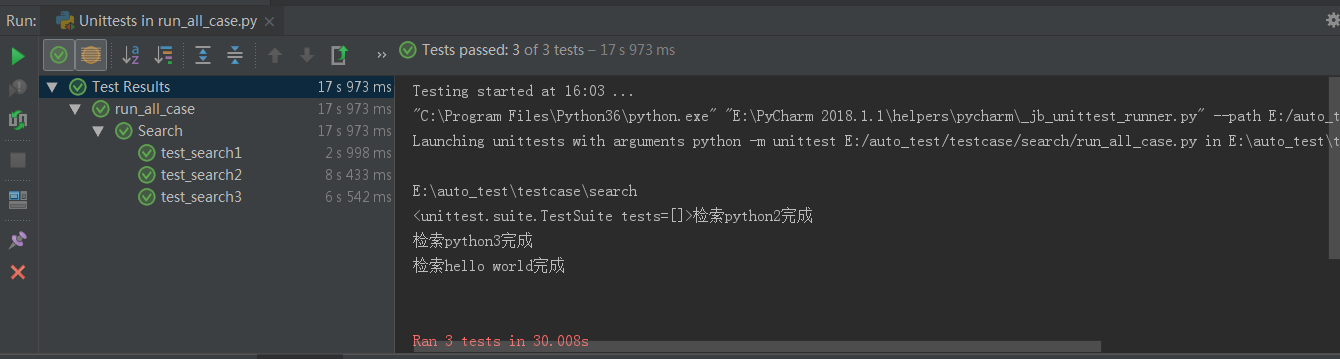
获取所有的测试用例集使用的是discover()方法,在PyCharm中运行该脚本就如下:
以上就完成了在Python Unittest单元测试框架下编写测试用例脚本,并使用其提供的多种方法来批量管理测试用例集并并执行。
Python3+Selenium2完整的自动化测试实现之旅(六):Python单元测试模块Unittest运用的更多相关文章
- Python3+Selenium2完整的自动化测试实现之旅(七):完整的轻量级自动化框架实现
一.前言 前面系列Python3+Selenium2自动化系列博文,陆陆续续总结了自动化环境最基础环境的搭建.IE和Chrome浏览器驱动配置.selenium下的webdriver模块提供的元素定位 ...
- Python3+Selenium2完整的自动化测试实现之旅(五):自动化测试框架、Python面向对象以及POM设计模型简介
前言 之前的系列博客,陆续学习整理了自动化测试环境的搭建.IE和Chrome浏览器驱动的配置.selenium-webdriver模块封装的元素定位以及控制浏览器.处理警示框.鼠标键盘等方法的使用,这 ...
- Python3+Selenium2完整的自动化测试实现之旅(一):自动化测试环境搭建
1 环境搭建准备 (1) 下载Python3版本的安装包,直接官网下载即可:Python官网:https://www.python.org/ (2) 下载Python的基础工具包p ...
- Python3+Selenium2完整的自动化测试实现之旅(四):Selenium-webdriver操作浏览器、Cookie、鼠标键盘、警示框、设置等待时间、多窗口切换
本篇学习总结webdriver模块操作浏览器.Cookie.鼠标键盘.警示框.设置等待时间.多窗口切换等方法的使用 1 浏览器控制 Selenium-webdriverAPI提供了对页面元素定位 ...
- Python3+Selenium2完整的自动化测试实现之旅(三):Selenium-webdriver提供的元素定位方法
本篇以实例介绍selenium下的webdriver模块提供的定位页面元素(也可以称为对象)的方法和使用技巧,在此注意:在做WEB自动化测试前,需要对前端相关的技术有所了解,如HTML.XML.Xpa ...
- Python3+Selenium2完整的自动化测试实现之旅(二):IE和Chrome浏览器驱动配置
上一篇写了自动化测试需要的最基础环境配置,地址:https://www.cnblogs.com/tdp0108/p/10412073.html 当前市面上很多公司开发的应用软件都是BS架构,即基于浏览 ...
- Python3 Selenium自动化web测试 ==> 第一节 起始点之Python单元测试框架 unittest
前置步骤 Python版本:3.6.4 selenium版本:3.11.0 >>> import selenium >>> help(selenium) IDE:P ...
- 【python之旅】python的模块
一.定义模块: 模块:用来从逻辑上组织python代码(变量.函数.类.逻辑:实现一个功能),本质就是以.py结尾的python文件(文件名:test.py ,对应的模块名就是test) 包:用来从逻 ...
- selenium2 Webdriver + Java 自动化测试实战和完全教程
selenium2 Webdriver + Java 自动化测试实战和完全教程一.快速开始 博客分类: Selenium-webdriverselenium webdriver 学习selenium ...
随机推荐
- 怎么修改kodexplorer网盘下的版权
前言: 要说kodexplorer,可是个好东西,在线web管理服务器文件,着实是网站管理员的好助手.内置的adminer管理数据库,用起来也是很顺手. 这么好的工具,还是免费的.但就是页面底部有ko ...
- Java工作原理:JVM,内存回收及其他
JAVA虚拟机系列文章 http://developer.51cto.com/art/201001/176550.htm Java语言引入了Java虚拟机,具有跨平台运行的功能,能够很好地适应各种We ...
- tyflow雨滴在物体上滑落测试
http://docs.tyflow.com/download/
- 二分- Count on Canton
题目: 代码: 是一个蛇形数列,把题目上的那组数倒过来看成一个正三角形. 第一行有1个数,1-2行有三个数,1-4行有6个数,1-4行有10个数,1-5行有15个数..... 现在要求第n个数是多少, ...
- SQL、索引
(二)数据库索引 数据库索引是用于提高数据库表的数据访问速度的. 数据库索引的特点: a)避免进行数据库全表的扫描,大多数情况,只需要扫描较少的索引页和数据页,而不是查询所有数据页.而且对于非聚集索引 ...
- 认识Python和基础知识
一.第一个Python程序 用vim编写,格式: vim hello.py 然后按 i 进入插入模式开始写代码,注意所有的代码都要用英文输入法,先写括号和引号,再在引号里面写内容(为了避免引号.括号不 ...
- ABP入门系列(2)——领域层创建实体
ABP入门系列目录--学习Abp框架之实操演练 这一节我们主要和领域层打交道.首先我们要对ABP的体系结构以及从模板创建的解决方案进行一一对应.网上有代码生成器去简化我们这一步的任务,但是不建议初学者 ...
- 老司机带路:《axios从入门到开车 嘀嘀~~》
前言:axios vue.axios 跨域.axios.js.axios get.axios post.axios中文文档 之前当vue更新到2.0之后,作者就宣告不再对vue-resource更新, ...
- emWin实现ATM机界面设计,含uCOS-III和FreeRTOS两个版本
第1期:ATM机配套例子:V6-900_STemWin提高篇实验_ATM机(uCOS-III)V6-901_STemWin提高篇实验_ATM机(FreeRTOS) 例程下载地址:http://foru ...
- [Swift]LeetCode66. 加一 | Plus One
Given a non-empty array of digits representing a non-negative integer, plus one to the integer. The ...