
ASP.NET Core分布式项目实战(Consent 代码重构)--学习笔记
任务23:Consent 代码重构
新建一个 Sercices 文件夹,在文件夹下新建一个 ConsentService,专门用于处理 Consent 的逻辑,我们会把 controller 中不是 action 的方法移到 service 中
先将 ConsentController 私有变量和构造函数搬到 ConsentService 中
ConsentService
private readonly IClientStore _clientSotre;

private readonly IResourceStore _resourceStore;

private readonly IIdentityServerInteractionService _identityServerInteractionService;

public ConsentService(

    IClientStore clientStore,

    IResourceStore resourceStore,

    IIdentityServerInteractionService identityServerInteractionService)

{

    _clientSotre = clientStore;

    _resourceStore = resourceStore;

    _identityServerInteractionService = identityServerInteractionService;

}
接着搬移私有方法,并将 BuildConsentViewModel 修改为 public
ConsentService
#region Private Methods

private ConsentViewModel CreateConsentViewModel(AuthorizationRequest request, Client client, Resources resources)

{

    var vm = new ConsentViewModel();

    vm.ClientName = client.ClientName;

    vm.ClientLogoUrl = client.LogoUri;

    vm.ClientUrl = client.ClientUri;

    vm.RememberConsent = client.AllowRememberConsent;

    vm.IdentityScopes = resources.IdentityResources.Select(i => CreateScopeViewModel(i));

    vm.ResourceScopes = resources.ApiResources.SelectMany(i => i.Scopes).Select(x => CreateScopeViewModel(x));

    return vm;

}

private ScopeViewModel CreateScopeViewModel(IdentityResource identityResource)

{

    return new ScopeViewModel

    {

        Name = identityResource.Name,

        DisplayName = identityResource.DisplayName,

        Description = identityResource.Description,

        Required = identityResource.Required,

        Checked = identityResource.Required,

        Emphasize = identityResource.Emphasize,

    };

}

private ScopeViewModel CreateScopeViewModel(Scope scope)

{

    return new ScopeViewModel

    {

        Name = scope.Name,

        DisplayName = scope.DisplayName,

        Description = scope.Description,

        Required = scope.Required,

        Checked = scope.Required,

        Emphasize = scope.Emphasize,

    };

}

#endregion

public async Task<ConsentViewModel> BuildConsentViewModel(string returnUrl)

{

    var request = await _identityServerInteractionService.GetAuthorizationContextAsync(returnUrl);

    if (request == null)

        return null;

    var client = await _clientSotre.FindEnabledClientByIdAsync(request.ClientId);

    var resources = await _resourceStore.FindEnabledResourcesByScopeAsync(request.ScopesRequested);

    var vm = CreateConsentViewModel(request, client, resources);

    vm.ReturnUrl = returnUrl;

    return vm;

}
接着将 ConsentService 注入到 ConsentController 中并调用 BuildConsentViewModel
ConsentController
private readonly ConsentService _consentService;

public ConsentController(ConsentService consentService)

{

    _consentService = consentService;

}

[HttpGet]

public async Task<IActionResult> Index(string returnUrl)

{

    var model = await _consentService.BuildConsentViewModel(returnUrl);

    if (model == null)

    {

    }

    return View(model);

}
接着将 ConsentController 中 post 的逻辑搬到 ConsentService 的一个方法 ProcessConsent 中
这里不能直接调用 Redirect 所以需要一个新建一个ViewModel 作为返回
ProcessConsentResult
public class ProcessConsentResult

{

    public string RedirectUrl { get; set; }

    public bool IsRedirect => RedirectUrl != null;

}
ConsentService
public async Task<ProcessConsentResult> ProcessConsent(InputConsentViewModel viewModel)

{

    ConsentResponse consentResponse = null;

    var result = new ProcessConsentResult();

    if (viewModel.Button == "no")

    {

        consentResponse = ConsentResponse.Denied;

    }

    else if (viewModel.Button == "yes")

    {

        if (viewModel.ScopesConsented != null && viewModel.ScopesConsented.Any())

        {

            consentResponse = new ConsentResponse

            {

                RememberConsent = viewModel.RememberConsent,

                ScopesConsented = viewModel.ScopesConsented,

            };

        }

    }

    if (consentResponse != null)

    {

        var request = await _identityServerInteractionService.GetAuthorizationContextAsync(viewModel.ReturnUrl);

        await _identityServerInteractionService.GrantConsentAsync(request, consentResponse);

        result.RedirectUrl = viewModel.ReturnUrl;

    }

    return result;

}
接着在 ConsentController 的 post 逻辑中调用 ProcessConsent
ConsentController
[HttpPost]

public async Task<IActionResult> Index(InputConsentViewModel viewModel)

{

    var result = await _consentService.ProcessConsent(viewModel);

    if (result.IsRedirect)

    {

        return Redirect(result.RedirectUrl);

    }

    return View(viewModel);

}
因为在视图层 index 中使用的是 ConsentViewModel,不能直接把 InputConsentViewModel 传过去,因为是无法识别的,所以我们需要在 ConsentService 中转换一下
首先在 ProcessConsentResult 中添加一个 ConsentViewModel
ProcessConsentResult
public class ProcessConsentResult

{

    public string RedirectUrl { get; set; }

    public bool IsRedirect => RedirectUrl != null;

    public ConsentViewModel viewModel { get; set; }

}
在什么情况下会返回这个 ViewModel,当 ConsentService 的 ProcessConsent 方法中的 consentResponse 为 null 的时候,在这个时候我们需要给它封装一个 model
ConsentService
if (consentResponse != null)

{

...

}

{

    var consentViewModel = await BuildConsentViewModel(viewModel.ReturnUrl);

    result.viewModel = consentViewModel;

}
但是在 BuildConsentViewModel 的时候,ConsentViewModel 的 ScopeViewModel 里面有 Required 和 Checked,如果在填写的时候已经勾选了,我们需要把它的状态带过去,而在 viewModel.ScopesConsented 的时候已经知道勾选了哪些,所以我们需要把 model 传过去
ConsentService
var consentViewModel = await BuildConsentViewModel(viewModel.ReturnUrl, viewModel);
改造一下 BuildConsentViewModel,接收一个 InputConsentViewModel,默认为 null,如有它有值,可以知道客户的选中信息,然后传入 CreateConsentViewModel 中
ConsentService
public async Task<ConsentViewModel> BuildConsentViewModel(string returnUrl, InputConsentViewModel model = null)

{

    ...

    var vm = CreateConsentViewModel(request, client, resources, model);

    ...

}
所以在 CreateConsentViewModel 的时候对 Checked 赋值,或者已经选中的情况下就选中
ConsentService
private ScopeViewModel CreateScopeViewModel(IdentityResource identityResource, bool check)

{

    return new ScopeViewModel

    {

        Name = identityResource.Name,

        DisplayName = identityResource.DisplayName,

        Description = identityResource.Description,

        Required = identityResource.Required,

        Checked = check || identityResource.Required,

        Emphasize = identityResource.Emphasize,

    };

}

private ScopeViewModel CreateScopeViewModel(Scope scope, bool check)

{

    return new ScopeViewModel

    {

        Name = scope.Name,

        DisplayName = scope.DisplayName,

        Description = scope.Description,

        Required = scope.Required,

        Checked = check ||scope.Required,

        Emphasize = scope.Emphasize,

    };

}
接着处理一下 CreateConsentViewModel,传入一个 InputConsentViewModel,然后修改 RememberConsent,以及获取一个 selectedScopes
ConsentService
private ConsentViewModel CreateConsentViewModel(AuthorizationRequest request, Client client, Resources resources, InputConsentViewModel model)

{

    var rememberConsent = model?.RememberConsent ?? true;

    var selectedScopes = model?.ScopesConsented ?? Enumerable.Empty<string>();

    var vm = new ConsentViewModel();

    vm.ClientName = client.ClientName;

    vm.ClientLogoUrl = client.LogoUri;

    vm.ClientUrl = client.ClientUri;

    vm.RememberConsent = rememberConsent;

    vm.IdentityScopes = resources.IdentityResources.Select(i => CreateScopeViewModel(i, selectedScopes.Contains(i.Name) || model == null));

    vm.ResourceScopes = resources.ApiResources.SelectMany(i => i.Scopes).Select(x => CreateScopeViewModel(x, selectedScopes.Contains(x.Name) || model == null));

    return vm;

}
这一块就改进完了,接下来就是在不选中的情况下会有提示让我们选择,现在添加一些错误的提示,在 ProcessConsentResult 中添加一些信息
ProcessConsentResult
public string ValidationError { get; set; }
赋值 ValidationError
ConsentService
else if (viewModel.Button == "yes")

{

    if (viewModel.ScopesConsented != null && viewModel.ScopesConsented.Any())

    {

        consentResponse = new ConsentResponse

        {

            RememberConsent = viewModel.RememberConsent,

            ScopesConsented = viewModel.ScopesConsented,

        };

    }

    result.ValidationError = "请至少选中一个权限";

}
接着处理一下页面,将信息返回
ConsentController
[HttpPost]

public async Task<IActionResult> Index(InputConsentViewModel viewModel)

{

    var result = await _consentService.ProcessConsent(viewModel);

    if (result.IsRedirect)

    {

        return Redirect(result.RedirectUrl);

    }

    if (!string.IsNullOrEmpty(result.ValidationError))

    {

        ModelState.AddModelError("", result.ValidationError);

    }

    return View(result.viewModel);

}
加入验证信息之后需要修改视图把这块信息显示出来
Index
<input type="hidden" asp-for="ReturnUrl"/>

    <div class="alert alert-danger">

        <strong>Error""</strong>

        <div asp-validation-summary="All" class="danger"></div>

    </div>
添加依赖注入
startup
services.AddScoped<ConsentService>();
启动服务端,启动客户端
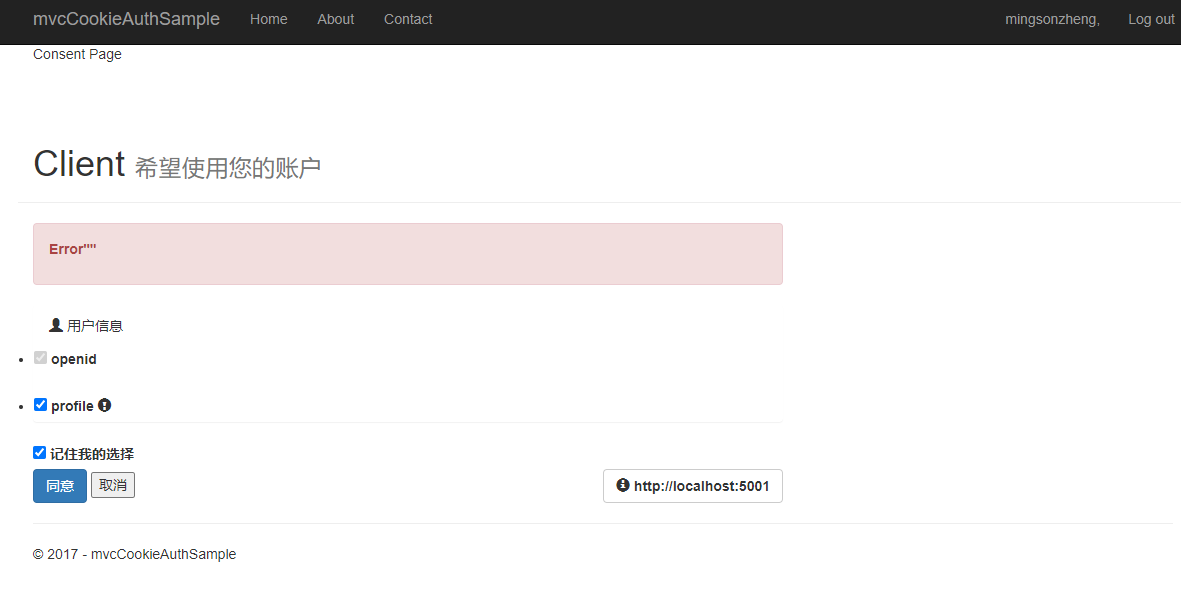
因为默认勾选第一个,无法看到错误信息,所以去掉 disabled 与 hidden 控件,两个选项都不勾选,点击同意就会看到错误信息
_ScopeListitem
disabled="@Model.Required"

@if (Model.Required)

{

    <input type="hidden" name="ScopesConsented" value="@Model.Name"/>

}

课程链接
http://video.jessetalk.cn/course/explore


本作品采用知识共享署名-非商业性使用-相同方式共享 4.0 国际许可协议进行许可。
欢迎转载、使用、重新发布,但务必保留文章署名 郑子铭 (包含链接: http://www.cnblogs.com/MingsonZheng/ ),不得用于商业目的,基于本文修改后的作品务必以相同的许可发布。
如有任何疑问,请与我联系 (MingsonZheng@outlook.com) 。
ASP.NET Core分布式项目实战(Consent 代码重构)--学习笔记的更多相关文章
- ASP.NET Core分布式项目实战
ASP.NET Core开发者成长路线图 asp.net core 官方文档 https://docs.microsoft.com/zh-cn/aspnet/core/getting-started/ ...
- 【笔记目录1】ASP.NET Core分布式项目实战
当前标签: ASP.NET Core分布式项目实战 共2页: 1 2 下一页 35.Docker安装Mysql挂载Host Volume GASA 2019-06-20 22:02 阅读:51 评论 ...
- 【笔记目录2】ASP.NET Core分布式项目实战
当前标签: ASP.NET Core分布式项目实战 共2页: 上一页 1 2 11.ClientCredential模式总结 GASA 2019-03-11 12:59 阅读:26 评论:0 10. ...
- 【ASP.NET Core分布式项目实战】(三)整理IdentityServer4 MVC授权、Consent功能实现
本博客根据http://video.jessetalk.cn/my/course/5视频整理(内容可能会有部分,推荐看源视频学习) 前言 由于之前的博客都是基于其他的博客进行开发,现在重新整理一下方便 ...
- ASP.NET Core分布式项目实战-目录
前言 今年是2018年,发现已经有4年没有写博客了,在这4年的时光里,接触了很多的.NET技术,自己的技术也得到很大的进步.在这段时光里面很感谢张队长以及其他开发者一直对.NET Core开源社区做出 ...
- 【ASP.NET Core分布式项目实战】(六)Gitlab安装
Gitlab GitLab是由GitLabInc.开发,使用MIT许可证的基于网络的Git仓库管理工具,且具有wiki和issue跟踪功能.使用Git作为代码管理工具,并在此基础上搭建起来的web服务 ...
- 【ASP.NET Core分布式项目实战】(一)IdentityServer4登录中心、oauth密码模式identity server4实现
本博客根据http://video.jessetalk.cn/my/course/5视频整理 资料 OAuth2 流程:http://www.ruanyifeng.com/blog/2014/05/o ...
- 【ASP.NET Core分布式项目实战】(五)Docker制作dotnet core控制台程序镜像
Docker制作dotnet core控制台程序镜像 基于dotnet SDK 新建控制台程序 mkdir /home/console cd /home/console dotnet new cons ...
- 【ASP.NET Core分布式项目实战】(二)oauth2 + oidc 实现 server部分
本博客根据http://video.jessetalk.cn/my/course/5视频整理(内容可能会有部分,推荐看源视频学习) 资料 我们基于之前的MvcCookieAuthSample来做开发 ...
- 【ASP.NET Core分布式项目实战】(四)使用mysql/mysql-server安装mysql
Docker安装Mysql 拉取镜像 docker pull mysql/mysql-server 运行mysql docker run -d -p : --name mysql01 mysql/my ...
随机推荐
- 《深入理解计算机系统》(CSAPP)读书笔记 —— 第六章 存储器层次结构
在计算机系统模型中,CPU执行指令,而存储器系统为CPU存放指令和数据.实际上,存储器系统是一个具有不同容量.成本和访问时间的存储设备的层次结构. 如果你的程序需要的数据是存储在CPU寄存器中 ...
- freeswitch的事件引擎实现分析
概述 freeswitch是由事件驱动的,fs内部有各种事件来标识状态的变化包括呼叫的变化.配置的变化.号码的变化等等. 而一个框架内的事件引擎需要实现哪些基本的功能呢? 让我们来看一下fs的事件引擎 ...
- Laravel : 模糊查询 where orWhere
Banner::where('title', 'like', "%{$keyword}%")->orWhere('introduce', 'like', "%{$k ...
- Spring——静态/动态代理模式
代理模式 代理模式: 静态代理 动态代理 学习aop之前,要先了解代理模式 静态代理 抽象角色:一般使用接口或者抽象类来实现 真实角色:被代理的角色 代理角色:代理真实角色:代理真实角色后,一般会做一 ...
- [转帖]MySQL如何在InnoDB中重建索引并更新统计数据?
https://geek-docs.com/mysql/mysql-ask-answer/356_mysql_how_can_i_rebuild_indexes_and_update_stats_in ...
- Intel 移动CPU天梯榜
Intel酷睿i9-13980HX 2023 2121 Intel酷睿i9-13900HX 2023 2051 Intel酷睿i9-13950HX 2023 2005 4 + Intel酷睿i9-12 ...
- [转帖]db file sequential read-数据文件顺序读取
https://www.cnblogs.com/xibuhaohao/p/9959593.html 等待事件: "db file sequential read" Referenc ...
- [转帖]CPU Turbo&Cstate&Pstate简介
https://www.jianshu.com/p/eaefd1eb0ac6 测试环境 CPU 1 Intel(R) Xeon(R) Gold 5218 CPU @ 2.30GHz 16 3130 3 ...
- [转帖]egrep 正则表达式
https://www.cnblogs.com/ordili/p/9395735.html 一.功能 用正则表达式在文件或输入中搜索匹配的字符串,并打印出匹配的行.egrep匹配之前,会删除每行结尾的 ...
- F5内核参数的简要学习
前言 最近学习了很长时间的Linux内核参数 但是大部分是纸上谈兵. 也没有一个好的系统用于学习和参照 晚上搜索F5资料时发现F5有一些iso和ova文件 就想着下载学习一下. 看看F5系统默认的参数 ...