
【ASP.NET Core分布式项目实战】(一)IdentityServer4登录中心、oauth密码模式identity server4实现
本博客根据http://video.jessetalk.cn/my/course/5视频整理
资料
OAuth2 流程:http://www.ruanyifeng.com/blog/2014/05/oauth_2_0.html
博客园晓晨的关于identityServer4的中文文档地址: http://www.cnblogs.com/stulzq/p/8119928.html
Docker中文文档 https://yeasy.gitbooks.io/docker_practice/content/
OAuth2.0概念
OAuth2.0(Open Authorization)是一个开放授权协议;第三方应用不需要接触到用户的账户信息(如用户名密码),通过用户的授权访问用户资源
OAuth的步骤一般如下:
1、客户端要求用户给予授权
2、用户同意给予授权
3、根据上一步获得的授权,向认证服务器请求令牌(token)
4、认证服务器对授权进行认证,确认无误后发放令牌
5、客户端使用令牌向资源服务器请求资源
6、资源服务器使用令牌向认证服务器确认令牌的正确性,确认无误后提供资源
该协议的参与者至少包含:
RO (resource owner): 资源所有者:用户。
RS (resource server): 资源服务器:数据中心;它存储资源,并处理对资源的访问请求。如:API资源,相册服务器、博客服务器。
AS (authorization server): 授权服务器
Client: 第三方应用
四种模式:
1、授权码模式(authorization code)
2、简化模式(implicit)
3、密码模式(resource owner password credentials)
4、客户端模式(client credentials)
接下来我们使用客户端模式来实现一个IdentityServer4授权
客户端模式(Client Credentials Grant)
客户端模式(ClientCredentials):经常运用于服务器对服务器中间通讯使用;步骤如下:
1、客户端直接用自身的信息向授权服务器请求token:
HTTP请求:
granttype:授权类型
scope:授权范围
     POST /token HTTP/1.1

     Host: server.example.com

     Authorization: Basic czZCaGRSa3F0MzpnWDFmQmF0M2JW

     Content-Type: application/x-www-form-urlencoded

     grant_type=client_credentials&scope=api001
2、授权服务器验证信息后返回token
     HTTP/1.1  OK

     Content-Type: application/json;charset=UTF-

     Cache-Control: no-store

     Pragma: no-cache

     {

       "access_token":"2YotnFZFEjr1zCsicMWpAA",

       "token_type":"example",

       "expires_in":,

       "example_parameter":"example_value"

     }
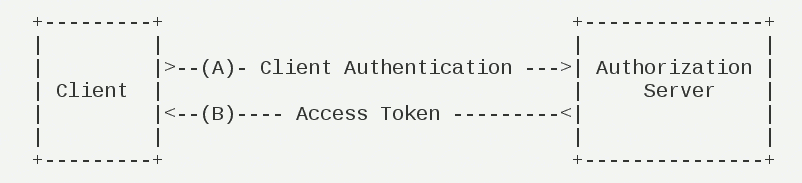
下面通过一个快速示例理解;快速示例将通过服务器与服务器直接通过api访问数据;
授权服务端
步骤:
添加Nuget包:IdentityServer4

添加Startup配置

添加Config.cs配置类

更改identity server4配置

添加客户端配置
第一步:添加Nuget包:IdentityServer4
首先,新建一个webapi项目 IdentityServerCenter
dotnet new webapi --name IdentityServerCenter
我们可以在vscode中使用ctrl+P键来打开命令面板。然后输入nuget按回车,输入identityserver4后按回车来选择版本进行安装
【注意:重新打开文件夹项目后才能在类中引用IdentityServer4有提示】
第二步:添加Startup配置
引用命名空间:
using IdentityServer4;
添加IdentityServer依赖注入
services.AddIdentityServer()

    .AddDeveloperSigningCredential();//添加开发人员签名凭据
app.UseIdentityServer();//使用IdentityServer
我们可以在Program.cs将当前api的地址设置成http://localhost:5000

第三步:添加Config.cs配置类
我们接下来添加一个Config.cs类,这个类是用来初始化IdentityServer的
using System.Collections;

using System.Collections.Generic;

using IdentityServer4;

using IdentityServer4.Models;

namespace IdentityServerCenter

{

    public class Config

    {

        //所有可以访问的Resource

        public static IEnumerable<ApiResource> GetResources()

        {

            return new List<ApiResource>

            {

                new ApiResource("api","My Api")

            };

        }

        //客户端

        public static IEnumerable<Client> GetClients()

        {

            return new List<Client>

            {

                new Client()

                {

                    ClientId="client",

                    AllowedGrantTypes= GrantTypes.ClientCredentials,//模式:最简单的模式

                    ClientSecrets={//私钥

                        new Secret("secret".Sha256())

                    },

                    AllowedScopes={//可以访问的Resource

                        "api"

                    }

                }

            };

        }

    }

}
第四步:更改identity server4配置
services.AddIdentityServer()

    .AddDeveloperSigningCredential()//添加开发人员签名凭据

    .AddInMemoryApiResources(Config.GetResources());//添加内存apiresource
第五步:添加客户端配置
services.AddIdentityServer()

    .AddDeveloperSigningCredential()//添加开发人员签名凭据

    .AddInMemoryApiResources(Config.GetResources())//添加内存apiresource

    .AddInMemoryClients(Config.GetClients());//添加内存client
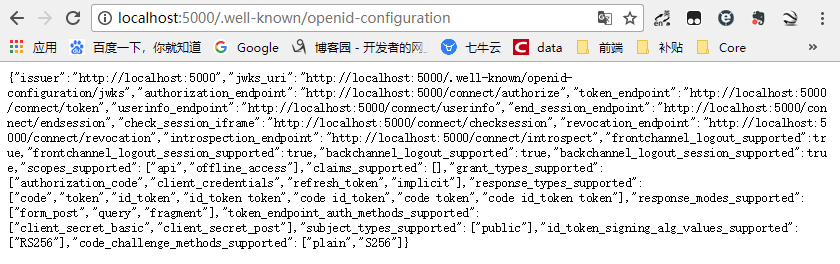
这是后我们执行dotnet run通过http://localhost:5000/.well-known/openid-configuration访问 ;可以看到是一个restful的api;
客户端集成IdentityServer
新建一个新的webapi,命名为ClientCredentialApi
dotnet new webapi --name ClientCredentialApi
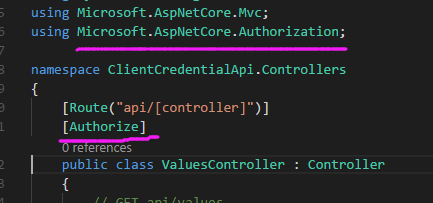
给控制器添加引用Microsoft.AspNetCore.Authorization并添加 [Authorize] 标签
添加中间件IdentityServer4.AccessTokenValidation 包引用

配置api的地址 http://localhost:5001

添加授权DI注入
services.AddAuthentication("Bearer")//添加授权模式

    .AddIdentityServerAuthentication(Options=>{

        Options.Authority="http://localhost:5000";//授权服务器地址

        Options.RequireHttpsMetadata=false;//是否是https

        Options.ApiName="api";

   });
app.UseAuthentication();//使用授权中间件
这时候执行 dotnet run进行访问http://localhost:5001/api/values
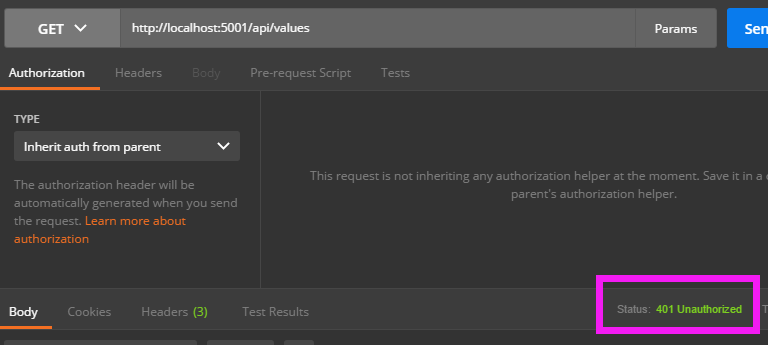
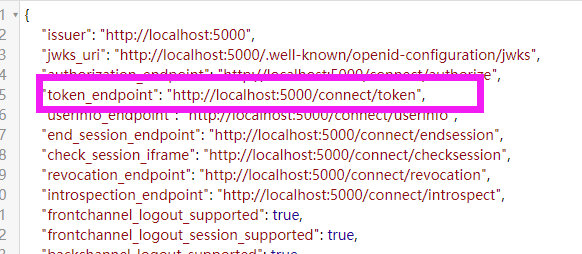
这时候我们运行之前的IdentityServerCenter通过http://localhost:5000/.well-known/openid-configuration访问 ,来拿到获取token的地址 http://localhost:5000/connect/token
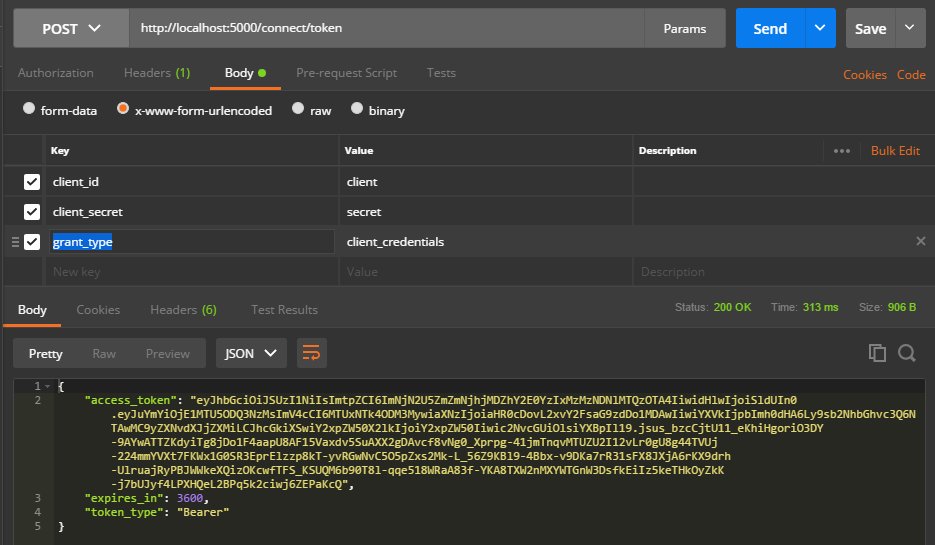
我们接下来使用postman来获取一下token,请求参数
client_id、client_secret、grant_type
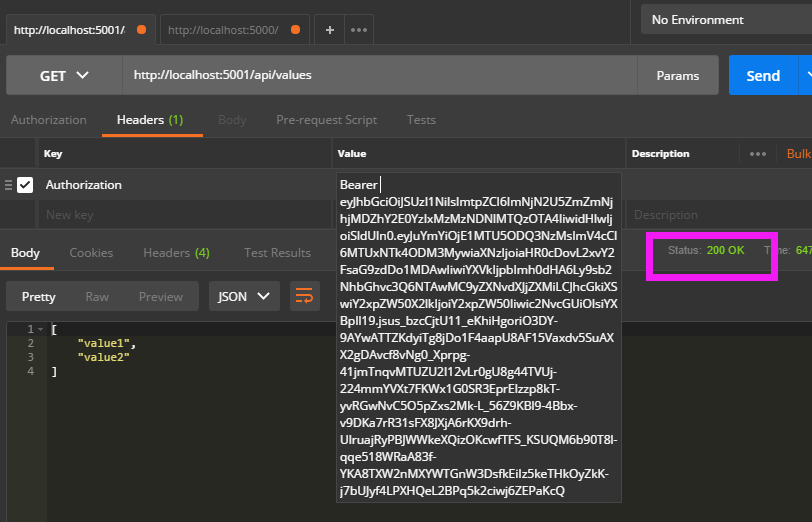
这样我们拿到token后,再去访问ClientCredentialApi(成功)
控制台获取token
新建一个控制台ThirdPartyDemo
dotnet new console --name ThirdPartyDemo
添加添加nuget引用包 IdentityModel
using System;

using System.Net.Http;

using IdentityModel.Client;

namespace ThirdPartyDemo

{

    class Program

    {

        static void Main(string[] args)

        {

            var dico = DiscoveryClient.GetAsync("http://localhost:5000").Result;

            //token

            var tokenClient = new TokenClient(dico.TokenEndpoint, "client", "secret");

            var tokenResponse = tokenClient.RequestClientCredentialsAsync("api").Result;

            if (tokenResponse.IsError)

            {

                Console.WriteLine(tokenResponse.Error);

                return;

            }

            Console.WriteLine(tokenResponse.Json);

            Console.WriteLine("\n\n");

            var httpClient = new HttpClient();

            httpClient.SetBearerToken(tokenResponse.AccessToken);

            var response = httpClient.GetAsync("http://localhost:5001/api/values").Result;

            if (!response.IsSuccessStatusCode)

            {

                Console.WriteLine(response.Content.ReadAsStringAsync().Result);

            }

            Console.ReadLine();

        }

    }

}
DiscoveryClient类:IdentityModel提供给我们通过基础地址(如:http://localhost:5000)就可以访问令牌服务端;当然可以根据上面的restful api里面的url自行构建;上面就是通过基础地址,获取一个TokenClient;(对应restful的url:token_endpoint "http://localhost:5000/connect/token")
RequestClientCredentialsAsync方法:请求令牌;
获取令牌后,就可以通过构建http请求访问API接口;这里使用HttpClient构建请求,获取内容;
运行效果:

oauth密码模式identity server4实现
1、Config.cs添加用户的配置
2、添加client的配置
3、修改Startup.cs
Config.cs添加用户的配置
添加测试用户,并给其用户名密码(其他Claim);TestUser是IdentityServer给我们的测试抽象用户类;实际可自行定义
TestUser类型表示一个测试用户及其身份信息。让我们向配置类(如果你有严格按照顺序进行演练,那么配置类应该在 QuickstartIdentityServer 项目的 Config.cs 文件中)中添加以下代码以创建一对用户:
首先添加以下语句 到Config.cs文件中:
        //测试用户

        public static List<TestUser> GetTestUsers()

        {

            return new List<TestUser>{

                new TestUser{

                    SubjectId="",

                    Username="wyt",

                    Password=""

                }

            };

        }
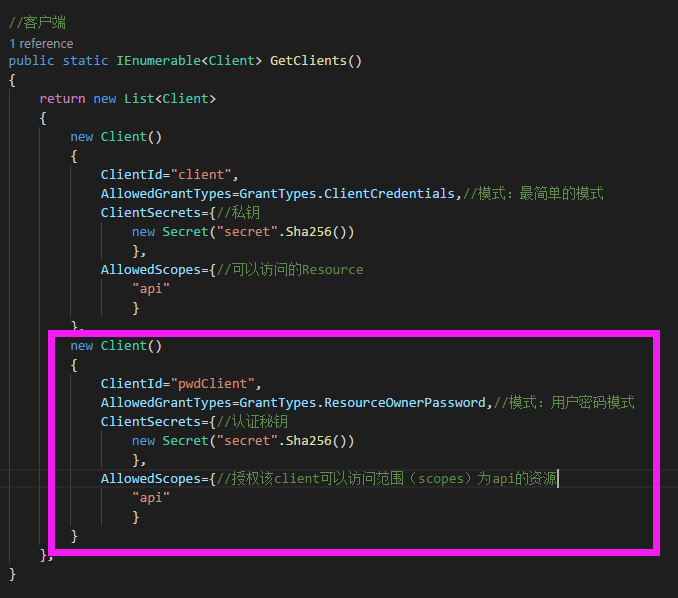
添加client的配置
添加一个客户端
修改Startup.cs
这里AddTestUser会给授权服务端增加各类支持用户(RO)的密码支持

我们接下来使用postman来获取一下账号密码模式token,请求参数【注意:这里必须要使用x-www-form-urlencoded的请求方式,否则无法获取token】
client_id、client_secret、grant_type、username、password
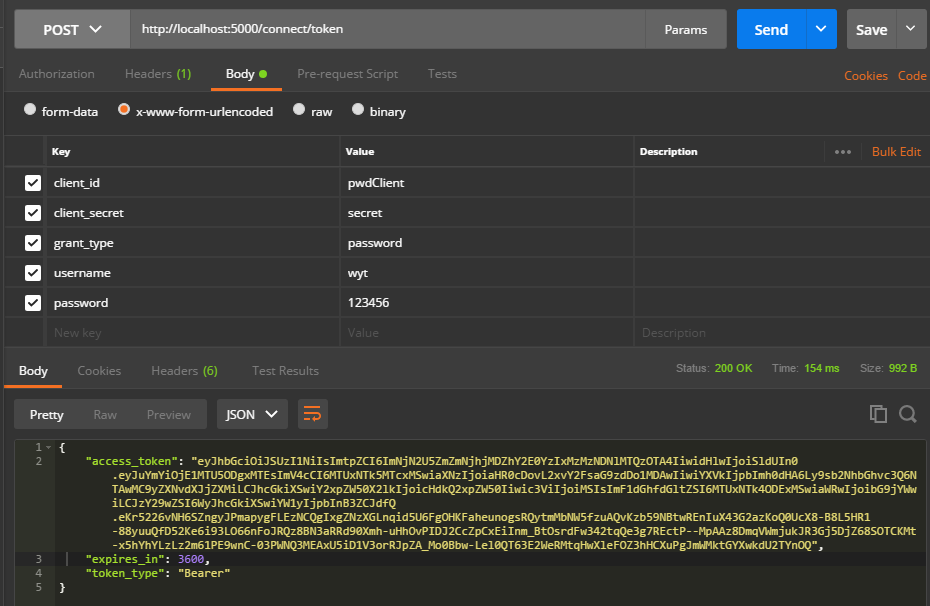
完成~~~
控制台请求获取token
新建一个控制台PwdClient
dotnet new console --name PwdClient
添加添加nuget引用包 IdentityModel
using System;

using System.Net.Http;

using IdentityModel.Client;

namespace PwdClient

{

    class Program

    {

        static void Main(string[] args)

        {

            var dico = DiscoveryClient.GetAsync("http://localhost:5000").Result;

            //token

            var tokenClient = new TokenClient(dico.TokenEndpoint, "pwdClient", "secret");

            var tokenResponse = tokenClient.RequestResourceOwnerPasswordAsync("wyt","").Result;

            if (tokenResponse.IsError)

            {

                Console.WriteLine(tokenResponse.Error);

                return;

            }

            Console.WriteLine(tokenResponse.Json);

            Console.WriteLine("\n\n");

            var httpClient = new HttpClient();

            httpClient.SetBearerToken(tokenResponse.AccessToken);

            var response = httpClient.GetAsync("http://localhost:5001/api/values").Result;

            if (!response.IsSuccessStatusCode)

            {

                Console.WriteLine(response.Content.ReadAsStringAsync().Result);

            }

            Console.ReadLine();

        }

    }

}
运行效果:

如果信任的第三方,不想加入密码,可以在授权服务的Config.cs中Client添加设置RequireClientSecret=false即可

【ASP.NET Core分布式项目实战】(一)IdentityServer4登录中心、oauth密码模式identity server4实现的更多相关文章
- ASP.NET Core分布式项目实战
ASP.NET Core开发者成长路线图 asp.net core 官方文档 https://docs.microsoft.com/zh-cn/aspnet/core/getting-started/ ...
- 【笔记目录2】ASP.NET Core分布式项目实战
当前标签: ASP.NET Core分布式项目实战 共2页: 上一页 1 2 11.ClientCredential模式总结 GASA 2019-03-11 12:59 阅读:26 评论:0 10. ...
- 【笔记目录1】ASP.NET Core分布式项目实战
当前标签: ASP.NET Core分布式项目实战 共2页: 1 2 下一页 35.Docker安装Mysql挂载Host Volume GASA 2019-06-20 22:02 阅读:51 评论 ...
- ASP.NET Core分布式项目-2.oauth密码模式identity server4实现
源码下载 这里根据<ASP.NET Core分布式项目-1.IdentityServer4登录中心>的代码来继续更新oauth密码模式,这里的密码模式比上次的客户端模式更安全 在WebAp ...
- 【ASP.NET Core分布式项目实战】(三)整理IdentityServer4 MVC授权、Consent功能实现
本博客根据http://video.jessetalk.cn/my/course/5视频整理(内容可能会有部分,推荐看源视频学习) 前言 由于之前的博客都是基于其他的博客进行开发,现在重新整理一下方便 ...
- ASP.NET Core分布式项目实战-目录
前言 今年是2018年,发现已经有4年没有写博客了,在这4年的时光里,接触了很多的.NET技术,自己的技术也得到很大的进步.在这段时光里面很感谢张队长以及其他开发者一直对.NET Core开源社区做出 ...
- 【ASP.NET Core分布式项目实战】(二)oauth2 + oidc 实现 server部分
本博客根据http://video.jessetalk.cn/my/course/5视频整理(内容可能会有部分,推荐看源视频学习) 资料 我们基于之前的MvcCookieAuthSample来做开发 ...
- 【ASP.NET Core分布式项目实战】(五)Docker制作dotnet core控制台程序镜像
Docker制作dotnet core控制台程序镜像 基于dotnet SDK 新建控制台程序 mkdir /home/console cd /home/console dotnet new cons ...
- 【ASP.NET Core分布式项目实战】(六)Gitlab安装
Gitlab GitLab是由GitLabInc.开发,使用MIT许可证的基于网络的Git仓库管理工具,且具有wiki和issue跟踪功能.使用Git作为代码管理工具,并在此基础上搭建起来的web服务 ...
随机推荐
- java泛型学习(一)
泛型也叫做参数化类型,顾名思义的去理解,就是把类型作为一个参数.类比方法的传参,我们举个例子. class A{ public void getX(int x){ System.out.println ...
- 【JavaScript】 JS面向对象的模式与实践 (重点整治原型这个熊孩子 (/= _ =)/~┴┴ )
参考书籍 <JavaScript高级语言程序设计>—— Nicholas C.Zakas <你不知道的JavaScript> —— KYLE SIMPSON 在JS的面向 ...
- mysql主从备份+keepalived自动切换
数据库这一层需要做到避免单点故障可以是主从备份和主主备份,主主备份可能有性能损耗和数据同步的问题.这里记录下主从备份, mysql进行备份之前确保mysql的版本是一样的,我这里用的都是mysql5. ...
- MongoDB集群搭建-副本集
MongoDB集群搭建-副本集 概念性的知识,可以参考本人博客地址: 一.Master-Slave方案: 主从: 二.Replica Set方案: 副本集: 步骤:(只要按步骤操作,100%成功) 1 ...
- mongodb命令行基础语法
首先是安装并配置mongodb,这个请自行百度,安装完成后打开cmd命令输入mongo.我们现在先做一个例子吧,假设有一个班级叫c1,里面有若干个人,里面的人有姓名.年龄.性别和班级,我们分别对他们进 ...
- OC学习11——循环引用与@class
转载自 OC学习篇之---@class关键字的作用以及#include和#import的区别 一.#import和#include的区别 当我们在代码中使用两次#include的时候会报错:因为#in ...
- Udacity并行计算课程笔记-The GPU Hardware and Parallel Communication Patterns
本小节笔记大纲: 1.Communication patterns gather,scatter,stencil,transpose 2.GPU hardware & Programming ...
- NOIP2002 字符变换
啊本来以为2002的题应该会比较友善于是很naive地像模拟一样用着stl乱玩结果死也过不了最后一个点qaq 心情很悲痛于是为了解放自我 #include<iostream> #inclu ...
- 浅谈对ST表的一些理解
今天打了人生第一道ST表题(其实只是ST表跑得最快); ST表是一种用来解决RMQ问题的利器... 大体操作有两步: 第一部分nlogn预处理 第二部分O(1)询问 预处理就是运用倍增+区间动规 ST ...
- PHP-无限级分类
给定省市地区数组如下: $area = array( array('id'=>1,'name'=>'安徽','parent'=>'0'), ...