flask 源码专题(三):请求上下文和应用上下文入栈与出栈
1.请求上下文和应用上下文入栈
# 将ctx入栈,但是内部也将应用上下文入栈

 ctx.push()
def push(self):

    # 获取到的  top  == ctx

    top = _request_ctx_stack.top

    if top is not None and top.preserved:

        top.pop(top._preserved_exc)

    # Before we push the request context we have to ensure that there

    # is an application context.

    """

        _request_ctx_stack 和 _app_ctx_stack 都是 Local 类的实例

    """

    # 获取 应用上下文的栈顶元素,得到 app_ctx

    app_ctx = _app_ctx_stack.top

    if app_ctx is None or app_ctx.app != self.app:

        # self.app == Fask()

        # 得到 一个 AppContext类的实例对象,得到一个 应用上下文对象 app_ctx,此时 app_ctx拥有以下属性: app_ctx.app = app, app_ctx.g = app.app_ctx_globals_class()

        app_ctx = self.app.app_context()

        # 将 app_ctx 入栈,应用上下文入栈

        app_ctx.push()

        self._implicit_app_ctx_stack.append(app_ctx)

    else:

        self._implicit_app_ctx_stack.append(None)

    if hasattr(sys, 'exc_clear'):

        sys.exc_clear()

    # self 指的是 ctx,即将ctx入栈,即 _request_ctx_stack._local.stack = [ctx]。请求上下文入栈

    _request_ctx_stack.push(self)

    # 由于每次请求都会初始化创建你ctx,因此session都为None

    if self.session is None:

        # SecureCookieSessionInterface()

        # session_interface = SecureCookieSessionInterface(),即session_interface就是一个SecureCookieSessionInterface类的实例对象

        session_interface = self.app.session_interface

        # 第一次访问:生成一个 字典(容器) 返回至 self.session

        self.session = session_interface.open_session(

            self.app, self.request

        )

        if self.session is None:

            self.session = session_interface.make_null_session(self.app)
首先,应用上下文入栈,这里不多做解释说明,其执行流程与请求上下文相同,请参考下文对与请求上下文的入栈流程分析。
到_app_ctx_stack这个栈中取最后一个数据,如果未取到或者取到的不是当前的app,就调用app.app_context()方法,就是新实例一个上下文app_ctx对象,再执行app_ctx.push()方法 (在这再次强调,因为app_ctx是AppContext对象,就要先去AppContext类中找push方法),
class AppContext(object):

   def push(self):

        _app_ctx_stack.push(self)     #把新创建的app_ctx上下文app对象添加到了_app_ctx_stack这个栈中

        appcontext_pushed.send(self.app)   #在这里遇到了第一个信号,请求app上下文push时执行
其次,请求上下文入栈。执行 _request_ctx_stack.push(self) ,我们先看看 _request_ctx_stack 是什么。由 _request_ctx_stack = LocalStack()
可知 _request_ctx_stack 是 LocalStack 类实例对象,进入 LocalStack 的构造方法中
    def __init__(self):

        self._local = Local()
即在类实例化过程中,为 _request_ctx_stack 实例对象创建 _local 属性,该属性的值是 Local 类实例,进入其构造方法中,在该方法中为每一个 Local 类实例创建 __storage__ 和 __ident_func__ 属性:
class Local(object):

    __slots__ = ('__storage__', '__ident_func__')

    def __init__(self):

        object.__setattr__(self, '__storage__', {})

        object.__setattr__(self, '__ident_func__', get_ident)
至此,完成了对 _request_ctx_stack 实例对象创建的流程分析,但是需要注意的是,该实例对象并不是在每次请求之后才创建完成的,而是在flask项目启动之后就会被立即创建,该对象对于每次的请求都会调用该对象的push方法进行请求上下文的入栈,也就是说 _request_ctx_stack 是一个单例对象,该单例对象可以在任何的地方被调用,其他的单例对象还有:
"""

    注意:

        在项目启动之后,global里的代码就已经执行完毕,而且也只会执行一次,因此这里面的变量是针对所有请求所使用的,但是根据不同线程id用来存放各自的值

"""

#  生成 请求上下文栈对象,将请求上下文对象 ctx 保存到 _request_ctx_stack._local.stack = [ctx]中

_request_ctx_stack = LocalStack()

# 生成应用上下文栈对象,将应用上下文对象 app_ctx 保存到  _app_ctx_stack._local.stack = [app_ctx]中

_app_ctx_stack = LocalStack()

# current_app.__local = app

current_app = LocalProxy(_find_app)

# 获取ctx.request

request = LocalProxy(partial(_lookup_req_object, 'request'))

# 获取 ctx.session

session = LocalProxy(partial(_lookup_req_object, 'session'))

# 维护此次请求的一个全局变量,其实就是一个字典

g = LocalProxy(partial(_lookup_app_object, 'g'))
对于以上的单例对象,在项目启动之后被创建,在项目停止后被销毁,与请求是否进来无任何关系。现在我们知道了 _request_ctx_stack 的创建流程,我们返回之前对请求上下文的入栈操作 _request_ctx_stack.push(self) (self指的是ctx),进入push方法:
def push(self, obj):

    # obj == ctx

    """Pushes a new item to the stack"""

    rv = getattr(self._local, 'stack', None)

    if rv is None:

        self._local.stack = rv = []

    rv.append(obj)

    return rv
在上述流程中,首先使用反射获取 _request_ctx_stack._local.stack 的值,也就是获取请求栈的值。项目刚启动,在第一次请求进来之前,请求栈的为空,则代码继续向下执行将当前请求的ctx追加至请求栈中,并且返回请求栈的值。这里着重说一下入栈之前的流程和入栈之后的数据结构:执行 self._local.stack = rv = [] ,会调用 Local 类的 __setattr__ 方法
def __setattr__(self, name, value):

        ident = self.__ident_func__()

        storage = self.__storage__

        try:

            storage[ident][name] = valueexcept KeyError:

            storage[ident] = {name: value}
self.__ident_func__() 为获取当前此次请求的协程id或者线程id, self.__storage__ 为一个字典对象,在项目启动后的第一个请求进来之后会发生 storage[ident][name] = value 的异常错误,抛出异常被下面捕获,因此执行 storage[ident] = {name: value} (以此次协程id或线程id为key,该key的value为一个字典,在字典中存储一个键值对"stack":[ctx]),即此数据结构为:
_request_ctx_stack._local.stack={

        线程id或协程id: {

            'stack': [ctx]

        }

}
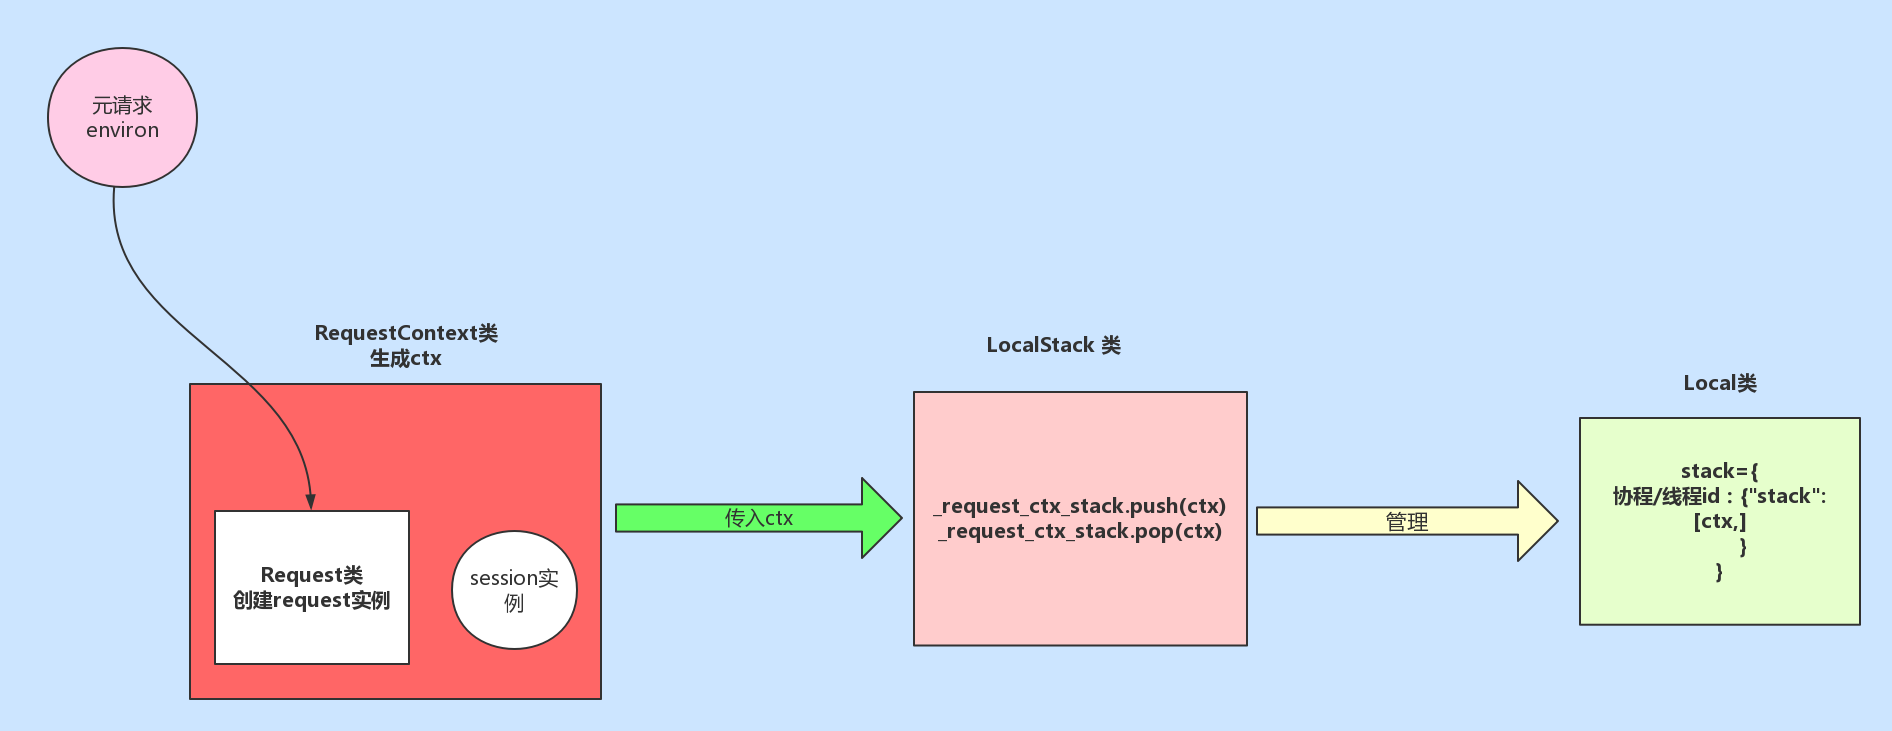
同时, self._local.stack = [ctx]。至此,完成请求上下文的入栈操作,应用上下文与请求上下文的入栈流程相同,这里不在赘述。至此完成了请求入栈的操作,我们需要知道在上述过程中使用到的四个类: RequestContext (请求上下文类,实例对象ctx中包含了request,Session两个属性)、
Request (对请求的元信息environ进行封装)、 LocalStack (使用该类实例对象 _request_ctx_stack ,维护请求上下文对象ctx的入栈和出栈操作,相当于请求上下文对象的管理者)、 Local (堆栈类,真正存放请求上下文的类),如果你还是对着几个类关系还是不明白,请看我为你准备的图:
2. ctx.auto_pop(error) 函数,完成对请求上下文和应用上下文的出栈操作:
# 出栈,删除本次请求的相关信息

ctx.auto_pop(error)
def auto_pop(self, exc):

    if self.request.environ.get('flask._preserve_context') or \

       (exc is not None and self.app.preserve_context_on_exception):

        self.preserved = True

        self._preserved_exc = exc

    else:

        self.pop(exc)
def pop(self, exc=_sentinel):

    """Pops the request context and unbinds it by doing that.  This will

    also trigger the execution of functions registered by the

    :meth:`~flask.Flask.teardown_request` decorator.

    .. versionchanged:: 0.9

       Added the `exc` argument.

    """

    app_ctx = self._implicit_app_ctx_stack.pop()

    try:

        clear_request = False

        if not self._implicit_app_ctx_stack:

            self.preserved = False

            self._preserved_exc = None

            if exc is _sentinel:

                exc = sys.exc_info()[1]

            self.app.do_teardown_request(exc)

            # If this interpreter supports clearing the exception information

            # we do that now.  This will only go into effect on Python 2.x,

            # on 3.x it disappears automatically at the end of the exception

            # stack.

            if hasattr(sys, 'exc_clear'):

                sys.exc_clear()

            request_close = getattr(self.request, 'close', None)

            if request_close is not None:

                request_close()

            clear_request = True

    finally:

        # 请求上下文出栈

        rv = _request_ctx_stack.pop()

        # get rid of circular dependencies at the end of the request

        # so that we don't require the GC to be active.

        if clear_request:

            rv.request.environ['werkzeug.request'] = None

        # Get rid of the app as well if necessary.

        if app_ctx is not None:

            # 应用上下文出栈

            app_ctx.pop(exc)

        assert rv is self, 'Popped wrong request context.  ' \

            '(%r instead of %r)' % (rv, self)
def pop(self):

    """Removes the topmost item from the stack, will return the

    old value or `None` if the stack was already empty.

    """

    stack = getattr(self._local, 'stack', None)

    if stack is None:

        return None

    elif len(stack) == 1:

        release_local(self._local)

        return stack[-1]

    else:

        # 获取并删除列表中的第一个元素,同时返回该元素

        return stack.pop()
stack获取到的是请求栈或应用栈的列表,栈的长度为1,则进入 elif 控制语句中,首先执行 release_local(self._local) :
def release_local(local):

    local.__release_local__()
local=self._local ,即执行 Local 类的 __release_local__ 方法,进入该方法:
def __release_local__(self):

    # 将 self.__storage__ 所维护的字典中删除当前协程或线程id为key的元素

    self.__storage__.pop(self.__ident_func__(), None)
从上面的语句中可以很明显看出,要执行的操作就是将以当前协程或线程id为key的元素从字典 self.__storage__ 中删除,返回至pop函数中的elif控制语句,最终将列表中的最后一个元素返回。注意,最终 _request_ctx_stack._local 的请求栈和应用栈列表中至少会存在一个元素。
flask 源码专题(三):请求上下文和应用上下文入栈与出栈的更多相关文章
- flask 源码专题(二):请求上下文与全文上下文
源码解析 0. 请求入口 if __name__ == '__main__': app.run() def run(self, host=None, port=None, debug=None, lo ...
- flask 源码专题(五):SqlAlchemy 中操作数据库时session和scoped_session的区别
1原生session: from sqlalchemy.orm import sessionmaker from sqlalchemy import create_engine from sqlalc ...
- flask 源码专题(九):flask扩展点
1. 信号(源码) 信号,是在flask框架中为我们预留的钩子,让我们可以进行一些自定义操作. pip3 install blinker 2. 根据flask项目的请求流程来进行设置扩展点 中间件 # ...
- flask 源码专题(十一):LocalStack和Local对象实现栈的管理
目录 04 LocalStack和Local对象实现栈的管理 1.源码入口 1. flask源码关于local的实现 2. flask源码关于localstack的实现 3. 总结 04 LocalS ...
- flask 源码专题(六):session处理机制
前言 flask_session是flask框架实现session功能的一个插件,用来替代flask自带的session实现机制,flask默认的session信息保存在cookie中,不够安全和灵活 ...
- flask 源码专题(一):app.run()的背后
当我们用Flask写好一个app后, 运行app.run()表示监听指定的端口, 对收到的request运行app生成response并返回. 现在分析一下, 运行app.run()后具体发生了什么事 ...
- Python Web Flask源码解读(三)——模板渲染过程
关于我 一个有思想的程序猿,终身学习实践者,目前在一个创业团队任team lead,技术栈涉及Android.Python.Java和Go,这个也是我们团队的主要技术栈. Github:https:/ ...
- flask 源码专题(八):路由加载
1.示例代码 from flask import Flask app = Flask(__name__,static_url_path='/xx') @app.route('/index') def ...
- flask 源码专题(十):flash源码研究
flash源码 def flash(message, category="message"): flashes = session.get("_flashes" ...
随机推荐
- 2019-02-15 CSS样式学习——(内容来自mooc北京林业大学web前端开发授课ppt)
CSS样式的添加方法 行内样式 e.x. 内嵌样式 e.x. 注意内嵌样式写在head标签内: 单独文件(外部式样式表文件) 也是在head标签内插入超链接,sublime+emmet可以用link: ...
- VM virtualBox中文版 v6.0.12.133076官方版(64/-虚拟机
virtualBox中文版 v6.0.12.133076官方版(64/-虚拟机 http://www.onlinedown.net/soft/82464.htm http://8dx.pc6.com/ ...
- SLAM数据集序列图片如何批量处理
SLAM数据集序列图片如何批量处理 原创:SLAM爬坑之行 引言:在SLAM学习过程中,有时候需要对大量的数据集比如TUM/KITTI等图片序列进行批量处理,这个时候需要用到opencv中的函数对图像 ...
- 【转】Windows下PATH等环境变量详解
[转]“肖凡的专栏” 博客,请务必保留此出处http://legend2011.blog.51cto.com/3018495/553255 在学习JAVA的过程中,涉及到多个环境变量(environm ...
- Jmeter工具环境搭建
Jmeter工具什么 1 多线程框架-支持多并发操作 2 用于对服务器模拟负载 3 支持web,数据库,FTP服务器系统的性能测试 4 开源,可二次定制开发 下载Java JDK 下载地址: http ...
- WireShark——IP协议包分析(Ping分析IP协议包)
互联网协议 IP 是 Internet Protocol 的缩写,中文缩写为“网协”.IP 协议是位于 OSI 模型中第三层的协议,其主要目的就是使得网络间能够互联通信.前面介绍了 ARP 协议, 该 ...
- 使用DragonFly进行智能镜像分发
Dragonfly 是一款基于 P2P 的智能镜像和文件分发工具.它旨在提高文件传输的效率和速率,最大限度地利用网络带宽,尤其是在分发大量数据时,例如应用分发.缓存分发.日志分发和镜像分发. 在阿里巴 ...
- SpringCloud 入门(三)
前文我们介绍了简单的创建一个客户端,并介绍了它是如何提供服务的,接下来介绍它的另外一个组件:zuul. zuul 提供了微服务的网关功能,通过它提供的接口,可以转发不同的服务,可以当作一个中转站. 搭 ...
- TestNG离线安装步骤
1.下载testNG 离线安装包[eclipse-testng离线包],并解压.资源可以在下载:http://download.csdn.net/detail/u012100968/9623613: ...
- 入门大数据---SparkSQL联结操作
一. 数据准备 本文主要介绍 Spark SQL 的多表连接,需要预先准备测试数据.分别创建员工和部门的 Datafame,并注册为临时视图,代码如下: val spark = SparkSessio ...