Signature Request Warnings & eth_sign学习
https://consensys.zendesk.com/hc/en-us/articles/360004427792-Signature-Request-Warnings-eth-sign
MetaMask helps you manage your Ethereum private keys. As you probably know, you can use these keys to sign transactions that send Ether or ERC20 tokens from one account to another. But you can also use these keys to sign data presented to you by an application. This is powerful: signing data can prove ownership of your account and act as a form of authentication, user consent, or messaging.
metamask帮助我们管理以太坊私钥,我们可以使用这些key去对从一个账户到另一个账户之间的ether和ERC20 tokens交易进行签名。除此之外你还可以使用它来在应用中签署数据来代表你的身份。这是十分有用的,签署数据能够帮助我们证明我们对账户的拥有权或充当身份验证、用户同意或消息传递的形式
As Ethereum has evolved, the mechanics of asking users to sign data have evolved as well. For usability's sake, the community is trying to make data as clear and readable as possible when presented for signing. If an application asks a user to sign a Terms of Service with their private key, the user should be able to understand the content of what they're signing and trust its accuracy.
随着Ethereum的发展,要求用户签署数据的机制也在不断发展。出于可用性的考虑,社区正在努力使数据在提供签名时尽可能清晰和可读。如果应用程序要求用户用私钥签署服务条款,用户应该能够理解他们所签署的内容并相信其准确性。
For some older signing methods, this is not technically possible. When MetaMask encounters an application that asks for a signature on data in a format that's not human readable, we warn our users to sign only if they fully trust the application they are interacting with. In these cases, the balance of your wallet is at stake: it's possible for a malicious actor to encode a real transaction involving Eth or tokens inside the data, ask for your signature, and submit the transaction to the blockchain as if you had signed the transaction yourself.
对于一些较老的签名方法,这在技术上是不可能的。当MetaMask遇到要求对数据进行签名的应用程序时,该应用程序的格式不是人类可读的,我们警告用户只有在完全信任与之交互的应用程序时才签名。在这种情况下,你钱包的余额就岌岌可危了:恶意的参与者可能会对数据中涉及Eth或token的真实交易进行编码,请求您的签名,并将交易提交给区块链,就好像您自己签署了交易一样。

上图这种就是一种很老旧的签名方法,用户并不知道它签署的信息到底是什么
Some applications still rely on these older methods to interact with users, so we continue to support this type of signing functionality in our extension with a significant warning. In the long term we hope the Ethereum community will stop using these dangerous signing methods in favor of newer & safer alternatives.
有些应用程序仍然依赖这些较老的方法与用户交互,因此我们在扩展中继续支持这种签名功能,并发出了重要警告。从长远来看,我们希望Ethereum社区将停止使用这些危险的签约方式,支持更新和更安全的替代方案。

上图就是一种比较新的方法,在这里可以看见用户签署的信息
If you'd like to see how different signing methods interact with the MetaMask extension, check out these signing examples.
如果您想了解不同的签名方法如何与MetaMask扩展交互,请查看写在下面的这个实例中的这些方法:
有一个实现的例子:signing examples.
页面实现为:

这里面实现的代码都写在了bundle.js,从6506行可见对web3签署的API的调用,好好看看,了解人家是怎么实现的
后面学习之后发现实现代码是index.js,bundle.js是使用browserify将index.js转换成了浏览器能调用的格式的代码
var ethUtil = require('ethereumjs-util')

var sigUtil = require('eth-sig-util')

var Eth = require('ethjs')

window.Eth = Eth

var fs = require('fs')

var terms = fs.readFileSync(__dirname + '/terms.txt').toString()

ethSignButton.addEventListener('click', function(event) {

  event.preventDefault() //阻止元素发生默认的行为(例如,当点击提交按钮时阻止对表单的提交)

  var msg = '0x879a053d4800c6354e76c7985a865d2922c82fb5b3f4577b2fe08b998954f2e0'

  var from = web3.eth.accounts[]

  web3.eth.sign(from, msg, function (err, result) {

    if (err) return console.error(err)

    console.log('SIGNED:' + result)

  })

})

personalSignButton.addEventListener('click', function(event) {

  event.preventDefault()

  var text = terms

  var msg = ethUtil.bufferToHex(new Buffer(text, 'utf8'))

  // var msg = '0x1' // hexEncode(text)

  console.log(msg)

  var from = web3.eth.accounts[]

  /*  web3.personal.sign not yet implemented!!!

   *  We're going to have to assemble the tx manually!

   *  This is what it would probably look like, though:

    web3.personal.sign(msg, from) function (err, result) {

      if (err) return console.error(err)

      console.log('PERSONAL SIGNED:' + result)

    })

  */

   console.log('CLICKED, SENDING PERSONAL SIGN REQ')

  var params = [msg, from]

  var method = 'personal_sign'

  web3.currentProvider.sendAsync({

    method,

    params,

    from,

  }, function (err, result) {

    if (err) return console.error(err)

    if (result.error) return console.error(result.error)

    console.log('PERSONAL SIGNED:' + JSON.stringify(result.result))

    console.log('recovering...')

    const msgParams = { data: msg }

    msgParams.sig = result.result

    console.dir({ msgParams })

    const recovered = sigUtil.recoverPersonalSignature(msgParams)

    console.dir({ recovered })

    if (recovered === from ) {

      console.log('SigUtil Successfully verified signer as ' + from)

    } else {

      console.dir(recovered)

      console.log('SigUtil Failed to verify signer when comparing ' + recovered.result + ' to ' + from)

      console.log('Failed, comparing %s to %s', recovered, from)

    }

    /*

    method = 'personal_ecRecover'

    var params = [msg, result.result]

    web3.currentProvider.sendAsync({

      method,

      params,

      from,

    }, function (err, recovered) {

      console.dir({ err, recovered })

      if (err) return console.error(err)

      if (result.error) return console.error(result.error)

      if (result.result === from ) {

        console.log('Successfully verified signer as ' + from)

      } else {

        console.log('Failed to verify signer when comparing ' + result.result + ' to ' + from)

      }

    })

    */

  })

})

personalRecoverTest.addEventListener('click', function(event) {

  event.preventDefault()

  var text = 'hello!'

  var msg = ethUtil.bufferToHex(new Buffer(text, 'utf8'))

  // var msg = '0x1' // hexEncode(text)

  console.log(msg)

  var from = web3.eth.accounts[]

  /*  web3.personal.sign not yet implemented!!!

   *  We're going to have to assemble the tx manually!

   *  This is what it would probably look like, though:

    web3.personal.sign(msg, from) function (err, result) {

      if (err) return console.error(err)

      console.log('PERSONAL SIGNED:' + result)

    })

  */

   console.log('CLICKED, SENDING PERSONAL SIGN REQ')

  var params = [msg, from]

  var method = 'personal_sign'

  web3.currentProvider.sendAsync({

    method,

    params,

    from,

  }, function (err, result) {

    if (err) return console.error(err)

    if (result.error) return console.error(result.error)

    console.log('PERSONAL SIGNED:' + JSON.stringify(result.result))

    console.log('recovering...')

    const msgParams = { data: msg }

    msgParams.sig = result.result

    method = 'personal_ecRecover'

    var params = [msg, result.result]

    web3.currentProvider.sendAsync({

      method,

      params,

      from,

    }, function (err, result) {

      var recovered = result.result

      console.log('ec recover called back:')

      console.dir({ err, recovered })

      if (err) return console.error(err)

      if (result.error) return console.error(result.error)

      if (recovered === from ) {

        console.log('Successfully ecRecovered signer as ' + from)

      } else {

        console.log('Failed to verify signer when comparing ' + result + ' to ' + from)

      }

    })

  })

})

ethjsPersonalSignButton.addEventListener('click', function(event) {

  event.preventDefault()

  var text = terms

  var msg = ethUtil.bufferToHex(new Buffer(text, 'utf8'))

  var from = web3.eth.accounts[]

  console.log('CLICKED, SENDING PERSONAL SIGN REQ')

  var params = [from, msg]

  // Now with Eth.js

  var eth = new Eth(web3.currentProvider)

  eth.personal_sign(msg, from)

  .then((signed) => {

    console.log('Signed!  Result is: ', signed)

    console.log('Recovering...')

    return eth.personal_ecRecover(msg, signed)

  })

  .then((recovered) => {

    if (recovered === from) {

      console.log('Ethjs recovered the message signer!')

    } else {

      console.log('Ethjs failed to recover the message signer!')

      console.dir({ recovered })

    }

  })

})

signTypedDataButton.addEventListener('click', function(event) {

  event.preventDefault()

  const msgParams = [

    {

      type: 'string',

      name: 'Message',

      value: 'Hi, Alice!'

    },

    {

      type: 'uint32',

      name: 'A number',

      value: ''

    }

  ]

  var from = web3.eth.accounts[]

  /*  web3.eth.signTypedData not yet implemented!!!

   *  We're going to have to assemble the tx manually!

   *  This is what it would probably look like, though:

    web3.eth.signTypedData(msg, from) function (err, result) {

      if (err) return console.error(err)

      console.log('PERSONAL SIGNED:' + result)

    })

  */

   console.log('CLICKED, SENDING PERSONAL SIGN REQ')

  var params = [msgParams, from]

  console.dir(params)

  var method = 'eth_signTypedData'

  web3.currentProvider.sendAsync({

    method,

    params,

    from,

  }, function (err, result) {

    if (err) return console.dir(err)

    if (result.error) {

      alert(result.error.message)

    }

    if (result.error) return console.error(result)

    console.log('PERSONAL SIGNED:' + JSON.stringify(result.result))

    const recovered = sigUtil.recoverTypedSignature({ data: msgParams, sig: result.result })

    if (recovered === from ) {

      alert('Successfully ecRecovered signer as ' + from)

    } else {

      alert('Failed to verify signer when comparing ' + result + ' to ' + from)

    }

  })

})

ethjsSignTypedDataButton.addEventListener('click', function(event) {

  event.preventDefault()

  const msgParams = [

    {

      type: 'string',

      name: 'Message',

      value: 'Hi, Alice!'

    },

    {

      type: 'uint32',

      name: 'A number',

      value: ''

    }

  ]

  var from = web3.eth.accounts[]

  console.log('CLICKED, SENDING PERSONAL SIGN REQ')

  var params = [msgParams, from]

  var eth = new Eth(web3.currentProvider)

  eth.signTypedData(msgParams, from)

  .then((signed) => {

    console.log('Signed!  Result is: ', signed)

    console.log('Recovering...')

    const recovered = sigUtil.recoverTypedSignature({ data: msgParams, sig: signed })

    if (recovered === from ) {

      alert('Successfully ecRecovered signer as ' + from)

    } else {

      alert('Failed to verify signer when comparing ' + signed + ' to ' + from)

    }

  })

})
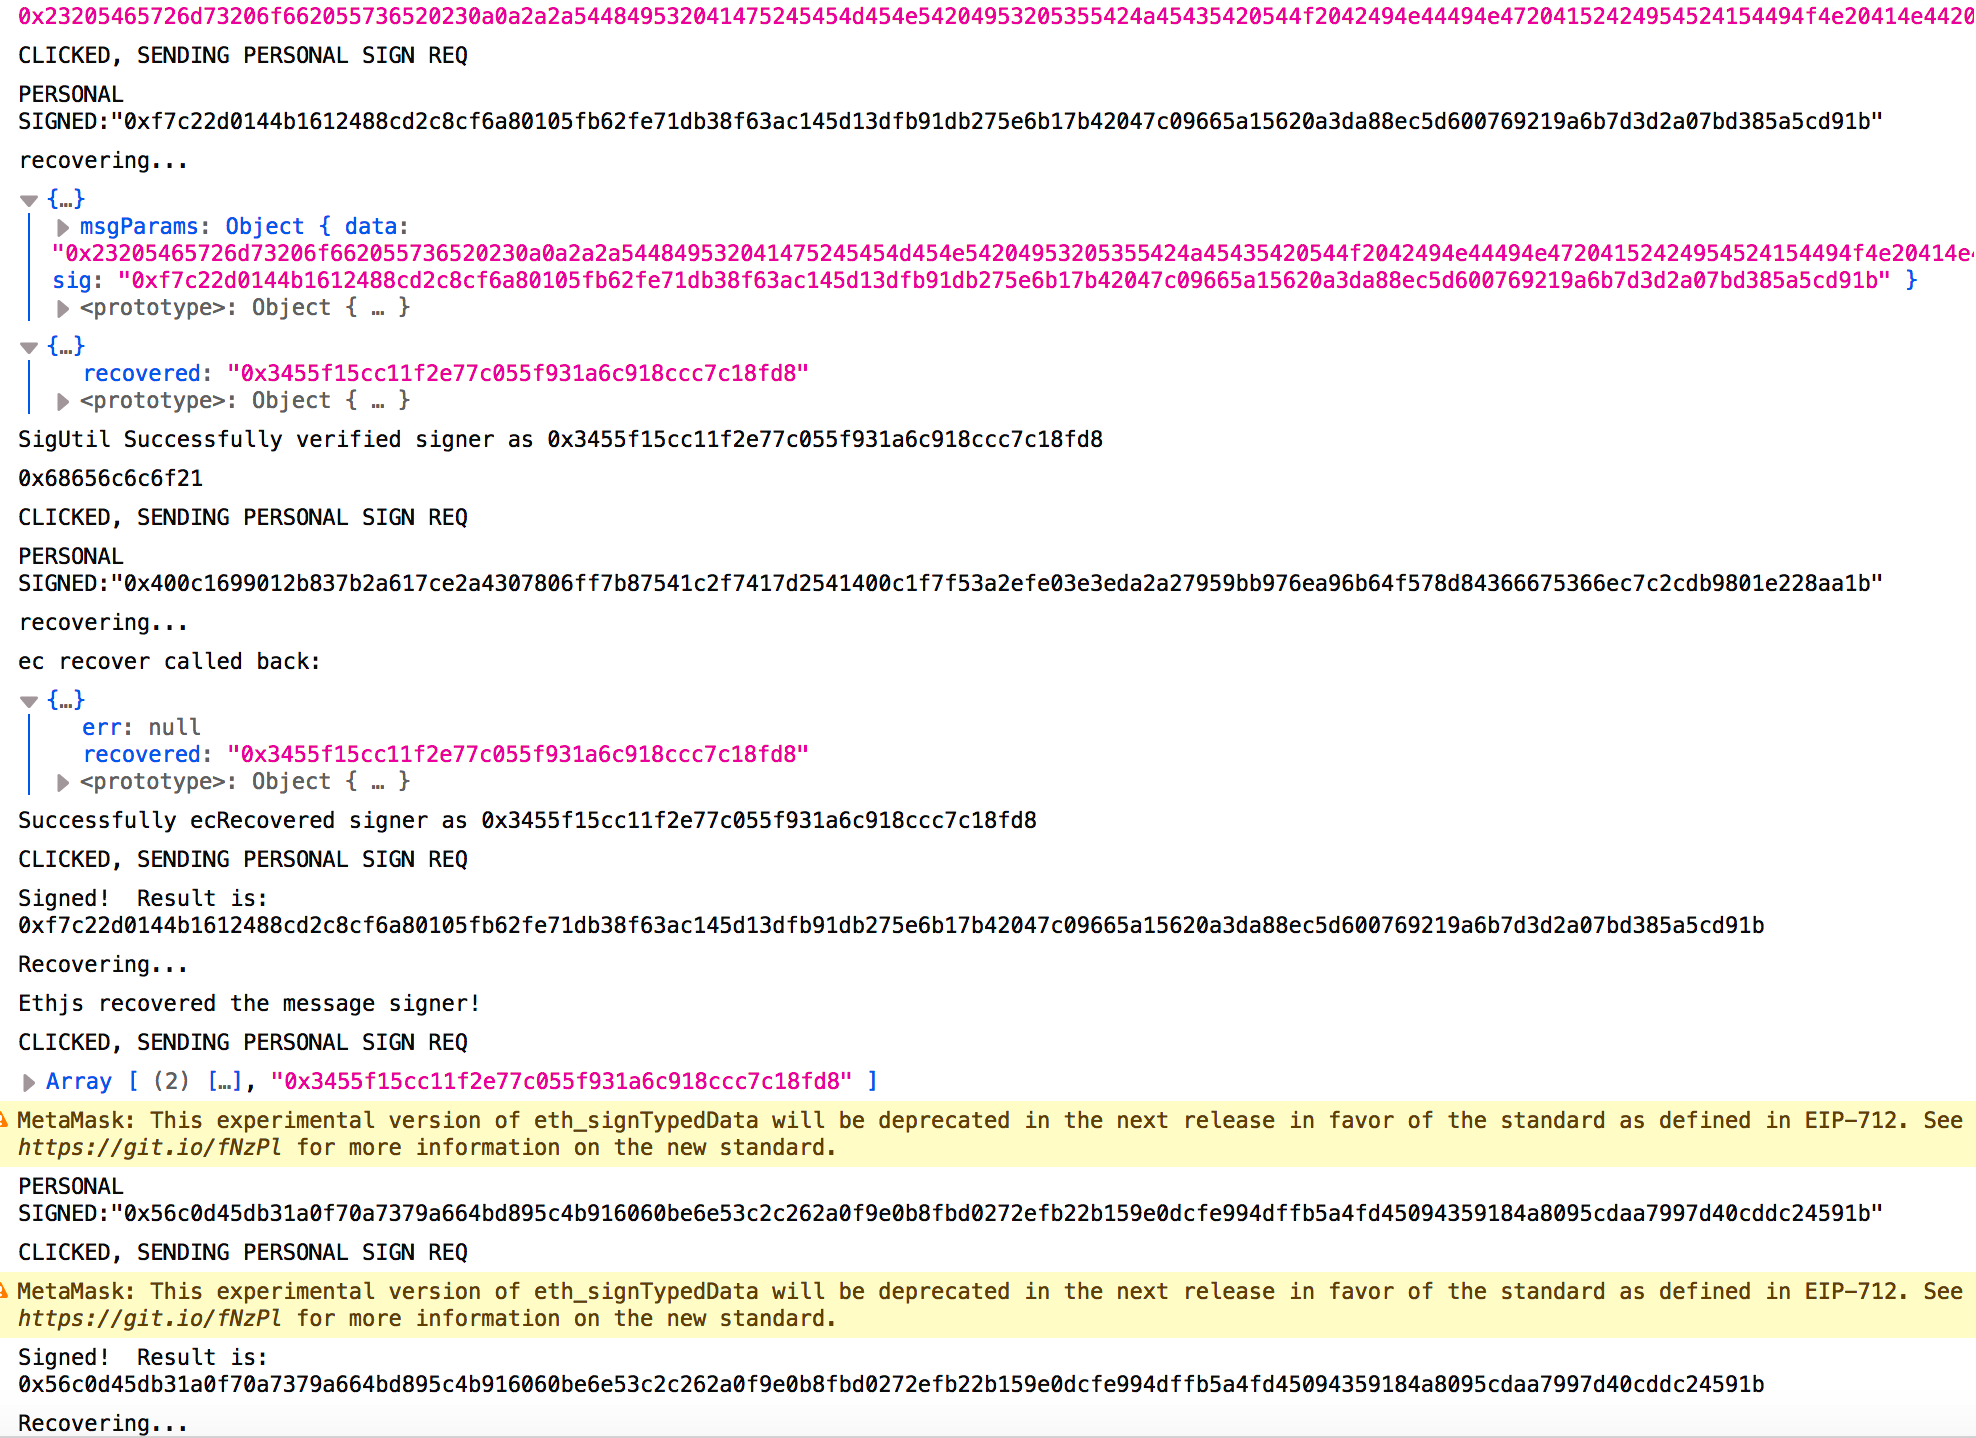
在运行的过程中我们能够看见我们进行签名的信息到底是什么
在页面控制器中的返回信息如下图所示:
点击eth_sign,metamask如图:

不能看见签署的信息到底是什么
而另外的几种新的签名方法都能够很详细地看见用户对什么信息进行了签名
Signature Request Warnings & eth_sign学习的更多相关文章
- Request模块入门学习
使用指令npm install --save request来安装模块,然后使用var request = require('request')完成引用. 对于GET请求,主要是获取目的url中数据. ...
- JSP内置对象之request对象【学习笔记】
request对象是JSP中重要的对象,每个request对象封装着一次用户的请求,并且所有的请求参数都被封装在request对象中,因此request对象是获取请求参数的重要途径. 一.获取请求头与 ...
- <c:set var="ctx" value="${pageContext.request.contextPath}" />的学习
${pageContext.request.contextPath},是获取当前根目录 set var="ctx",是给这个路径定义了一个变量,用的时候可以通过EL表达式获取:${ ...
- python+request 常用基础学习笔记
1.pycharm,避免控制台输出的json内容中文出现乱码. #注:乱码为Unicode格式:\u6d4b\u8bd5.加入如下代码后正确返回中文:测试 get_result = r.json() ...
- browerify初步了解
之前在写Signature Request Warnings & eth_sign学习的时候在里的signing examples时了解到browserify工具,可以通过这个例子学习如何使用 ...
- C#开发微信公众号-学习笔记
由于最近要做微信服务号的开发,所以开始找相关说明和接口文档开始学,故把学习过程及注意事项记录一下,帮助想学习的快速上手.废话不多少了,直接上干货! 1.申请微信公众号 这个就不需要多说了吧,大家直接照 ...
- java微信学习 接入
现在实习的公司要做微信开发,然而一直没安排任务,所以一直在看微信接口,记录下学习的内容 微信开发肯定要看的就是微信公众平台开发者文档,上面有每种接口的调用格式,刚开始学习的时候自己申请了一个订阅号,个 ...
- Core Data 学习简单整理01
Core Data是苹果针对Mac和iOS平台开发的一个框架, 通过CoreData可以在本地生成数据库sqlite,提供了ORM的功能,将对象和数据模型相互转换 . 通过Core Data管理和操作 ...
- webx学习
webx框架学习指南 http://openwebx.org/docs/Webx3_Guide_Book.html webx学习(一)——初识webx webx学习(二)——Webx Framewor ...
随机推荐
- JAVA 的输入与输出流当中,什么时候该使用字符流?什么时候该使用字节流?
1. InputStream 和OutputStream,两个是为字节流设计的,主要用来处理字节或二进制对象, 2. Reader和 Writer.两个是为字符流(一个字符占两个字节)设计的,主要用来 ...
- [PHP] 数据结构-循环链表的PHP实现
1.将单链表中终端结点的指针端由空指针改为指向头结点,单循环链表,循环链表和单链表的主要差异就在于循环的判断条件上原来是判断p->next是否为空,现在则是p->next不等于头结点,则循 ...
- C++ enum的使用
enum day {Sun,Mon,Tue,Wed,Thu,Fri,Sat}; 默认情况下,枚举符的值从0开始,其后值总是前面一个+1. 即Sun=0,Mon=1,Tue=2,Wed=3,Thu= ...
- hive的行列转换
行转列(把多个行合并) 比如把: id tag 1 12 1 23 2 67 2 78 2 76 行转列之后: id tag 1 12,23 2 67,78,76 使用函数为:concat_w ...
- echarts环形图,自定义说明文字
一.代码 app.title = '已安装通讯盒电站统计'; option = { backgroundColor: '#0f0f31',//#0f0f31 title: { show:true, x ...
- 小程序和PHP学习笔记 ----- 不定期更新。
学习tp5和小程序过程需要记住的重点记录 1,box-sizing: border-box; 规定两个并排的带边框的框 border-box 为元素设定的宽度和高度决定了元素的边框盒. 就是说,为元素 ...
- Spark 跑 java 示例代码
一.下载示例代码: git clone https://github.com/melphi/spark-examples.git 从示例代码中可以看到 pox中引入了 Spark开发所需要的依赖. 二 ...
- phothoshop 快捷键
界面构成: 1 菜单栏 2 工具箱 3 工具属性栏 4 悬浮面板(辅助作用) CTRL + N 新建对话框(对画布进行设置) 回车确定 CTRL + O (字母) 打开对话框(选择图片) 画布的三种显 ...
- Bootstrap里的文件分别代表什么意思及其引用方法
关于Bootstrap打包的文件分别代表什么意思,官网也没有给出一个明确的解释,在网上查了一些资料,总价归纳了如下: bootstrap/ <!--主目录--> ├── css/ < ...
- 我的Java之旅 第八课 Servlet 进阶API、过滤器与监听器
1.Servlet.ServletConfig与GenericServlet 首次请求的顺序 => 生成HttpServletRequest与HttpServletRespon ...