interface21 - web - ContextLoaderListener(Spring Web Application Context加载流程)
前言
最近打算花点时间好好看看spring的源码,然而现在Spring的源码经过迭代的版本太多了,比较庞大,看起来比较累,所以准备从最初的版本(interface21)开始入手,仅用于学习,理解其设计思想,后续慢慢研究其每次版本变更的内容。。。
先从interface21的一个典型web工程例子看起,宠物诊所 - petclinic,因为该工程基本涵盖了Spring的APO、IOC、JDBC、Web MVC、事务、国际化、主题切换、参数校验等主要功能。。。
继上一篇,了解完Log4jConfigListener(加载Log4j日志)的流程后,看看ContextLoaderListener(加载Spring Web Application Context)流程是如何的~~~~~~~
对应的web.xml配置
    <listener>

        <listener-class>com.interface21.web.context.ContextLoaderListener</listener-class>

    </listener>
执行时序图(看不清的话可以点击查看原图)
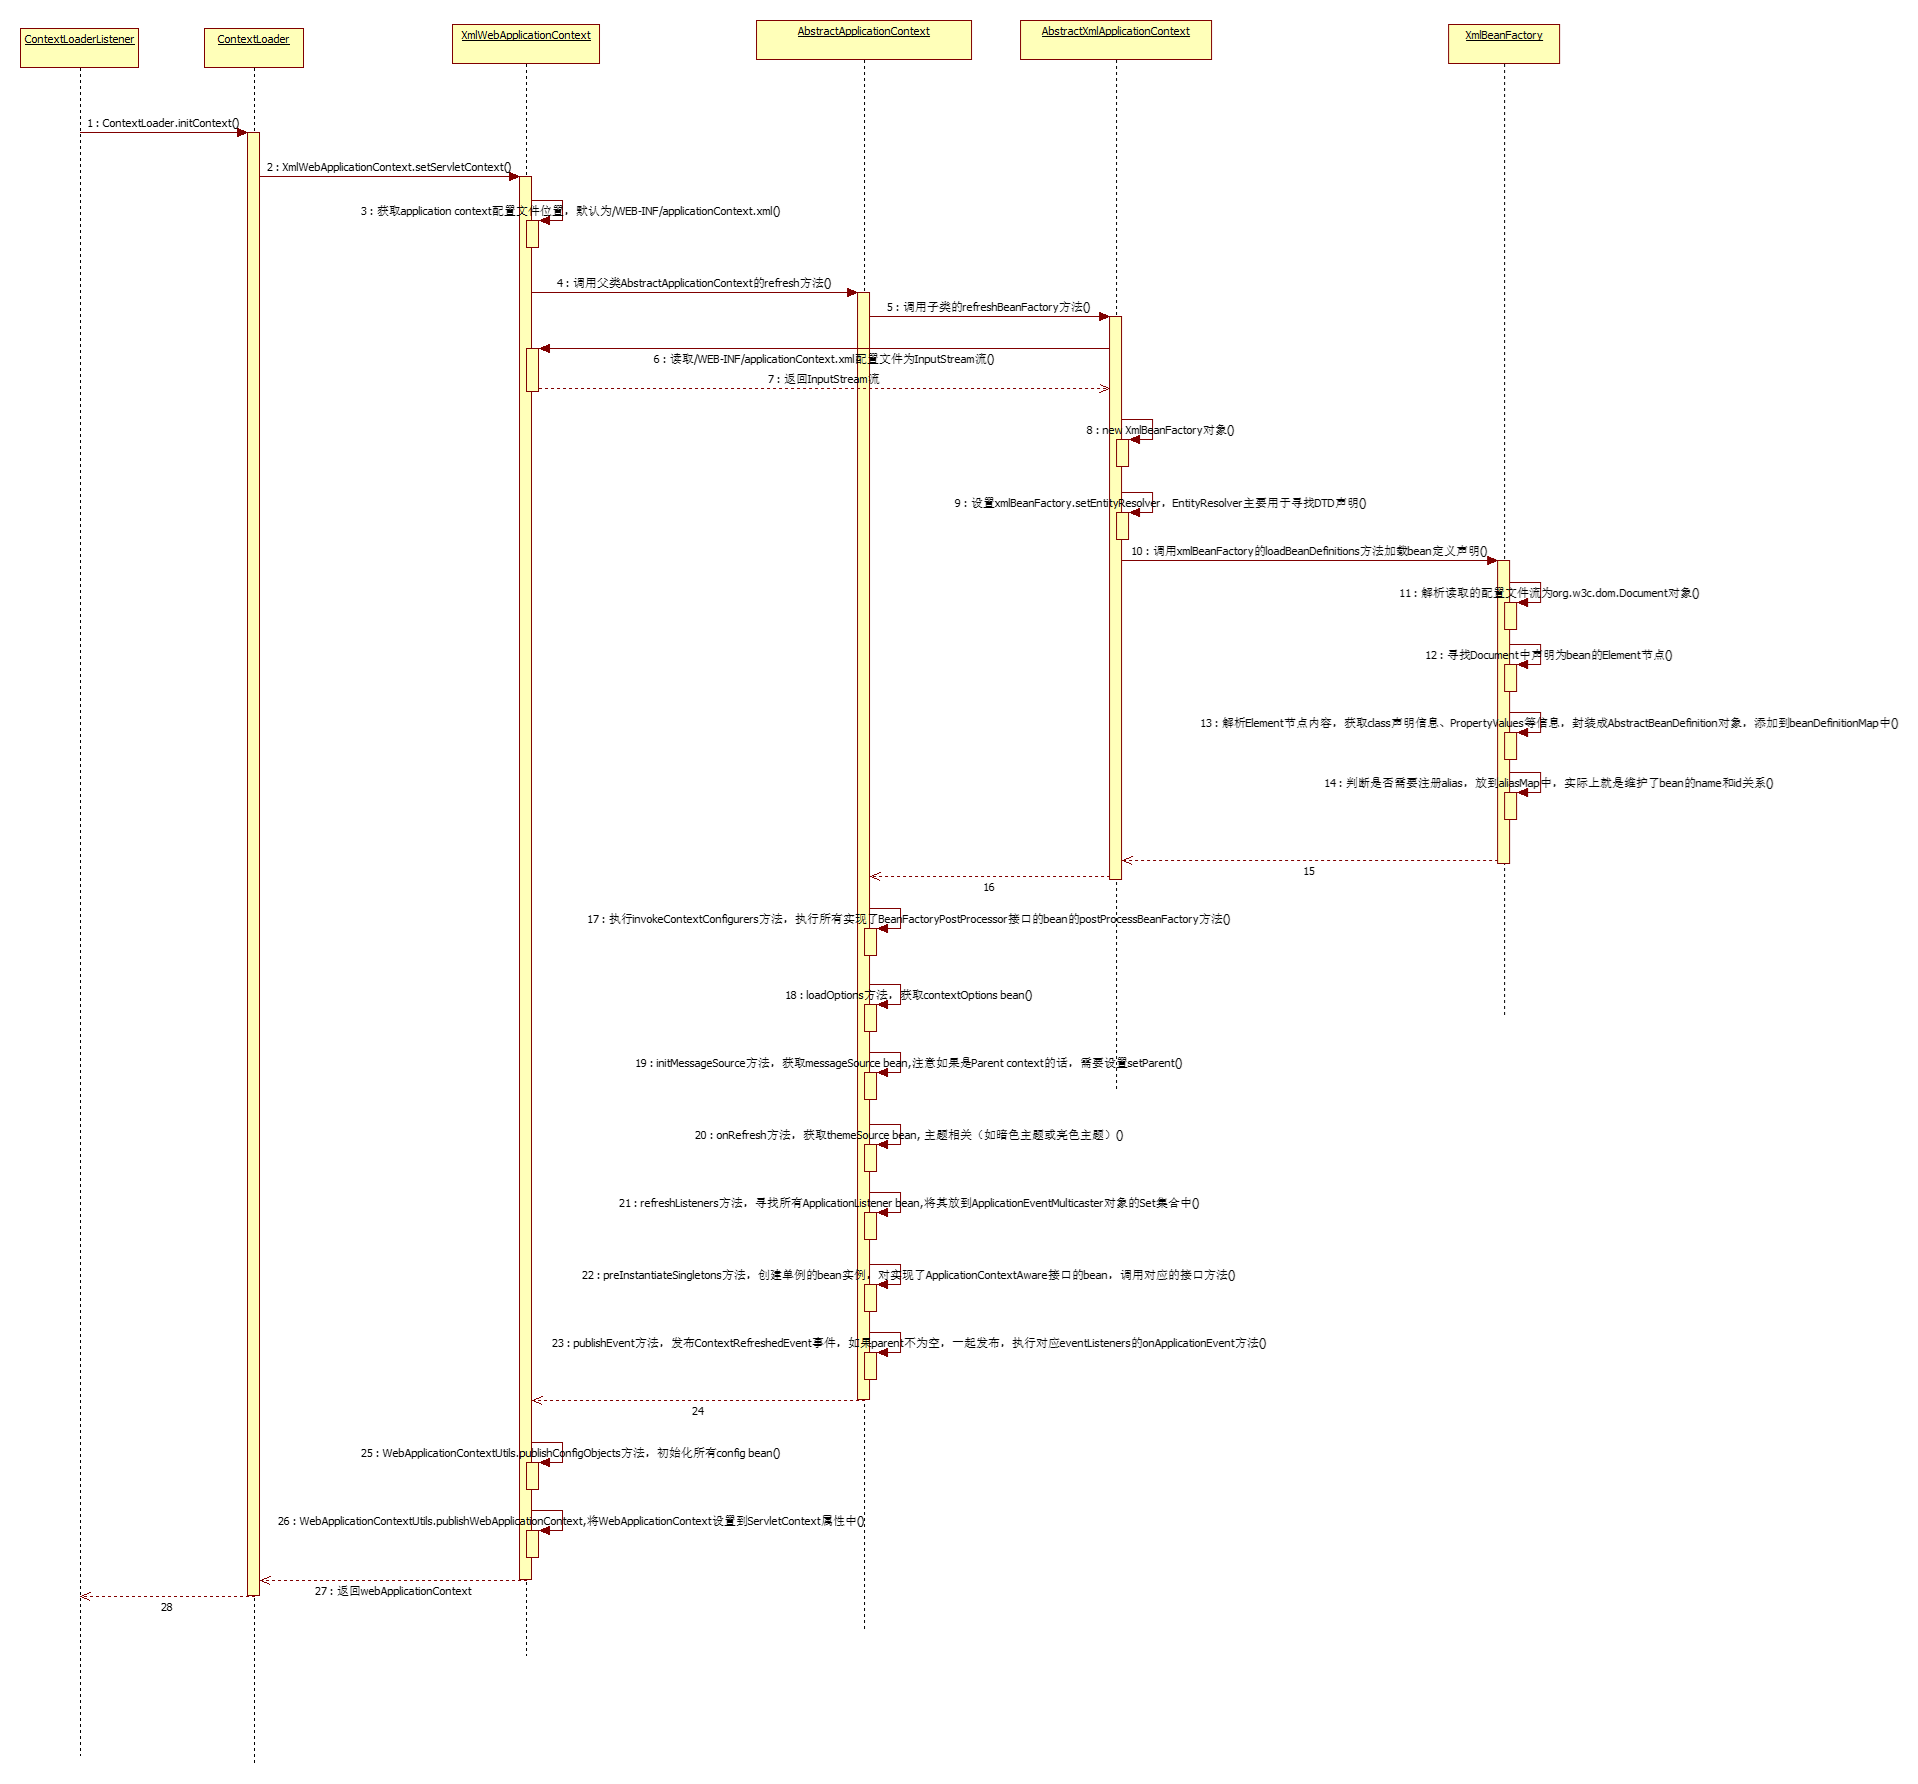
时序图中的各个步骤简要分析
执行的入口在ContextLoaderListener类的contextInitialized方法,由于ContextLoaderListener类实现了ServletContextListener接口,所以在Servlet容器(tomcat)启动时,会自动调用contextInitialized方法。
步骤描述:
- 进入ContextLoaderListener类的contextInitialized方法,该类只有一句代码,执行ContextLoader.initContext(event.getServletContext())方法;
public void contextInitialized(ServletContextEvent event) {

        ContextLoader.initContext(event.getServletContext());

} - 进入ContextLoader类的initContext方法,首先,从servletContext中获取contextClass参数,如果配置了该参数,则创建该实例对象,否则创建默认的XmlWebApplicationContext实例对象,接下来调用XmlWebApplicationContext的setServletContext方法;
public static WebApplicationContext initContext(ServletContext servletContext) throws ApplicationContextException {

        servletContext.log("Loading root WebApplicationContext");

        String contextClass = servletContext.getInitParameter(CONTEXT_CLASS_PARAM);

        // Now we must load the WebApplicationContext.

        // It configures itself: all we need to do is construct the class with a no-arg

        // constructor, and invoke setServletContext.

        try {

            Class clazz = (contextClass != null ? Class.forName(contextClass) : DEFAULT_CONTEXT_CLASS);

            logger.info("Loading root WebApplicationContext: using context class '" + clazz.getName() + "'");

            if (!WebApplicationContext.class.isAssignableFrom(clazz)) {

                throw new ApplicationContextException("Context class is no WebApplicationContext: " + contextClass);

            }

            WebApplicationContext webApplicationContext = (WebApplicationContext) clazz.newInstance();

            webApplicationContext.setServletContext(servletContext);

            return webApplicationContext;

        } catch (ApplicationContextException ex) {

            handleException("Failed to initialize application context", ex);

        } catch (BeansException ex) {

            handleException("Failed to initialize beans in application context", ex);

        } catch (ClassNotFoundException ex) {

            handleException("Failed to load config class '" + contextClass + "'", ex);

        } catch (InstantiationException ex) {

            handleException("Failed to instantiate config class '" + contextClass + "': does it have a public no arg constructor?", ex);

        } catch (IllegalAccessException ex) {

            handleException("Illegal access while finding or instantiating config class '" + contextClass + "': does it have a public no arg constructor?", ex);

        } catch (Throwable ex) {

            handleException("Unexpected error loading context configuration", ex);

        }

        return null;

} - 进入XmlWebApplicationContext类的setServletContext方法,首先,调用initConfigLocation方法从servletContext中获取contextConfigLocation参数(Spring Application配置文件),如果没配置该参数,则默认获取/WEB-INF/applicationContext.xml该文件;
    public void setServletContext(ServletContext servletContext) throws ApplicationContextException {

        this.servletContext = servletContext;

        this.configLocation = initConfigLocation();

        logger.info("Using config location '" + this.configLocation + "'");

        refresh();

        if (this.namespace == null) {

            // We're the root context

            WebApplicationContextUtils.publishConfigObjects(this);

            // Expose as a ServletContext object

            WebApplicationContextUtils.publishWebApplicationContext(this);

        }

} - 迎来了非常关键的一步操作,调用AbstractApplicationContext类的refresh()方法,该方法具体如下,每个阶段的英文注释已经比较清晰了,下面步骤也会做个详细描述:
    public final void refresh() throws ApplicationContextException {

        if (this.contextOptions != null && !this.contextOptions.isReloadable())

            throw new ApplicationContextException("Forbidden to reload config");

        this.startupTime = System.currentTimeMillis();

        refreshBeanFactory();

        if (getBeanDefinitionCount() == 0)

            logger.warn("No beans defined in ApplicationContext [" + getDisplayName() + "]");

        else

            logger.info(getBeanDefinitionCount() + " beans defined in ApplicationContext [" + getDisplayName() + "]");

        // invoke configurers that can override values in the bean definitions

        invokeContextConfigurers();

        // load options bean for this context

        loadOptions();

        // initialize message source for this context

        initMessageSource();

        // initialize other special beans in specific context subclasses

        onRefresh();

        // check for listener beans and register them

        refreshListeners();

        // instantiate singletons this late to allow them to access the message source

        preInstantiateSingletons();

        // last step: publish respective event

        publishEvent(new ContextRefreshedEvent(this));

} - 首先,调用AbstractXmlApplicationContext类的refreshBeanFactory方法,该方法如下,具体完成的操作内容下面步骤会详细描述:
  protected void refreshBeanFactory() throws ApplicationContextException {

        String identifier = "application context with display name [" + getDisplayName() + "]";

        InputStream is = null;

        try {

            // Supports remote as well as local URLs

            is = getInputStreamForBeanFactory();

            this.xmlBeanFactory = new XmlBeanFactory(getParent());

            this.xmlBeanFactory.setEntityResolver(new ResourceBaseEntityResolver(this));

            this.xmlBeanFactory.loadBeanDefinitions(is);

            if (logger.isInfoEnabled()) {

                logger.info("BeanFactory for application context: " + this.xmlBeanFactory);

            }

        } catch (IOException ex) {

            throw new ApplicationContextException("IOException parsing XML document for " + identifier, ex);

        } catch (NoSuchBeanDefinitionException ex) {

            throw new ApplicationContextException("Cannot load configuration: missing bean definition [" + ex.getBeanName() + "]", ex);

        } catch (BeansException ex) {

            throw new ApplicationContextException("Cannot load configuration: problem instantiating or initializing beans", ex);

        } finally {

            try {

                if (is != null)

                    is.close();

            } catch (IOException ex) {

                throw new ApplicationContextException("IOException closing stream for XML document for " + identifier, ex);

            }

        }

} - 调用XmlWebApplicationContext类的getInputStreamForBeanFactory方法,读取阶段3获取到的配置文件为输入流InputStream
    protected InputStream getInputStreamForBeanFactory() throws IOException {

        InputStream in = getResourceAsStream(this.configLocation);

        if (in == null) {

            throw new FileNotFoundException("Config location not found: " + this.configLocation);

        }

        return in;

} - 返回配置文件输入流InputStream
- 回到AbstractXmlApplicationContext的refreshBeanFactory方法,new出一个XmlBeanFactory对象
- 设置xmlBeanFactory.setEntityResolver,这里的EntityResolver主要用于寻找DTD声明
- 调用xmlBeanFactory的loadBeanDefinitions方法加载bean定义声明
- 进入xmlBeanFactory类的loadBeanDefinitions方法,解析读取的配置文件流InputStream为org.w3c.dom.Document对象,然后调用loadBeanDefinitions方法依次解析各个bean元素节点信息
    public void loadBeanDefinitions(InputStream is) throws BeansException {

        if (is == null)

            throw new BeanDefinitionStoreException("InputStream cannot be null: expected an XML file", null);

        try {

            logger.info("Loading XmlBeanFactory from InputStream [" + is + "]");

            DocumentBuilderFactory factory = DocumentBuilderFactory.newInstance();

            logger.debug("Using JAXP implementation [" + factory + "]");

            factory.setValidating(true);

            DocumentBuilder db = factory.newDocumentBuilder();

            db.setErrorHandler(new BeansErrorHandler());

            db.setEntityResolver(this.entityResolver != null ? this.entityResolver : new BeansDtdResolver());

            Document doc = db.parse(is);

            loadBeanDefinitions(doc);

        } catch (ParserConfigurationException ex) {

            throw new BeanDefinitionStoreException("ParserConfiguration exception parsing XML", ex);

        } catch (SAXException ex) {

            throw new BeanDefinitionStoreException("XML document is invalid", ex);

        } catch (IOException ex) {

            throw new BeanDefinitionStoreException("IOException parsing XML document", ex);

        } finally {

            try {

                if (is != null)

                    is.close();

            } catch (IOException ex) {

                throw new FatalBeanException("IOException closing stream for XML document", ex);

            }

        }

} - 寻找Document中声明为bean的Element节点,依次解析
    public void loadBeanDefinitions(Document doc) throws BeansException {

        Element root = doc.getDocumentElement();

        logger.debug("Loading bean definitions");

        NodeList nl = root.getElementsByTagName(BEAN_ELEMENT);

        logger.debug("Found " + nl.getLength() + " <" + BEAN_ELEMENT + "> elements defining beans");

        for (int i = 0; i < nl.getLength(); i++) {

            Node n = nl.item(i);

            loadBeanDefinition((Element) n);

        }

} - 解析Element节点内容,获取class声明信息、PropertyValues等信息,封装成AbstractBeanDefinition对象,添加到beanDefinitionMap中
    private void loadBeanDefinition(Element el) throws BeansException {

        // The DTD guarantees an id attribute is present

        String id = el.getAttribute(ID_ATTRIBUTE);

        logger.debug("Parsing bean definition with id '" + id + "'");

        // Create BeanDefinition now: we'll build up PropertyValues later

        AbstractBeanDefinition beanDefinition;

        PropertyValues pvs = getPropertyValueSubElements(el);

        beanDefinition = parseBeanDefinition(el, id, pvs);

        registerBeanDefinition(id, beanDefinition);

        String name = el.getAttribute(NAME_ATTRIBUTE);

        if (name != null && !"".equals(name)) {

            // Automatically create this alias. Used for

            // names that aren't legal in id attributes

            registerAlias(id, name);

        }

} - 判断是否需要注册alias,放到aliasMap中,实际上就是维护了bean的name和id关系
- 返回到AbstractXmlApplicationContext类refreshBeanFactory方法中
- 返回到AbstractApplicationContext类refresh方法中
- 执行AbstractApplicationContext的invokeContextConfigurers方法,实际上内部是执行所有实现了BeanFactoryPostProcessor接口的bean的postProcessBeanFactory方法
    private void invokeContextConfigurers() {

        String[] beanNames = getBeanDefinitionNames(BeanFactoryPostProcessor.class);

        for (int i = 0; i < beanNames.length; i++) {

            String beanName = beanNames[i];

            BeanFactoryPostProcessor configurer = (BeanFactoryPostProcessor) getBean(beanName);

            configurer.postProcessBeanFactory(getBeanFactory());

        }

} - 执行AbstractApplicationContext的loadOptions方法,获取contextOptions bean,首先,查看配置文件是否已经配置contextOptions bean,没有则自己创建一个new ContextOptions()对象,主要用于当应用运行时,是否可以重新加载该配置,如果配置成false的话,会在调用refresh方法时,抛出一个ApplicationContextException("Forbidden to reload config")异常;
    private void loadOptions() {

        try {

            this.contextOptions = (ContextOptions) getBean(OPTIONS_BEAN_NAME);

        } catch (NoSuchBeanDefinitionException ex) {

            logger.info("No options bean (\"" + OPTIONS_BEAN_NAME + "\") found: using default");

            this.contextOptions = new ContextOptions();

        }

} - 执行AbstractApplicationContext的initMessageSource方法,获取messageSource bean,首先,查看配置文件是否已经配置messageSource bean,没有则自己创建一个StaticMessageSource对象,注意如果Parent context不为null的话,需要设置Parent MessageSource
    private void initMessageSource() {

        try {

            this.messageSource = (MessageSource) getBean(MESSAGE_SOURCE_BEAN_NAME);

            // set parent message source if applicable,

            // and if the message source is defined in this context, not in a parent

            if (this.parent != null && (this.messageSource instanceof NestingMessageSource) &&

                    Arrays.asList(getBeanDefinitionNames()).contains(MESSAGE_SOURCE_BEAN_NAME)) {

                ((NestingMessageSource) this.messageSource).setParent(this.parent);

            }

        } catch (NoSuchBeanDefinitionException ex) {

            logger.info("No MessageSource found for [" + getDisplayName() + "]: using empty StaticMessageSource");

            // use empty message source to be able to accept getMessage calls

            this.messageSource = new StaticMessageSource();

        }

} - 执行AbstractXmlUiApplicationContext的onRefresh方法,获取themeSource bean, 主题相关(如应用可配置暗色主题或亮色主题功能),同样,这里也首先查看配置文件是否已经配置themeSource bean,没有则自己创建一个ResourceBundleThemeSource对象,注意这里还需要根据判断条件设置Parent ThemeSource
    protected void onRefresh() {

        this.themeSource = UiApplicationContextUtils.initThemeSource(this);

    }
public static ThemeSource initThemeSource(ApplicationContext applicationContext) {
ThemeSource themeSource;
try {
themeSource = (ThemeSource) applicationContext.getBean(THEME_SOURCE_BEAN_NAME);
// set parent theme source if applicable,
// and if the theme source is defined in this context, not in a parent
if (applicationContext.getParent() instanceof ThemeSource && themeSource instanceof NestingThemeSource &&
Arrays.asList(applicationContext.getBeanDefinitionNames()).contains(THEME_SOURCE_BEAN_NAME)) {
((NestingThemeSource) themeSource).setParent((ThemeSource) applicationContext.getParent());
}
} catch (NoSuchBeanDefinitionException ex) {
logger.info("No ThemeSource found for [" + applicationContext.getDisplayName() + "]: using ResourceBundleThemeSource");
themeSource = new ResourceBundleThemeSource();
}
return themeSource;
} - 执行AbstractApplicationContext的refreshListeners方法,寻找所有ApplicationListener bean,将其放到ApplicationEventMulticaster对象的Set集合中
    private void refreshListeners() {

        logger.info("Refreshing listeners");

        List listeners = BeanFactoryUtils.beansOfType(ApplicationListener.class, this);

        logger.debug("Found " + listeners.size() + " listeners in bean factory");

        for (int i = 0; i < listeners.size(); i++) {

            ApplicationListener listener = (ApplicationListener) listeners.get(i);

            addListener(listener);

            logger.info("Bean listener added: [" + listener + "]");

        }

} - 执行AbstractApplicationContext的preInstantiateSingletons方法,创建单例的bean实例,创建bean对象是在调用getBean方法时创建的,具体创建逻辑在getSharedInstance方法里;另外,对实现了ApplicationContextAware接口的bean,会调用对应的接口setApplicationContext方法,这里涉及的细节比较多,后续有时间可以具体详细分析;
    private void preInstantiateSingletons() {

        logger.info("Configuring singleton beans in context");

        String[] beanNames = getBeanDefinitionNames();

        logger.debug("Found " + beanNames.length + " listeners in bean factory: names=[" +

                StringUtils.arrayToDelimitedString(beanNames, ",") + "]");

        for (int i = 0; i < beanNames.length; i++) {

            String beanName = beanNames[i];

            if (isSingleton(beanName)) {

                getBean(beanName);

            }

        }

    }
public Object getBean(String name) throws BeansException {
Object bean = getBeanFactory().getBean(name);
configureManagedObject(name, bean);
return bean;
}private final synchronized Object getSharedInstance(String pname, Map newlyCreatedBeans) throws BeansException {
// Get rid of the dereference prefix if there is one
String name = transformedBeanName(pname); Object beanInstance = this.singletonCache.get(name);
if (beanInstance == null) {
logger.info("Creating shared instance of singleton bean '" + name + "'");
beanInstance = createBean(name, newlyCreatedBeans);
this.singletonCache.put(name, beanInstance);
} else {
if (logger.isDebugEnabled())
logger.debug("Returning cached instance of singleton bean '" + name + "'");
} // Don't let calling code try to dereference the
// bean factory if the bean isn't a factory
if (isFactoryDereference(pname) && !(beanInstance instanceof FactoryBean)) {
throw new BeanIsNotAFactoryException(name, beanInstance);
} // Now we have the beanInstance, which may be a normal bean
// or a FactoryBean. If it's a FactoryBean, we use it to
// create a bean instance, unless the caller actually wants
// a reference to the factory.
if (beanInstance instanceof FactoryBean) {
if (!isFactoryDereference(pname)) {
// Configure and return new bean instance from factory
FactoryBean factory = (FactoryBean) beanInstance;
logger.debug("Bean with name '" + name + "' is a factory bean");
beanInstance = factory.getObject(); // Set pass-through properties
if (factory.getPropertyValues() != null) {
logger.debug("Applying pass-through properties to bean with name '" + name + "'");
new BeanWrapperImpl(beanInstance).setPropertyValues(factory.getPropertyValues());
}
// Initialization is really up to factory
//invokeInitializerIfNecessary(beanInstance);
} else {
// The user wants the factory itself
logger.debug("Calling code asked for BeanFactory instance for name '" + name + "'");
}
} // if we're dealing with a factory bean return beanInstance;
}private void configureManagedObject(String name, Object bean) {
if (bean instanceof ApplicationContextAware &&
(!isSingleton(name) || !this.managedSingletons.contains(bean))) {
logger.debug("Setting application context on ApplicationContextAware object [" + bean + "]");
ApplicationContextAware aca = (ApplicationContextAware) bean;
aca.setApplicationContext(this);
this.managedSingletons.add(bean);
}
} - 执行AbstractApplicationContext的publishEvent方法,发布ContextRefreshedEvent事件,如果parent不为空,一起发布,内部的逻辑是执行对应eventListeners的onApplicationEvent方法
    public final void publishEvent(ApplicationEvent event) {

        if (logger.isDebugEnabled()) {

            logger.debug("Publishing event in context [" + getDisplayName() + "]: " + event.toString());

        }

        this.eventMulticaster.onApplicationEvent(event);

        if (this.parent != null) {

            parent.publishEvent(event);

        }

} - 回到XmlWebApplicationContext类
- 执行WebApplicationContextUtils.publishConfigObjects方法,寻找所有config bean,将其设置到ServletContext的属性中
    public static void publishConfigObjects(WebApplicationContext wac) throws ApplicationContextException {

        logger.info("Configuring config objects");

        String[] beanNames = wac.getBeanDefinitionNames();

        for (int i = 0; i < beanNames.length; i++) {

            String name = beanNames[i];

            if (name.startsWith(CONFIG_OBJECT_PREFIX)) {

                // Strip prefix

                String strippedName = name.substring(CONFIG_OBJECT_PREFIX.length());

                try {

                    Object configObject = wac.getBean(name);

                    wac.getServletContext().setAttribute(strippedName, configObject);

                    logger.info("Config object with name [" + name + "] and class [" + configObject.getClass().getName() +

                            "] initialized and added to ServletConfig");

                } catch (BeansException ex) {

                    throw new ApplicationContextException("Couldn't load config object with name '" + name + "': " + ex, ex);

                }

            }

        }

} - 执行WebApplicationContextUtils.publishWebApplicationContext,将WebApplicationContext设置到ServletContext属性中
    public static void publishWebApplicationContext(WebApplicationContext wac) {

        // Set WebApplicationContext as an attribute in the ServletContext so

        // other components in this web application can access it

        ServletContext sc = wac.getServletContext();

        if (sc == null)

            throw new IllegalArgumentException("ServletContext can't be null in WebApplicationContext " + wac);

        sc.setAttribute(WebApplicationContext.WEB_APPLICATION_CONTEXT_ATTRIBUTE_NAME, wac);

        logger.info(

                "Loader initialized on server name "

                        + wac.getServletContext().getServerInfo()

                        + "; WebApplicationContext object is available in ServletContext with name '"

                        + WebApplicationContext.WEB_APPLICATION_CONTEXT_ATTRIBUTE_NAME

                        + "'");

} - 返回webApplicationContext到ContextLoader类
- ContextLoaderListener.contextInitialized方法执行结束
就这样,Spring Web Application Context加载完成了,是不是感觉也挺简单的,主要就是读取xml配置文件中bean的配置信息,创建bean实例放到一个map中维护,当然,中间还穿插了各种逻辑;
另外补充下,当Servlet容器销毁时,会调用ContextLoaderListener的contextDestroyed方法,最终是调用ContextLoader.closeContext(event.getServletContext(),执行一些资源销毁等操作,销毁工厂创建的bean对象,发布ContextClosedEvent事件等;
  public void close() {

        logger.info("Closing application context [" + getDisplayName() + "]");

        // destroy all cached singletons in this context,

        // invoking DisposableBean.destroy and/or "destroy-method"

        getBeanFactory().destroySingletons();

        // publish respective event

        publishEvent(new ContextClosedEvent(this));

    }
interface21代码参考
https://github.com/peterchenhdu/interface21
interface21 - web - ContextLoaderListener(Spring Web Application Context加载流程)的更多相关文章
- Spring Security拦截器加载流程分析--练气中期
写在前面 上回我们讲了spring security整合spring springmvc的流程,并且知道了spring security是通过过滤器链来进行认证授权操作的.今天我们来分析一下sprin ...
- Spring源码剖析2:Spring IOC容器的加载过程
spring ioc 容器的加载流程 1.目标:熟练使用spring,并分析其源码,了解其中的思想.这篇主要介绍spring ioc 容器的加载 2.前提条件:会使用debug 3.源码分析方法:In ...
- Spring源码剖析3:Spring IOC容器的加载过程
本文转自五月的仓颉 https://www.cnblogs.com/xrq730 本系列文章将整理到我在GitHub上的<Java面试指南>仓库,更多精彩内容请到我的仓库里查看 https ...
- 第8章—使用Spring Web Flow—Spring Web Flow的配置
Spring中配置Web Flow Spring Web Flow 是 Spring 的一个子项目,其最主要的目的是解决跨越多个请求的.用户与服务器之间的.有状态交互问题,比较适合任何比较复杂的.有状 ...
- web.xml中配置启动时加载的servlet,load-on-starup
web.xml中配置启动时加载的servlet,load-on-starup 使用servlet来初始化配置文件数据: 在servlet的配置当中,<load-on-startup>1&l ...
- Spring Boot JPA 懒加载
最近在使用spring jpa 的过程中经常遇到懒加载的错误:"` org.hibernate.LazyInitializationException: could not initiali ...
- java面试记录二:spring加载流程、springmvc请求流程、spring事务失效、synchronized和volatile、JMM和JVM模型、二分查找的实现、垃圾收集器、控制台顺序打印ABC的三种线程实现
注:部分答案引用网络文章 简答题 1.Spring项目启动后的加载流程 (1)使用spring框架的web项目,在tomcat下,是根据web.xml来启动的.web.xml中负责配置启动spring ...
- Spring IoC BeanDefinition 的加载和注册
前言 本系列全部基于 Spring 5.2.2.BUILD-SNAPSHOT 版本.因为 Spring 整个体系太过于庞大,所以只会进行关键部分的源码解析. 本篇文章主要介绍 Spring IoC 容 ...
- 微服务架构 | *2.3 Spring Cloud 启动及加载配置文件源码分析(以 Nacos 为例)
目录 前言 1. Spring Cloud 什么时候加载配置文件 2. 准备 Environment 配置环境 2.1 配置 Environment 环境 SpringApplication.prep ...
随机推荐
- (十)创建ROS消息和ROS服务
ROS总教程(中文版) 110.创建ROS消息和ROS服务
- adb、monkey常用命令
adb.monkey常用命令 1.查看连接设备 adb devices 2.连接android模拟器 adb connect 127.0.0.1:62001 3.安装软件 adb install 这个 ...
- kubernetes namespace Terminating
1.kubectl get namespace annoying-namespace-to-delete -o json > tmp.jsonthen edit tmp.json and rem ...
- 1,postman的安装
1,下载postman 2,安装,下载和自己系统相对应的版本 本人下载的是window版本的,直接一步步安装就行 打开后进入下边的界面 建议使用native版本的postman,chrome插件的po ...
- idea配置网络代理
背景 公司限制连接外网,很多软件都被限制了,包括idea,只能通过代理上网. 使用代理上网,以往都是在IE的工具-Internet选项-连接里进行设置就OK了,谷歌浏览器啥的就可以上网了.但intel ...
- cpp 区块链模拟示例(二)工程代码解析
/* 作 者: itdef 欢迎转帖 请保持文本完整并注明出处 技术博客 http://www.cnblogs.com/itdef/ 技术交流群 群号码:432336863欢迎c c++ window ...
- centos6.9 编译安装 zabbix-3.0.15
本文采用编译安装,请在zabbix官网下载所需版本.此处安装版本是:zabbix-3.0.15.tar.gz 操作系统:centos 6.9 一.安装mysqlmysql-community-libs ...
- Alpha项目冲刺
一.团队成员 学号 姓名 211606361 何承华(队长) 211606356 陈宇 211606360 丁培辉 211606333 温志铭 211606343 杨宇潇 211606391 张主强 ...
- springBoot基础
开始之前最基础的东东here 官网:http://projects.spring.io/spring-boot/ 基础快速构建:http://start.spring.io/ 松哥的博客:http:/ ...
- 异常与Final
Throwable 类是 Java 语言中所有错误或异常的超类(这就是一切皆可抛的东西).它有两个子类:Error和Exception.Error:用于指示合理的应用程序不应该试图捕获的严重问题.这种 ...