day44-pymysql模块的使用
pymysql模块的使用
本节重点:
- pymysql的下载和使用
- execute()之sql注入
- 增、删、改:conn.commit()
- 查:fetchone、fetchmany、fetchall
一、pymysql的下载
之前我们都是通过MySQL自带的命令行客户端工具mysql来操作数据库,那如何在python程序中操作数据库呢?这就用到了pymysql模块,该模块本质就是一个套接字客户端软件,使用前需要事先安装。
pip3 install pymysql
二、pymysql的使用
实现:使用Python实现用户登录,如果用户存在则登录成功(假设该用户已在数据库中)
import pymysql

user = input('请输入用户名:').strip()

pwd = input('请输入密码:').strip()

# 1.连接

#创建一个连接对象<pymysql.connections.Connection object at 0x005F2910>

conn = pymysql.connect(host='192.168.76.136', port=3306, user='root', password='root', db='db1', charset='utf8')

# 2.创建游标

#创建一个游标对象<pymysql.cursors.Cursor object at 0x005E0290>

cursor = conn.cursor()

#注意%s需要加引号

sql = 'select * from user where  username="%s" and password="%s"'%(user, pwd)

print(sql)

# 3.执行sql语句

result = cursor.execute(sql) #执行sql语句,返回sql查询成功的记录数目,不是查询内容

print(result)

# 4.关闭连接,游标和连接都要关闭

cursor.close()

conn.close()

#打印结果时可以根据判断输出不同结果

if result:

    print('登陆成功')

else:

    print('登录失败')

或

print('登录成功') if res else print('登录失败')
三、execute()之sql注入
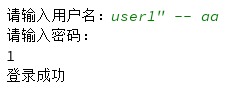
最后那一个空格,在一条sql语句中如果遇到select * from userinfo where username='user1' -- asadasdas' and pwd='' 则--之后的条件被注释掉了(注意--后面还有一个空格)
#1、sql注入之:用户存在,绕过密码
user1' -- 任意字符
#2、sql注入之:用户不存在,绕过用户与密码
xxx' or 1=1 -- 任意字符

解决方法:
# 原来是我们对sql进行字符串拼接

# sql="select * from userinfo where name='%s' and password='%s'" %(username,pwd)

# print(sql)

# result=cursor.execute(sql)

#改写为(execute帮我们做字符串拼接,我们无需且一定不能再为%s加引号了)

sql="select * from userinfo where name=%s and password=%s" #!!!注意%s需要去掉引号,因为pymysql会自动为我们加上

result=cursor.execute(sql,[user,pwd]) #pymysql模块自动帮我们解决sql注入的问题,只要我们按照pymysql的规矩来。

sql = 'select * from user where  username=%s and password=%s'

res = cursor.execute(sql, (user, pwd))
四、增、删、改:conn.commit()
commit()方法:在数据库里增、删、改的时候,必须要进行提交,否则插入的数据不生效。
import pymysql

user = input('请输入用户名:').strip()

pwd = input('请输入密码:').strip()

conn = pymysql.connect(host='192.168.76.136', port=3306, user='root', password='root', db='db1', charset='utf8')

cursor = conn.cursor()
#定义insert语句
sql_insert = 'insert into user (username, password) values (%s, %s)'

res = cursor.execute(sql_insert, (user, pwd))

#一定要commit

conn.commit()

cursor.close()

conn.close()

print('登录成功') if res else print('登录失败')

mysql> select * from user;

+----+----------+----------+----------------+

| id | username | password | emall          |

+----+----------+----------+----------------+

|  1 | user1    |      123 | user1@test.com |

|  2 | user2    |      123 | user2@test.com |

|  3 | user3    |      123 | NULL           |

+----+----------+----------+----------------+
#添加多条记录,参数是一个列表中的多个集合
res = cursor.executemany(sql_insert, [('aaa',123),('bbb',123)])

conn.commit()

cursor.close()

conn.close()

mysql> select * from user;

+----+----------+----------+----------------+

| id | username | password | emall          |

+----+----------+----------+----------------+

|  1 | user1    |      123 | user1@test.com |

|  2 | user2    |      123 | user2@test.com |

|  3 | user3    |      123 | NULL           |

|  4 | aaa      |      123 | NULL           |

|  5 | bbb      |      123 | NULL           |

+----+----------+----------+----------------+
#定义修改update语句
sql_update = 'update user set username = %s where id=2'

res = cursor.execute(sql_update, user)

conn.commit()

cursor.close()

conn.close()

mysql> select * from user;

+----+----------+----------+----------------+

| id | username | password | emall          |

+----+----------+----------+----------------+

|  1 | user1    |      123 | user1@test.com |

|  2 | test1    |      123 | user2@test.com |

|  3 | user3    |      123 | NULL           |

|  4 | aaa      |      123 | NULL           |

|  5 | bbb      |      123 | NULL           |

+----+----------+----------+----------------+
#定义删除delete语句
sql_delete = 'delete from user where id=4'

res = cursor.execute(sql_delete)

conn.commit()

cursor.close()

conn.close()

mysql> select * from user;

+----+----------+----------+----------------+

| id | username | password | emall          |

+----+----------+----------+----------------+

|  1 | user1    |      123 | user1@test.com |

|  2 | test1    |      123 | user2@test.com |

|  3 | user3    |      123 | NULL           |

|  5 | bbb      |      123 | NULL           |

+----+----------+----------+----------------+
五、查:fetchone、fetchmany、fetchall
fetchone():获取下一行数据,第一次为首行,可多次执行。
fetchall():获取所有行数据源
fetchmany(4):获取4行数据,n可指定
查看表内容:
1、fetchone()
import pymysql

conn = pymysql.connect(host='192.168.76.136', port=3306, user='root', password='root', db='db1', charset='utf8')

cursor = conn.cursor()

#定义查询语句

sql_select = 'select * from user '

res = cursor.execute(sql_select)

row = cursor.fetchone()

print(row)

row = cursor.fetchone()

print(row)

cursor.close()

conn.close()

结果:每执行一次查询一行,可多次执行逐行查看

(1, 'user1', 123, 'user1@test.com')

(2, 'test1', 123, 'user2@test.com')
2、fetchmany(n)
row = cursor.fetchmany(3)

print(row)

结果:显示3条记录

((1, 'user1', 123, 'user1@test.com'), (2, 'test1', 123, 'user2@test.com'), (3, 'user3', 123, None))
3、cursor.fetchall()
row = cursor.fetchall()

print(row)

结果:显示所有记录

((1, 'user1', 123, 'user1@test.com'), (2, 'test1', 123, 'user2@test.com'), (3, 'user3', 123, None), (5, 'bbb', 123, None))
4、DictCursor
默认情况下,我们获取到的返回值是元组,在获取数据的时候并不方便,可以使用以下方式来返回字典,每一行的数据都会生成一个字典:

#在实例化conn的时候,将属性cursor设置为pymysql.cursors.DictCursor

cursor = conn.cursor(cursor=pymysql.cursors.DictCursor)

结果:

[{'id': 1, 'username': 'user1', 'password': 123, 'emall': 'user1@test.com'}, {'id': 2, 'username': 'test1', 'password': 123, 'emall': 'user2@test.com'}, {'id': 3, 'username': 'user3', 'password': 123, 'emall': None}, {'id': 5, 'username': 'bbb', 'password': 123, 'emall': None}]
5、指针位置移动
在fetchone示例中,在获取行数据的时候,可以理解开始的时候,有一个行指针指着第一行的上方,获取一行,它就向下移动一行,所以当行指针到最后一行的时候,就不能再获取到行的内容,所以我们可以使用如下方法来移动行指针:

cursor.scroll(1,mode='relative')  # 相对当前位置移动

cursor.scroll(2,mode='absolute') # 相对绝对位置移动

第一个值为移动的行数,整数为向下移动,负数为向上移动,mode指定了是相对当前位置移动,还是相对于首行移动

sql = 'select * from user'

cursor.execute(sql)

# 查询第一行的数据

row = cursor.fetchone()

print(row)

# 查询第二行数据

row = cursor.fetchone()

print(row)

cursor.scroll(-1,mode='relative') #设置之后,光标相对于当前位置(第3行)往前移动了一行,所以打印的结果为第二行的数据

row = cursor.fetchone()

print(row)

cursor.scroll(0,mode='absolute') #设置之后,光标相对于首行没有任何变化,所以打印的结果为第一行数据

row = cursor.fetchone()

print(row)
day44-pymysql模块的使用的更多相关文章
- Python中操作mysql的pymysql模块详解
Python中操作mysql的pymysql模块详解 前言 pymsql是Python中操作MySQL的模块,其使用方法和MySQLdb几乎相同.但目前pymysql支持python3.x而后者不支持 ...
- python实战第一天-pymysql模块并练习
操作系统 Ubuntu 15.10 IDE & editor JetBrains PyCharm 5.0.2 ipython3 Python版本 python-3.4.3 安装pymysql模 ...
- pymysql 模块介绍
pymysql模块是python与mysql进行交互的一个模块. pymysql模块的安装: pymysql模块的用法: import pymysql user=input('user>> ...
- Mysql(六):数据备份、pymysql模块
一 IDE工具介绍 生产环境还是推荐使用mysql命令行,但为了方便我们测试,可以使用IDE工具 下载链接:https://pan.baidu.com/s/1bpo5mqj 掌握: #1. 测试+链接 ...
- python如何使用pymysql模块
Python 3.x 操作MySQL的pymysql模块详解 前言pymysql是Python中操作MySQL的模块,其使用方法和MySQLdb几乎相同.但目前pymysql支持python3.x而M ...
- MySQL之pymysql模块
MySQL之pymysql模块 import pymysql #s链接数据库 conn = pymysql.connect( host = '127.0.0.1', #被连接数据库的ip地址 po ...
- PyMySQL模块的使用
PyMySQL介绍 PyMySQL是在Python3.x版本中用于连接MySQL服务器的一个库,Python2系列中则使用mysqldb.Django中也可以使用PyMySQL连接MySQL数据库. ...
- MySQL学习12 - pymysql模块的使用
一.pymysql的下载和使用 1.pymysql模块的下载 2.pymysql的使用 二.execute()之sql注入 三.增.删.改:conn.commit() 四.查:fetchone.fet ...
- 数据库入门-pymysql模块的使用
一.pymysql模块安装 由于本人的Python版本为python3.7,所以用pymysql来连接数据库(mysqldb不支持python3.x) 方法一: #在cmd输入 pip3 instal ...
- Python连接MySQL数据库之pymysql模块使用
安装PyMySQL pip install pymysql PyMySQL介绍 PyMySQL是在python3.x版本中用于连接MySQL服务器的一个库,2中则使用mysqldb. Django中也 ...
随机推荐
- [UE4]关卡蓝图
- 00012 - ps命令详解
使用权限:所有使用者使用方式:ps [options] [--help]说明:显示瞬间行程 (process) 的动态参数:ps的参数非常多, 在此仅列出几个常用的参数并大略介绍含义-A 列出所 ...
- Round545div2B(1138B)
一.题目链接 https://codeforces.com/problemset/problem/1138/B 二.思路 贪心是肯定不行的. 设会$[1,0]$的人存在容器$p_1$里面,会$[0,1 ...
- python学习笔记之二
1.python计算运行时间 方法1 import datetime starttime = datetime.datetime.now() #long running endtime = datet ...
- virtual box + win7 + usb + share folder
1.enable virtaulization on BIOS 2.new machine setup, memory, harddisk size 3. 4.install extension pa ...
- WebBrowser JS回调delphi的方法 (简单通用)
上一部分讲了Delphi根据方法名调用方法,这一部分还有用到,接着上一章: [主要原理] 通过TEmbeddedWB控件的OnShowMessage事件捕获弹窗来实现,弹窗时定义方法名和参数,在捕获方 ...
- bzoj2555 substring(LCT 后缀自动机)
/* 动态求right集合的大小 LCT维护parent树即可 注意 由于树是有向的不会换根并且每次操作单一, 于是不需要维护子树和(写起来很麻烦) 直接打标记修改即可 */ #include< ...
- Splunk和ElasticSearch深度对比解析(转)
转载自:http://www.sohu.com/a/154105465_354963 随着Splunk越来越被大家熟知和认可,现在市面上也不断涌各种同类产品,作为大数据搜索界的翘楚Splunk和Ela ...
- mysql给查询的结果添加序号
1.法一: select (@i:=@i+1) i,a.url from base_api_resources a ,(select @i:=0) t2 order by a.id de ...
- 【Selenium-WebDriver自学】Selenium-IDE测试创建(三)
==================================================================================================== ...