React 从入门到进阶之路(七)
之前的文章我们介绍了 React 表单详解 约束性和非约束性组件 input text checkbox radio select textarea 以及获取表单的内容。接下来我们将介绍 React中的组件、父子组件、React props父组件给子组件传值、子组件给父组件传值、父组件中通过refs获取子组件属性和方法。
之前我们已经根据 create-react-app 模块创建了一个 React 项目,并定义 App.js 为根组件,即父组件,Home.js 为子组件。我们看一下两个组件的代码:
App.js
 import React, {Component} from 'react';

 import Home from './components/Home';

 class App extends Component {

     constructor(props) {

         super(props);

         this.state = {

             title: "I am father"

         }

     }

     fatherFunction = () => {

         console.log("I am fatherFunction")

     }

     fatherSelf = () => {

         console.log("I am fatherSelf")

     }

     getChildData = (name) => {

         console.log(name)

     }

     render() {

         return (

             <div className="App">

                 <Home

                     title={this.state.title}

                     fatherFunction={this.fatherFunction}

                     father={this}

                 />

             </div>

         );

     }

 }

 export default App;
Home.js
 import React, {Component} from 'react';

 class Home extends Component {

     constructor(props) {

         super(props);

         this.state = {

             name: "zhangsan",

         }

     }

     render() {

         return (

             <div>

                 <p>Hello {this.state.name}</p>

                 {/*接收父组件的传值*/}

                 {this.props.title}

                 <br/><br/>

                 {/*接收父组件的 fatherFunction 方法*/}

                 <button onClick={this.props.fatherFunction}>调用父组件的fatherFunction方法</button>

                 <br/><br/>

                 {/*调用父组件的fatherSelf方法*/}

                 <button onClick={this.props.father.fatherSelf}>调用父组件的fatherSelf方法</button>

                 <br/><br/>

                 {/*子组件给父组件传值*/}

                 <button onClick={this.props.father.getChildData.bind(this, this.state.name)}>子组件给父组件传值</button>

             </div>

         );

     }

 }

 export default Home;
我们在 App.js 的 render 中 插入 <Home /> 标签,即代表将子组件 Home 挂载到了父组件 App 中。
在父组件 App 标签 <Home /> 标签中传给子组件 Home:
值:
title={this.state.title},
方法:
fatherFunction={this.fatherFunction},
整个父组件 App:
father={this}
在子组件 Home 中:
通过 {this.props.title} 来获取父组件 App 的传值。
在子组件 Home 的 button 的 onClick 事件中绑定 {this.props.fatherFunction} 来获取父组件 App 传过来的方法。
在子组件 Home 的 button 的 onClick 事件中绑定 {this.props.father.fatherSelf} 来获取父组件 App 传过来整个 App 组件中的 fatherSelf 方法,在这里我们可以看出我们并没有向子组件中传递 fatherSelf 方法,但是我们将整个父组件传递给了子组件,所以子组件中能够调用父组件的所有方法和传值。
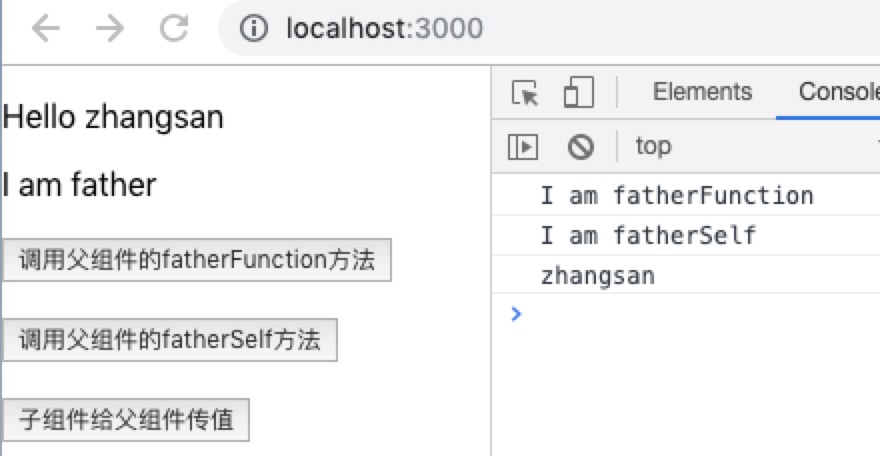
由于我们将整个父组件都传递给了子组件,在子组件中我们可以调用父组件的方法并将子组件的值传给父组件来完成父子组件间的通信。我们在子组件中通过 button 的 onClick 事件调用父组件的 getChildData 方法将 name 值传给父组件。onClick = {this.props.father.getChildData.bind(this, this.state.name)}。然后我们在父组件 App 中就可以获取到子组件 Home 传递过来的 name 值了。
运行结果如下:
以上就是父子组件间的通信,当然子组件向父组件传值和方法还可以通过 ref 和 refs 来实现。如下:
App.js
 import React, {Component} from 'react';

 import Home from './components/Home';

 class App extends Component {

     getChildData = () => {

         console.log(this.refs.child.state.name);

         this.refs.child.childFunction();

     }

     render() {

         return (

             <div className="App">

                 <Home ref="child"/>

                 <button onClick={this.getChildData}>获取子组件的传值和方法</button>

             </div>

         );

     }

 }

 export default App;
Home.js
import React, {Component} from 'react';

class Home extends Component {

    constructor(props) {

        super(props);

        this.state = {

            name: "zhangsan",

        }

    }

    childFunction = () => {

        console.log("I am child")

    }

    render() {

        return (

            <div>

                <p>Hello {this.state.name}</p>

            </div>

        );

    }

}

export default Home;
我们在父组件 App 中挂载子组件 Home,并在标签<Home /> 中插入 ref="child",意思是将子组件 Home 通过 ref 传过来。然后在父组件 App 中的 button 的 onClick 事件中定义 getChildData 方法,在该方法里可以通过 this.refs.child.state.name 来获取子组件 Home 的 name 值,通过 this.refs.child.childFunction() 来调用子组件 Home 的 childFunction 方法。
最后运行结果如下:

React 从入门到进阶之路(七)的更多相关文章
- React 从入门到进阶之路(四)
之前的文章我们介绍了 React 绑定属性( 绑定class 绑定style).引入图片 循环数组渲染数据.接下来我们将介绍 React 事件,方法, React定义方法的几种方式 获取数据 改 ...
- React 从入门到进阶之路(三)
之前的文章我们介绍了 React 创建组件.JSX 语法.绑定数据和绑定对象.接下来我们将介绍 React 绑定属性( 绑定class 绑定style).引入图片 循环数组渲染数据. 上一篇中我们 ...
- React 从入门到进阶之路(五)
之前的文章我们介绍了 React 事件,方法, React定义方法的几种方式 获取数据 改变数据 执行方法传值.接下来我们将介绍 React 表单事件 键盘事件 事件对象以及 React中 的 re ...
- React 从入门到进阶之路(六)
之前的文章我们介绍了 React 表单事件 键盘事件 事件对象以及 React中 的 ref 获取 dom 节点 .双向数据绑定.接下来我们将介绍 React 表单详解 约束性和非约束性组件 inpu ...
- React 从入门到进阶之路(八)
之前的文章我们介绍了 React中的组件.父子组件.React props父组件给子组件传值.子组件给父组件传值.父组件中通过refs获取子组件属性和方法.接下来我们将介绍 React propTyp ...
- React 从入门到进阶之路(九)
之前的文章我们介绍了 React propTypes defaultProps.接下来我们将介绍 React 生命周期函数. 之前我们已经根据 create-react-app 模块创建了一个 Re ...
- React 从入门到进阶之路(二)
在之前的文章中我们介绍了 React 开发的环境搭建及目录介绍和整理,本篇文章将介绍 React 创建组件.JSX 语法.绑定数据和绑定对象. 之前我们已经将项目运行了起来,我们再来看一下目录结构: ...
- React 从入门到进阶之路(一)
在开始 React 学习之前我们先进入官网 https://react.docschina.org/ 看看官方对 React 的解释:React 是用于构建用户界面的JavaScript 库.我们只需 ...
- Python 爬虫从入门到进阶之路(七)
在之前的文章中我们一直用到的库是 urllib.request,该库已经包含了平常我们使用的大多数功能,但是它的 API 使用起来让人感觉不太好,而 Requests 自称 “HTTP for Hum ...
随机推荐
- 宜信开源微服务任务调度平台(SIA-TASK)
背景 无论是互联网应用或者企业级应用,都充斥着大量的批处理任务.常常需要一些任务调度系统帮助开发者解决问题.随着微服务化架构的逐步演进,单体架构逐渐演变为分布式.微服务架构.在此的背景下,很多原先的任 ...
- SQLMAP源码分析(一)
说起来,学习Python很大一部分原因是由于对WEB安全的兴趣以及对SQLMAP这款工具的好奇,曾经设想学完Python基础就读一读SQLMAP源码,然而懒病一犯,随之就大江东去.近来,又重新燃起了读 ...
- Autofac基本使用(转载)
AutoFac是.net平台下的IOC容器产品,它可以管理类之间的复杂的依赖关系.在使用方面主要是register和resolve两类操作. 这篇文章用单元测试的形式列举了AutoFac的常用使用方法 ...
- live555直播
http://www.cppblog.com/tx7do/archive/2014/05/31/207155.aspx http://blog.csdn.net/sunkwei/article/det ...
- 图像滤镜艺术---PS图层混合模式之明度模式
本文将介绍PS图层混合模式中比較复杂 的"明度"模式的算法原理及代码实现内容. 说到PS的图层混合模式,计算公式都有,详细代码实现也能找到,可是,都没有完整介绍全部图层混合模式的代 ...
- c# SQLServer导入大批量数据
说来惭愧,关于批量导入数据,一直采用的是最原始的方式,一条一条插入,或者100条一块批量插入,这种方式,五十步笑百步,并没有明显的性能提升, 昨天在从别的库查询数据到DataTable内存中,然后插入 ...
- Netty 仿QQ聊天室 (实战二)
Netty 聊天器(百万级流量实战二):仿QQ客户端 疯狂创客圈 Java 分布式聊天室[ 亿级流量]实战系列之15 [博客园 总入口 ] 源码IDEA工程获取链接:Java 聊天室 实战 源码 写在 ...
- Please read "Security" section of the manual to find out how to run mysqld as root!
[root@test ~]# /usr/local/mysql/bin/mysqld2018-08-05T08:29:05.143142Z 0 [Warning] [MY-011070] [Serve ...
- tornado之模板扩展
当我们有多个模板的时候,很多模板之间其实相似度很高.我们期望可以重用部分网页代码.这在tornado中可以通过extends语句来实现.为了扩展一个已经存在的模板,你只需要在新的模板文件的顶部放上一句 ...
- Linux环境下安装MySQL(解压方式)
1.将安装包放在服务器上:mysql-5.6.37-linux-glibc2.12-x86_64.tar.gz 2.将安装包解压:tar -zxvf mysql-5.6.37-linux-glibc2 ...