15-Flutter移动电商实战-商品推荐区域制作
1、推荐商品类的编写
这个类接收一个List参数,就是推荐商品的列表,这个列表是可以左右滚动的。
/*商品推荐*/
class Recommend extends StatelessWidget {
  final List  recommendList;

  Recommend({Key key, this.recommendList}) : super(key: key);
}
2、推荐标题内部方法的编写
实际开发中,要尽量减少嵌套,我们需要把复杂的组件,单独拿出一个方法进行编写。这里就把商品推荐标题单独拿出一个方法进行编写。
/*推荐商品标题*/
Widget _titleWidget(){
 return Container(
   alignment: Alignment.centerLeft,
   padding: EdgeInsets.fromLTRB(10.0, 2.0, 0,5.0),
   decoration: BoxDecoration(
     color:Colors.white,
     border: Border(
       bottom: BorderSide(width:0.5,color:Colors.black12)
     )
   ),
   child:Text(
     '商品推荐',
     style:TextStyle(color:Colors.pink)
     )
 );
}
3、推荐商品单独项编写
把推荐商品的每一个子项我们也分离出来。每一个子项都使用InkWell,这样为以后的页面导航作准备。里边使用了Column,把内容分成三行。
先不充关于InkWel的使用
InkWell有的叫溅墨效果,有的叫水波纹效果。使用场景是给一些无点击事件的部件添加点击事件时使用(也支持长按、双击等事件),同时你也可以去修改它的颜色和形状。
InkWell(
  borderRadius: BorderRadius.circular(8.0), /*圆角*/
  splashColor: Colors.transparent, /*溅墨色(波纹色)*/
  highlightColor: Colors.transparent, /*点击时的背景色(高亮色)*/
  onTap: () {},/*点击事件*/
  child: Container(),
);
再回访推荐商品的编写
Widget _item(index){
    return InkWell(
      onTap: (){},
      child: Container(
        height: ScreenUtil().setHeight(330),
        width: ScreenUtil().setWidth(250),
        padding: EdgeInsets.all(8.0),
        decoration:BoxDecoration(
          color:Colors.white,
          border:Border(
            left: BorderSide(width:0.5,color:Colors.black12)
          )
        ),
        child: Column(
          children: <Widget>[
            Image.network(recommendList[index]['image']),
            Text('¥${recommendList[index]['mallPrice']}'),
            Text(
              '¥${recommendList[index]['price']}',
              style: TextStyle(
                decoration: TextDecoration.lineThrough,
                color:Colors.grey
              ),
            )
          ],
        ),
      ),
    );
}
4、横向列表组件的编写
横向列表组件也进行单独编写,以减少嵌套,这样我们就把每一个重要的部分都进行了分离。
Widget _recommedList(){

  return Container(
    height: ScreenUtil().setHeight(330),
    child: ListView.builder(
      scrollDirection: Axis.horizontal,
      itemCount: recommendList.length,
      itemBuilder: (context,index){
        return _item(index);
      },
    ),
  );
}
有了这三个基本组件,最后我们在build方法里进行组合,形成商品推荐区域。
@override
Widget build(BuildContext context) {
return Container(
   height: ScreenUtil().setHeight(380),
   margin: EdgeInsets.only(top: 10.0),
   child: Column(
     children: <Widget>[
       _titleWidget(),
       _recommedList()
     ],
   ),
);
}
5、整个组件的类代码如下
商品推荐
class Recommend extends StatelessWidget {
  final List  recommendList;

  Recommend({Key key, this.recommendList}) : super(key: key);

  @override
  Widget build(BuildContext context) {
    return Container(
       height: ScreenUtil().setHeight(380),
       margin: EdgeInsets.only(top: 10.0),
       child: Column(
         children: <Widget>[
           _titleWidget(),
           _recommedList()
         ],
       ),
    );
  }

推荐商品标题
  Widget _titleWidget(){
     return Container(
       alignment: Alignment.centerLeft,
       padding: EdgeInsets.fromLTRB(10.0, 2.0, 0,5.0),
       decoration: BoxDecoration(
         color:Colors.white,
         border: Border(
           bottom: BorderSide(width:0.5,color:Colors.black12)
         )
       ),
       child:Text(
         '商品推荐',
         style:TextStyle(color:Colors.pink)
         )
     );
  }

  Widget _recommedList(){

      return Container(
        height: ScreenUtil().setHeight(330),
        child: ListView.builder(
          scrollDirection: Axis.horizontal,
          itemCount: recommendList.length,
          itemBuilder: (context,index){
            return _item(index);
          },
        ),
      );
  }

  Widget _item(index){
    return InkWell(
      onTap: (){},
      child: Container(
        height: ScreenUtil().setHeight(330),
        width: ScreenUtil().setWidth(250),
        padding: EdgeInsets.all(8.0),
        decoration:BoxDecoration(
          color:Colors.white,
          border:Border(
            left: BorderSide(width:0.5,color:Colors.black12)
          )
        ),
        child: Column(
          children: <Widget>[
            Image.network(recommendList[index]['image']),
            Text('¥${recommendList[index]['mallPrice']}'),
            Text(
              '¥${recommendList[index]['price']}',
              style: TextStyle(
                decoration: TextDecoration.lineThrough,
                color:Colors.grey
              ),
            )
          ],
        ),
      ),
    );
  }
}
6、准备数据并进行调用
在 HomePage build 中继续添加:
List<Map> recommendList = (data['data']['recommend'] as List).cast();
 Recommend(recommendList:recommendList),
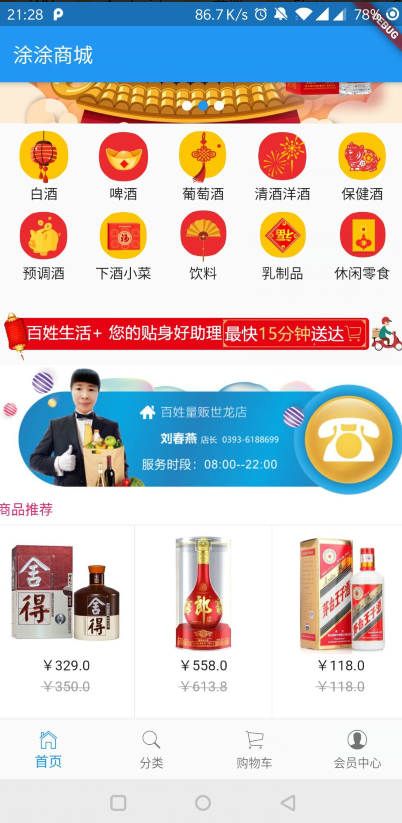
效果图:
15-Flutter移动电商实战-商品推荐区域制作的更多相关文章
- Flutter移动电商实战 --(15)商品推荐区域制作
1.推荐商品类的编写 这个类接收一个List参数,就是推荐商品的列表,这个列表是可以左右滚动的. /*商品推荐*/ class Recommend extends StatelessWidget { ...
- Flutter移动电商实战 --(1)项目学习记录
1.项目相关截图 2.项目知识点梳理图 Dio2.0: Dio是一个强大的 Dart Http 请求库,支持 Restful API.FormData.拦截器.请求取消等操作. Swiper: Swi ...
- Flutter移动电商实战 --(43)详细页_补充首页跳转到详细页
首页轮播点击到详细页 修改我们轮播这里的代码:SwiperDiy这个类这里的代码 return InkWell( onTap: (){ Application.router.navigateTo(co ...
- Flutter移动电商实战 --(51)购物车_Provide中添加商品
新加provide的cart.dart页面 引入三个文件.开始写provide类.provide需要用with 进行混入 从prefs里面获取到数据,判断有没有数据,如果有数据就返转正List< ...
- Flutter移动电商实战 --(37)路由_Fluro引入和商品详细页建立
https://github.com/theyakka/fluro pages/details_page.dart新建页面 使用路由 先添加路由插件的引用 fluro: ^1.4.0 如果网络上下载不 ...
- Flutter移动电商实战 --(33)列表页_子类和商品列表交互效果
主要实现点击小类下面的列表跟着切换 获取右侧下面的列表信息,即要传递大类的id也要传递小类的,所以需要把左侧的大类的id也要Provide化 可以看下网站上的接口说明: https://jspang. ...
- Flutter移动电商实战 --(28)列表页_商品列表后台接口调试
主要调试商品列表页的接口 这个接口是最难的因为有大类.小类还有上拉加载 先配置接口 config/service_url.dart //const serviceUrl='http://test.ba ...
- Flutter移动电商实战 --(53)购物车_商品列表UI框架布局
cart_page.dart 清空原来写的持久化的代码; 添加对应的引用,stless生成一个静态的类.建议始终静态的类,防止重复渲染 纠正个错误,上图的CartPage单词拼错了,这里改过来防止后面 ...
- Flutter移动电商实战 --(30)列表页_商品列表UI界面布局
小程序里面的布局方式 小程序的图片上这里使用的是warp布局,因为首页里面火爆专区,已经用过了warp来布局了. 所以这里我们没有必要再讲一遍,这里我们使用ListView,我们把它布局成下图这种形式 ...
随机推荐
- 如何申请高德地图用户Key
打开网页https://lbs.amap.com/,进入高德开发平台. 单击箭头处[注册],打开注册页面.(如果您已注册为高德地图开发者可跳过此步骤,直接登录即可). 选择[成为个人开发者],如果您是 ...
- 迪杰斯特拉算法(Dijkstra) (基础dij+堆优化) BY:优少
首先来一段百度百科压压惊... 迪杰斯特拉算法(Dijkstra)是由荷兰计算机科学家狄克斯特拉于1959 年提出的,因此又叫狄克斯特拉算法.是从一个顶点到其余各顶点的最短路径算法,解决的是有权图中最 ...
- 学java必须知道的那些queue
队列是我们学java必须接触到的知识,很多内容都和它相关,但是你真的了解它们的概念和使用方法吗?在本文,你可以获取关于queue的一切信息,希望我能够帮助你在java的学习道路上乘风破浪. 概念 队列 ...
- PB 修改datawindow 的背景色
1.修改标题行的背景色 rgb(235, 235, 235) 2.修改选择行的背景色(即选择行高亮) if(currentrow() = getrow(), rgb(235,235,235), rgb ...
- SQL SERVER 数据库查询表信息
SELECT 表名 then d.name else '' end, 表说明 then isnull(f.value,'') else '' end, 字段序号 = a.colorder, 字段名 = ...
- U9单据打印模板自定义扩展字段显示名称
UBF打印模板中,单据自定义扩展字段显示均为扩展字段值集值编码,而在实际运用过程中打印时需要显示扩展字段名称,具体实现方法如下 方式一:采用SQL系统定义函数[dbo].[fn_GetSegName] ...
- 【题解】Luogu P5361 [SDOI2019]热闹又尴尬的聚会
原题传送门 构造题. 明显p,q都越大越好 我们考虑每次取出度最小的点,加到尴尬聚会的集合中(因为把与它相邻的点全删了,不珂能出现认识的情况),把它自己和与自己相连的点从图上删掉(边也删掉),记下这个 ...
- 洛谷 P1411 树 (树形dp)
大意: 给定树, 求删除一些边, 使得连通块大小的乘积最大 设$dp_{i,j}$表示只考虑点$i$的子树, $i$所在连通块大小为$j$的最大值. 转移的时候不计算$i$所在连通块的贡献, 留到最后 ...
- MongoDB的安装,mongod和mongo的区别
一. mongoDB安装路径 安装路径(最新4.0.11):https://www.mongodb.com/download-center/community?jmp=nav 建议另外找路径下载,外网 ...
- spring boot 分布式锁组件 spring-boot-klock-starter
基于redis的分布式锁spring-boot starter组件,使得项目拥有分布式锁能力变得异常简单,支持spring boot,和spirng mvc等spring相关项目 快速开始 sprin ...