MongoDB C Driver Building on Windows
一、编译mongodb c driver:
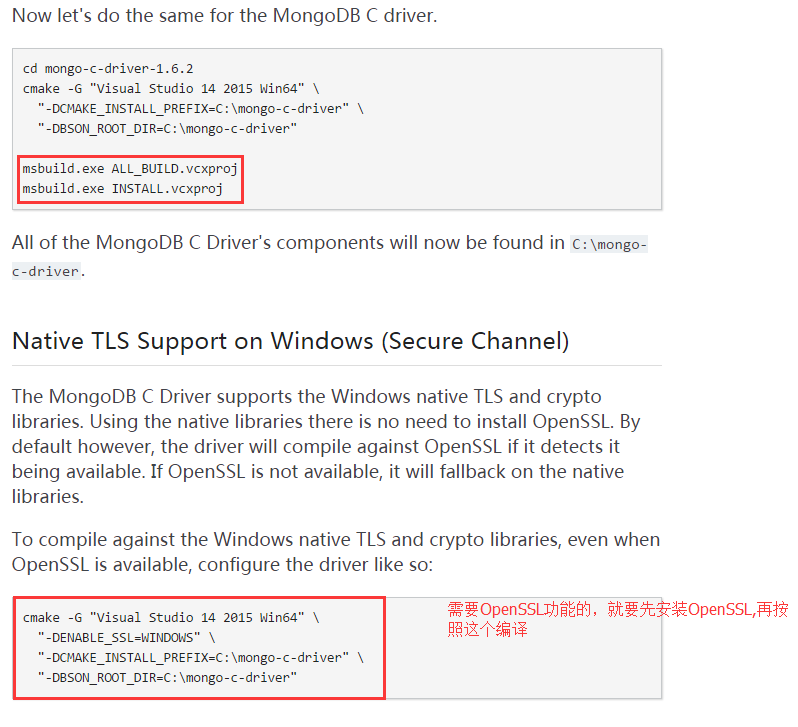
需要先安装OpenSSL:(参见:http://bbs.aircheng.com/read-2222-1)
步骤:(MongoDB不需要授权登陆的话,就不需要OpenSSL,直接跳到第步)
1.下载ActivePerl 5.24.0.2400
http://www.activestate.com/activeperl/downloads
2.安装ActivePerl软件
没什么好说的,一步一步安装即可。安装成功后,设置环境变量。
例如我将ActivePerl安装在C:\Perl64\目录下,则选中Path,单击编辑按钮,
将C:\Perl64\site\bin;C:\Perl64\bin;加入其中,确认即可。
运行”CMD“命令,使用cd命令将运行目录指向perl安装目录的eg文件夹,
执行“perl example.pl”若显示“Hello from ActivePerl!”,则说明Perl安装成功,
可以开始使用Perl的相关命令来进行OpenSSL的安装了。
3.安装Microsoft Visual Studio 2010
将C:\Program Files (x86)\Microsoft Visual Studio 10.0\VC\bin\amd64;
加入系统环境变量,具体以你安装的路径为准,
注意(64位)是 bin\amd64; 不是 bin; 多么痛的领悟。
4.安装NASM
http://www.nasm.us/
当前稳定版本为:2.12.02
http://www.nasm.us/pub/nasm/releasebuilds/2.12.02/win64/

将nasm的路径添加至环境变量
例如我的nasm安装在 C:\Users\lenovo\AppData\Local\NASM 目录
5.下载OpenSSL
https://www.openssl.org/source/
下载后,将其解压缩至C:\openssl目录下,这样做便于后续操作
注意目录结构,不要出现openssl-1.1.0c子目录,
而是将openssl-1.1.0c目录下的文件拷贝至C:\openssl目录下
6.初始化编译环境
因为Visual Studio 2010安装在目录中C:\Program Files (x86)\Microsoft Visual Studio 10.0\
这里使用的是在Visual Studio Tools文件夹下的Visual Studio x64 Win64命令提示(2010)工具。
然后右键:以管理员身份运行

进入Visual Studio 2010安装目录 C:\Program Files (x86)\Microsoft Visual Studio 10.0\中
执行命令:cd C:\Program Files (x86)\Microsoft Visual Studio 10.0\VC\bin\amd64
执行命令:vcvars64.bat
7.openssl的源文件已解压至C:\openssl的目录中,下面开始执行Configure
进入openssl 目录下执行 perl Configure VC-WIN64A

执行结束后,如下图所示

8.执行命令:nmake

如果执行成功,则等待输入下一个命令

9.执行命令:nmake test

很顺利的情况下:

10.执行命令:nmake install

当出现下面页面的时候,证明你已成功:

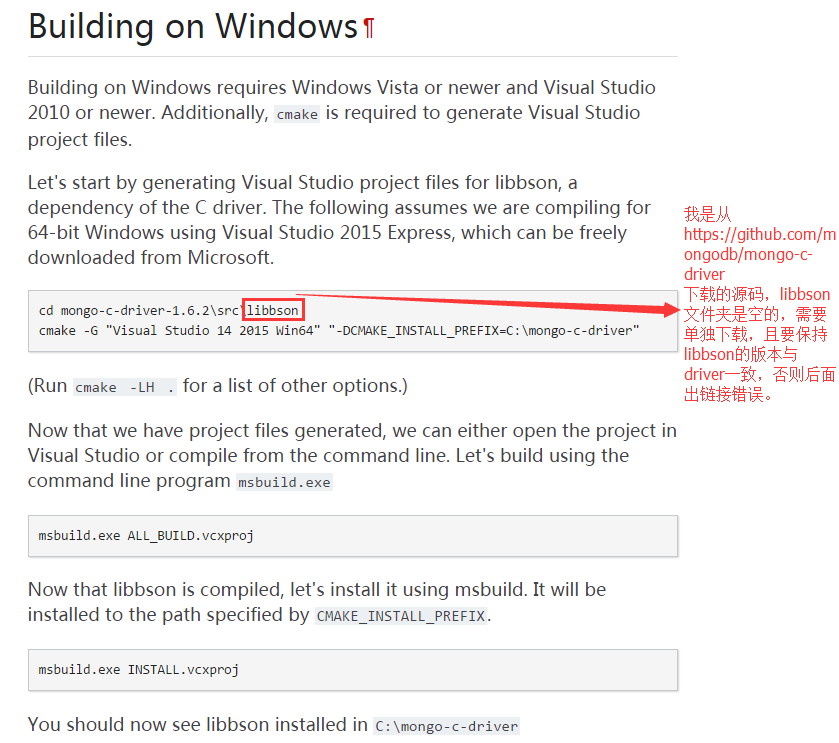
11.编译驱动:
http://mongoc.org/libmongoc/(api 官方文档)
https://github.com/mongodb/mongo-c-driver(GitHub驱动源码,这个 src/libbson 文件夹里面是空的)
驱动源码下载:https://github.com/mongodb/mongo-c-driver/releases
build前需下载个最新的cmake安装。
编译完成之后在c:\mongo-c-driver目录下有bin、include、lib三个文件夹,分别包含所需的dll、.h文件、lib。
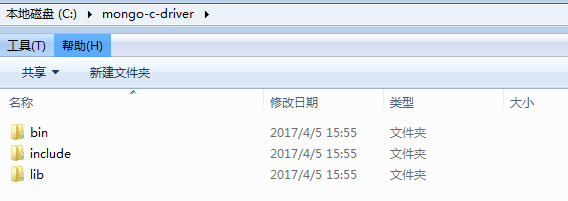
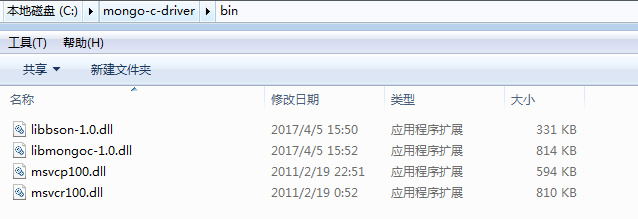
在自己的项目中引入这些.h文件、lib、dll就可以使用 C API 了。
二、C API 的使用
1.连接MongoDB:
//只能调用一次mongoc_init

mongoc_init();

const char *uristr = "mongodb://user:pwd@host:port/";

//MongoDB不需要登录认证的话,连接字符串中的用户名:密码@可以省略。

//connection to MongoDB.

m_client = mongoc_client_new (uristr);

if (!m_client)

{

	return false;

}

m_pCollection = mongoc_client_get_collection(m_client, "myDatabase", "mycollection");

return true;
2.Insert操作:
bson_t query;

bson_init(&query);

BSON_APPEND_UTF8(&query,"name","chunxiao");

BSON_APPEND_INT32(&query,"age",NULL);

BSON_APPEND_DOUBLE(&query,"Price",66.0);

if (!mongoc_collection_insert(m_pCollection,MONGOC_INSERT_NONE,&query,NULL,&error))

{

  AfxMessageBox(error.message);

}

bson_destroy(&query);

return true;
3.Find操作:
double age1 = 20;

double age2 = 22;

char	name[10] = "chunxiao";

int sex = 0;

bson_init(&query);

bson_append_document_begin(&query,"age",3,&child);

bson_append_double(&child,"$gt",3,age1);

bson_append_document_end(&query,&child);

bson_append_document_begin(&query,"age",3,&child1);

bson_append_double(&child1,"$lte",4,age2);

bson_append_document_end(&query,&child1);

cursor = mongoc_collection_find(m_pCollection,MONGOC_QUERY_NONE,0,0,0,&query,NULL,NULL);

vector<string> vData;

while (mongoc_cursor_next(cursor,&docFind))

{

	//方法一

	bson_iter_t iter;

	bson_iter_init(&iter,docFind);

	if (bson_iter_find(&iter,"name"))

	{

	  strcpy(str,bson_iter_utf8(&iter,NULL));

	  strtest = bson_iter_utf8(&iter,NULL);

	  if (strcmp(strtest.c_str(),"xiaochun")==0)

	  {

		  AfxMessageBox(str);

		  continue;

	  }

	  strtest = strtest.substr(strtest.find_first_of("x"),2);

	  AfxMessageBox(str);

	}

	bson_iter_init(&iter,docFind);//顺序不一致的话,要重新初始化一下 iter,否则find不到

	if (bson_iter_find(&iter,"age"))

	{

	  int f = bson_iter_int32(&iter);

	  sprintf(str,"%d",f);

	  AfxMessageBox(str);

	}

	//方法二

	char *str;

    str = bson_as_json(docFind, NULL);

    vData.push_back(str);

}

if (mongoc_cursor_error(cursor, &error))//mongoc_cursor_error 要在 mongoc_cursor_next 之后调用,否则获取不到 error.message

{

	cout << "An error occurred:" << error.message << endl;

  mongoc_cursor_destroy(cursor);

  bson_destroy(&query);

  return false;

}

mongoc_cursor_destroy(cursor);

bson_destroy(&query);

return true;
4.Delete操作:
double age = 21;

bson_init(&query);

bson_append_document_begin(&query,"age",3,&child);

bson_append_double(&child,"$gt",3,age);

bson_append_document_end(&query,&child);

BSON_APPEND_UTF8(&query,"name","chun.xiao");

if (!mongoc_collection_remove(m_pCollection,MONGOC_REMOVE_NONE,&query,NULL,&error))

{

  AfxMessageBox(error.message);

}

bson_destroy(&query);

return true;
5.UpDate操作:
bson_init(&query);

BSON_APPEND_UTF8(&query,"name","chunxiao");

bson_t *docUpDate = bson_new();

bson_append_document_begin(docUpDate,"$set",-1,&child);

BSON_APPEND_UTF8(&child,"name","xiaochun");

bson_append_document_end(docUpDate,&child);

bson_init(&child);

bson_append_document_begin(docUpDate,"$set",-1,&child);

BSON_APPEND_UTF8(&child,"age","21");

bson_append_document_end(docUpDate,&child);

if (!mongoc_collection_update(m_pCollection,MONGOC_UPDATE_NONE,&query,docUpDate,NULL,&error))

{

  AfxMessageBox(error.message);

}

bson_destroy(&query);

bson_destroy(docUpDate);

return true;
百度云(13207134391):
编译 C driver:
MongoDB\C API\安装MongoDB以及编译 C driver
Demo:
MongoDB\C API\C API 操作MongoDB
MongoDB C Driver Building on Windows的更多相关文章
- mongodb c++ driver(2.53)windows编译
编译环境: (1) 下载python2.7, 使用x86_32位,因为scons只有32位安装包可用: (2) 下载scons2.3.0,The current production release ...
- MongoDB C Driver Building on CentOS
Building on Unix Prerequisites OpenSSL is required for authentication or for SSL connections to Mong ...
- windows平台下安装、编译、使用mongodb C++ driver
本博客将记录在Win8.1 ,VS2013环境下编译.配置mongodb C++ driver的流程. 1.下载预备 下载Boost:http://sourceforge.net/projects/b ...
- MongoDB C Driver使用教程
MongoDB C Driver使用教程 转载请注明出处http://www.cnblogs.com/oloroso/ 本指南提供简介 MongoDB C 驱动程序. 在 C API 的详细信息,请参 ...
- MongoDB C Driver and APIinstances linux MongoDB安装配置
<一,linux平台MongoDB安装配置>在这我们使用的Centos6 yum部署的,你想搞编译,自个干!
- MongoDB Java Driver操作指南
MongoDB为Java提供了非常丰富的API操作,相比关系型数据库,这种NoSQL本身的数据也有点面向对象的意思,所以对于Java来说,Mongo的数据结构更加友好. MongoDB在今年做了一次重 ...
- Ignoring Extra Elements in mongoDB C# Driver
MongoDB删除字段后会报错: Element ... does not match any field or property of class Customer. 需要在实体类增加 [BsonI ...
- mongodb .net driver
1.介绍 The official MongoDB .NET Driver provides asynchronous interaction with MongoDB. Powering the d ...
- Mongodb Java Driver 参数配置解析
要正确使用Mongodb Java Driver,MongoClientOptions参数配置对数据库访问的并发性能影响极大. connectionsPerHost:与目标数据库能够建立的最大conn ...
随机推荐
- debian更新源时找不到公钥的解决办法
W: GPG error: http://mirrors.163.com jessie-updates InRelease: The following signatures couldn't be ...
- HTTP请求流程(二)----Telnet模拟HTTP请求
http://www.cnblogs.com/stg609/archive/2008/07/06/1237000.html 上一部分"流程简介", 我们大致了解了下HTTP请求的流 ...
- ubuntu安装chrome浏览器
PPA方法,免FQ,否则,你得FQ下载chrome,你Firefox VPN配置好了吗!!! wget -q -O - https://raw.githubusercontent.com/longhr ...
- html中如何让table显示的更好
在html文件编写中,经常使用到table来做一些表格.如何让它显示的更像一张表格?接下来为你讲解. 基本格式 <div> <th>我的一张表格</th> < ...
- OpenGL cullface
opengl cullface是根据顶点顺逆时针来判断正反面的.而不是根据法线判断的.所以有可能法线是正确的,但cullface效果却是反的.
- 安装composer slim(php web api micro services)
1. 安装php7 2. 下载 https://getcomposer.org/composer.phar 3. 开启ssh, 在 php.ini中.extension=C:\Program File ...
- Windows 上安装docker
Windows 上安装docker //(第一种)下载boot2docker https://github.com/boot2docker/windows-installer/releases //( ...
- springcloud Ribbon自定义负载均衡插件
现在我们通过插件的方式添加新的一种策略. package com.zhuyang.config; import org.springframework.beans.factory.annotation ...
- Zero Downtime Upgrade of Oracle 10g to Oracle 11g Using GoldenGate — 4
Target Side Setup Install OGG on Target Side Creates required directories for OGG [oracle@vzwc1 ggs] ...
- IP首部
1. 引言 IP是TCP/IP协议族中最为核心的协议.所有的TCP.UDP.ICMP及IGMP数据都以IP数据报格式传输,但是IP提供不可靠.无连接的数据报传送服务.不可靠的意思是它不能保证IP数据报 ...