
浅谈java中线程和操作系统线程
在聊线程之前,我们先了解一下操作系统线程的发展历程,在最初的时候,操作系统没有进程线程一说,执行程序都是串行方式执行,就像一个队列一样,先执行完排在前面的,再去执行后面的程序,这样的话很多程序的响应就很慢,而且有些程序是io型操作居多,很多时间都在等待中浪费了,这时候进程应运而生,现在面试的都知道进程是资源管理的最小单位,线程是cpu调度的最小单位(其实我还是对此持保留意见),殊不知,在那个时候,进程才是cpu调度的最小单位(谁曾今还不是个宝宝了),进程就是用来解决并发场景提升cpu利用率的,多进程在多核cpu下甚至可以并行操作,即便是单核情况,也可以通过中断机制,切换cpu资源,达到并发的效果。
这么看来进程和我们现在java的线程好像也没啥区别啊,但是由于每次fork进程消耗比较大,对进程的管理也相对消耗更多资源,当然,更重要的还是进程是资源独占的,进程共享资源太难了,而我们在很多场景下需要资源的共享,因此线程的诞生就变得意义重大。
线程是进程下面的一个单位,可以说离开了进程线程啥都不是,多线程共享进程资源,线程创建与销毁以及对线程的管理更加轻量等等这些都是线程的特点,好像线程都是优点没有啥缺点一样,但是线程真的是这样完美吗?没有深入了解它我不敢妄加评论,那么我们来看看线程是个啥,在Linux中又是咋实现的呢:
线程主要分为用户级线程,内核级线程,在主流操作系统中,线程的实现主要三种:
1.用户级线程实现:顾名思义其实就是在用户态实现的,线程的创建,销毁,线程调度都是在用户态处理,可以根据自己的需要实现不同的调度算法,由于不用切换到内核态,属于最轻量级的一种实现,资源消耗小,也正是由于这些原因,操作系统内核是不知道线程的存在的,cpu调度,时钟切换都无法控制,当一个线程发生系统调用时,所有线程都无法使用,毕竟给你进程都给停了,你个小喽啰还咋蹦跶。
2.内核级线程:这种才是勉强号称cpu最小调度单位,为啥说勉强呢,我们后面再说,内核级实现顾名思义是在内核态实现的,cpu资源调度也是直接分给线程使用的,由操作系统内核直接调度,这样线程与线程之间关联更小,一个线程挂了(这里当然是指陷入内核时)不会影响其他线程的正常运行,但是毕竟是在内核中管理的消耗资源也大一点。
3.混合级线程实现: 这种实现确实是操作内核线程的,但是其实是采用多路复用方式,会有多个用户级线程复用一个内核线程,每个内核线程对应多个用户线程集合,算是前两种方式的综合体吧。
这里对线程的我只简单的介绍一下,以方便理解线程,毕竟我们在使用一个工具时,首先要做的事是了解它是什么,用来解决什么问题的。想对操作系统线程进程深入了解的,推荐去看现代操作系统第四版:
链接:https://pan.baidu.com/s/1C8PhQNTdYAb_LWGoIMW7CA 提取码:asdf ,或者去听陈向群老师的课,附链接https://www.bilibili.com/video/av9555596?from=search&seid=8107077283516919308,想要做一个好的程序员,基础是少不了的。
到这里我们大概知道了线程的基本概念,其实我一直觉得在linux中,一直都是进程在调度,像2.5之前的LWP和之后的NPTL其实本质还是用task_struct实现的,LWP的实现其实就是在同一个地址空间创建多个task_struct,这样就可以做到资源共享,创建销毁也轻量很多,因此也叫作轻量级进程,大致如下图:
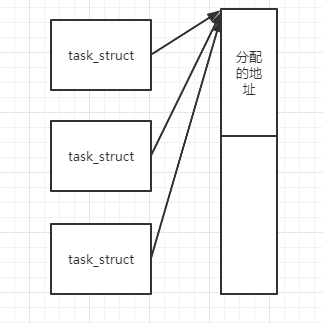
每次创建线程就加一个task_struct,而号称和POSIX线程标准兼容的NPTL的实现,比如clone增加线程创建标志位CLONE_THREAD,内核结构增加TGID指向PID,原来的PID记录线程号,其实也只是增加了对线程的支持,而没有重新定义线程的数据结构,所以我说linux还是对进程的调度也可以,但是同时他也符合POSIX线程标准,你说是线程也不为过,我更愿意理解为进程可共享资源的实现方式。越来越理解啥叫程序员的思想更重要,有的时候确实更多的是思想,但如果说线程是用来解决高并发下资源共享,那确实这个只能称为线程。
不杠linux的线程实现了,反正是解决了线程要解决的问题,接下来我们正式进入java线程的源码之路,虽然c语言已经基本忘了(本来准备说还给老师了,突然想起来,我没有老师教过,好像没有资格这么说),但是看一下大致逻辑还是可以看的懂得(Google一下你就知道):
首先看java中实现,很简单,就是调用了Thread.start()方法:
public synchronized void start() {

        /**

         * This method is not invoked for the main method thread or "system"

         * group threads created/set up by the VM. Any new functionality added

         * to this method in the future may have to also be added to the VM.

         *

         * A zero status value corresponds to state "NEW".

         */

        if (threadStatus != 0)

            throw new IllegalThreadStateException();

        /* Notify the group that this thread is about to be started

         * so that it can be added to the group's list of threads

         * and the group's unstarted count can be decremented. */

        group.add(this);

        boolean started = false;

        try {

            start0();

            started = true;

        } finally {

            try {

                if (!started) {

                    group.threadStartFailed(this);

                }

            } catch (Throwable ignore) {

                /* do nothing. If start0 threw a Throwable then

                  it will be passed up the call stack */

            }

        }

    }
操作很简单,加入group,调用start0()方法,
private native void start0();
再一看,start0是一个native方法,这可咋办,路堵死了,没关系,接下来我吭哧吭哧下载了openJdk源码,咱们接着撸,openjdk源码全局搜start0可以找到在Thread.c文件中,记录了映射关系:
static JNINativeMethod methods[] = {

    {"start0",           "()V",        (void *)&JVM_StartThread},

    {"stop0",            "(" OBJ ")V", (void *)&JVM_StopThread},

    {"isAlive",          "()Z",        (void *)&JVM_IsThreadAlive},

    {"suspend0",         "()V",        (void *)&JVM_SuspendThread},

    {"resume0",          "()V",        (void *)&JVM_ResumeThread},

    {"setPriority0",     "(I)V",       (void *)&JVM_SetThreadPriority},

    {"yield",            "()V",        (void *)&JVM_Yield},

    {"sleep",            "(J)V",       (void *)&JVM_Sleep},

    {"currentThread",    "()" THD,     (void *)&JVM_CurrentThread},

    {"countStackFrames", "()I",        (void *)&JVM_CountStackFrames},

    {"interrupt0",       "()V",        (void *)&JVM_Interrupt},

    {"isInterrupted",    "(Z)Z",       (void *)&JVM_IsInterrupted},

    {"holdsLock",        "(" OBJ ")Z", (void *)&JVM_HoldsLock},

    {"getThreads",        "()[" THD,   (void *)&JVM_GetAllThreads},

    {"dumpThreads",      "([" THD ")[[" STE, (void *)&JVM_DumpThreads},

    {"setNativeName",    "(" STR ")V", (void *)&JVM_SetNativeThreadName},

};
第一个就是,继续往下跟,全局搜对应方法JVM_StartThread,在jvm.cpp中可看到如下代码:
JVM_ENTRY(void, JVM_StartThread(JNIEnv* env, jobject jthread))

  JVMWrapper("JVM_StartThread");

  JavaThread *native_thread = NULL;

  // We cannot hold the Threads_lock when we throw an exception,

  // due to rank ordering issues. Example:  we might need to grab the

  // Heap_lock while we construct the exception.

  bool throw_illegal_thread_state = false;

  // We must release the Threads_lock before we can post a jvmti event

  // in Thread::start.

  {

    // Ensure that the C++ Thread and OSThread structures aren't freed before

    // we operate.

    //上面翻译的意思是确保c++的线程和os线程结构不会在我们操作前被释放

    //其实就是加锁保证线程创建的唯一性

    MutexLocker mu(Threads_lock);

    // Since JDK 5 the java.lang.Thread threadStatus is used to prevent

    // re-starting an already started thread, so we should usually find

    // that the JavaThread is null. However for a JNI attached thread

    // there is a small window between the Thread object being created

    // (with its JavaThread set) and the update to its threadStatus, so we

    // have to check for this

    //大致意思就是jdk1.5以后,java线程threadStatus(线程状态)可以用来判断线程是否已经被创建,防止重复创建,浪费资源

    if (java_lang_Thread::thread(JNIHandles::resolve_non_null(jthread)) != NULL) {

      throw_illegal_thread_state = true;

    } else {

      // We could also check the stillborn flag to see if this thread was already stopped, but

      // for historical reasons we let the thread detect that itself when it starts running

      //这边也是做检查

      jlong size =

             java_lang_Thread::stackSize(JNIHandles::resolve_non_null(jthread));

      // Allocate the C++ Thread structure and create the native thread.  The

      // stack size retrieved from java is signed, but the constructor takes

      // size_t (an unsigned type), so avoid passing negative values which would

      // result in really large stacks.

      size_t sz = size > 0 ? (size_t) size : 0;

     //创建一个线程对象,注意这只是一个线程对象

      native_thread = new JavaThread(&thread_entry, sz);

      // `At this point it may be possible that no osthread was created for the

      // JavaThread due to lack of memory. Check for this situation and throw

      // an exception if necessary. Eventually we may want to change this so

      // that we only grab the lock if the thread was created successfully -

      // then we can also do this check and throw the exception in the

      // JavaThread constructor.`

      if (native_thread->osthread() != NULL) {

        // Note: the current thread is not being used within "prepare".

        native_thread->prepare(jthread);

      }

    }

  }

//这边基本都是在做线程可用检查

  if (throw_illegal_thread_state) {

    THROW(vmSymbols::java_lang_IllegalThreadStateException());

  }

  assert(native_thread != NULL, "Starting null thread?");

  if (native_thread->osthread() == NULL) {

    // No one should hold a reference to the 'native_thread'.

    //垃圾清理

    delete native_thread;

    if (JvmtiExport::should_post_resource_exhausted()) {

      JvmtiExport::post_resource_exhausted(

        JVMTI_RESOURCE_EXHAUSTED_OOM_ERROR | JVMTI_RESOURCE_EXHAUSTED_THREADS,

        "unable to create new native thread");

    }

    THROW_MSG(vmSymbols::java_lang_OutOfMemoryError(),

              "unable to create new native thread");

  }

//开始启动线程

  Thread::start(native_thread);

JVM_END
上面没什么看头,基本都是线程创建的准备工作,主要看创建和启动线程部分,首先看创建部分,在yhread.cpp中1558行,
JavaThread::JavaThread(ThreadFunction entry_point, size_t stack_sz) :

  Thread()

#if INCLUDE_ALL_GCS

  , _satb_mark_queue(&_satb_mark_queue_set),

  _dirty_card_queue(&_dirty_card_queue_set)

#endif // INCLUDE_ALL_GCS

{

  if (TraceThreadEvents) {

    tty->print_cr("creating thread %p", this);

  }

  initialize();

  _jni_attach_state = _not_attaching_via_jni;

  set_entry_point(entry_point);

  // Create the native thread itself.

  // %note runtime_23

  os::ThreadType thr_type = os::java_thread;

  thr_type = entry_point == &compiler_thread_entry ? os::compiler_thread :

                                                     os::java_thread;

  os::create_thread(this, thr_type, stack_sz);

  _safepoint_visible = false;

  // The _osthread may be NULL here because we ran out of memory (too many threads active).

  // We need to throw and OutOfMemoryError - however we cannot do this here because the caller

  // may hold a lock and all locks must be unlocked before throwing the exception (throwing

  // the exception consists of creating the exception object & initializing it, initialization

  // will leave the VM via a JavaCall and then all locks must be unlocked).

  //

  // The thread is still suspended when we reach here. Thread must be explicit started

  // by creator! Furthermore, the thread must also explicitly be added to the Threads list

  // by calling Threads:add. The reason why this is not done here, is because the thread

  // object must be fully initialized (take a look at JVM_Start)

}
继续跟创建部分,os::create_thread:
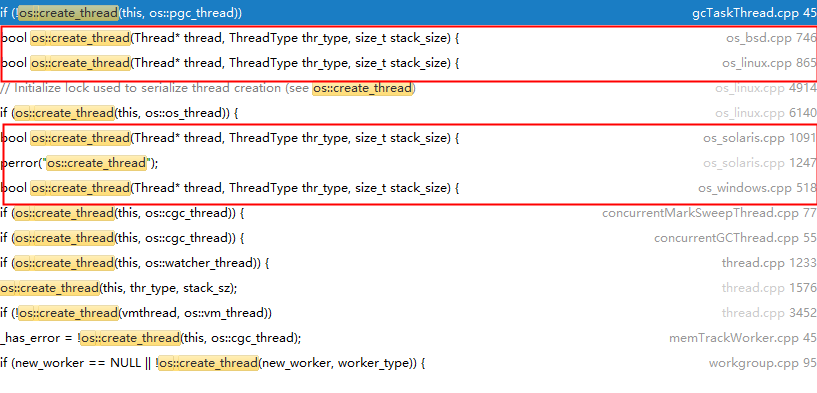
可以看到多个操作系统不同实现都有,我们看linux的实现:
bool os::create_thread(Thread* thread, ThreadType thr_type, size_t stack_size) {

  assert(thread->osthread() == NULL, "caller responsible");

  // Allocate the OSThread object

  OSThread* osthread = new OSThread(NULL, NULL);

  if (osthread == NULL) {

    return false;

  }

  // set the correct thread state

  osthread->set_thread_type(thr_type);

  // Initial state is ALLOCATED but not INITIALIZED

  osthread->set_state(ALLOCATED);

  thread->set_osthread(osthread);

  // init thread attributes

  pthread_attr_t attr;

  pthread_attr_init(&attr);

  pthread_attr_setdetachstate(&attr, PTHREAD_CREATE_DETACHED);

  // stack size

  if (os::Linux::supports_variable_stack_size()) {

    // calculate stack size if it's not specified by caller

    if (stack_size == 0) {

      stack_size = os::Linux::default_stack_size(thr_type);

      switch (thr_type) {

      case os::java_thread:

        // Java threads use ThreadStackSize which default value can be

        // changed with the flag -Xss

        assert (JavaThread::stack_size_at_create() > 0, "this should be set");

        stack_size = JavaThread::stack_size_at_create();

        break;

      case os::compiler_thread:

        if (CompilerThreadStackSize > 0) {

          stack_size = (size_t)(CompilerThreadStackSize * K);

          break;

        } // else fall through:

          // use VMThreadStackSize if CompilerThreadStackSize is not defined

      case os::vm_thread:

      case os::pgc_thread:

      case os::cgc_thread:

      case os::watcher_thread:

        if (VMThreadStackSize > 0) stack_size = (size_t)(VMThreadStackSize * K);

        break;

      }

    }

    stack_size = MAX2(stack_size, os::Linux::min_stack_allowed);

    pthread_attr_setstacksize(&attr, stack_size);

  } else {

    // let pthread_create() pick the default value.

  }

  // glibc guard page

  pthread_attr_setguardsize(&attr, os::Linux::default_guard_size(thr_type));

  ThreadState state;

  {

    // Serialize thread creation if we are running with fixed stack LinuxThreads

    bool lock = os::Linux::is_LinuxThreads() && !os::Linux::is_floating_stack();

    if (lock) {

      os::Linux::createThread_lock()->lock_without_safepoint_check();

    }

    pthread_t tid;
    //调用函数创建线程

    int ret = pthread_create(&tid, &attr, (void* (*)(void*)) java_start, thread);

    pthread_attr_destroy(&attr);

    if (ret != 0) {

      if (PrintMiscellaneous && (Verbose || WizardMode)) {

        perror("pthread_create()");

      }

      // Need to clean up stuff we've allocated so far

      thread->set_osthread(NULL);

      delete osthread;

      if (lock) os::Linux::createThread_lock()->unlock();

      return false;

    }

    // Store pthread info into the OSThread

    osthread->set_pthread_id(tid);

    // Wait until child thread is either initialized or aborted

    {

      Monitor* sync_with_child = osthread->startThread_lock();

      MutexLockerEx ml(sync_with_child, Mutex::_no_safepoint_check_flag);

      while ((state = osthread->get_state()) == ALLOCATED) {

        sync_with_child->wait(Mutex::_no_safepoint_check_flag);

      }

    }

    if (lock) {

      os::Linux::createThread_lock()->unlock();

    }

  }

  // Aborted due to thread limit being reached

  if (state == ZOMBIE) {

      thread->set_osthread(NULL);

      delete osthread;

      return false;

  }

  // The thread is returned suspended (in state INITIALIZED),

  // and is started higher up in the call chain

  assert(state == INITIALIZED, "race condition");

  return true;

}
这边其实主要就是调用pthread_create指令创建线程,主要看 int ret = pthread_create(&tid, &attr, (void* (*)(void*)) java_start, thread);
pthread_create函数一共4个参数,分别表示线程tid,属性,执行方法地址,thread, 我们主要看后面两个,thread是上面作为参数传进来的,我们再看上层:
JavaThread::JavaThread(ThreadFunction entry_point, size_t stack_sz) :

{

。。。。。。

os::create_thread(this, thr_type, stack_sz);

。。。。。

}
这个thread就是我们上面创建的一个javaThread对象,再看java_start调用,在这个类当中搜一下可以看到一个方法:
static void *java_start(Thread *thread) {

// call one more level start routine

  thread->run();

  return 0;

}
忽略调上面初始化,校验的一系列代码,我们可以看到调用thread的run方法,回到thread.cpp中:
void JavaThread::run() {

  // We call another function to do the rest so we are sure that the stack addresses used

  // from there will be lower than the stack base just computed

  thread_main_inner();

  // Note, thread is no longer valid at this point!

}
接着看thread_main_inner方法调用:
void JavaThread::thread_main_inner() {

  assert(JavaThread::current() == this, "sanity check");

  assert(this->threadObj() != NULL, "just checking");

  // Execute thread entry point unless this thread has a pending exception

  // or has been stopped before starting.

  // Note: Due to JVM_StopThread we can have pending exceptions already!

  if (!this->has_pending_exception() &&

      !java_lang_Thread::is_stillborn(this->threadObj())) {

    {

      ResourceMark rm(this);

      this->set_native_thread_name(this->get_thread_name());

    }

    HandleMark hm(this);

    this->entry_point()(this, this);

  }

  DTRACE_THREAD_PROBE(stop, this);

  this->exit(false);

  delete this;

}
其实是调用entry_point()(this, this)方法实现的,我们在回到创建javaThread的地方:
JavaThread::JavaThread(ThreadFunction entry_point, size_t stack_sz) :

{

。。。

  set_entry_point(entry_point);

。。。

}
看这一行代码其实就是设置entry_point的,那么这个entry_point又是从哪来的呢,再看jvm.cpp最开始调用的地方:
JVM_ENTRY(void, JVM_StartThread(JNIEnv* env, jobject jthread))

  JVMWrapper("JVM_StartThread");

  JavaThread *native_thread = NULL;

  // We cannot hold the Threads_lock when we throw an exception,

  // due to rank ordering issues. Example:  we might need to grab the

  // Heap_lock while we construct the exception.

  bool throw_illegal_thread_state = false;

  // We must release the Threads_lock before we can post a jvmti event

  // in Thread::start.

  {

。。。。。

native_thread = new JavaThread(&thread_entry, sz);

。。。。。。。。。

}
继续看jvm.cpp中的thread_entry函数:
static void thread_entry(JavaThread* thread, TRAPS) {

  HandleMark hm(THREAD);

  Handle obj(THREAD, thread->threadObj());

  JavaValue result(T_VOID);

  JavaCalls::call_virtual(&result,

                          obj,

                          KlassHandle(THREAD, SystemDictionary::Thread_klass()),

                          vmSymbols::run_method_name(),

                          vmSymbols::void_method_signature(),

                          THREAD);

}
这里其实就是JavaCalls::call_virtual去回调的java里面run方法的,Klass这个还是很熟悉的吧,对象头里的klass point ,我猜就是通过这个找到对象,再通过run_method_name找到对象中的方法。
到这里线程的初始化工作算是完成了,接下来看启动部分,
启动部分在thread.cpp451行:
void Thread::start(Thread* thread) {

  trace("start", thread);

  // Start is different from resume in that its safety is guaranteed by context or

  // being called from a Java method synchronized on the Thread object.

  if (!DisableStartThread) {

    if (thread->is_Java_thread()) {

      // Initialize the thread state to RUNNABLE before starting this thread.

      // Can not set it after the thread started because we do not know the

      // exact thread state at that time. It could be in MONITOR_WAIT or

      // in SLEEPING or some other state.

      java_lang_Thread::set_thread_status(((JavaThread*)thread)->threadObj(),

                                          java_lang_Thread::RUNNABLE);

    }

    os::start_thread(thread);

  }

}
这块主要是先将线程状态设置为就绪态,继续创建线程流程,看os.cpp859行:
void os::start_thread(Thread* thread) {

  // guard suspend/resume

  MutexLockerEx ml(thread->SR_lock(), Mutex::_no_safepoint_check_flag);

  OSThread* osthread = thread->osthread();

  osthread->set_state(RUNNABLE);

  pd_start_thread(thread);

}
拿到一个osThread,并将状态设置为就绪态,就绪态以后就可以被调度系统选中调用了,可以说这里线程就已经启动了,啥时候执行那就是操作系统内核调度的啥时候能选到了。
既然聊到调度了,就在简单说两句线程优先级吧,相信大家都听过一句话,java的线程优先级不一定有用,linux采用的是CFS调度,会根据计算虚拟运行时间分配优先级或者其他实时调度也会影响到优先级(这里太具体的调度算法我就不太清楚了),linux中线程的优先级确实是影响线程执行先后的,而java线程和linux内核线程明显是1:1模型的,按道理不是应该一样的吗,但是其实只映射了-5到4这段区间,对于linux上百个级别的优先级划分,确实没办法起决定性因素,为了证明这一点,我们还是过一下源码:
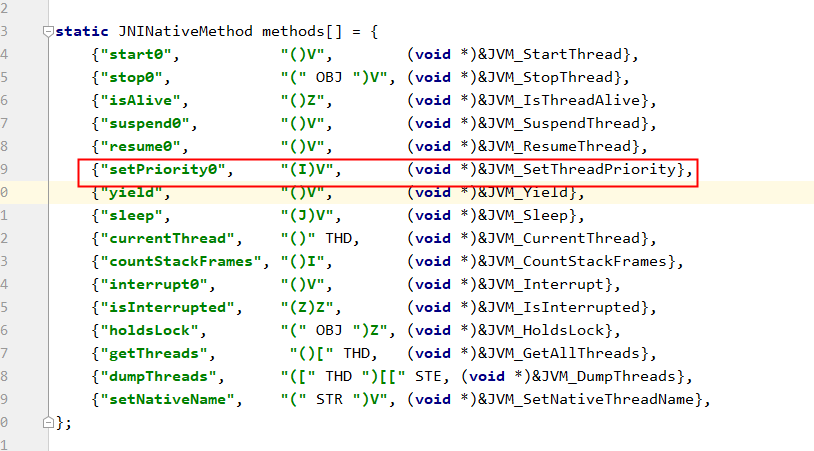
1.首先还是在上图这里找映射关系
JVM_ENTRY(void, JVM_SetThreadPriority(JNIEnv* env, jobject jthread, jint prio))

  JVMWrapper("JVM_SetThreadPriority");

  // Ensure that the C++ Thread and OSThread structures aren't freed before we operate

  MutexLocker ml(Threads_lock);

  oop java_thread = JNIHandles::resolve_non_null(jthread);

  java_lang_Thread::set_priority(java_thread, (ThreadPriority)prio);

  JavaThread* thr = java_lang_Thread::thread(java_thread);

  if (thr != NULL) {                  // Thread not yet started; priority pushed down when it is

    Thread::set_priority(thr, (ThreadPriority)prio);

  }

JVM_END
2.接着在jvm.cpp中找到对应实现,如上
void Thread::set_priority(Thread* thread, ThreadPriority priority) {

  trace("set priority", thread);

  debug_only(check_for_dangling_thread_pointer(thread);)

  // Can return an error!

  (void)os::set_priority(thread, priority);

}
3.thread.cpp这里面找到set_priority方法
OSReturn os::set_priority(Thread* thread, ThreadPriority p) {

#ifdef ASSERT

  if (!(!thread->is_Java_thread() ||

         Thread::current() == thread  ||

         Threads_lock->owned_by_self()

         || thread->is_Compiler_thread()

        )) {

    assert(false, "possibility of dangling Thread pointer");

  }

#endif

  if (p >= MinPriority && p <= MaxPriority) {

    int priority = java_to_os_priority[p];

    return set_native_priority(thread, priority);

  } else {

    assert(false, "Should not happen");

    return OS_ERR;

  }

}
4.os.cpp找到set_priority方法,关键看标红这一行
int os::java_to_os_priority[CriticalPriority + 1] = {

  19,              // 0 Entry should never be used

   4,              // 1 MinPriority

   3,              // 2

   2,              // 3

   1,              // 4

   0,              // 5 NormPriority

  -1,              // 6

  -2,              // 7

  -3,              // 8

  -4,              // 9 NearMaxPriority

  -5,              // 10 MaxPriority

  -5               // 11 CriticalPriority

};
5.找到linux中的实现,是不是有种恍然大悟的赶脚。
总结:
介绍到这里基本线程这个概念算是理清楚了,linux当中,至少到现在为止,其实所谓的线程本质上来说还是一个轻量级的进程,在jvm中线程的实现也是和os一一对应的,所以网上很多帖子说java线程是内核线程还是用户线程讨论了很多都是没有任何意义的,java作为一门跨平台的语言,他的基础就是jvm对不同操作系统都做了不同实现,所以说你问java到底是什么线程,java会告诉你:我也不知道,我听os的。
对于线程还有很多方法都没有说,一篇肯定是说不完的,之前准备系统写spring源码,准备写过jvm基础,最后都被加班给打败了,毕竟还是以学习为主,分享作为总结的一个手段吧,反正还是不要过于相信网上的博客,像R大这些大牛还行,像我们这些总结学习经验的只能说提供一些思路。后面有时间就写一点平时学习到的觉得有意思的东西,我不能保证正确,但是至少是有着自己的思考在里面。
还有要注意的点就是比如说上面线程jvm实现源码我是分两块介绍的,创建和启动,创建的时候把线程参数和需要回调的方法都设置好了,作为java程序员来说,很多可能觉得javaCall或者很多方法调用,但其实这里只是做了绑定,根本还没有执行,只有后面介绍到将线程状态设置为RUNNABLE时,调度系统调用到,才会真的执行,这块可能不太好理解,但是确实也是理解线程比较重要的部分 ---> 线程是被调度的,而不是主动执行的。
.tb_button { padding: 1px; cursor: pointer; border-right: 1px solid rgba(139, 139, 139, 1); border-left: 1px solid rgba(255, 255, 255, 1); border-bottom: 1px solid rgba(255, 255, 255, 1) }
.tb_button.hover { borer: 2px outset #def; background-color: rgba(248, 248, 248, 1) !important }
.ws_toolbar { z-index: 100000 }
.ws_toolbar .ws_tb_btn { cursor: pointer; border: 1px solid rgba(85, 85, 85, 1); padding: 3px }
.tb_highlight { background-color: rgba(255, 255, 0, 1) }
.tb_hide { visibility: hidden }
.ws_toolbar img { padding: 2px; margin: 0 }
浅谈java中线程和操作系统线程的更多相关文章
- 浅谈Java中的equals和==(转)
浅谈Java中的equals和== 在初学Java时,可能会经常碰到下面的代码: 1 String str1 = new String("hello"); 2 String str ...
- 浅谈Java中的对象和引用
浅谈Java中的对象和对象引用 在Java中,有一组名词经常一起出现,它们就是“对象和对象引用”,很多朋友在初学Java的时候可能经常会混淆这2个概念,觉得它们是一回事,事实上则不然.今天我们就来一起 ...
- 浅谈Java中的equals和==
浅谈Java中的equals和== 在初学Java时,可能会经常碰到下面的代码: String str1 = new String("hello"); String str2 = ...
- 浅谈Java中的深拷贝和浅拷贝(转载)
浅谈Java中的深拷贝和浅拷贝(转载) 原文链接: http://blog.csdn.net/tounaobun/article/details/8491392 假如说你想复制一个简单变量.很简单: ...
- 浅谈Java中的深拷贝和浅拷贝
转载: 浅谈Java中的深拷贝和浅拷贝 假如说你想复制一个简单变量.很简单: int apples = 5; int pears = apples; 不仅仅是int类型,其它七种原始数据类型(bool ...
- 【转】浅谈Java中的hashcode方法(这个demo可以多看看)
浅谈Java中的hashcode方法 哈希表这个数据结构想必大多数人都不陌生,而且在很多地方都会利用到hash表来提高查找效率.在Java的Object类中有一个方法: public native i ...
- 浅谈Java中的final关键字
浅谈Java中的final关键字 谈到final关键字,想必很多人都不陌生,在使用匿名内部类的时候可能会经常用到final关键字.另外,Java中的String类就是一个final类,那么今天我们就来 ...
- 【转】浅谈Java中的hashcode方法
哈希表这个数据结构想必大多数人都不陌生,而且在很多地方都会利用到hash表来提高查找效率.在Java的Object类中有一个方法: public native int hashCode(); 根据这个 ...
- 浅谈Java中的栈和堆
人们常说堆栈堆栈,堆和栈是内存中两处不一样的地方,什么样的数据存在栈,又是什么样的数据存在堆中? 这里浅谈Java中的栈和堆 首先,将结论写在前面,后面再用例子加以验证. Java的栈中存储以下类型数 ...
- 浅谈Java中的hashcode方法(转)
原文链接:http://www.cnblogs.com/dolphin0520/p/3681042.html 浅谈Java中的hashcode方法 哈希表这个数据结构想必大多数人都不陌生,而且在很多地 ...
随机推荐
- Dotnet Core多版本API共存的优雅实现
API升级,新旧版本的API共存,怎么管理呢? 一.前言 最近,单位APP做了升级,同步的,API也做了升级. 升级过程中,出现了一点问题:API升级后,旧API也需要保留,因为有旧的APP还在使 ...
- 微博爬虫,python微博用户主页小姐姐图片内容采集爬虫
python爬虫,微博爬虫,需要知晓微博用户id号,能够通过抓取微博用户主页内容来获取用户发表的内容,时间,点赞数,转发数等数据,当然以上都是本渣渣结合网上代码抄抄改改获取的! 要抓取的微博地址:ht ...
- 干货满满,32个常用 Python 实现,你学废了嘛!
1. 冒泡排序 lis = [56,12,1,8,354,10,100,34,56,7,23,456,234,-58] def sortport(): for i in range(len(lis)- ...
- EF5中使用UnitOfWork
前言 每次提交数据库都会打开一个连接,造成结果是:多个连接无法共用一个数据库级别的事务,也就无法保证数据的原子性.一致性. 解决办法是:在ObjectContext的CRUD操作基础上再包装一层,提供 ...
- 【升级版】如何使用阿里云云解析API实现动态域名解析,搭建私有服务器【含可执行文件和源码】
原文地址:http://www.yxxrui.cn/article/179.shtml 未经许可请勿转载,如有疑问,请联系作者:yxxrui@163.com 我遇到的问题:公司的网络没有固定的公网IP ...
- sql server 汉字转拼音首字母
create function fun_getPY ( @str nvarchar(4000) ) returns nvarchar(4000) as begin declare @word ncha ...
- 在项目中随手把haseMap改成了currenHaseMap差点被公司给开除了。
前言 在项目中随手把haseMap改成了currenHaseMap差点被公司给开除了. 判断相等 字符串判断相等 String str1 = null; String str2 = "jav ...
- [Machine Learning] 多变量线性回归(Linear Regression with Multiple Variable)-特征缩放-正规方程
我们从上一篇博客中知道了关于单变量线性回归的相关问题,例如:什么是回归,什么是代价函数,什么是梯度下降法. 本节我们讲一下多变量线性回归.依然拿房价来举例,现在我们对房价模型增加更多的特征,例如房间数 ...
- lambda表达式之方法引用
/** * 方法引用提供了非常有用的语法,可以直接引用已有Java类或对象(实例)的方法或构造器.<br> * 与lambda联合使用,方法引用可以使语言的构造更紧凑简洁,减少冗余代码. ...
- 效率工具 | 快速创建虚拟机,Vagrant真香!
Vagrant 是一个基于Ruby的工具,主要用于创建和部署虚拟化开发环境.它以来于Oracle的开源VirtualBox虚拟化系统,通过使用 Chef创建自动化虚拟环境. Vagrant 主要的功能 ...