Android 自定义View (三)
一、前言
上节 讲解了旋转圆环基本的实现方法。本文将在此基础上进一步改进,在属性文件中自定义控件属性,避免代码中显式调用setXXX() 方法。
二、流程
首先,在资源文件 values 中新建一个 attr.xml,其中定义了我们即将使用的几个旋转环的属性,如下所示
<?xml version="1.0" encoding="utf-8"?>

<resources>

    <declare-styleable name="RotatingRing">

        <attr name="width" format="integer"/>

        <attr name="radius" format="integer"/>

        <attr name="start_angle" format="integer"/>

        <attr name="sweep_angle" format="integer"/>

        <attr name="start_color" format="color"/>

        <attr name="end_color" format="color"/>

        <attr name="color" format="color"/>

        <attr name="duration" format="integer"/>

    </declare-styleable>

</resources>
在 RotatingRing 类中,添加第三个构造函数 (含3个参数的),如下所示
public RotatingRing(Context context, @Nullable AttributeSet attrs, int defStyleAttr) {

        super(context, attrs, defStyleAttr);

    }
根据属性清单获取属性值
public RotatingRing(Context context, @Nullable AttributeSet attrs, int defStyleAttr) {

        super(context, attrs, defStyleAttr);

        TypedArray typedArray = context.obtainStyledAttributes(attrs, R.styleable.RotatingRing);

        radius = typedArray.getInt(R.styleable.RotatingRing_radius, 100);

        width = typedArray.getInt(R.styleable.RotatingRing_width, 20);

        startAngle = typedArray.getInt(R.styleable.RotatingRing_start_angle, 0);

        sweepAngle = typedArray.getInt(R.styleable.RotatingRing_sweep_angle, 270);

        startColor = typedArray.getColor(R.styleable.RotatingRing_start_color, Color.WHITE);

        endColor = typedArray.getColor(R.styleable.RotatingRing_end_color, typedArray.getColor(R.styleable.RotatingRing_color, Color.BLUE));

        duration = typedArray.getColor(R.styleable.RotatingRing_duration, 1000);

        typedArray.recycle();

    }
由上所述,默认值可以被第三个构造函数所定义,故可以去除第一个构造函数里定义的的默认值,改进后的构造函数如下所示
public RotatingRing(Context context) {

        this(context, null);

    }

    public RotatingRing(Context context, @Nullable AttributeSet attrs) {

        this(context, attrs, 0);

    }

    public RotatingRing(Context context, @Nullable AttributeSet attrs, int defStyleAttr) {

        super(context, attrs, defStyleAttr);

        TypedArray typedArray = context.obtainStyledAttributes(attrs, R.styleable.RotatingRing);

        radius = typedArray.getInt(R.styleable.RotatingRing_radius, 100);

        width = typedArray.getInt(R.styleable.RotatingRing_width, 20);

        startAngle = typedArray.getInt(R.styleable.RotatingRing_start_angle, 0);

        sweepAngle = typedArray.getInt(R.styleable.RotatingRing_sweep_angle, 270);

        startColor = typedArray.getColor(R.styleable.RotatingRing_start_color, Color.WHITE);

        endColor = typedArray.getColor(R.styleable.RotatingRing_end_color, typedArray.getColor(R.styleable.RotatingRing_color, Color.BLUE));

        duration = typedArray.getColor(R.styleable.RotatingRing_duration, 1000);

        typedArray.recycle();

    }
到此,可以去除 MainActivity 中的 RotatingRing.setXXX()方法,而在 activity_main.xml 里定义属性
<?xml version="1.0" encoding="utf-8"?>

<androidx.constraintlayout.widget.ConstraintLayout xmlns:android="http://schemas.android.com/apk/res/android"

    xmlns:app="http://schemas.android.com/apk/res-auto"

    xmlns:tools="http://schemas.android.com/tools"

    android:layout_width="match_parent"

    android:layout_height="match_parent"

    tools:context=".MainActivity">

    <draw.bitmap.canvas.RotatingRing

        android:id="@+id/rotating_ring"

        android:layout_width="400dp"

        android:layout_height="400dp"

        app:width="30"

        app:radius="150"

        app:start_angle="0"

        app:sweep_angle="270"

        app:duration="1500"

        app:start_color="@color/colorWhite"

        app:end_color="@color/colorRed"

        app:layout_constraintBottom_toBottomOf="parent"

        app:layout_constraintLeft_toLeftOf="parent"

        app:layout_constraintRight_toRightOf="parent"

        app:layout_constraintTop_toTopOf="parent" />

</androidx.constraintlayout.widget.ConstraintLayout>
其中‘app’为原布局文件里定义好的命名空间,这里我直接拿来用了,也可以自己定义命名空间,只须在布局文件头加上
xmlns:命名空间="http://schemas.android.com/apk/res-auto"
这里我为区分定义了一个红色的圆环,而其他参数与原先 MainActivity 里setXXX() 方法里的参数一致,修改后的代码为
import android.os.Bundle;

import androidx.appcompat.app.AppCompatActivity;

public class MainActivity extends AppCompatActivity {

    RotatingRing rotatingRing;

    @Override

    protected void onCreate(Bundle savedInstanceState) {

        super.onCreate(savedInstanceState);

        setContentView(R.layout.activity_main);

        rotatingRing = findViewById(R.id.rotating_ring);

        rotatingRing.startAnim();

    }

}
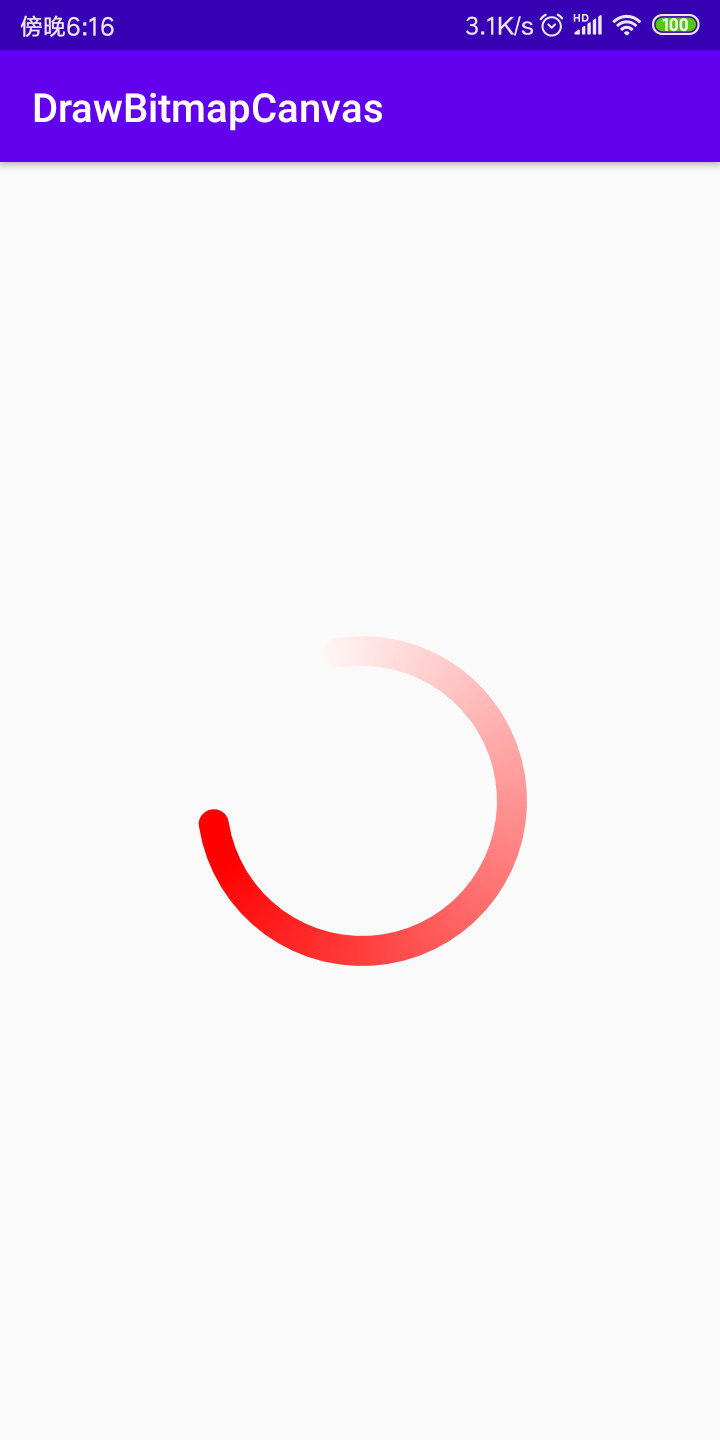
运行效果
到此已经初步掌握了自定义view的一些必要性质,下一节将深入了解一些高级属性以及绘制相关源码等。
Android 自定义View (三)的更多相关文章
- Android 自定义View (三) 圆环交替 等待效果
转载请标明出处:http://blog.csdn.net/lmj623565791/article/details/24500107 一个朋友今天有这么个需求(下图),我觉得那自定义View来做还是很 ...
- Android 自定义 view(三)—— onDraw 方法理解
前言: 上一篇已经介绍了用自己定义的属性怎么简单定义一个view<Android 自定义view(二) -- attr 使用>,那么接下来我们继续深究自定义view,下一步将要去简单理解自 ...
- Android 自定义View及其在布局文件中的使用示例(三):结合Android 4.4.2_r1源码分析onMeasure过程
转载请注明出处 http://www.cnblogs.com/crashmaker/p/3549365.html From crash_coder linguowu linguowu0622@gami ...
- Android自定义View(三、深入解析控件测量onMeasure)
转载请标明出处: http://blog.csdn.net/xmxkf/article/details/51490283 本文出自:[openXu的博客] 目录: onMeasure什么时候会被调用 ...
- 【朝花夕拾】Android自定义View篇之(四)自定义View的三种实现方式及自定义属性使用介绍
前言 转载请声明,转自[https://www.cnblogs.com/andy-songwei/p/10979161.html],谢谢! 尽管Android系统提供了不少控件,但是有很多酷炫效果仍然 ...
- Android自定义View 画弧形,文字,并增加动画效果
一个简单的Android自定义View的demo,画弧形,文字,开启一个多线程更新ui界面,在子线程更新ui是不允许的,但是View提供了方法,让我们来了解下吧. 1.封装一个抽象的View类 B ...
- Android 自定义View合集
自定义控件学习 https://github.com/GcsSloop/AndroidNote/tree/master/CustomView 小良自定义控件合集 https://github.com/ ...
- Android 自定义View (五)——实践
前言: 前面已经介绍了<Android 自定义 view(四)-- onMeasure 方法理解>,那么这次我们就来小实践下吧 任务: 公司现有两个任务需要我完成 (1)监测液化天然气液压 ...
- Android 自定义 view(四)—— onMeasure 方法理解
前言: 前面我们已经学过<Android 自定义 view(三)-- onDraw 方法理解>,那么接下我们还需要继续去理解自定义view里面的onMeasure 方法 推荐文章: htt ...
- Android 自定义view(二) —— attr 使用
前言: attr 在前一篇文章<Android 自定义view -- attr理解>已经简单的进行了介绍和创建,那么这篇文章就来一步步说说attr的简单使用吧 自定义view简单实现步骤 ...
随机推荐
- NC16644【字符串的展开】
正确代码: #include <iostream>#include <algorithm>using namespace std;bool IsSame(char a, cha ...
- 网络很慢mtu设置
[root@db-***** etc]# cat /etc/rc.local #!/bin/sh # # This script will be executed *after* all the ot ...
- 【STM32】电能表抄表功能实现|自学笔记
一.抄表的原理 抄表就是读电能表的测量参数,一般有电能,电压,电流,实时功率,功率因数等,用单板抄表其实就是读电能表种相应寄存器中的值.智能电表目前主流协议有DLT645国标各家通用,MODBUS各家 ...
- 3.Linux安装docker
Docker作为一个软件集装箱化平台,可以让开发者构建应用程序时,将它与其依赖环境一起打包到一个容器中,然后很容易地发布和应用到任意平台中. 进入docker官网找到安装文档 https://docs ...
- 实践:基于腾讯云播放器SDK,带您体验播放多场景下的 COS 视频文件
一. 实践步骤 1. 准备您的 腾讯云COS 视频文件链接,您需要: 1.1 创建一个存储桶: 1.2 上传对象: 1.3 在对象信息详情里复制对象地址: 注意: 目前腾讯云有COS特惠活动,新人1元 ...
- hive支持的压缩算法
压缩格式的设置 set mapred.output.compression= 压缩格式 工具 算法 扩展名 是否支持分割 Hadoop编码/解码器 default deflate .deflate N ...
- 杭电oj 求数列的和
Problem Description 数列的定义如下:数列的第一项为n,以后各项为前一项的平方根,求数列的前m项的和. Input 输入数据有多组,每组占一行,由两个整数n(n<10000 ...
- swoole的使用场景
一.TCP服务器 二.UDP服务器 三.HTTP服务器 四.WebSocket服务器 五.物联网服务器 六.执行异步任务 七.协程
- PostScript语言教程(七、条件语句)
POSTSCRIPT语言中有许多操作符用于制定程序内流的控制.我们在前一章使用了一个repeat运算.所有的控制操作符都使用了之前简要提到的对象类型,即函数,用于我们调用. 7.1.函数 函数(既过程 ...
- 解决通过Eclipse启动Tomcat-Run On Server无法选择Tomcat v7.0的问题
在eclipse中配置Tomcat并启动右键项目 -> Run As -> Run on Server可能会出现无法选择Tomcat v7.0的现象如下图,不慌菜鸟小编带你解决!1.定位到 ...