
怎么样快速完整备份和压缩 很大的 sqlserver 1TB 数据库 -摘自网络
How to increase SQL Database Full Backup speed using compression and Solid State Disks
The SQL 2008 Database backup compression feature (which was introduced as a SQL2008 Enterprise Edition only feature) will become available in the SQL2008 R2 Standard Edition also (SQL 2008 R2 Editions). I’m using the compression feature for quite some time now and really love it; it saves significant amounts of disk space and increases the backup throughput. And when such a great feature is available I would recommend you to use it! In the following walk through I will show you some simple tricks to speed up the backup throughput.
How fast can we run a Full Backup on a single database with a couple of billion rows of data, occupying a couple hundred Gigabytes of disk space, spread across multiple Filegroups?
Of course your server will use some extra CPU cycles to compress the data on the fly and will use the maximum available IO bandwidth. For that purpose I tested on some serious hardware with plenty of both: a 96 core Unisys ES7000 model 7600R with 2 DSI Solid State Disk units who deliver a total of 6+ GB/sec IO throughput.
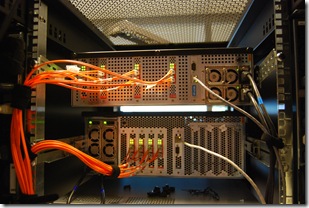
Getting started with Database Backup Compression
Database backup compression is disabled by default and it can be enabled through the SSMS GUI or by adding the word “COMPRESSION” to a T-SQL backup query.
Through SSMS, when you -right click- the database which you would like to backup, under –Tasks- , -Back Up…-, -Options-, at the bottom , you will find the Compression feature. (see pictures)
After you have selected the “Compress Backup” option, click the –Script- Option to generate the TSQL statement. Please note that the word COMPRESSION is all you need to enable the feature from your backup query statement.
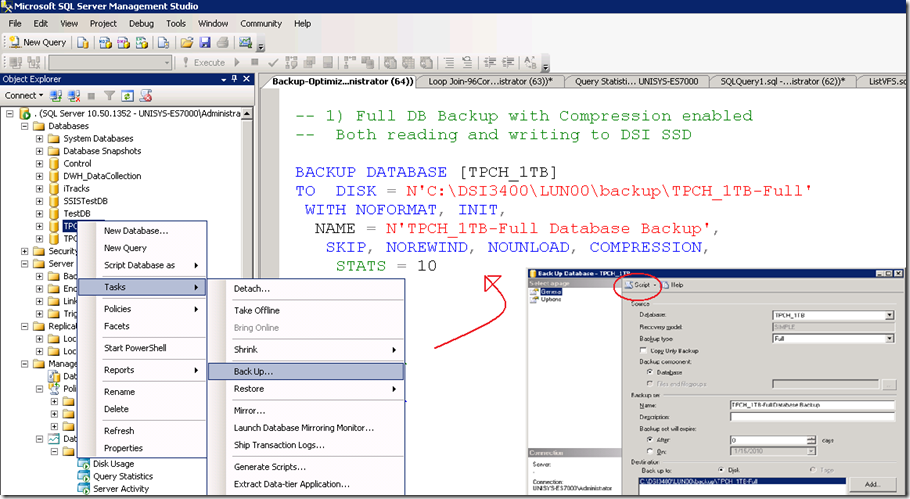
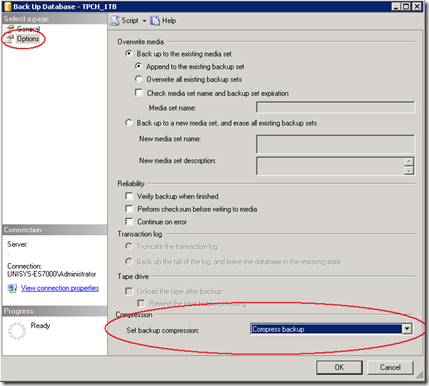
To enable backup compression feature for all your databases as the default option, change the default with the following sp_configure command:
GO
EXEC sp_configure backup compression default, '1';
RECONFIGURE WITH OVERRIDE
Step1 : Measure the “Out of the box” throughput
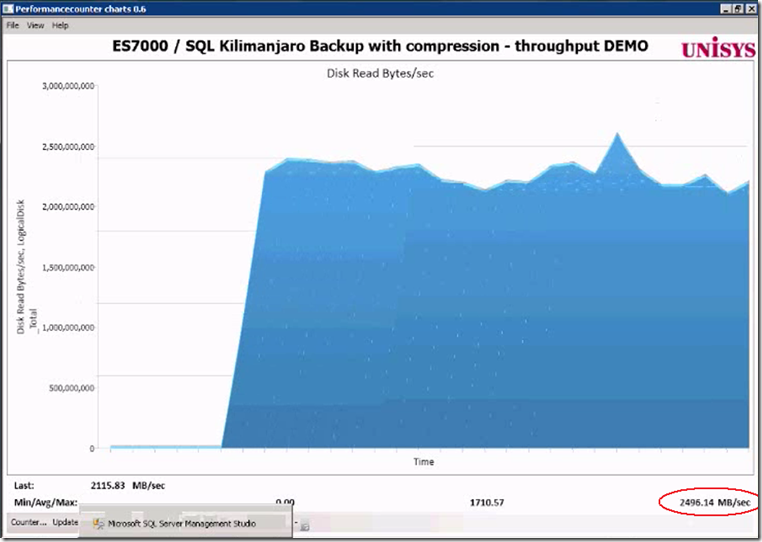
By running the above query, as a result, more than 1400 MByte/sec is read on average from both the DSI Solid State disks. That’s like reading all data from 2 full cd-rom’s each second. Not bad!
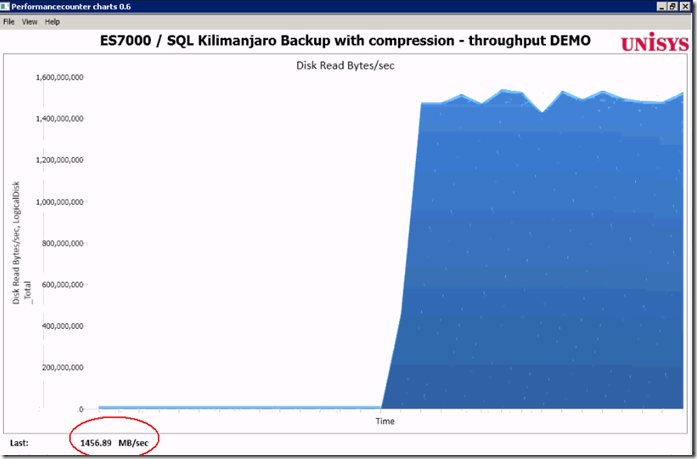
Waitstats
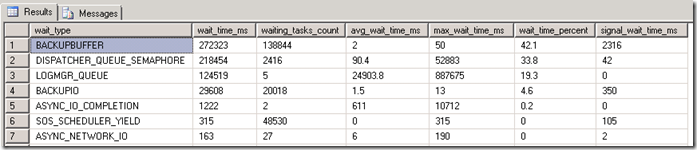
The SQL Waitstats show that the number 1 wait_type is BACKUPBUFFER.
The MSDN explanation for the BACKUPBUFFER wait_type is interesting: “the backup task is waiting for data or is waiting for a buffer in which to store data. This type is not typical, except when a task is waiting for a tape mount”. ehhh ok… since we are not using tapes , it means that this is not typical ! Let’s see what we can find out about the buffers.
Traceflag
To get more insights in the backup settings there are 2 interesting traceflags. With these traceflags enabled the actual backup parameters are logged into the SQL “Errorlog “.
DBCC TRACEON (3213, –1)
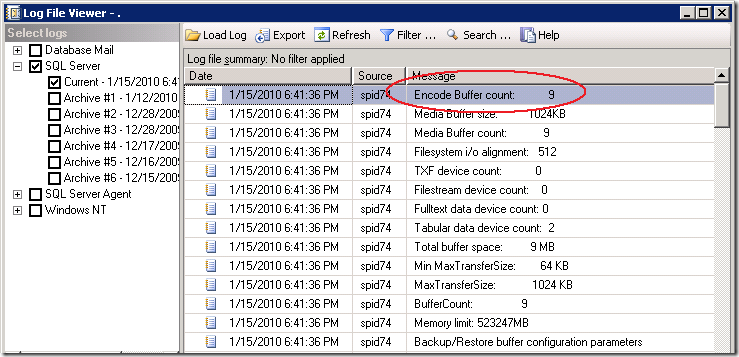
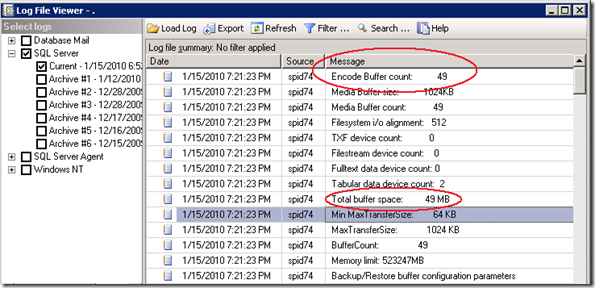
The Errorlog show that our backup was using 9 Buffers and allocated 9 Megabyte of buffer space.
9 MByte seems a relative low value to me to queue up all the destination backup file data and smells like an area where we can get some improvement, (especially since we have we have 16 x 4Gbit fiber cables and 6+ GigaByte/sec of IO bandwidth waiting to get saturated ;-) ).
Step2: Increase throughput by adding more destination files
A feature that not many people know is the option to specify multiple file destinations to increase the throughput:
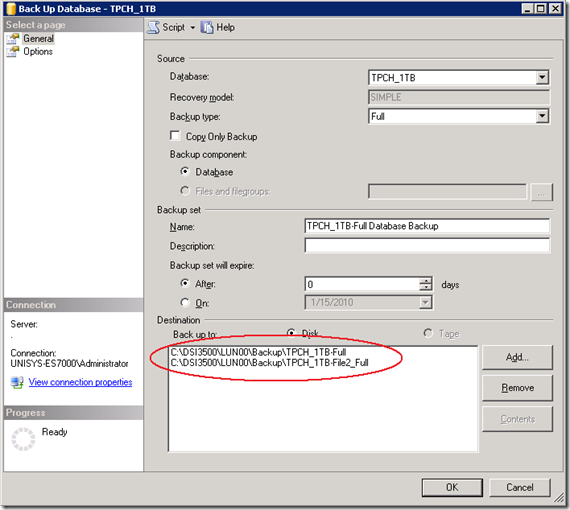
To add multiple Backup destination files in the query, add them like this:
DBCC TRACEON (3605, –1)
DBCC TRACEON (3213, –1)
BACKUP DATABASE [TPCH_1TB]
TO
DISK = N'C:\DSI3400\LUN00\backup\TPCH_1TB-Full',
DISK = N'C:\DSI3500\LUN00\backup\File2',
DISK = N'C:\DSI3500\LUN00\backup\File3',
DISK = N'C:\DSI3500\LUN00\backup\File4',
DISK = N'C:\DSI3500\LUN00\backup\File5',
DISK = N'C:\DSI3400\LUN00\backup\File6',
DISK = N'C:\DSI3500\LUN00\backup\File7',
DISK = N'C:\DSI3500\LUN00\backup\File8',
DISK = N'C:\DSI3500\LUN00\backup\File9'
WITH NOFORMAT, INIT,NAME = N'TPCH_1TB-Full Database Backup',
SKIP, NOREWIND, NOUNLOAD, COMPRESSION, STATS = 10
DBCC TRACEOFF(3605, –1)
DBCC TRACEOFF(3213, –1)
Result of adding 8 more destination files: the throughput increases from 1.4 GB/sec up to 2.2- 2.4 GB/sec.
That’s a quick win to remember!
The SQL Errrorlog with the buffer configuration parameters shows that extra buffers are added automatically.
Step3 : Set Backup parameters options
The Backup/Restore buffer configuration parameters show some interesting parameters and values!
Time to start reading the ehh documentation! When you highlight the word ‘Backup’ and you hit <Shift-F1> you can read more on the topic; there are 2 Data Transfer Options listed :
BUFFERCOUNT and MAXTRANSFERSIZE.
BUFFERCOUNT : specifies the total number of I/O buffers to be used for the backup operation.
The total space that will be used by the buffers is determined by: buffercount * maxtransfersize.
The output shows this is correct; with 49 buffers * 1024 KB = 49 MB total buffer space is in use.
MAXTRANSFERSIZE : specifies the largest unit of transfer in bytes to be used between SQL Server and the backup media.
The possible values are multiples of 64 KB ranging up to 4194304 bytes (4 MB). The default is 1 MB.
a 3rd option is listed under the section Media Set Options:
BLOCKSIZE : specifies the physical block size, in bytes. The supported sizes are 512, 1024, 2048, 4096, 8192, 16384, 32768, and 65536 (64 KB) bytes.The default is 65536 for tape devices and 512 otherwise.
Trial and Measure approach
By using the famous “Trial and Measure” approach, I found that the selecting the maximum value for Blocksize (65535) and doubling the MAXTRANSFERSIZE to (2097152) works best. also a BUFFERCOUNT of 2200 , allocating a buffer of 4400 MB total works best to get the maximum throughput;
DBCC TRACEON (3605, –1)
DBCC TRACEON (3213, –1)
BACKUP DATABASE [TPCH_1TB]TO
DISK = N'C:\DSI3400\LUN00\backup\TPCH_1TB-Full',
DISK = N'C:\DSI3500\LUN00\backup\File2',
DISK = N'C:\DSI3500\LUN00\backup\File3',
DISK = N'C:\DSI3500\LUN00\backup\File4',
DISK = N'C:\DSI3500\LUN00\backup\File5',
DISK = N'C:\DSI3400\LUN00\backup\File6',
DISK = N'C:\DSI3500\LUN00\backup\File7',
DISK = N'C:\DSI3500\LUN00\backup\File8',
DISK = N'C:\DSI3500\LUN00\backup\File9'
WITH NOFORMAT, INIT,NAME = N'TPCH_1TB-Full Database Backup',
SKIP, NOREWIND, NOUNLOAD, COMPRESSION,STATS = 10
— Magic:
,BUFFERCOUNT = 2200
,BLOCKSIZE = 65536
,MAXTRANSFERSIZE=2097152
GO
DBCC TRACEOFF(3605, –1)
DBCC TRACEOFF(3213, –1)
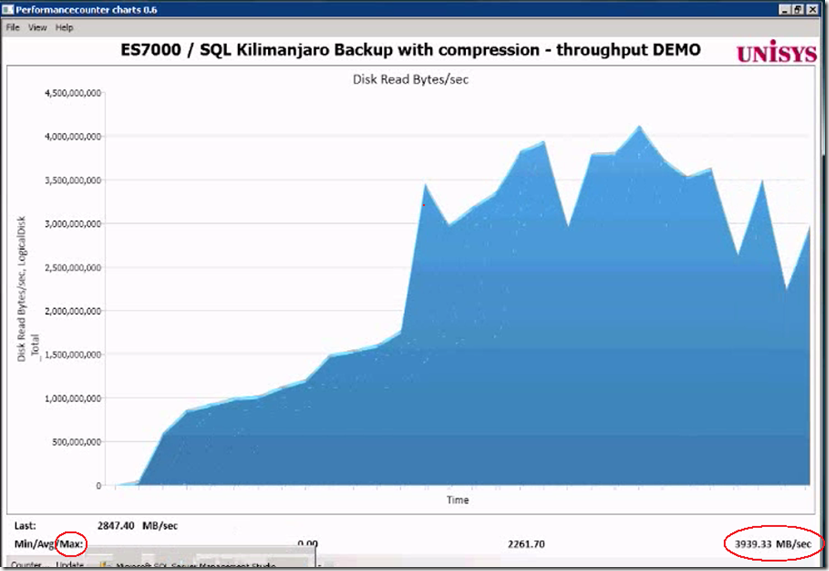
Result: the average throughput is more then doubled, and the maximum peak throughput is up to 3939 MB/sec !
BLOCKSIZE
An interesting observation is that I was more less expecting to see that by changing theBLOCKSIZE would also show up in the log, but it doesn’t .
Also the “Filesystem I/O alignment” value remained the same:
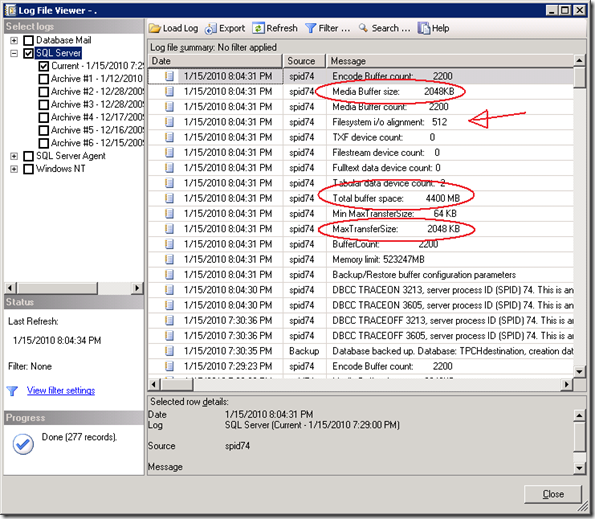
By coincidence, (I forgot to delete the backup files when adding some more destination files,) I found out that the blocksize value does make a change by looking at the error message:
Cannot use the backup file 'C:\DSI3500\LUN00\dummy-FULL_backup_TPCH_1TB_2' because
it was originally formatted with sector size 65536
and is now on a device with sector size 512.
Msg 3013, Level 16, State 1, Line 4
BACKUP DATABASE is terminating abnormally.
By specifying a large 64KB sector size instead of the default 512 bytes typically shows an 5-6% improvement in backup throughput.
BACKUP to DISK = ‘NUL’
To estimate and check how fast you can read the data from a database or Filegroup there is a special option you can use to backup to: DISK = ‘NUL’. You only need 1 of those !
FILEGROUP = 'SSD3500_0',
FILEGROUP = 'SSD3500_1'
TO DISK = 'NUL'
WITH COMPRESSION
, NOFORMAT, INIT, SKIP, NOREWIND, NOUNLOAD
, BUFFERCOUNT = 2200
, BLOCKSIZE = 65536
, MAXTRANSFERSIZE=2097152
Wrap-Up
Backup compression is a great feature to use. It will save you disk capacity and reduce the time needed to backup your data. SQL can leverage the IO bandwidth of Solid State storage well but to achieve maximum throughput you need to do some tuning. By adding multiple backup destination files and specifying the BUFFERCOUNT, BLOCKSIZE and MAXTRANSFERSIZE parameters you can typically double the backup throughput, which means reducing the backup time-taken by half!
怎么样快速完整备份和压缩 很大的 sqlserver 1TB 数据库 -摘自网络的更多相关文章
- MariaDB之基于Percona Xtrabackup备份大数据库[完整备份与增量备份]
MariaDB之基于Percona Xtrabackup备份大数据库[完整备份与增量备份] 1.Xtrabackup的安装 percona-xtrabackup-2.2.3-4982.el6.x86_ ...
- Percona Xtrabackup备份mysql大数据库(完整备份与增量备份)
Percona Xtrabackup备份mysql大数据库(完整备份与增量备份) 文章目录 [隐藏] Xtrabackup简介 Xtrabackup安装 Xtrabackup工具介绍 inno ...
- Percona Xtrabackup备份mysql全库及指定数据库(完整备份与增量备份)
原文地址:http://www.tuicool.com/articles/RZRnq2 Xtrabackup简介 Percona XtraBackup是开源免费的MySQL数据库热备份软件,它能对In ...
- postgresql-定时备份,压缩备份
crontab -e 在最后添加: # backup database at 22:00 every day 0 22 * * * thunisoft /home/eric/bin/backup-db ...
- Percona备份mysql全库及指定数据库(完整备份与增量备份)
Percona Xtrabackup备份mysql全库及指定数据库(完整备份与增量备份) Xtrabackup简介 Percona XtraBackup是开源免费的MySQL数据库热备份软件,它能对I ...
- 快速幂取模(当数很大时,相乘long long也会超出的解决办法)
当几个数连续乘最后取模时,可以将每个数字先取模,最后再取模,即%对于*具有结合律.但是如果当用来取模的数本身就很大,采取上述方法就不行了.这个时候可以借鉴快速幂取模的方法,来达到大数相乘取模的效果. ...
- Linux完整备份工具 - dump, restore(现在基本不用这两个)
dump 其实 dump 的功能颇强,他除了可以备份整个文件系统之外,还可以制定等级喔!什么意思啊! 假设你的 /home 是独立的一个文件系统,那你第一次进行过 dump 后,再进行第二次 dump ...
- 阿里云 如何减少备份使用量? mysql数据库的完整备份、差异备份、增量备份
RDS for MySQL备份.SQL审计容量相关问题_MYSQL使用_技术运维问题_云数据库 RDS 版-阿里云 https://help.aliyun.com/knowledge_detail/4 ...
- sql server 数据库备份,完整备份,差异备份,自动备份说明
Sql server 设置完整备份,差异备份说明 在数据库管理器中,选择要备份的数据库,右键找到“备份” 然后可以按照备份的方式进行备份. 关于文件的还原,作以下补充说明: 步骤为: 1.在需要还原的 ...
随机推荐
- mysql时间操作函数和存储过程
因为业务须要统计一批数据.用到关于mysql的时间操作函数和存储过程,问题已经基本解决.把过程记录下: 1. mysql的语句中不支持直接用循环.循环仅仅能在存储过程中使用. 2. 写为文件时,注意一 ...
- Mac Finder中如何复制当前完整路径
1.拖到命令行 2.在Finder中command+i 会弹出详细信息,然后[位置]处进行 copy 3.利用Automator,添加一个服务的快捷键. 转自:http://q.cnblogs.com ...
- uploadify的java应用
API:http://www.uploadify.com/documentation/ 下载地址:http://www.uploadify.com/ 这几天查看插件,发现uploadify插件做不错, ...
- ThinkPHP3.2 新bug ReadHtmlCache 支持不区分大写和小写的函数
报错提示: Fatal error: Function name must be a string in D:\wwwroot\zbphp.com\ThinkPHP\Library\Behavior\ ...
- 破解无线网络密码-BT3如何使用1
一分钟制作 BT3 U盘版 方便,快捷简单 光盘版BT3, 大概694MB,直接刻盘,然后用光盘引导,即可进入bt3,连接为: http://ftp.heanet.ie/mirrors/backtra ...
- Discuz常见大问题-如何使用图片轮播器
最简单的办法是用插件,在应用-插件中电机对应插件的设置(比如使用柒瑞幻灯图片展插件) 在展示图片参数设置中,按照要求放你要的设置(标题,注释,高清大图,缩略小兔,URL地址)注意一个都不能少,标题和注 ...
- AngularJS是什么?
AngularJS扩展了HTML? 看了几天AngularJS的各种中文教程,一直没有理解AngularJS是做什么的. 直到今天了英文文档,才有了初步了解. HTML是静态语言. JavaScrip ...
- Mockito: InvalidUseOfMatchersException
异常报错信息: org.mockito.exceptions.misusing.InvalidUseOfMatchersException: Invalid use of argument match ...
- CMake 基本用法--写CMakeList.txt
http://techbase.kde.org/Development/Tutorials/CMake_(zh_CN) http://www.cmake.org/Wiki/CMake 这一章将从软件开 ...
- hmac库 密钥相关的哈希运算消息认证码
# -*- coding: cp936 -*- #xiaodeng #python 2.7.10 #HMAC是密钥相关的哈希运算消息认证码,HMAC运算利用哈希算法,以一个密钥和一个消息为输入,生成一 ...