
TensorFlow从入门到理解(五):你的第一个循环神经网络RNN(回归例子)
运行代码:
import tensorflow as tf

import numpy as np

import matplotlib.pyplot as plt

BATCH_START = 0

TIME_STEPS = 20

BATCH_SIZE = 50

INPUT_SIZE = 1

OUTPUT_SIZE = 1

CELL_SIZE = 10

LR = 0.006

def get_batch():

    global BATCH_START, TIME_STEPS

    # xs shape (50batch, 20steps)

    xs = np.arange(BATCH_START, BATCH_START+TIME_STEPS*BATCH_SIZE).reshape((BATCH_SIZE, TIME_STEPS)) / (10*np.pi)

    seq = np.sin(xs)

    res = np.cos(xs)

    BATCH_START += TIME_STEPS

    # plt.plot(xs[0, :], res[0, :], 'r', xs[0, :], seq[0, :], 'b--')

    # plt.show()

    # returned seq, res and xs: shape (batch, step, input)

    return [seq[:, :, np.newaxis], res[:, :, np.newaxis], xs]

class LSTMRNN(object):

    def __init__(self, n_steps, input_size, output_size, cell_size, batch_size):

        self.n_steps = n_steps

        self.input_size = input_size

        self.output_size = output_size

        self.cell_size = cell_size

        self.batch_size = batch_size

        with tf.name_scope('inputs'):

            self.xs = tf.placeholder(tf.float32, [None, n_steps, input_size], name='xs')

            self.ys = tf.placeholder(tf.float32, [None, n_steps, output_size], name='ys')

        with tf.variable_scope('in_hidden'):

            self.add_input_layer()

        with tf.variable_scope('LSTM_cell'):

            self.add_cell()

        with tf.variable_scope('out_hidden'):

            self.add_output_layer()

        with tf.name_scope('cost'):

            self.compute_cost()

        with tf.name_scope('train'):

            self.train_op = tf.train.AdamOptimizer(LR).minimize(self.cost)

    def add_input_layer(self,):

        l_in_x = tf.reshape(self.xs, [-1, self.input_size], name='2_2D')  # (batch*n_step, in_size)

        # Ws (in_size, cell_size)

        Ws_in = self._weight_variable([self.input_size, self.cell_size])

        # bs (cell_size, )

        bs_in = self._bias_variable([self.cell_size,])

        # l_in_y = (batch * n_steps, cell_size)

        with tf.name_scope('Wx_plus_b'):

            l_in_y = tf.matmul(l_in_x, Ws_in) + bs_in

        # reshape l_in_y ==> (batch, n_steps, cell_size)

        self.l_in_y = tf.reshape(l_in_y, [-1, self.n_steps, self.cell_size], name='2_3D')

    def add_cell(self):

        lstm_cell = tf.contrib.rnn.BasicLSTMCell(self.cell_size, forget_bias=1.0, state_is_tuple=True)

        with tf.name_scope('initial_state'):

            self.cell_init_state = lstm_cell.zero_state(self.batch_size, dtype=tf.float32)

        self.cell_outputs, self.cell_final_state = tf.nn.dynamic_rnn(

            lstm_cell, self.l_in_y, initial_state=self.cell_init_state, time_major=False)

    def add_output_layer(self):

        # shape = (batch * steps, cell_size)

        l_out_x = tf.reshape(self.cell_outputs, [-1, self.cell_size], name='2_2D')

        Ws_out = self._weight_variable([self.cell_size, self.output_size])

        bs_out = self._bias_variable([self.output_size, ])

        # shape = (batch * steps, output_size)

        with tf.name_scope('Wx_plus_b'):

            self.pred = tf.matmul(l_out_x, Ws_out) + bs_out

    def compute_cost(self):

        losses = tf.contrib.legacy_seq2seq.sequence_loss_by_example(

            [tf.reshape(self.pred, [-1], name='reshape_pred')],

            [tf.reshape(self.ys, [-1], name='reshape_target')],

            [tf.ones([self.batch_size * self.n_steps], dtype=tf.float32)],

            average_across_timesteps=True,

            softmax_loss_function=self.ms_error,

            name='losses'

        )

        with tf.name_scope('average_cost'):

            self.cost = tf.div(

                tf.reduce_sum(losses, name='losses_sum'),

                self.batch_size,

                name='average_cost')

            tf.summary.scalar('cost', self.cost)

    @staticmethod

    def ms_error(labels, logits):

        return tf.square(tf.subtract(labels, logits))

    def _weight_variable(self, shape, name='weights'):

        initializer = tf.random_normal_initializer(mean=0., stddev=1.,)

        return tf.get_variable(shape=shape, initializer=initializer, name=name)

    def _bias_variable(self, shape, name='biases'):

        initializer = tf.constant_initializer(0.1)

        return tf.get_variable(name=name, shape=shape, initializer=initializer)

if __name__ == '__main__':

    model = LSTMRNN(TIME_STEPS, INPUT_SIZE, OUTPUT_SIZE, CELL_SIZE, BATCH_SIZE)

    sess = tf.Session()

    merged = tf.summary.merge_all()

    writer = tf.summary.FileWriter("logs", sess.graph)

    init = tf.global_variables_initializer()

    sess.run(init)

    # relocate to the local dir and run this line to view it on Chrome (http://0.0.0.0:6006/):

    # $ tensorboard --logdir='logs'

    plt.ion()

    plt.show()

    for i in range(200):

        seq, res, xs = get_batch()

        if i == 0:

            feed_dict = {

                    model.xs: seq,

                    model.ys: res,

                    # create initial state

            }

        else:

            feed_dict = {

                model.xs: seq,

                model.ys: res,

                model.cell_init_state: state    # use last state as the initial state for this run

            }

        _, cost, state, pred = sess.run(

            [model.train_op, model.cost, model.cell_final_state, model.pred],

            feed_dict=feed_dict)

        # plotting

        plt.plot(xs[0, :], res[0].flatten(), 'r', xs[0, :], pred.flatten()[:TIME_STEPS], 'b--')

        plt.ylim((-1.2, 1.2))

        plt.draw()

        plt.pause(0.3)

        if i % 20 == 0:

            print('cost: ', round(cost, 4))

            result = sess.run(merged, feed_dict)

            writer.add_summary(result, i)
运行结果:
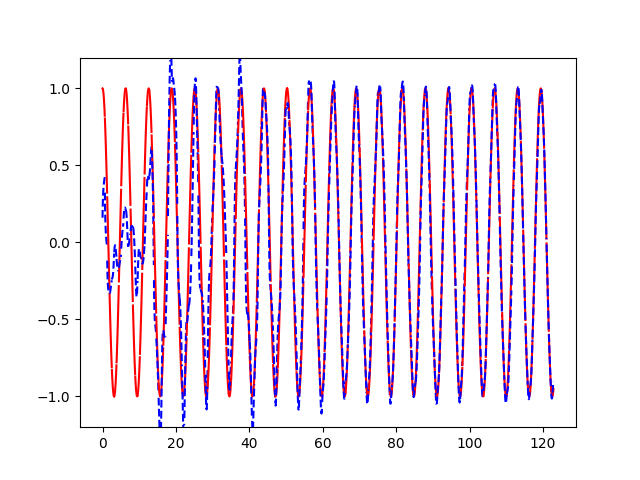
TensorFlow从入门到理解(五):你的第一个循环神经网络RNN(回归例子)的更多相关文章
- TensorFlow从入门到理解(四):你的第一个循环神经网络RNN(分类例子)
运行代码: import tensorflow as tf from tensorflow.examples.tutorials.mnist import input_data # set rando ...
- TensorFlow从入门到理解
一.<莫烦Python>学习笔记: TensorFlow从入门到理解(一):搭建开发环境[基于Ubuntu18.04] TensorFlow从入门到理解(二):你的第一个神经网络 Tens ...
- 通过keras例子理解LSTM 循环神经网络(RNN)
博文的翻译和实践: Understanding Stateful LSTM Recurrent Neural Networks in Python with Keras 正文 一个强大而流行的循环神经 ...
- 基于TensorFlow的循环神经网络(RNN)
RNN适用场景 循环神经网络(Recurrent Neural Network)适合处理和预测时序数据 RNN的特点 RNN的隐藏层之间的节点是有连接的,他的输入是输入层的输出向量.extend(上一 ...
- TensorFlow从入门到理解(六):可视化梯度下降
运行代码: import tensorflow as tf import numpy as np import matplotlib.pyplot as plt from mpl_toolkits.m ...
- TensorFlow从入门到理解(三):你的第一个卷积神经网络(CNN)
运行代码: from __future__ import print_function import tensorflow as tf from tensorflow.examples.tutoria ...
- TensorFlow从入门到理解(二):你的第一个神经网络
运行代码: from __future__ import print_function import tensorflow as tf import numpy as np import matplo ...
- TensorFlow从入门到理解(一):搭建开发环境【基于Ubuntu18.04】
*注:教程及本文章皆使用Python3+语言,执行.py文件都是用终端(如果使用Python2+和IDE都会和本文描述有点不符) 一.安装,测试,卸载 TensorFlow官网介绍得很全面,很完美了, ...
- 循环神经网络-RNN入门
首先学习RNN需要一定的基础,即熟悉普通的前馈神经网络,特别是BP神经网络,最好能够手推. 所谓前馈,并不是说信号不能反向传递,而是网络在拓扑结构上不存在回路和环路. 而RNN最大的不同就是存在环路. ...
随机推荐
- QML学习笔记(二)-纯qml画图实现canvas画板-鼠标画图
作者: 狐狸家的鱼 Github: 八至 版权声明:如需转载请获取授权和联系作者 用纯qml实现canvas画板功能,用鼠标进行画图,可以画直线,画圆,画矩形,画弧线. 由于canvas画图会有延迟和 ...
- C# http请求带请求头部分
直接上代码 前台调用: <script type="text/javascript"> function zLoginCheck() { var Account = ' ...
- 关于MySQL索引的最左前缀匹配原则原理说明说明
假设有2个这样的SQL SELECT * FROM table WHERE a = 1 AND c = 3; // c不走索引 SELECT * FROM table WHERE a = 1 AND ...
- 微型 ORM-FluentData 实例详解
https://blog.csdn.net/tai532439904/article/details/77879767 环境要求 .NET 4.0. 支持数据库 MS SQL Server 使用本地. ...
- linux系统调用之网络管理2
socketcall socket系统调用 socket 建立socket bind 绑定socket到端口 connect 连接远程主机 accept 响应socket连接请求 send 通过soc ...
- 第三十六节,目标检测之yolo源码解析
在一个月前,我就已经介绍了yolo目标检测的原理,后来也把tensorflow实现代码仔细看了一遍.但是由于这个暑假事情比较大,就一直搁浅了下来,趁今天有时间,就把源码解析一下.关于yolo目标检测的 ...
- halcon几何变换(仿射变换)
旋转.平移.镜像.缩放.斜切,可参考https://blog.csdn.net/machaoyu86/article/details/51182473 仿射变换前,需要获得仿射变换矩阵. 关于shap ...
- league之csv导出
有的时候当我们导出文件时,如果文件比较小可以使用phpexcel,但是当文件太大时就会遇到很多瓶颈(excel条数限制.导出时间太长等). 这个时候要么使用excel分批次导出,要么就需要使用csv导 ...
- Go 的构建模式
Go 的八种 Build Mode exe (静态编译) exe (动态链接 libc) exe (动态链接 libc 和非 Go 代码) pie 地址无关可执行文件(安全特性) c-archive ...
- 2017-12-15python全栈9期第二天第七节之x or y ,x 为 非 0时,则返回x
#!/user/bin/python# -*- coding:utf-8 -*-# x or y ,x 为 非 0时,则返回xprint(1 or 2)print(3 or 2)print(0 or ...