
Android自定义控件之自定义ViewGroup实现标签云
前言:
前面几篇讲了自定义控件绘制原理Android自定义控件之基本原理(一),自定义属性Android自定义控件之自定义属性(二),自定义组合控件Android自定义控件之自定义组合控件(三),常言道:“好记性不如烂笔头,光说不练假把式!!!”,作为一名学渣就是因为没有遵循这句名言才沦落于此,所以要谨遵教诲,注重理论与实践相结合,今天通过自定义ViewGroup来实现一下项目中用到的标签云。
自定义控件相关文章地址:
需求背景:
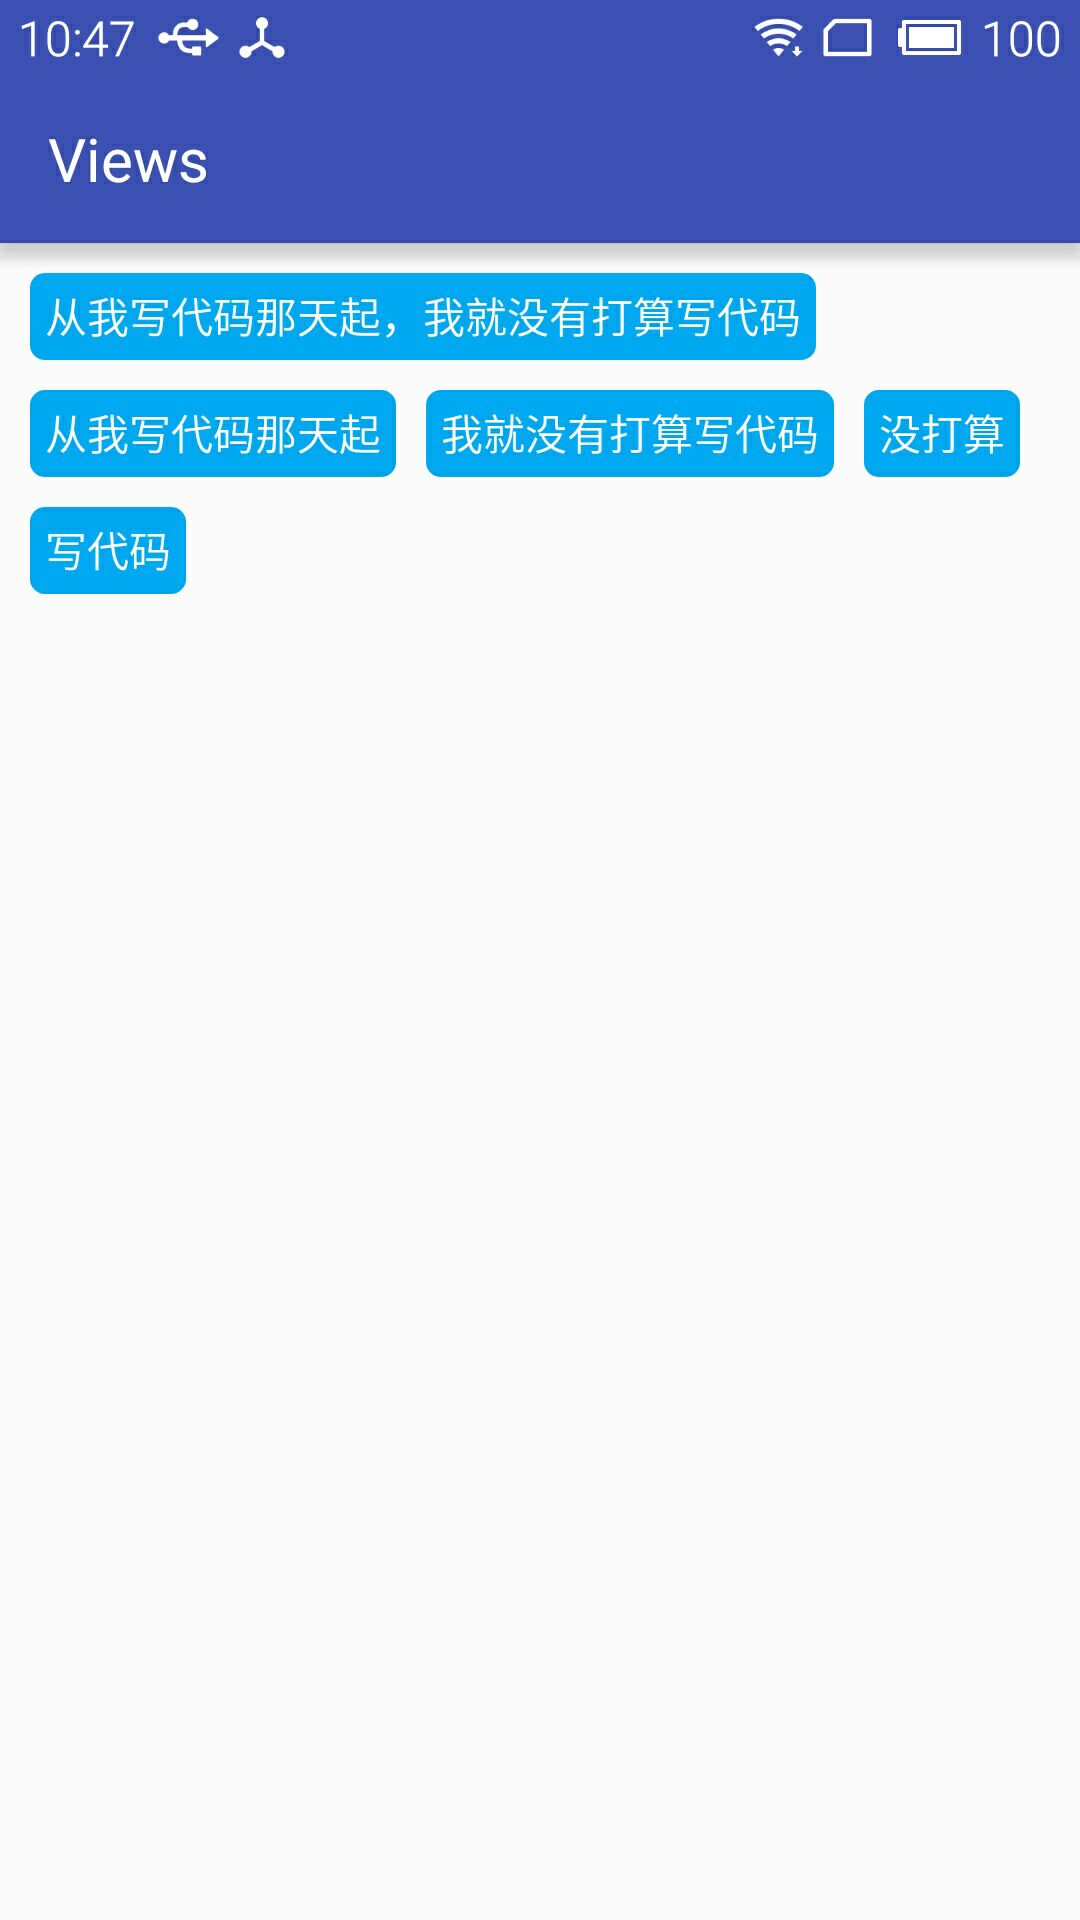
公司需要实现一个知识点的标签显示,每个标签的长度未知,如下图所示

基本绘制流程:
绘制原理这里不再介绍大致介绍下绘制流程
- 构造函数获取自定义属性
- onMeasure()方法,测量子控件的大小
- onLayout()方法,对子控件进行布局
1.)自定义属性
<declare-styleable name="TagsLayout">

        <attr name="tagVerticalSpace" format="dimension" />

        <attr name="tagHorizontalSpace" format="dimension" />

</declare-styleable>
2.)构造函数中获取自定义属性值
    private int childHorizontalSpace;

    private int childVerticalSpace;

    public TagsLayout(Context context, AttributeSet attrs) {

        super(context, attrs);

        TypedArray attrArray = context.obtainStyledAttributes(attrs, R.styleable.TagsLayout);

        if (attrArray != null) {

            childHorizontalSpace = attrArray.getDimensionPixelSize(R.styleable.TagsLayout_tagHorizontalSpace, 0);

            childVerticalSpace = attrArray.getDimensionPixelSize(R.styleable.TagsLayout_tagVerticalSpace, 0);

            attrArray.recycle();

        }

    }
3.)onMeasure函数测量子控件大小,然后设置当前控件大小
@Override
protected LayoutParams generateDefaultLayoutParams() {
    return new ViewGroup.LayoutParams(LayoutParams.WRAP_CONTENT, LayoutParams.WRAP_CONTENT);
}

/**
 * 负责设置子控件的测量模式和大小 根据所有子控件设置自己的宽和高
 */
@Override
protected void onMeasure(int widthMeasureSpec, int heightMeasureSpec) {
    super.onMeasure(widthMeasureSpec, heightMeasureSpec);
    // 获得它的父容器为它设置的测量模式和大小
    int sizeWidth = MeasureSpec.getSize(widthMeasureSpec);
    int sizeHeight = MeasureSpec.getSize(heightMeasureSpec);
    int modeWidth = MeasureSpec.getMode(widthMeasureSpec);
    int modeHeight = MeasureSpec.getMode(heightMeasureSpec);
    // 如果是warp_content情况下,记录宽和高
    int width = 0;
    int height = 0;
    /**
     * 记录每一行的宽度,width不断取最大宽度
     */
    int lineWidth = 0;
    /**
     * 每一行的高度,累加至height
     */
    int lineHeight = 0;

    int count = getChildCount();
    int left = getPaddingLeft();
    int top = getPaddingTop();
    // 遍历每个子元素
    for (int i = 0; i < count; i++) {
        View child = getChildAt(i);
        if (child.getVisibility() == GONE)
            continue;
        // 测量每一个child的宽和高
        measureChild(child, widthMeasureSpec, heightMeasureSpec);
        // 得到child的lp
        ViewGroup.LayoutParams lp = child.getLayoutParams();
        // 当前子空间实际占据的宽度
        int childWidth = child.getMeasuredWidth() + childHorizontalSpace;
        // 当前子空间实际占据的高度
        int childHeight = child.getMeasuredHeight() + childVerticalSpace;

        if (lp != null && lp instanceof MarginLayoutParams) {
            MarginLayoutParams params = (MarginLayoutParams) lp;
            childWidth += params.leftMargin + params.rightMargin;
            childHeight += params.topMargin + params.bottomMargin;
        }

        /**
         * 如果加入当前child,则超出最大宽度,则的到目前最大宽度给width,类加height 然后开启新行
         */
        if (lineWidth + childWidth > sizeWidth - getPaddingLeft() - getPaddingRight()) {
            width = Math.max(lineWidth, childWidth);// 取最大的
            lineWidth = childWidth; // 重新开启新行,开始记录
            // 叠加当前高度,
            height += lineHeight;
            // 开启记录下一行的高度
            lineHeight = childHeight;
            child.setTag(new Location(left, top + height, childWidth + left - childHorizontalSpace, height + child.getMeasuredHeight() + top));
        } else {// 否则累加值lineWidth,lineHeight取最大高度
            child.setTag(new Location(lineWidth + left, top + height, lineWidth + childWidth - childHorizontalSpace + left, height + child.getMeasuredHeight() + top));
            lineWidth += childWidth;
            lineHeight = Math.max(lineHeight, childHeight);
        }
    }
    width = Math.max(width, lineWidth) + getPaddingLeft() + getPaddingRight();
    height += lineHeight;
    sizeHeight += getPaddingTop() + getPaddingBottom();
    height += getPaddingTop() + getPaddingBottom();
    setMeasuredDimension((modeWidth == MeasureSpec.EXACTLY) ? sizeWidth : width, (modeHeight == MeasureSpec.EXACTLY) ? sizeHeight : height);
}
通过遍历所有子控件调用measureChild函数获取每个子控件的大小,然后通过宽度叠加判断是否换行,叠加控件的高度,同时记录下当前子控件的坐标,这里记录坐标引用了自己写的一个内部类Location.java
    /**

     * 记录子控件的坐标

     */

    public class Location {

        public Location(int left, int top, int right, int bottom) {

            this.left = left;

            this.top = top;

            this.right = right;

            this.bottom = bottom;

        }

        public int left;

        public int top;

        public int right;

        public int bottom;

    }
4.)onLayout函数对所有子控件重新布局
    @Override

    protected void onLayout(boolean changed, int l, int t, int r, int b) {

        int count = getChildCount();

        for (int i = 0; i < count; i++) {

            View child = getChildAt(i);

            if (child.getVisibility() == GONE)

                continue;

            Location location = (Location) child.getTag();

            child.layout(location.left, location.top, location.right, location.bottom);

        }

    }
这里直接遍历所有子控件调用子控件的layout函数进行布局。
如何使用:
1.布局问自己中直接引用
<?xml version="1.0" encoding="utf-8"?>

<LinearLayout xmlns:android="http://schemas.android.com/apk/res/android"

    xmlns:lee="http://schemas.android.com/apk/res-auto"

    android:layout_width="match_parent"

    android:layout_height="match_parent"

    android:orientation="vertical">

    <com.whoislcj.views.TagsLayout

        android:id="@+id/image_layout"

        android:layout_width="match_parent"

        android:layout_height="wrap_content"

        android:layout_margin="10dp"

        lee:tagHorizontalSpace="10dp"

        lee:tagVerticalSpace="10dp" />

</LinearLayout>
2.)代码添加标签
  TagsLayout imageViewGroup = (TagsLayout) findViewById(R.id.image_layout);

  ViewGroup.MarginLayoutParams lp = new ViewGroup.MarginLayoutParams(ViewGroup.LayoutParams.WRAP_CONTENT, ViewGroup.LayoutParams.WRAP_CONTENT);

        String[] string={"从我写代码那天起,我就没有打算写代码","从我写代码那天起","我就没有打算写代码","没打算","写代码"};

        for (int i = 0; i < 5; i++) {

            TextView textView = new TextView(this);

            textView.setText(string[i]);

            textView.setTextColor(Color.WHITE);

            textView.setBackgroundResource(R.drawable.round_square_blue);

            imageViewGroup.addView(textView, lp);

        }
具体效果
3.)最后附上TagsLayout全部代码
public class TagsLayout extends ViewGroup {

    private int childHorizontalSpace;

    private int childVerticalSpace;

    public TagsLayout(Context context, AttributeSet attrs) {

        super(context, attrs);

        TypedArray attrArray = context.obtainStyledAttributes(attrs, R.styleable.TagsLayout);

        if (attrArray != null) {

            childHorizontalSpace = attrArray.getDimensionPixelSize(R.styleable.TagsLayout_tagHorizontalSpace, 0);

            childVerticalSpace = attrArray.getDimensionPixelSize(R.styleable.TagsLayout_tagVerticalSpace, 0);

            attrArray.recycle();

        }

    }

    /**

     * 负责设置子控件的测量模式和大小 根据所有子控件设置自己的宽和高

     */

    @Override

    protected void onMeasure(int widthMeasureSpec, int heightMeasureSpec) {

        super.onMeasure(widthMeasureSpec, heightMeasureSpec);

        // 获得它的父容器为它设置的测量模式和大小

        int sizeWidth = MeasureSpec.getSize(widthMeasureSpec);

        int sizeHeight = MeasureSpec.getSize(heightMeasureSpec);

        int modeWidth = MeasureSpec.getMode(widthMeasureSpec);

        int modeHeight = MeasureSpec.getMode(heightMeasureSpec);

        // 如果是warp_content情况下,记录宽和高

        int width = 0;

        int height = 0;

        /**

         * 记录每一行的宽度,width不断取最大宽度

         */

        int lineWidth = 0;

        /**

         * 每一行的高度,累加至height

         */

        int lineHeight = 0;

        int count = getChildCount();

        int left = getPaddingLeft();

        int top = getPaddingTop();

        // 遍历每个子元素

        for (int i = 0; i < count; i++) {

            View child = getChildAt(i);

            if (child.getVisibility() == GONE)

                continue;

            // 测量每一个child的宽和高

            measureChild(child, widthMeasureSpec, heightMeasureSpec);

            // 得到child的lp

            MarginLayoutParams lp = (MarginLayoutParams) child.getLayoutParams();

            // 当前子空间实际占据的宽度

            int childWidth = child.getMeasuredWidth() + lp.leftMargin + lp.rightMargin + childHorizontalSpace;

            // 当前子空间实际占据的高度

            int childHeight = child.getMeasuredHeight() + lp.topMargin + lp.bottomMargin + childVerticalSpace;

            /**

             * 如果加入当前child,则超出最大宽度,则的到目前最大宽度给width,类加height 然后开启新行

             */

            if (lineWidth + childWidth > sizeWidth - getPaddingLeft() - getPaddingRight()) {

                width = Math.max(lineWidth, childWidth);// 取最大的

                lineWidth = childWidth; // 重新开启新行,开始记录

                // 叠加当前高度,

                height += lineHeight;

                // 开启记录下一行的高度

                lineHeight = childHeight;

                child.setTag(new Location(left, top + height, childWidth + left - childHorizontalSpace, height + child.getMeasuredHeight() + top));

            } else {// 否则累加值lineWidth,lineHeight取最大高度

                child.setTag(new Location(lineWidth + left, top + height, lineWidth + childWidth - childHorizontalSpace + left, height + child.getMeasuredHeight() + top));

                lineWidth += childWidth;

                lineHeight = Math.max(lineHeight, childHeight);

            }

        }

        width = Math.max(width, lineWidth) + getPaddingLeft() + getPaddingRight();

        height += lineHeight;

        sizeHeight += getPaddingTop() + getPaddingBottom();

        height += getPaddingTop() + getPaddingBottom();

        setMeasuredDimension((modeWidth == MeasureSpec.EXACTLY) ? sizeWidth : width, (modeHeight == MeasureSpec.EXACTLY) ? sizeHeight : height);

    }

    @Override

    protected void onLayout(boolean changed, int l, int t, int r, int b) {

        int count = getChildCount();

        for (int i = 0; i < count; i++) {

            View child = getChildAt(i);

            if (child.getVisibility() == GONE)

                continue;

            Location location = (Location) child.getTag();

            child.layout(location.left, location.top, location.right, location.bottom);

        }

    }

    /**

     * 记录子控件的坐标

     */

    public class Location {

        public Location(int left, int top, int right, int bottom) {

            this.left = left;

            this.top = top;

            this.right = right;

            this.bottom = bottom;

        }

        public int left;

        public int top;

        public int right;

        public int bottom;

    }

}
TagsLayout.java
总结:
至此有关简单的自定义控件已经介绍的差不多了,项目中很复杂的控件现在涉及的比较少,以后用到之后再做记录。
Android自定义控件之自定义ViewGroup实现标签云的更多相关文章
- Android自定义控件之自定义组合控件
前言: 前两篇介绍了自定义控件的基础原理Android自定义控件之基本原理(一).自定义属性Android自定义控件之自定义属性(二).今天重点介绍一下如何通过自定义组合控件来提高布局的复用,降低开发 ...
- Android自定义控件之自定义组合控件(三)
前言: 前两篇介绍了自定义控件的基础原理Android自定义控件之基本原理(一).自定义属性Android自定义控件之自定义属性(二).今天重点介绍一下如何通过自定义组合控件来提高布局的复用,降低开发 ...
- Android 自定义控件之继承ViewGroup创建新容器
欢迎大家来学习本节内容,前几节我们已经学习了其他几种自定义控件,分别是Andriod 自定义控件之音频条及 Andriod 自定义控件之创建可以复用的组合控件还没有学习的同学请先去学习下,因为本节将使 ...
- android自定义控件(3)-自定义当前按钮属性
那么还是针对我们之前写的自定义控件:开关按钮为例来说,在之前的基础上,我们来看看有哪些属性是可以自定义的:按钮的背景图片,按钮的滑块图片,和按钮的状态(是开还是关),实际上都应该是可以在xml文件中直 ...
- android自定义控件(4)-自定义水波纹效果
一.实现单击出现水波纹单圈效果: 照例来说,还是一个自定义控件,观察这个效果,发现应该需要重写onTouchEvent和onDraw方法,通过在onTouchEvent中获取触摸的坐标,然后以这个坐标 ...
- android自定义控件(五) 自定义组合控件
转自http://www.cnblogs.com/hdjjun/archive/2011/10/12/2209467.html 代码为自己编写 目标:实现textview和ImageButton组合, ...
- 老猪带你玩转android自定义控件二——自定义索引栏listview
带索引栏的listview,在android开发非常普遍,方便用户进行字母索引,就像微信通讯录这样: 今天,我们就从零到一实现这个具有索引栏的listview. 怎么实现这个控件了,我们应当梳理出一个 ...
- 玩转android自定义控件二——自定义索引栏listview
带索引栏的listview,在android开发非常普遍,方便用户进行字母索引,就像微信通讯录这样: 今天,我们就从零到一实现这个具有索引栏的listview. 怎么实现这个控件了,我们应当梳理出一个 ...
- Android动画效果之自定义ViewGroup添加布局动画
前言: 前面几篇文章介绍了补间动画.逐帧动画.属性动画,大部分都是针对View来实现的动画,那么该如何为了一个ViewGroup添加动画呢?今天结合自定义ViewGroup来学习一下布局动画.本文将通 ...
随机推荐
- 深入理解BFC
定义 在解释BFC之前,先说一下文档流.我们常说的文档流其实分为定位流.浮动流和普通流三种.而普通流其实就是指BFC中的FC.FC是formatting context的首字母缩写,直译过来是格式化上 ...
- SQLServer 版本之八大方法搞清 "我是谁"
你正在使用 SQL Server 的哪个版本? 贴士:作为一个SQL Server数据库管理者或维护.支持人员,应该会经常问自己这样一个问题:我当前SQL Server版本号是?当前版本已经有的累计更 ...
- ASP.Net MVC4+Memcached+CodeFirst实现分布式缓存
ASP.Net MVC4+Memcached+CodeFirst实现分布式缓存 part 1:给我点时间,允许我感慨一下2016年 正好有时间,总结一下最近使用的一些技术,也算是为2016年画上一个完 ...
- Postman接口调试神器-Chrome浏览器插件
首先大家可以去这个地址下载 Postman_v4.1.3 这个版本,我用的就是这个版本 http://chromecj.com/web-development/2014-09/60/download. ...
- 将DataTable中的某列转换成数组或者List
string[] arrRate = dtRate.AsEnumerable().Select(d => d.Field<string>("arry")).ToA ...
- 解决IE8下不兼容rgba()的解决办法
rgba()是css3的新属性,所以IE8及以下浏览器不兼容,这怎么办呢?终于我找到了解决办法. 解决办法 我们先来解释以下rgba rgba: rgba的含义,r代表red,g代表green,b代表 ...
- iOS 数据存储之SQLite3的使用
SQLite3是iOS内嵌的数据库,SQLite3在存储和检索大量数据方面非常有效,它使得不必将每个对象都加到内存中.还能够对数据进行负责的聚合,与使用对象执行这些操作相比,获得结果的速度更快. SQ ...
- [Android]使用Dagger 2进行依赖注入 - Producers(翻译)
以下内容为原创,欢迎转载,转载请注明 来自天天博客:http://www.cnblogs.com/tiantianbyconan/p/6234811.html 使用Dagger 2进行依赖注入 - P ...
- 【iOS10 SpeechRecognition】语音识别 现说现译的最佳实践
首先想强调一下“语音识别”四个字字面意义上的需求:用户说话然后马上把用户说的话转成文字显示!,这才是开发者真正需要的功能. 做需求之前其实是先谷歌百度一下看有没有造好的轮子直接用,结果真的很呵呵,都是 ...
- iOS网络4——Reachability检测网络状态
一.整体介绍 前面已经介绍了网络访问的NSURLSession.NSURLConnection,还有网页加载有关的webview,基本满足通常的网络相关的开发. 其实在网络开发中还有比较常用的就是网络 ...