WebService与CXF
一:Webservice
1:WebService是干什么的?有什么用?
一言以蔽之:WebService是一种跨编程语言和跨操作系统平台的远程调用规范。
比如,amazon,天气预报系统,淘宝网,校内网,百度等把自己的系统服务以webservice服务的形式暴露出来,让第三方网站和程序可以调用这些服务功能,这样扩展了自己系统的市场占有率
从表面上看,WebService就是一个应用程序向外界暴露出一个能通过Web进行调用的API,也就是说能用编程的方法通过Web来调用这个应用程序。我们把调用这个WebService的应用程序叫做客户端,而把提供这个WebService的应用程序叫做服务端。我们要做的就是开发Webservice接口,调用WebService接口
从深层次看,WebService是建立可互操作的分布式应用程序的新平台,是一个平台,是一套标准。它定义了应用程序如何在Web上实现互操作性,你可以用任何你喜欢的语言,在任何你喜欢的平台上写Web service ,只要我们可以通过Web service标准对这些服务进行查询和访问。
2:什么是SAOP??什么是WSDL??
2.1 SAOP:
SAOP是一种WebService平台技术
SOAP协议 = HTTP协议 + XML数据格式
WebService通过HTTP协议发送请求和接收结果时,发送的请求内容和结果内容都采用XML格式封装,并增加了一些特定的HTTP消息头,以说明HTTP消息的内容格式,这些特定的HTTP消息头和XML内容格式就是SOAP协议。
当然除了SAOP还有其他WebService技术,XML+XSD,SOAP和WSDL就是构成WebService平台的三大技术。
2.2 WSDL(Web Service Description Language)
是一个用来描述Web服务的说明如何与Web服务通信的xml语言,为用户提供详细的接口说明书
好比我们去商店买东西,首先要知道商店里有什么东西可买,然后再来购买,商家的做法就是张贴广告海报。 WebService也一样,WebService客户端要调用一个WebService服务,首先要有知道这个服务的地址在哪,以及这个服务里有什么方法可以调用,所以,WebService务器端首先要通过一个WSDL文件来说明自己家里有啥服务可以对外调用,服务是什么(服务中有哪些方法,方法接受的参数是什么,返回值是什么),服务的网络地址用哪个url地址表示,服务通过什么方式来调用。
WSDL(Web Services Description Language)就是这样一个基于XML的语言,用于描述Web Service及其函数、参数和返回值。
一些最新的开发工具既能根据你的Web service生成WSDL文档,又能导入WSDL文档,生成调用相应WebService的代理类代码。
WSDL文件保存在Web服务器上,通过一个url地址就可以访问到它。客户端要调用一个WebService服务之前,要知道该服务的WSDL文件的地址。WebService服务提供商可以通过两种方式来暴露它的WSDL文件地址:1.注册到UDDI服务器,以便被人查找;2.直接告诉给客户端调用者。
3:什么是REST
https://www.cnblogs.com/loveis715/p/4669091.html
REST 是一种软件架构模式,只是一种风格,rest服务采用HTTP 做传输协议,REST 对于HTTP 的利用实现精确的资源定位。
Rest要求对资源定位更加准确,如下:
非rest方式:http://ip:port/queryUser.action?userType=student&id=001
Rest方式:http://ip:port/user/student/query/001
Rest方式表示互联网上的资源更加准确,但是也有缺点,可能目录的层级较多不容易理解。
Rest不再需要生成客户端,直接获取数据
二:CXF
1:简介
1.1 CXF是什么?有什么用?优点
Apache CXF 是一个开源的web Services 框架,CXF 帮助您构建和开发 web Services ,它支持多种协议,支持数据格式:XML,JSON(仅在REST方式下支持)
2:CXF的基础知识
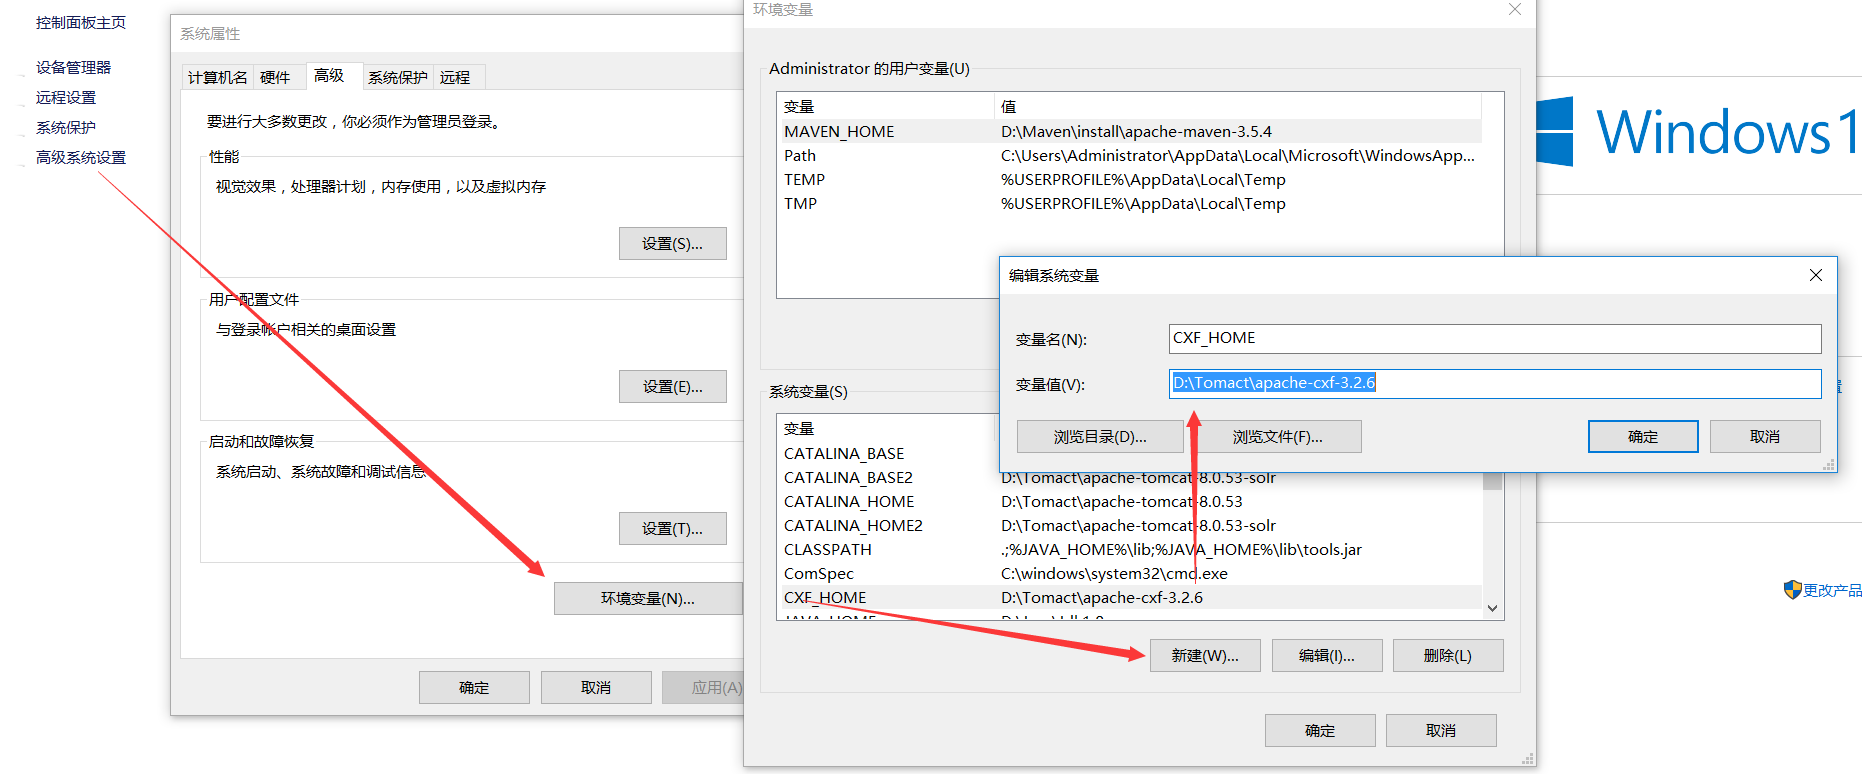
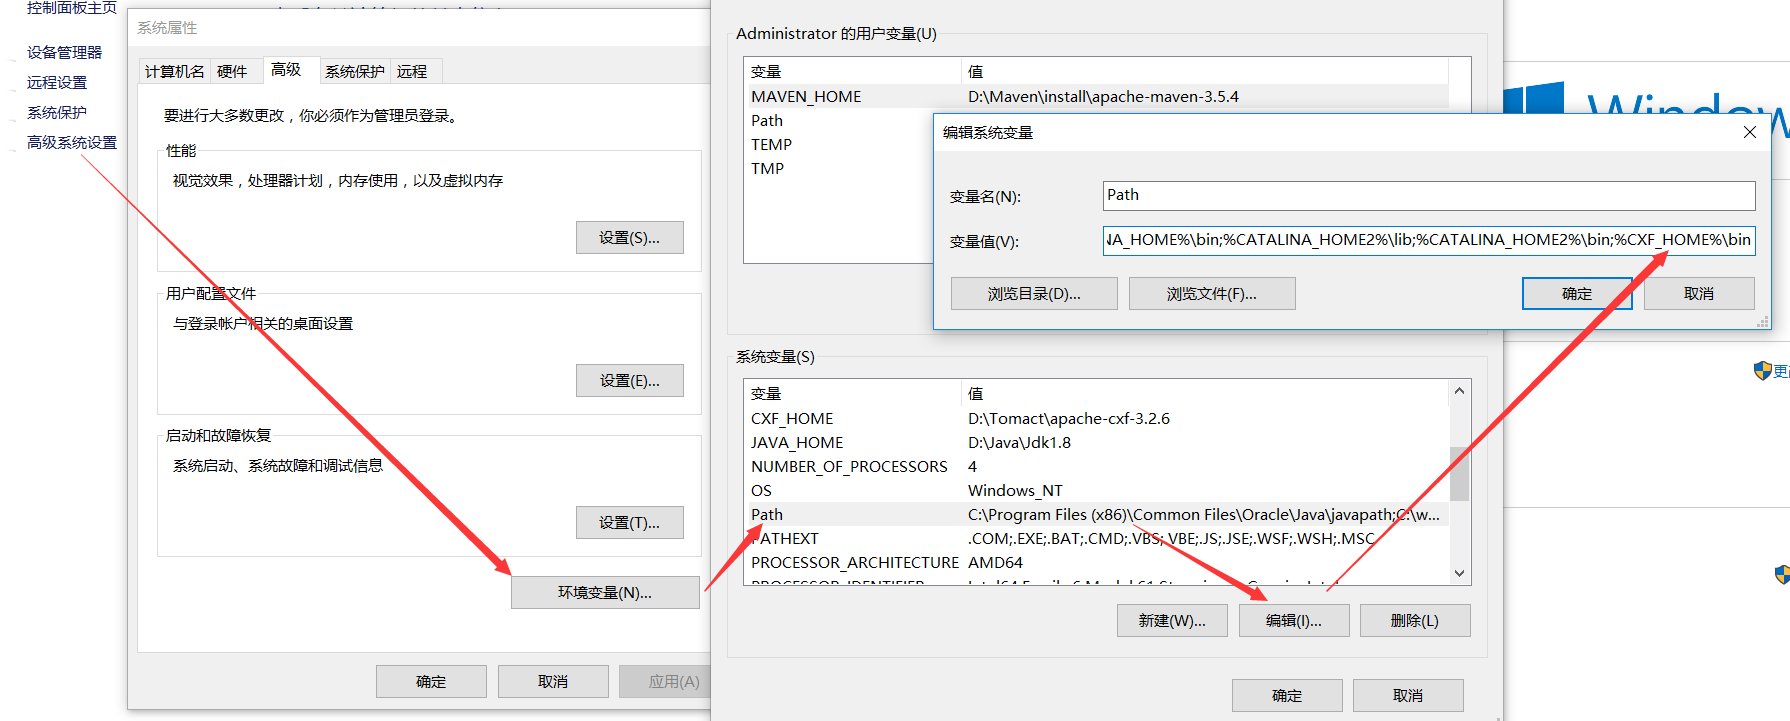
2.1:安装配置
官网下载,解压
环境变量配置
3:CXF与Spring整合发布SAOP与REST项目
3.1 CXF+Spring整合发布SAOP协议服务
3.1.1服务端
开发步骤:
第一步:创建web项目,导入jar包,maven项目添加坐标
maven需三个:cxf-core, cxf-rt-frontend-jaxws,cxf-rt-transports-http-jetty
第二步:创建SEI接口(SEI在webservice中称为portType,在java中称为接口)
 import javax.jws.WebService;

 import javax.xml.ws.BindingType;

 import javax.xml.ws.soap.SOAPBinding;

 /**

  *

  * <p>Title: WeatherInterface.java</p>

  * <p>Description:SEI接口</p>

  */

 @WebService

 @BindingType(SOAPBinding.SOAP12HTTP_BINDING)

 public interface WeatherInterface {

     public String queryWeather(String cityName);

 }
第三步:创建SEI实现类
 public class WeatherInterfaceImpl implements WeatherInterface {

     @Override

     public String queryWeather(String cityName) {

         System.out.println("from client..."+cityName);

         if("北京".equals(cityName)){

             return "冷且霾";

         } else {

             return "暖且晴";

         }

     }

 }
第四步:配置Spring配置文件beans.xml
用<jaxws:server标签发布服务,设置 1.服务地址; 2.设置服务接口; 3设置服务实现类
 <?xml version="1.0" encoding="UTF-8"?>

 <beans xmlns="http://www.springframework.org/schema/beans"

     xmlns:xsi="http://www.w3.org/2001/XMLSchema-instance" xmlns:jaxws="http://cxf.apache.org/jaxws"

     xmlns:jaxrs="http://cxf.apache.org/jaxrs" xmlns:cxf="http://cxf.apache.org/core"

     xsi:schemaLocation="http://www.springframework.org/schema/beans

                             http://www.springframework.org/schema/beans/spring-beans.xsd

                             http://cxf.apache.org/jaxrs http://cxf.apache.org/schemas/jaxrs.xsd

                             http://cxf.apache.org/jaxws http://cxf.apache.org/schemas/jaxws.xsd

                             http://cxf.apache.org/core http://cxf.apache.org/schemas/core.xsd">

     <!-- <jaxws:endpoint发布SOAP协议的服务 ,对Endpoint类封装-->

     <jaxws:endpoint address="/hello" implementor="com.xqc.ws.cxf.server.HelloWorld"/>

     <!-- <jaxws:server发布SOAP协议的服务 ,对JaxWsServerFactoryBean类封装-->

     <jaxws:server address="/weather" serviceClass="com.xqc.ws.cxf.server.WeatherInterface">

         <jaxws:serviceBean>

             <ref bean="weatherInterface"/>

         </jaxws:serviceBean>

         <!-- 配置拦截器 -->

         <jaxws:inInterceptors>

             <ref bean="inIntercepter"/>

         </jaxws:inInterceptors>

         <jaxws:outInterceptors>

             <ref bean="outIntercepter"/>

         </jaxws:outInterceptors>

     </jaxws:server>

     <!-- 配置拦截器的bean -->

     <bean name="inIntercepter" class="org.apache.cxf.interceptor.LoggingInInterceptor"/>

     <bean name="outIntercepter" class="org.apache.cxf.interceptor.LoggingOutInterceptor"/>

     <!-- 配置服务实现类 -->

     <bean name="weatherInterface" class="com.xqc.ws.cxf.server.WeatherInterfaceImpl"/>

 </beans>
第五步:配置Web.xml
 <?xml version="1.0" encoding="UTF-8"?>

 <web-app xmlns:xsi="http://www.w3.org/2001/XMLSchema-instance" xmlns="http://java.sun.com/xml/ns/javaee" xsi:schemaLocation="http://java.sun.com/xml/ns/javaee http://java.sun.com/xml/ns/javaee/web-app_3_0.xsd" id="WebApp_ID" version="3.0">

   <display-name>ws_2_cxf_spring_server</display-name>

   <!-- 设置spring的环境 ,加载spring配置文件 -->

   <context-param>

       <!--contextConfigLocation是不能修改的  -->

       <param-name>contextConfigLocation</param-name>

       <param-value>classpath:beans.xml</param-value>

   </context-param>

   <listener>

       <listener-class>org.springframework.web.context.ContextLoaderListener</listener-class>

   </listener>

   <!-- 配置CXF的Servlet -->

   <servlet>

       <servlet-name>CXF</servlet-name>

       <servlet-class>org.apache.cxf.transport.servlet.CXFServlet</servlet-class>

   </servlet>

   <servlet-mapping>

       <servlet-name>CXF</servlet-name>

       <url-pattern>/ws/*</url-pattern>

   </servlet-mapping>

   <welcome-file-list>

     <welcome-file>index.html</welcome-file>

     <welcome-file>index.htm</welcome-file>

     <welcome-file>index.jsp</welcome-file>

     <welcome-file>default.html</welcome-file>

     <welcome-file>default.htm</welcome-file>

     <welcome-file>default.jsp</welcome-file>

   </welcome-file-list>

 </web-app>
第六步:部署到tomact下,启动tomact
第七步:测试服务
浏览器输入:WSDL地址规则:http://ip:端口号/项目名称/servlet拦截路径/服务名称?wsdl
第八步:Endpoint标签发布服务
<jaxws:endpoint>标签
添加文件
 @WebService

 public class HelloWorld {

     public String sayHello(String name){

         return "hello,"+name;

     }

 }
在beans中添加配置
      <!-- <jaxws:endpoint发布SOAP协议的服务 ,对Endpoint类封装-->

      <jaxws:endpoint address="/hello" implementor="com.xqc.ws.cxf.server.HelloWorld"/>
访问:http://ip:端口号/项目名称/servlet拦截路径/ 例如:http://localhost:8080/ws_2_cxf_spring_server/ws/
3.1.2 客户端(近写一个javase的客户端演示一下,客户端可以很多)
开发步骤:
第一步:引入jar包
第二步:生成客户端代码
第三步:配置spring配置文件,applicationContent.xml
<?xml version="1.0" encoding="UTF-8"?>

<beans xmlns="http://www.springframework.org/schema/beans"

    xmlns:xsi="http://www.w3.org/2001/XMLSchema-instance" xmlns:jaxws="http://cxf.apache.org/jaxws"

    xmlns:jaxrs="http://cxf.apache.org/jaxrs" xmlns:cxf="http://cxf.apache.org/core"

    xsi:schemaLocation="http://www.springframework.org/schema/beans

                            http://www.springframework.org/schema/beans/spring-beans.xsd

                            http://cxf.apache.org/jaxrs http://cxf.apache.org/schemas/jaxrs.xsd

                            http://cxf.apache.org/jaxws http://cxf.apache.org/schemas/jaxws.xsd

                            http://cxf.apache.org/core http://cxf.apache.org/schemas/core.xsd">

    <!-- <jaxws:client实现客户端 ,对JaxWsProxyFactoryBean类封装-->

    <jaxws:client id="weatherClient" address="http://127.0.0.1:8080/ws_2_cxf_spring_server/ws/weather" serviceClass="com.xqc.cxf.weather.WeatherInterface"/>

</beans>
第四步:从spring上下文件获取服务实现类
第五步:调用查询方法,打印
 package com.xqc.cxf.client;

 import org.springframework.context.ApplicationContext;

 import org.springframework.context.support.ClassPathXmlApplicationContext;

 import com.xqc.cxf.weather.WeatherInterface;

 public class WeatherClient {

     public static void main(String[] args) {

         //初始化spring的上下文

         ApplicationContext context = new ClassPathXmlApplicationContext("classpath:beans.xml");

         WeatherInterface  weatherInterface = (WeatherInterface) context.getBean("weatherClient");

         String weather = weatherInterface.queryWeather("保定");

         System.out.println(weather);

     }

 }
3.2CXF+Spring整合发布REST服务
3.2.1服务端
开发步骤:
第一步:导入jar包
第二步:创建学生pojo类,要加入@ XmlRootElement
 package com.xqc.ws.rest.pojo;

 import java.util.Date;

 import javax.xml.bind.annotation.XmlRootElement;

 /**

  *

  * <p>Title: Student.java</p>

  * <p>Description:学生实体类</p>

  */

 @XmlRootElement(name="student")//@XmlRootElement可以实现对象和XML数据之间的转换

 public class Student {

     private long id;

     private String name;

     private Date birthday;

     public long getId() {

         return id;

     }

     public void setId(long id) {

         this.id = id;

     }

     public String getName() {

         return name;

     }

     public void setName(String name) {

         this.name = name;

     }

     public Date getBirthday() {

         return birthday;

     }

     public void setBirthday(Date birthday) {

         this.birthday = birthday;

     }

 }
第三步:创建SEI接口
 package com.xqc.ws.rest.server;

 import java.util.List;

 import javax.jws.WebService;

 import javax.ws.rs.GET;

 import javax.ws.rs.Path;

 import javax.ws.rs.PathParam;

 import javax.ws.rs.Produces;

 import javax.ws.rs.core.MediaType;

 import com.xqc.ws.rest.pojo.Student;

 /**

  *

  * <p>Title: StudentInterface.java</p>

  * <p>Description:学生接口</p>

  */

 @WebService

 @Path("/student")//@Path("/student")就是将请求路径中的“/student”映射到接口上

 public interface StudentInterface {

     //查询单个学生

     @GET//指定请求方式,如果服务端发布的时候指定的是GET(POST),那么客户端访问时必须使用GET(POST)

     @Produces(MediaType.APPLICATION_XML)//指定服务数据类型

     @Path("/query/{id}")//@Path("/query/{id}")就是将“/query”映射到方法上,“{id}”映射到参数上,多个参数,以“/”隔开,放到“{}”中

     public Student query(@PathParam("id")long id);

     //查询多个学生

     @GET//指定请求方式,如果服务端发布的时候指定的是GET(POST),那么客户端访问时必须使用GET(POST)

     @Produces("application/json;charset=utf-8")//指定服务数据类型

     @Path("/queryList/{name}")//@Path("/queryList/{name}")就是将“/queryList”映射到方法上,“{name}”映射到参数上,多个参数,以“/”隔开,放到“{}”中

     public List<Student> queryList(@PathParam("name")String name);

 }
第四步:创建SEI实现类
 package com.xqc.ws.rest.server;

 import java.util.ArrayList;

 import java.util.Date;

 import java.util.List;

 import com.xqc.ws.rest.pojo.Student;

 /**

  *

  * <p>Title: StudentInterfaceImpl.java</p>

  * <p>Description:学生的实现类</p>

  */

 public class StudentInterfaceImpl implements StudentInterface {

     @Override

     public Student query(long id) {

         Student st = new Student();

         st.setId(110);

         st.setName("张三");

         st.setBirthday(new Date());

         return st;

     }

     @Override

     public List<Student> queryList(String name) {

         Student st = new Student();

         st.setId(110);

         st.setName("张三");

         st.setBirthday(new Date());

         Student st2 = new Student();

         st2.setId(120);

         st2.setName("李四");

         st2.setBirthday(new Date());

         List<Student> list = new ArrayList<Student>();

         list.add(st);

         list.add(st2);

         return list;

     }

 }
第五步:
配置Spring配置文件,beans.xml,<jaxrs:server,设置1.服务地址;2.服务实现类
 <?xml version="1.0" encoding="UTF-8"?>

 <beans xmlns="http://www.springframework.org/schema/beans"

     xmlns:xsi="http://www.w3.org/2001/XMLSchema-instance" xmlns:jaxws="http://cxf.apache.org/jaxws"

     xmlns:jaxrs="http://cxf.apache.org/jaxrs" xmlns:cxf="http://cxf.apache.org/core"

     xsi:schemaLocation="http://www.springframework.org/schema/beans

                             http://www.springframework.org/schema/beans/spring-beans.xsd

                             http://cxf.apache.org/jaxrs http://cxf.apache.org/schemas/jaxrs.xsd

                             http://cxf.apache.org/jaxws http://cxf.apache.org/schemas/jaxws.xsd

                             http://cxf.apache.org/core http://cxf.apache.org/schemas/core.xsd">

     <!-- <jaxrs:server发布REST的服务 ,对JAXRSServerFactoryBean类封装-->

     <jaxrs:server address="/user">

         <jaxrs:serviceBeans>

             <ref bean="studentInterface"/>

         </jaxrs:serviceBeans>

     </jaxrs:server>

     <!-- 配置服务实现类 -->

     <bean name="studentInterface" class="com.xqc.ws.rest.server.StudentInterfaceImpl"/>

 </beans>
第六步:配置web.xml
<?xml version="1.0" encoding="UTF-8"?>

<web-app xmlns:xsi="http://www.w3.org/2001/XMLSchema-instance" xmlns="http://java.sun.com/xml/ns/javaee" xsi:schemaLocation="http://java.sun.com/xml/ns/javaee http://java.sun.com/xml/ns/javaee/web-app_3_0.xsd" id="WebApp_ID" version="3.0">

  <display-name>ws_2_cxf_spring_server</display-name>

  <!-- 设置spring的环境 -->

  <context-param>

      <!--contextConfigLocation是不能修改的  -->

      <param-name>contextConfigLocation</param-name>

      <param-value>classpath:applicationContext.xml</param-value>

  </context-param>

  <listener>

      <listener-class>org.springframework.web.context.ContextLoaderListener</listener-class>

  </listener>

  <!-- 配置CXF的Servlet -->

  <servlet>

      <servlet-name>CXF</servlet-name>

      <servlet-class>org.apache.cxf.transport.servlet.CXFServlet</servlet-class>

  </servlet>

  <servlet-mapping>

      <servlet-name>CXF</servlet-name>

      <url-pattern>/ws/*</url-pattern>

  </servlet-mapping>

  <welcome-file-list>

    <welcome-file>index.html</welcome-file>

    <welcome-file>index.htm</welcome-file>

    <welcome-file>index.jsp</welcome-file>

    <welcome-file>default.html</welcome-file>

    <welcome-file>default.htm</welcome-file>

    <welcome-file>default.jsp</welcome-file>

  </welcome-file-list>

</web-app>
第七步:部署到tomcat下,启动tomcat
第八步:测试服务
REST服务的使用说明书地址:
http://127.0.0.1:8080/ws_4_cxf_rest_spring_server/ws/user?_wadl
http://127.0.0.1:8080/ws_4_cxf_rest_spring_server/ws/user/student/query/110 查询单个学生,返回XML数据
 <student>

 <birthday>2015-11-27T15:22:14.240+08:00</birthday>

 <id>110</id>

 <name>张三</name>

 </student>
http://127.0.0.1:8080/ws_4_cxf_rest_spring_server/ws/user//student/queryList/110?_type=json 查询多个学生,返回JSON
{"student":[{"birthday":"2015-11-27T15:24:21.565+08:00","id":110,"name":"张三"},{"birthday":"2015-11-27T15:24:21.565+08:00","id":120,"name":"李四"}]}
3.2.2:客户端:因为返回的直接就是数据,其实直接解析就可以,DOM4J解析
直接用新建html然后使用Ajax使用即可
———————————————————————————————————————————————
综合案例训练:
———————————————————————————————————————————————
WebService与CXF的更多相关文章
- WebService之CXF注解报错(一)
WebService之CXF注解 1.详细报错例如以下 usage: java org.apache.catalina.startup.Catalina [ -config {pathname} ] ...
- WebService它CXF注释错误(两)
WebService它CXF注解 1.详细报错例如以下 五月 04, 2014 11:24:12 下午 org.apache.cxf.wsdl.service.factory.ReflectionSe ...
- WebService之CXF注解报错(三)
WebService之CXF注解 1.具体错误如下 五月 04, 2014 11:29:28 下午 org.apache.cxf.wsdl.service.factory.ReflectionServ ...
- WebService之CXF注解报错(二)
WebService之CXF注解 1.具体报错如下 五月 04, 2014 11:24:12 下午 org.apache.cxf.wsdl.service.factory.ReflectionServ ...
- 转载 WebService 的CXF框架 WS方式Spring开发
WebService 的CXF框架 WS方式Spring开发 1.建项目,导包. 1 <project xmlns="http://maven.apache.org/POM/4.0 ...
- 【WebService】WebService之CXF和Spring整合(六)
前面介绍了WebService与CXF的使用,项目中我们经常用到Spring,这里介绍CXF与Spring整合 步骤 1.创建一个Maven Web项目,可以参照:[Maven]Eclipse 使用M ...
- 转-JAVA webservice之CXF 范例--http://cxshun.iteye.com/blog/1275408
JAVA webservice之CXF 博客分类: j2ee相关 昨天我们一起学习了一下xfire,今天我们来看一下CXF,为什么学完那个接着学这个呢.因为CXF是在xfire的基础上实现 的,所以我 ...
- Webservice与CXF框架快速入门
1. Webservice Webservice是一套远程调用技术规范 远程调用RPC, 实现了系统与系统进程间的远程通信.java领域有很多可实现远程通讯的技术,如:RMI(Socket + 序列化 ...
- WebService之CXF框架
本文主要包括以下内容 ant工具的使用 利用cxf实现webservice cxf与spring整合 ajax访问webservice ant 工具 1.为什么要用到ant这个工具呢? Ant做为一种 ...
- So easy Webservice 7.CXF 发布WebService
(一)使用ServerFactoryBean 方式实现发布WS服务 1.新建项目,添加cxf jar包到项目中 2.编写服务实现类 /** * CXF WebService * 不用注解 * @aut ...
随机推荐
- Windows下 webpack4.0 的安装
这里我们通过npm来进行安装 1. 安装 webpack // 全局安装webpack npm install webpack -g 2. 通过 webpack -v 命令查看当前安装的版本 此时如果 ...
- SAP 官网中文帮助文件&BP中文资料汇总
系统 描述 版本 连接 SAP ME 制造执行 SAP Manufacturing Execution (SAP ME) 15.0 点击我 SAP ECC EHP6 财务部分 SAP ERP 6.0 ...
- loadrunner 运行脚本-Run-time Settings之Preferences设置
运行脚本-Run-time Settings之Preferences设置 by:授客 QQ:1033553122 打开Preferences设置对话框,这里提供了对运行时的参数选择设置 Enable ...
- Expo大作战(三十一)--expo sdk api之Payments(expo中的支付),翻译这篇文章傻逼了,完全不符合国内用户,我只负责翻译大家可以略过!
简要:本系列文章讲会对expo进行全面的介绍,本人从2017年6月份接触expo以来,对expo的研究断断续续,一路走来将近10个月,废话不多说,接下来你看到内容,讲全部来与官网 我猜去全部机翻+个人 ...
- mysql8 :客户端连接caching-sha2-password问题
在安装mysql8的时候如果选择了密码加密,之后用客户端连接比如navicate,会提示客户端连接caching-sha2-password,是由于客户端不支持这种插件,可以通过如下方式进行修改: # ...
- 洗礼灵魂,修炼python(55)--爬虫篇—知识补充—RFC 2616 http状态码
不多说直接上状态码表: 状态码 含义 100 客户端应当继续发送请求.这个临时响应是用来通知客户端它的部分请求已经被服务器接收,且仍未被拒绝.客户端应当继续发送请求的剩余部分,或者如果请求已经完成,忽 ...
- python第六十六天--sqlalchemy
#!usr/bin/env python #-*-coding:utf-8-*- # Author calmyan #python #2017/7/6 21:29 #__author__='Admin ...
- Servlet (HttpServletResponse)对象
1.setStatus(int status)方法:用于设置HTTP响应消息的状态码,并生成响应状态行.响应状态行中的状态描述信息直接与状态码相关,HTTP版本由服务器确定,因此只需要通过这个方法设置 ...
- ORA-12538;ORA-12154;使用PL/SQL dve无法连接远程服务器上的oracle数据库,同时本机上也安装了一个oracle数据库
问题描述:本人使用PL/SQL dve连接远程服务器上的oracle数据库,一直是没有问题的.我想提高下自己在数据库方面的能力就在自己的笔记本上安装了一个oracle数据库实例,安装并配置好之后,使用 ...
- 改变javascript函数内部this指针指向的三种方法
在查了大量的资料后,我总结了下面的三条规则,这三条规则,已经可以解决目前我所遇到的所有问题.规则0:函数本身是一个特殊类型,大多数时候,可以认为是一个变量. function a() { alert( ...