
SpringMVC和mybatis的框架
1.首先以一个项目做例子,该项目用到的框架即为SpringMVC+mybatis,项目环境为MyEclipse+sqlserver+tomcat6,项目的地址(项目+数据库备份文件)大家可以上我的百度云下载http://pan.baidu.com/s/1o8qDqxs
2.还原项目怎么还原这里不具体说了,打开项目,找到ApplicationContext.xml,先改变一下数据库的连接,把用户名和密码设成自己的数据库的用户名和密码

3.我们现在整体看一下这个项目的结构,首先是整合SpringMVC,Appicationcontext-mvc.xml
<?xml version="1.0" encoding="UTF-8"?>
<beans xmlns="http://www.springframework.org/schema/beans"
xmlns:xsi="http://www.w3.org/2001/XMLSchema-instance"
xmlns:mvc="http://www.springframework.org/schema/mvc"
xmlns:context="http://www.springframework.org/schema/context"
xsi:schemaLocation="http://www.springframework.org/schema/beans http://www.springframework.org/schema/beans/spring-beans-3.0.xsd
http://www.springframework.org/schema/mvc http://www.springframework.org/schema/mvc/spring-mvc-3.0.xsd
http://www.springframework.org/schema/context http://www.springframework.org/schema/context/spring-context-3.0.xsd">
<!-- 启用spring mvc 注解-->
<mvc:annotation-driven/>
<!-- 自动扫描的包名 ,使Spring支持自动检测组件,如注解的Controller-->
<context:component-scan base-package="com.flf.controller" />
<!--配置拦截器, 多个拦截器,顺序执行 -->
<mvc:interceptors>
<mvc:interceptor>
<!-- 匹配的是url路径 -->
<mvc:mapping path="/**/*.html*"/>
<bean class="com.flf.interceptor.LoginHandlerInterceptor"/>
</mvc:interceptor>
<mvc:interceptor>
<mvc:mapping path="/**/*.html*"/>
<bean class="com.flf.interceptor.RightsHandlerInterceptor"/>
</mvc:interceptor>
</mvc:interceptors>
<!-- 视图解析器:定义跳转的文件的前后缀 -->
<bean class="org.springframework.web.servlet.view.InternalResourceViewResolver">
<property name="prefix" value="/jsp/"/>
<property name="suffix" value=".jsp"/><!--可为空,方便实现自已的依据扩展名来选择视图解释类的逻辑 -->
</bean>
<bean id="exceptionResolver" class="com.flf.resolver.MyExceptionResolver"></bean>
</beans>
4.整合mybitas,ApplicationContext.xml
<?xml version="1.0" encoding="UTF-8"?>
<beans xmlns="http://www.springframework.org/schema/beans"
xmlns:xsi="http://www.w3.org/2001/XMLSchema-instance"
xmlns:aop="http://www.springframework.org/schema/aop"
xmlns:tx="http://www.springframework.org/schema/tx"
xsi:schemaLocation="http://www.springframework.org/schema/beans http://www.springframework.org/schema/beans/spring-beans.xsd
http://www.springframework.org/schema/aop http://www.springframework.org/schema/aop/spring-aop-2.0.xsd
http://www.springframework.org/schema/tx http://www.springframework.org/schema/tx/spring-tx-2.0.xsd">
<import resource="ApplicationContext-service.xml"/>
<!-- 配置数据源 ,与数据库的连接-->
<bean id="dataSource" class="org.springframework.jdbc.datasource.DriverManagerDataSource">
<property name="driverClassName" value="com.microsoft.sqlserver.jdbc.SQLServerDriver"/>
<property name="username" value="sa"/>
<property name="password" value="123456"/>
<property name="url" value="jdbc:sqlserver://localhost:1433; DatabaseName=chongqing"/>
</bean>
<!-- mybatis配置 -->
<bean id="sqlSessionFactory" class="org.mybatis.spring.SqlSessionFactoryBean">
<property name="dataSource" ref="dataSource"/>
<property name="configLocation" value="classpath:mybatis/config.xml"/>
</bean>
<bean id="sqlSession" class="org.mybatis.spring.SqlSessionTemplate">
<constructor-arg index="0" ref="sqlSessionFactory"></constructor-arg>
</bean>
<!-- 扫描 basePackage下所有的接口,根据对应的mapper.xml为其生成代理类-->
<bean class="org.mybatis.spring.mapper.MapperScannerConfigurer">
<property name="basePackage" value="com.flf.mapper" />
</bean>
<!-- 数据源指向于DataSource -->
<bean name="transactionManager" class="org.springframework.jdbc.datasource.DataSourceTransactionManager">
<property name="dataSource" ref="dataSource"></property>
</bean>
<!-- 增删该查的操作指向于transactionManager -->
<tx:advice id="txAdvice" transaction-manager="transactionManager">
<tx:attributes>
<tx:method name="delete*" propagation="REQUIRED" read-only="false"
rollback-for="java.lang.Exception"/>
<tx:method name="insert*" propagation="REQUIRED" read-only="false"
rollback-for="java.lang.Exception" />
<tx:method name="update*" propagation="REQUIRED" read-only="false"
rollback-for="java.lang.Exception" />
<tx:method name="save*" propagation="REQUIRED" read-only="false"
rollback-for="java.lang.Exception" />
<tx:method name="*" propagation="REQUIRED" read-only="true"/>
</tx:attributes>
</tx:advice>
<!--
aop: 作用表达于com.flf.service下的所有service,指向于txAdvice的方法
-->
<aop:config>
<aop:pointcut id="pc" expression="execution(* com.flf.service..*(..))" />
<aop:advisor pointcut-ref="pc" advice-ref="txAdvice" />
</aop:config>
</beans>
5web.xml整合SpringMVC和mybitas
<?xml version="1.0" encoding="UTF-8"?>
<web-app xmlns:xsi="http://www.w3.org/2001/XMLSchema-instance" xmlns="http://java.sun.com/xml/ns/javaee" xsi:schemaLocation="http://java.sun.com/xml/ns/javaee http://java.sun.com/xml/ns/javaee/web-app_2_5.xsd" version="2.5">
<!--
<display-name>wl</display-name>
<context-param>
<param-name>webAppRootKey</param-name>
<param-value>wl</param-value>
</context-param>
-->
<!-- 初始化过程首先读的节点 -->
<context-param>
<param-name>contextConfigLocation</param-name>
<param-value>classpath:spring/ApplicationContext.xml</param-value>
</context-param>
<context-param>
<param-name>log4jConfigLocation</param-name>
<param-value>classpath:log4j.xml</param-value>
</context-param>
<!-- 配置字符集 -->
<filter>
<filter-name>encodingFilter</filter-name>
<filter-class>org.springframework.web.filter.CharacterEncodingFilter</filter-class>
<init-param>
<param-name>encoding</param-name>
<param-value>utf-8</param-value>
</init-param>
</filter>
<filter-mapping>
<filter-name>encodingFilter</filter-name>
<url-pattern>/*</url-pattern>
</filter-mapping>
<listener>
<listener-class>org.springframework.web.util.Log4jConfigListener</listener-class>
</listener>
<listener>
<listener-class>org.springframework.web.context.ContextLoaderListener</listener-class>
</listener>
<listener>
<listener-class>com.flf.listener.WebAppContextListener</listener-class>
</listener>
<!-- 初始化 DispatcherServlet时,该框架在 web应用程序classpath目录中寻找spring/ApplicationContext-mvc.xml的文件,
并在那里定义相关的Beans,重写在全局中定义的任何Beans -->
<servlet>
<servlet-name>springMvc</servlet-name>
<servlet-class>org.springframework.web.servlet.DispatcherServlet</servlet-class>
<init-param>
<param-name>contextConfigLocation</param-name>
<param-value>classpath:spring/ApplicationContext-mvc.xml</param-value>
</init-param>
<load-on-startup>1</load-on-startup>
</servlet>
<!-- 所有以.html的请求,都会被DispatcherServlet处理 -->
<servlet-mapping>
<servlet-name>springMvc</servlet-name>
<url-pattern>*.html</url-pattern>
</servlet-mapping>
</web-app>
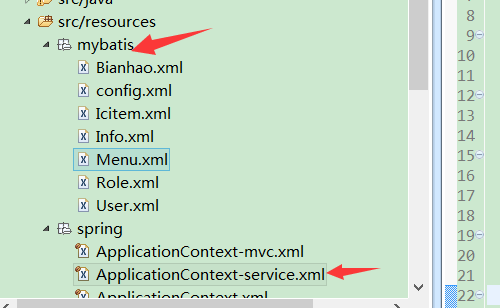
6.当我们新增一个对象的时候,先要在Applicationcontext.service中注入该对象的service,然后再在mybatis文件夹中增加该对象对应的xml文件
本人微信号xjt199561,有什么技术上的交流欢迎添加
SpringMVC和mybatis的框架的更多相关文章
- (一)springmvc+spring+mybatis+maven框架搭建
(一)springmvc+spring+mybatis+maven框架搭建 1.说明 工作之余,为了学习点东西.先搭建个框架. 以后要往里面加东西,比如rabbitMQ.redis.shiro等. 也 ...
- SSM(SpringMVC+Spring+MyBatis)三大框架使用Maven快速搭建整合(实现数据库数据到页面进行展示)
本文介绍使用SpringMVC+Spring+MyBatis三大框架使用Maven快速搭建一个demo,实现数据从数据库中查询返回到页面进行展示的过程. 技术选型:SpringMVC+Spring+M ...
- SSM(SpringMVC+Spring+Mybatis)框架学习理解
近期做到的项目中,用到的框架是SSM(SpringMVC+Spring+Mybatis).之前比较常见的是SSH.用到了自然得了解各部分的分工 spring mvc 是spring 处理web层请求的 ...
- spring+websocket综合(springMVC+spring+MyBatis这是SSM框架和websocket集成技术)
java-websocket该建筑是easy.儿童无用的框架可以在这里下载主线和个人教学好java-websocket计划: Apach Tomcat 8.0.3+MyEclipse+maven+JD ...
- SpringSecurity——基于Spring、SpringMVC和MyBatis自定义SpringSecurity权限认证规则
本文转自:https://www.cnblogs.com/weilu2/p/springsecurity_custom_decision_metadata.html 本文在SpringMVC和MyBa ...
- SSM框架-----------SpringMVC+Spring+Mybatis框架整合详细教程
1.基本概念 1.1.Spring Spring是一个开源框架,Spring是于2003 年兴起的一个轻量级的Java 开发框架,由Rod Johnson 在其著作Expert One-On-One ...
- 手把手Maven搭建SpringMVC+Spring+MyBatis框架(超级详细版)
手把手Maven搭建SpringMVC+Spring+MyBatis框架(超级详细版) SSM(Spring+SpringMVC+Mybatis),目前较为主流的企业级架构方案.标准的MVC设计模式, ...
- springmvc+spring-security+mybatis +redis +solar框架抽取
参考文章:Spring MVC 3 深入总结: 第二章 Spring MVC入门 —— 跟开涛学SpringMVC 参考博客:http://www.cnblogs.com/liukemng/categ ...
- spring+springMVC+mybatis的框架项目基础环境搭建
上一个项目在后台用到spring+springMVC+mybatis的框架,先新项目初步需求也已经下来,不出意外的话,应该也是用这个框架组合. 虽然在之前activiti相关的学习中所用到的框架也是这 ...
随机推荐
- 软件设计模式详解:OCP原则
看到两篇关于OCP的文章, 纳之. 原文: http://www.cnblogs.com/muzongyan/archive/2010/08/05/1793454.html http://blog. ...
- Android OpenGL ES(三)OpenGL ES API 命名习惯 .
OpenGL ES是个跨平台的3D图形开发包规范,最常见的实现是采用C语言实现的,Android OpenGL ES 实现上是使用Java 语言对底层的C接口进行了封装,因此在android.open ...
- 单元测试、自动化测试、接口测试过程中的Excel数据驱动(java实现)
import java.io.FileInputStream;import java.io.InputStream;import java.util.HashMap;import java.util. ...
- offset获取位置
<!DOCTYPE HTML> <html> <head> <meta http-equiv="Content-Type" content ...
- php截取中文字符串,英文字符串,中英文字符串长度的方法
今天学习了php函数截取中文字符串,英文字符串,中英文字符串的函数使用方法.对中英文截取方法不理解,此处先做记录. PHP自带的函数如strlen().mb_strlen()都是通过计算字符串所占字节 ...
- Git学习 -- 简介
Git是什么? 是一款免费.开源的分布式版本控制系统,用于敏捷高效地处理任何或小或大的项目. 特点 分布式相比于集中式的最大区别在于开发者可以提交到本地,每个开发者通过克隆(git clone),在本 ...
- Chapter 1 First Sight——21
They were sitting in the corner of the cafeteria, as far away from where I sat as possible in the lo ...
- double类型之四舍五入
题目: A - Tutor Time Limit:1000MS Memory Limit:65535KB 64bit IO Format:%I64d & %I64u Submi ...
- 剑指offer 重建二叉树
1 2 3 4 5 6 7 8 9 10 11 12 13 14 15 16 17 18 19 20 21 22 23 24 25 26 27 28 29 30 31 32 33 34 35 36 3 ...
- javascript 中arguments.callee 调用自身
一.Arguments该对象代表正在执行的函数和调用他的函数的参数.[function.]arguments[n]参数function :选项.当前正在执行的 Function 对象的名字.n :选项 ...