Spring Security 入门(基本使用)
Spring Security 入门(基本使用)
这几天看了下b站关于 spring security 的学习视频,不得不说 spring security 有点复杂,脑袋有点懵懵的,在此整理下学习内容。
1、入门
1.1、什么是 spring security
- spring security 是一个比 shiro 更加强大的安全管理框架,权限颗粒度更细。
- 源自于 spring 家族,能跟 springboot 无缝整合,对 oauth2 的支持也更好。
1.2、依赖配置
<dependency>

    <groupId>org.springframework.boot</groupId>

    <artifactId>spring-boot-starter-security</artifactId>

</dependency>
1.3、测试接口
添加一个简单的 /hello 接口:
@RequestMapping("/hello")

@ResponseBody

public String hello() {

    return "恭喜你登录成功";

}
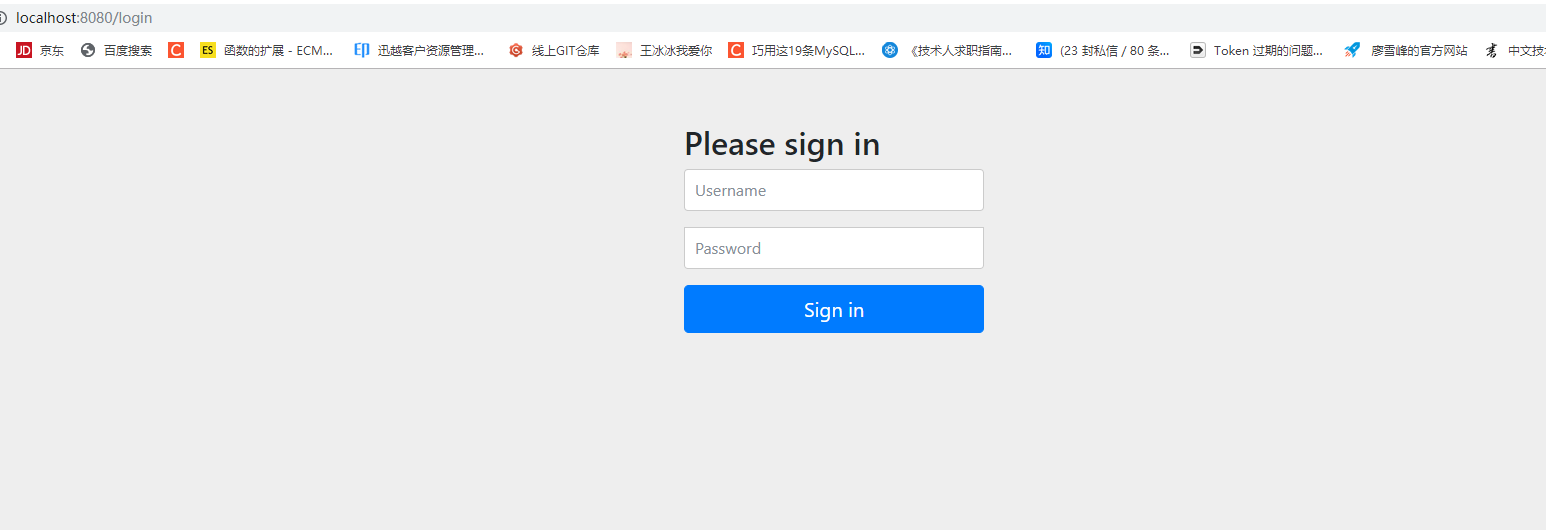
启动项目,访问 /hello 接口,会发现自动跳转到 spring security 提供的登录页面:
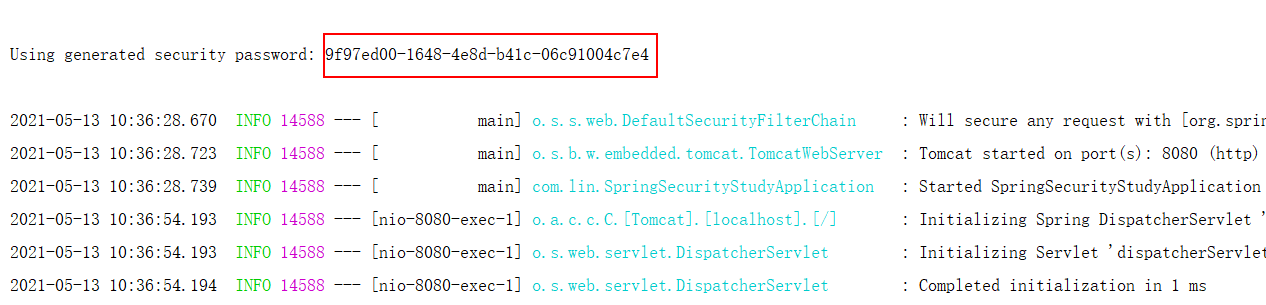
默认的 username 为 :user,password 在项目启动时随机生成,具体如下:
登录成功后即可访问 /hello接口。
2、自定义登录页面、登录成功处理器、登录失败处理器、异常处理器、权限逻辑
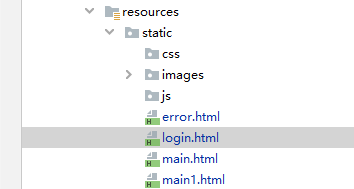
页面结构如下:
2.1、自定义登录页面
1、登录页面 login.html :
<!DOCTYPE html>

<html lang="en">

<head>

    <meta charset="UTF-8">

    <title>登陆</title>

</head>

<body>

<form method="post" action="/login">

    用户名:<input type="text" name="username123"><br />

    密码:<input type="password" name="password123"><br />

    <button type="submit">立即登陆</button>

</form>

</body>

</html>
2、登录成功跳转页 main.html
<!DOCTYPE html>

<html lang="en">

<head>

    <meta charset="UTF-8">

    <title>Title</title>

</head>

<body>

登录成功!!!

<a href="/main1.html">跳转权限页</a>

</body>

</html>
3、登录失败跳转页 error.html
<!DOCTYPE html>

<html lang="en">

<head>

    <meta charset="UTF-8">

    <title>Title</title>

</head>

<body>

登录失败,请重新登录<a href="/login.html">跳转</a>

</body>

</html>
4、权限页 main1.html
**main.html **如果有权限,则能访问该页面,否则报 403
<!DOCTYPE html>

<html lang="en">

<head>

    <meta charset="UTF-8">

    <title>Title</title>

</head>

<body>

权限控制!!!</a>

</body>

</html>
2.2、自定义登录逻辑
自定义登录逻辑主要用于对用户名和密码进行校验,需要实现 UserDetailService 接口
@Service

public class UserDetailServiceImpl implements UserDetailsService {

    @Autowired

    private BCryptPasswordEncoder bCryptPasswordEncoder;

    @Override

    public UserDetails loadUserByUsername(String username) throws UsernameNotFoundException {

        System.out.println("=======执行自定义登录逻辑====");

        //校验用户名,实际环境中需要从数据库查询

        if (!username.equals("admin")) {

            throw new UsernameNotFoundException("用户不存在");

        }

        //比较密码,实际需要从数据库取出原密码校验,框架会自动读取登录页面的密码

        String password = bCryptPasswordEncoder.encode("123456");

        //返回UserDetails,实际开发中可拓展UserDetails

        return new User(username, password,

                        //自定义权限

                        AuthorityUtils.commaSeparatedStringToAuthorityList("permission1"));

    }

}
2.3、自定义登录成功处理器
登录成功处理器实现 AuthenticationSuccessHandler 接口
public class MyAuthenticationSuccessHandler implements AuthenticationSuccessHandler {

    private String url;

    public MyAuthenticationSuccessHandler(String url) {

        this.url = url;

    }

    @Override

    public void onAuthenticationSuccess(HttpServletRequest request, HttpServletResponse response, Authentication authentication) throws IOException, ServletException {

        //获取IP地址

        System.out.println(request.getRemoteAddr());

        //获取认证用户信息

        User user = (User) authentication.getPrincipal();

        System.out.println("=====" + user.getAuthorities());

        //重定向

        response.sendRedirect(url);

    }

}
2.4、自定义登录失败处理器
登录失败处理器实现 AuthenticationFailureHandler接口
public class MyAuthenticationFailureHandler implements AuthenticationFailureHandler {

    private String url;

    public MyAuthenticationFailureHandler(String url) {

        this.url = url;

    }

    @Override

    public void onAuthenticationFailure(HttpServletRequest request, HttpServletResponse response, AuthenticationException exception) throws IOException, ServletException {

        //重定向

        response.sendRedirect(url);

    }

}
2.5、自定义异常处理器
@Component

public class MyAccessDeniedHandler implements AccessDeniedHandler {

    @Override

    public void handle(HttpServletRequest request, HttpServletResponse response, AccessDeniedException accessDeniedException) throws IOException, ServletException {

        //响应状态403

        response.setStatus(HttpServletResponse.SC_FORBIDDEN);

        //返回格式

        response.setHeader("Content-Type", "application/json;charset=utf-8");

        PrintWriter writer = response.getWriter();

        writer.write("{status: \"error\",\"msg\": \"权限不足,请联系管理员\"}");

        writer.flush();

        writer.close();

    }

}
2.6、配置 Spring Security
该类是 Spring Security 的配置类, 继承 WebSecurityConfigurerAdapter
@Configuration

public class SecurityConfig extends WebSecurityConfigurerAdapter {

    @Autowired

    private MyAccessDeniedHandler myAccessDeniedHandler;

    /**

     * 指定密码加密的方法

     *

     * @return

     */

    @Bean

    public BCryptPasswordEncoder getPasswordEncode() {

        return new BCryptPasswordEncoder();

    }

    @Override

    protected void configure(HttpSecurity http) throws Exception {

        //表单提交

        http.formLogin()

                //自定义用户名和密码参数

                .usernameParameter("username123")

                .passwordParameter("password123")

                //自定义登录页面

                .loginPage("/showLogin")

                //必须和表单提交的接口一样,执行自定义登录逻辑

                .loginProcessingUrl("/login")

                //自定义登录成功处理器

                .successHandler(new MyAuthenticationSuccessHandler("/main.html"))

                //自定义登录失败处理器

                .failureHandler(new MyAuthenticationFailureHandler("/error.html"));

        //授权

        http.authorizeRequests()

                //放行/login.html,不需要认证

                .antMatchers("/showLogin").permitAll()

                //放行/error.html,不需要认证

                .antMatchers("/error.html").permitAll()

                //基于权限判断

                .antMatchers("/main1.html").hasAuthority("permission1")

                //所有请求必须认证

                .anyRequest().authenticated();

        //异常处理器

        http.exceptionHandling().accessDeniedHandler(myAccessDeniedHandler);

        //关闭csrf防护

        http.csrf().disable();

    }

    /**

     * 放行静态资源,css,js,images

     *

     * @param web

     * @throws Exception

     */

    @Override

    public void configure(WebSecurity web) throws Exception {

        web.ignoring().antMatchers("/css/**", "/js/**")

        .antMatchers("/**/*.png");

    }

}
2.7、运行测试
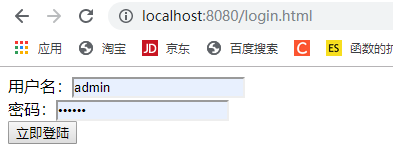
1、运行后访问 http://localhost:8080/login.html,加载的自定义登录页面如下:
注意我在前面的自定义登录逻辑中写死了 username: admin和password:123456
2、点击立即登陆按钮,根据登录成功处理器重定向到登录成功页 main.html:
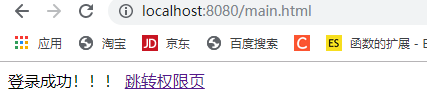
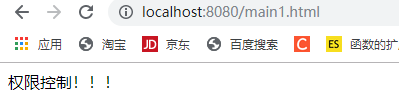
3、前面的代码中,如果登录成功则拥有permission1权限,而访问权限页刚好需要 permission1 权限,
点击跳转权限页,来到权限页** main1.html**:
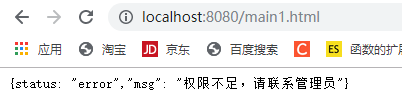
4、修改登录成功的权限为 permission2,
@Override

public UserDetails loadUserByUsername(String username) throws UsernameNotFoundException {

    System.out.println("=======执行自定义登录逻辑====");

    //校验用户名,实际环境中需要从数据库查询

    if (!username.equals("admin")) {

        throw new UsernameNotFoundException("用户不存在");

    }

    //比较密码,实际需要从数据库取出原密码校验,框架会自动读取登录页面的密码

    String password = bCryptPasswordEncoder.encode("123456");

    //返回UserDetails,实际开发中可拓展UserDetails

    return new User(username, password,

            //修改权限为permisson2

            AuthorityUtils.commaSeparatedStringToAuthorityList("permission2"));

}
再次访问需要 permission1 权限的权限页,打印以下错误:
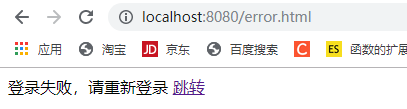
5、如果 username 或者 password 错误,根据登录失败处理器重定向到登录失败页 error.html:
3、自定义用户退出登录
3.1、默认的退出登录
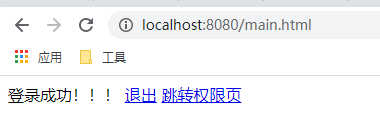
spring security 有默认的退出登录接口,直接访问 /logout 接口,就能实现退出登录,下面是简单演示:
main.html 添加退出登录的访问链接logout:
<!DOCTYPE html>

<html lang="en">

<head>

    <meta charset="UTF-8">

    <title>Title</title>

</head>

<body>

登录成功!!!

<a href="/logout">退出</a>

<a href="/main1.html">跳转权限页</a>

</body>

</html>
直接就能退出了,简不简单呢?默认跳转到登录页:
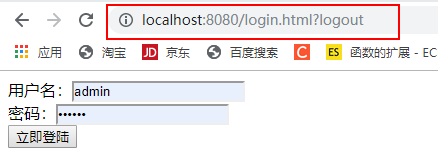
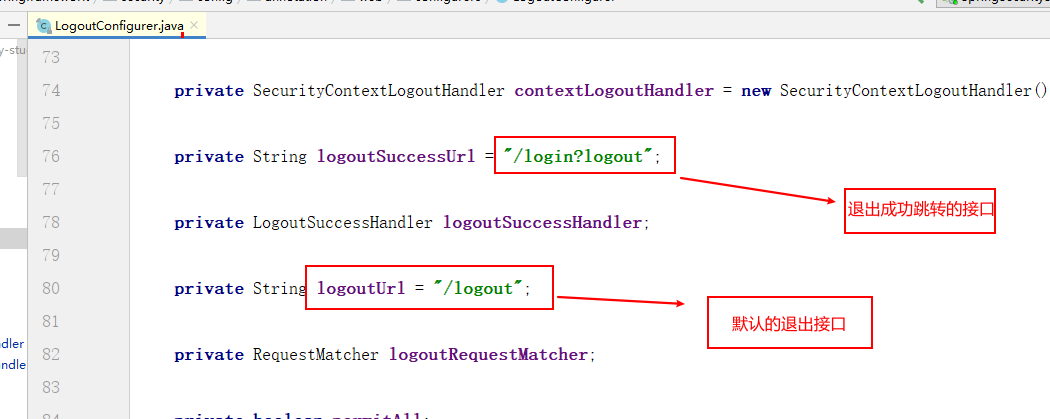
仔细观察,发现访问路径拼接了 ?logout 字符串,查看源码可以发现默认的配置如下:
3.2、自定义退出登录
如果默认的退出登录无法满足,可以自定义处理器来解决。
3.2.1、自定义 LogoutHandler
默认情况下清除认证信息 (clearAuthentication),和Session 失效(invalidateHttpSession) 已经由内置的SecurityContextLogoutHandler 来完成。
这个 LogoutHandle 主要用来处理用户信息。
/**

 * 登出接口处理器

 */

public class MyLogoutHandler implements LogoutHandler {

    @Override

    public void logout(HttpServletRequest request, HttpServletResponse response, Authentication authentication) {

        User user = (User) authentication.getPrincipal();

        //执行用户信息操作,如记录用户下线时间...

    }

}
3.2.2、自定义 LogoutSuccessHandler
这个 LogoutSuccessHandler 用于返回响应信息给前端,可以返回 json、重定向页面。
注意配置这个处理器之后,就不需要配置 logoutSuccessUrl了。
/**

 * 登出成功处理器

 */

public class MyLogoutSuccessHandler implements LogoutSuccessHandler {

    private String url;

    public MyLogoutSuccessHandler(String url) {

        this.url = url;

    }

    @Override

    public void onLogoutSuccess(HttpServletRequest request, HttpServletResponse response, Authentication authentication) throws IOException, ServletException {

        //重定向

        response.sendRedirect(url);

    }

}
3.3.3、spring security 添加配置
@Override

protected void configure(HttpSecurity http) throws Exception {

    //表单提交

    http.formLogin()

        //自定义用户名和密码参数

        .usernameParameter("username123")

        .passwordParameter("password123")

        //自定义登录页面

        .loginPage("/login.html")

        //必须和表单提交的接口一样,执行自定义登录逻辑

        .loginProcessingUrl("/login")

        //自定义登录成功处理器

        .successHandler(new MyAuthenticationSuccessHandler("/main.html"))

        //自定义登录失败处理器

        .failureHandler(new MyAuthenticationFailureHandler("/error.html"));

    //授权

    http.authorizeRequests()

        //放行/login.html,不需要认证

        .antMatchers("/login.html").permitAll()

        //放行/error.html,不需要认证

        .antMatchers("/error.html").permitAll()

        //基于权限判断

        .antMatchers("/main1.html").hasAuthority("permission1")

        //所有请求必须认证

        .anyRequest().authenticated();

    //异常处理器

    http.exceptionHandling().accessDeniedHandler(myAccessDeniedHandler);

    //登出

    http.logout()

        //登出接口,与表单访问接口一致

        .logoutUrl("/signLogout")

        //登出处理器

        .addLogoutHandler(new MyLogoutHandler())

        //登出成功后跳转的页面

        .logoutSuccessHandler(new MyLogoutSuccessHandler("/login.html"));

    //关闭csrf防护

    http.csrf().disable();

}
3.3.4、修改登出接口
main.html 修改如下:
<!DOCTYPE html>

<html lang="en">

<head>

    <meta charset="UTF-8">

    <title>Title</title>

</head>

<body>

登录成功!!!

<a href="/signLogout">退出</a>

<a href="/main1.html">跳转权限页</a>

</body>

</html>
运行测试后,返回 localhost://8080/login.html
4、基于注解的权限控制
4.1、权限注解参数
关于权限的注解参数共有三个:
- @PreAuthorize:方法执行前进行权限检查
- @PostAuthorize:方法执行后进行权限检查
- @Secured:类似于 @PreAuthorize
4.2、启动类添加 @EnableGlobalMethodSecurity
启动类配置如下:
@SpringBootApplication

@EnableGlobalMethodSecurity(securedEnabled = true,prePostEnabled = true)

public class SpringSecurityStudyApplication {

    public static void main(String[] args) {

        SpringApplication.run(SpringSecurityStudyApplication.class, args);

    }

}
4.3、运行测试
4.3.1、修改 spring security 和 自定义登录逻辑
successHander(登录成功处理器) 修改为 successForwardUrl(登录成功访问路径),删除 permission1的权限判断,改成访问接口时进行权限判断。
@Override

protected void configure(HttpSecurity http) throws Exception {

    //表单提交

    http.formLogin()

        //自定义用户名和密码参数

        .usernameParameter("username123")

        .passwordParameter("password123")

        //自定义登录页面

        .loginPage("/login.html")

        //必须和表单提交的接口一样,执行自定义登录逻辑

        .loginProcessingUrl("/login")

        //登录成功跳转的页面,post请求

        //.successForwardUrl("/toMain")

        //自定义登录失败处理器

        .failureHandler(new MyAuthenticationFailureHandler("/error.html"));

    //授权

    http.authorizeRequests()

        //放行/login.html,不需要认证

        .antMatchers("/login.html").permitAll()

        //放行/error.html,不需要认证

        .antMatchers("/error.html").permitAll()

        //所有请求必须认证

        .anyRequest().authenticated();

    //异常处理器

    http.exceptionHandling().accessDeniedHandler(myAccessDeniedHandler);

    //登出

    http.logout()

        //登出接口,与表单访问接口一致

        .logoutUrl("/signLogout")

        //登出处理器

        .addLogoutHandler(new MyLogoutHandler())

        //登出成功后跳转的页面

        .logoutSuccessHandler(new MyLogoutSuccessHandler("/login.html"));

    //关闭csrf防护

    http.csrf().disable();

}
自定义登录逻辑如下:
@Override

public UserDetails loadUserByUsername(String username) throws UsernameNotFoundException {

    //校验用户名,实际环境中需要从数据库查询

    if (!username.equals("admin")) {

        throw new UsernameNotFoundException("用户不存在");

    }

    //比较密码,实际需要从数据库取出原密码校验,框架会自动读取登录页面的密码

    String password = bCryptPasswordEncoder.encode("123456");

    //返回UserDetails,实际开发中可拓展UserDetails

    return new User(username, password,

                    //自定义权限

                    AuthorityUtils.commaSeparatedStringToAuthorityList("permission1"));

}
4.3.2、添加测试接口
//登录成功跳转页

@PostMapping("/toMain")

//判断是否拥有permission1的权限

@PreAuthorize("hasPermission('permission1')")

public String toMain() {

    //获得认证用户信息

    Object object = SecurityContextHolder.getContext().getAuthentication().getPrincipal();

    if (object instanceof UserDetails) {

        //进行一系列操作

    }

    return "redirect:main.html";

}
4.3.3、运行测试
登录成功,通过 /toMain接口重定向到 main.html:
5、参考资料:
https://www.bilibili.com/video/BV1Cz4y1k7rd?from=search&seid=8886448532131988851
https://blog.csdn.net/zhaoxichen_10/article/details/88713799
Spring Security 入门(基本使用)的更多相关文章
- SpringBoot集成Spring Security入门体验
一.前言 Spring Security 和 Apache Shiro 都是安全框架,为Java应用程序提供身份认证和授权. 二者区别 Spring Security:重量级安全框架 Apache S ...
- Spring Security 入门(1-1)Spring Security是什么?
1.Spring Security是什么? Spring Security 是一个安全框架,前身是 Acegi Security , 能够为 Spring企业应用系统提供声明式的安全访问控制. Spr ...
- Spring Security 入门
一.Spring Security简介 Spring Security是一个能够为基于Spring的企业应用系统提供声明式的安全访问控制解决方案的安全框架.它提供了一组可以在Spring应用上下文中配 ...
- Spring Security 入门 (二)
我们在篇(一)中已经谈到了默认的登录页面以及默认的登录账号和密码. 在这一篇中我们将自己定义登录页面及账号密码. 我们先从简单的开始吧:设置自定义的账号和密码(并非从数据库读取),虽然意义不大. 上一 ...
- Spring Security 入门(一)
当你看到这篇文章时,我猜你肯定是碰到令人苦恼的问题了,我希望本文能让你有所收获. 本人几个月前还是 Spring 小白,几个月走来,看了 Spring,Spring boot,到这次的 Spring ...
- Spring Security 入门—内存用户验证
简介 作为 Spring 全家桶组件之一,Spring Security 是一个提供安全机制的组件,它主要解决两个问题: 认证:验证用户名和密码: 授权:对于不同的 URL 权限不一样,只有当认证的用 ...
- 030 SSM综合练习06--数据后台管理系统--SSM权限操作及Spring Security入门
1.权限操作涉及的三张表 (1)用户表信息描述users sql语句: CREATE TABLE users ( id ) DEFAULT SYS_GUID () PRIMARY KEY, email ...
- Spring Security 入门详解(转)
1.Spring Security介绍 Spring Security是基于spring的应用程序提供声明式安全保护的安全性框架,它提供了完整的安全性解决方案,能够在web请求级别和方法调用级别 处理 ...
- Spring Security入门(1-13)Spring Security的投票机制和投票器
1.三种表决方式,默认是 一票制AffirmativeBased public interface AccessDecisionManager { /** * 通过传递的参数来决定用户是否有访问对应受 ...
随机推荐
- Django中间件(中间件版登陆验证、访问频率限制)
一.介绍 官方的说法:中间件是一个用来处理Django的请求和响应的框架级别的钩子.它是一个轻量.低级别的插件系统,用于在全局范围内改变Django的输入和输出.每个中间件组件都负责做一些特定的功能. ...
- IDApro 快捷键
https://www.hex-rays.com/wp-content/static/products/ida/idapro_cheatsheet.html File Operations Parse ...
- 接口自动化——读取Excle中遇到的问题
一.module 'openpyxl' has no attribute 'load_workbook'问题 原因:在pycharm中py文件名字为openpyxl导致 修改方法:重新对py名字进行命 ...
- Rancher 安装和使用-实践
Rancher 安装和使用 Rancher是一个完整的,开源的平台,用于在生产环境中部署和管理容器.它包括Kubernetes,Mesos和Docker Swarm的商业支持发行版,使得在任何基础架构 ...
- Java学习笔记--文件IO
简介 对于任何程序设计语言,输入和输出(Input\Output)都是系统非常核心的功能,程序运行需要数据,而数据的获取往往需要跟外部系统进行通信,外部系统可能是文件.数据库.其他程序.网络.IO设备 ...
- day-06-集合-缓存机制-深浅copy
(1) is id ==用法 is 判断的是内存地址是否相同 id 查看内存地址:id相同,值一定相同,值相同,id不一定相同 == 比较判断是否相等 l1 = [1, 2, 3] l2 = [1, ...
- java面试-对象的创建、内存布局、访问定位
一.对象的创建 1.虚拟机遇到一条new指令时,首先将去检查这个指令的参数是否能在常量池中定位到一个类的符号引用,并且检查这个符号引用代表的类是否已被加载.解析和初始化过.如果没有,那必须先执行相应的 ...
- 软工案例分析作业-CSDN
项目 内容 这个作业属于哪个课程 2021春季计算机学院软件工程(罗杰 任健) 这个作业的要求在哪里 案例分析作业要求 我在这个课程的目标是 提升软件开发能力与团队意识 这个作业在哪个具体方面帮助我实 ...
- (数据科学学习手札117)Python+Dash快速web应用开发——交互表格篇(下)
本文示例代码已上传至我的Github仓库https://github.com/CNFeffery/DataScienceStudyNotes 1 简介 这是我的系列教程Python+Dash快速web ...
- 《C++ primer》学习笔记整理
简介 本笔记目前已包含<C++ Primer>中的绝大部分内容,但尚有部分小节有所缺漏,如 19.1.19.2 节的笔记尚未整理,会持续更新. 本项目中的学习笔记是在学完一章内容后,对其要 ...