
GitLab基本使用
一、引言
在微服务架构中,由于我们对系统的划分粒度足够小,服务会很多,而且也存在经常迭代的情况。如果还按照以前的部署方式显得非常吃力和复杂,并且很容易出现错误。而随着容器技术的发展,这个时候持续集成(CI)和持续部署(DI)也相应的流行起来,极大的方便了微服务的部署,而GitLab正式这样的一个DevOps工具。
GitLab是由GitLabInc.开发,使用MIT许可证的基于网络的Git仓库管理工具,且具有wiki和issue跟踪功能。使用Git作为代码管理工具,并在此基础上搭建起来的web服务。关于GitLab的信息可以查看官网: https://about.gitlab.com/ 。
接下来我们先来看下在Docker中如何安装GitLab。
二、安装GitLab
具体的安装可以在 https://docs.gitlab.com/omnibus/docker/README.html 看到详细的信息。
docker run --detach --hostname gitlab.example.com --publish : --publish : --publish : --name gitlab --restart always --volume /srv/gitlab/config:/etc/gitlab --volume /srv/gitlab/logs:/var/log/gitlab --volume /srv/gitlab/data:/var/opt/gitlab gitlab/gitlab-ce:latest
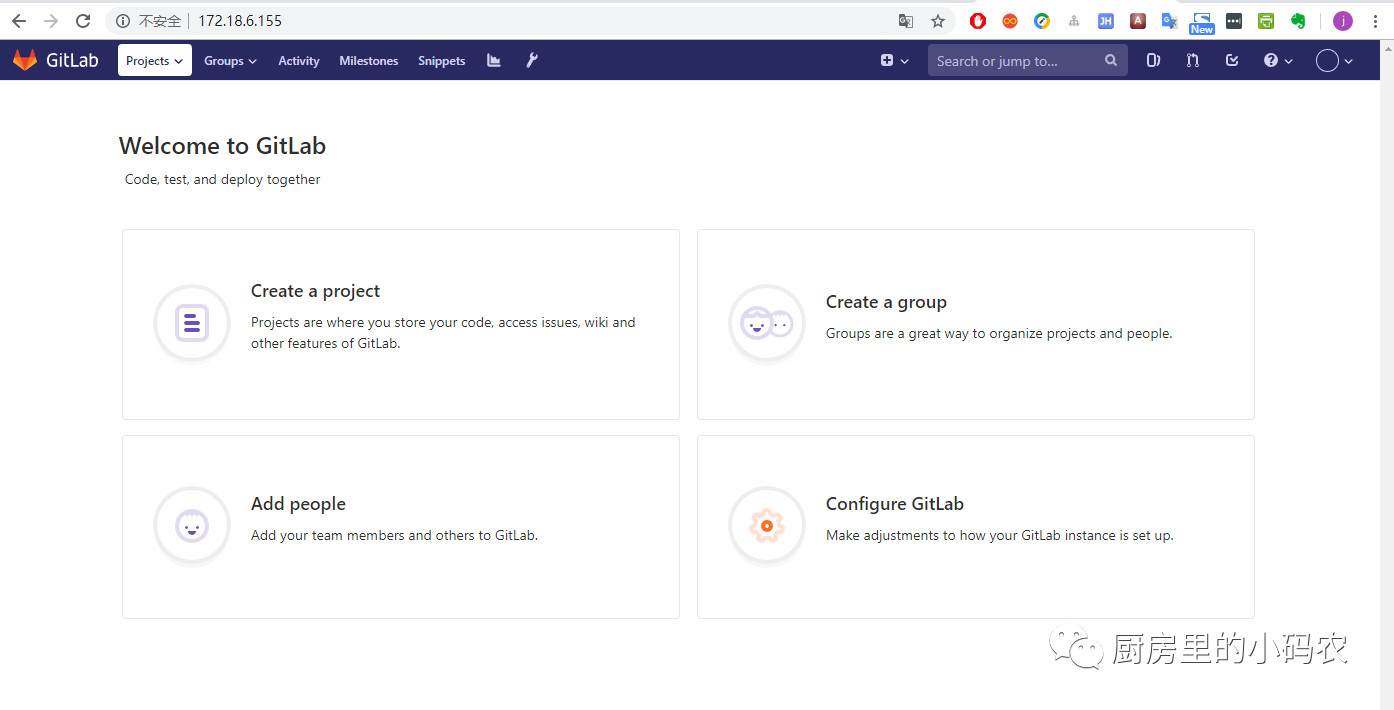
安装完成后可以通过浏览器访问到,作为git仓库其用法和github类似。
三、持续集成CI
GitLab Runner是一个开源项目,用于运行您的作业并将结果发送回GitLab。它与GitLab CI一起使用,GitLab CI是GitLab随附的开源持续集成服务,用于协调作业。https://docs.gitlab.com/runner/ 。
具体对于gitlab runner的详细介绍就请阅读官方文档。这里直接介绍其安装,那么我使用的是centos,就以linux x86-64安装为例。
1. 下载二进制文件
sudo curl -L --output /usr/local/bin/gitlab-runner https://gitlab-runner-downloads.s3.amazonaws.com/latest/binaries/gitlab-runner-linux-amd64
2. 赋予其执行权限
chmod +x /usr/local/bin/gitlab-runner
3. 创建用户
useradd --comment 'GitLab Runner' --create-home gitlab-runner --shell /bin/bash
4. 安装并运行,如果gitlab-runner安装并作为服务运行,它将以root用户身份运行,但将按照install命令指定的用户执行作业。 这意味着某些作业函数(如缓存和工件)需要执行/usr /local/bin/gitlab-runner命令,因此运行作业的用户需要具有对可执行文件的访问权限。
gitlab-runner install --user=gitlab-runner --working-directory=/home/gitlab-runner

gitlab-runner start
5. 将gitlab runner注册到gitlab上
(1) 运行命令
gitlab-runner register
(2) 输入GitLab的URL
Please enter the gitlab-ci coordinator URL (e.g. https://gitlab.com )

https://gitlab.example.com
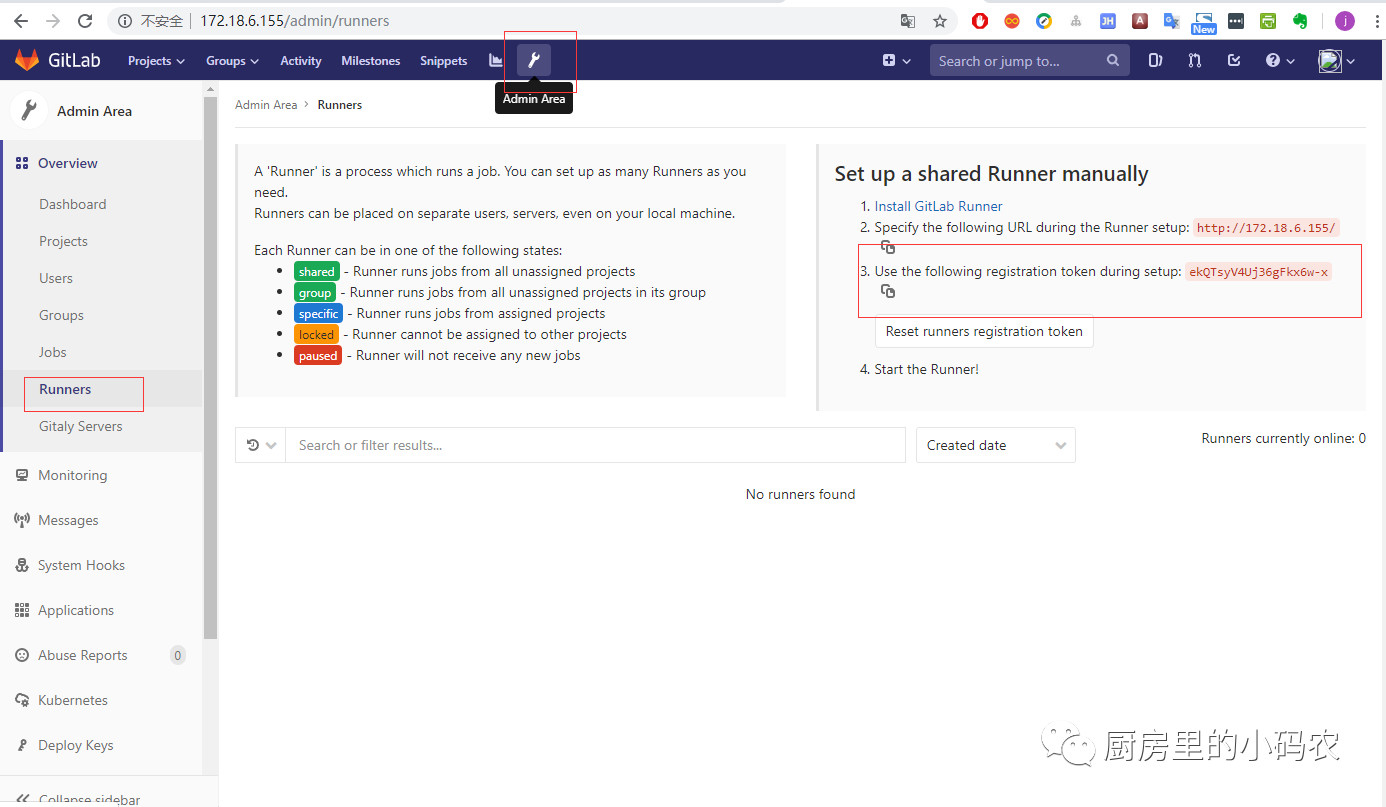
(3) 输入token,token的获取在Gitlab中,如下图
 Please enter the gitlab-ci token for this runner

 xxx
(4) 输入runner的描述
 Please enter the gitlab-ci description for this runner

 [hostname] my-runner
(5) 输入标签
 Please enter the gitlab-ci tags for this runner (comma separated):

 my-tag,another-tag
(6) 选择Runner的执行者,这里使用shell
 Please enter the executor: ssh, docker+machine, docker-ssh+machine, kubernetes, docker, parallels, virtualbox, docker-ssh, shell:

 shell
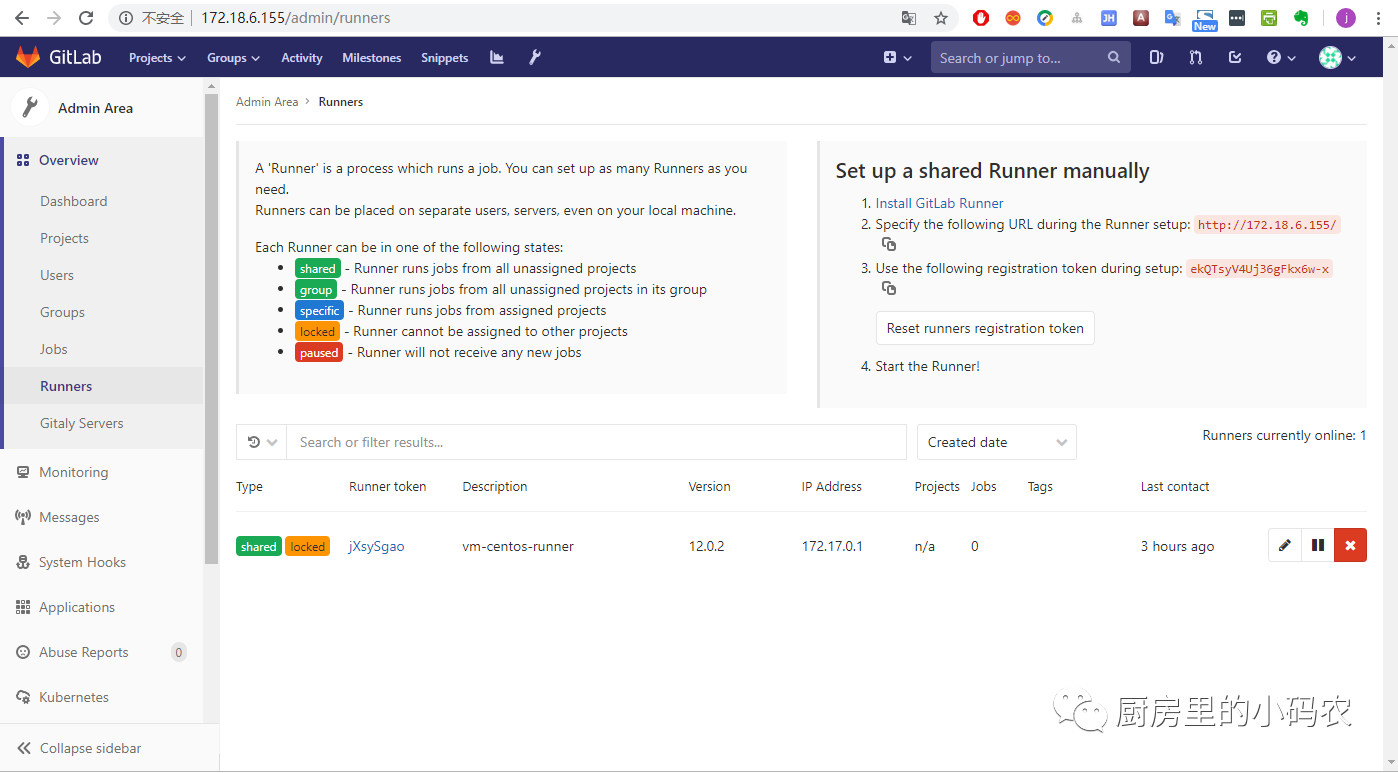
完成之后就可以在GitLab中查看到Runner了
6. 将.Net Core项目提交到GitLab完成自动化集成部署
(1) 在.git 根目录下创建.gitlab-ci.yml文件
rtest:

  script:

    - cd User.Api

    - docker-compose up -d --build --force-recreate
(2) 提交代码到GitLab上,由于22端口被占用改了其他端口,在git 的时候可以使用下面的命令来改变端口
git remote set-url origin ssh://git@172.18.6.155:23/jesen/user.api.git
或者clone仓库的时候直接指定
git clone ssh://git@172.18.6.155:23/jesen/user.api.git
(3) 提交完后,gitlab ci会自动构建镜像并运行,在这中间可能会有问题发生,我遇到的问题是找不到 devtoolset-7 和 git,这时可以是使用yum安装
yum install devtoolset-

yum install git
(4) 再次重试构建,依然出错
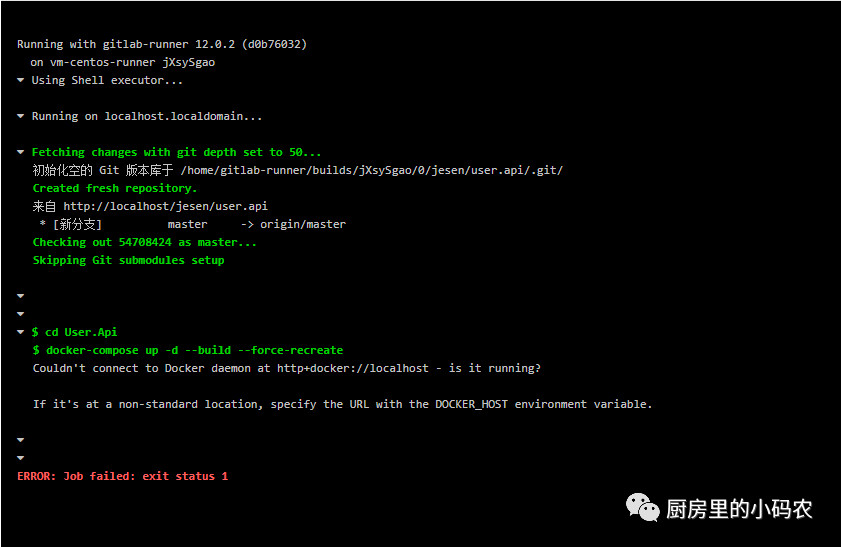
出现此错误是因为权限的问题,之前安装gitlab时创建的gitlab-runner用户没有指定用户组docker,可以查看/etc/group是否存在docker用户组,不存在则先创建 groupadd docker,然后将gitlab-runner用户添加到docker用户组中
gpasswd -a gitlab-runner docker

或

usermod -aG docker gitlab-runner
再次Retry,自动构建成功了
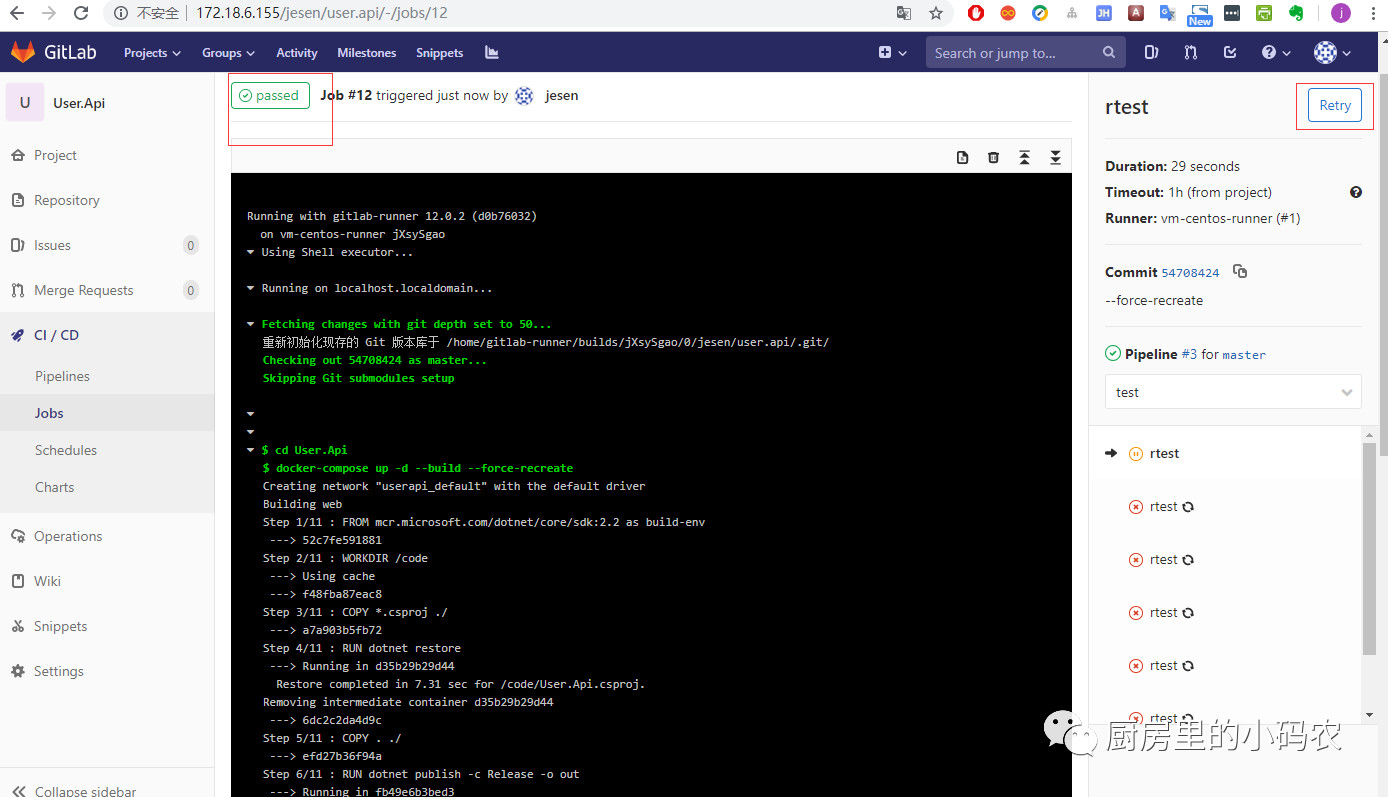
三、部署本地镜像仓库Registry,详细可参考 https://docs.docker.com/registry/
1、安装
docker run -d -p : --restart=always --name registry registry:
2、给镜像打标签后推送到本地仓库
docker image tag ubuntu localhost:/myfirstimage

docker push localhost:/myfirstimage
3、从本地仓库拉取镜像
docker pull localhost:/myfirstimage
4、停止并移除所有数据
docker container stop registry && docker container rm -v registry
5、添加可视化UI:https://github.com/kwk/docker-registry-frontend
docker run -d --name registry-web --link registry:registry -e ENV_DOCKER_REGISTRY_HOST=registry -e ENV_DOCKER_REGISTRY_PORT= -p : konradkleine/docker-registry-frontend:v2
四、参考资料
Gitlab CI 官方配置文件参数说明快速入门 :https://docs.gitlab.com/ce/ci/quick_start/README.html
配置文档讲解 :https://docs.gitlab.com/ce/ci/yaml/
持续集成的概念:http://www.ruanyifeng.com/blog/2015/09/continuous-integration.html
GitLab基本使用的更多相关文章
- 创建SSH Key连接github或gitlab
mac下用SoureceTree下载github或gitlab上的项目时,需要进行ssh key验证.每次重装系统啥的都要重新弄,我在csdn上看到一篇不错的文章.转载一下,以后自己找起来也方便. 地 ...
- 【补充】Gitlab 部署 CI 持续集成
上一篇:<劈荆斩棘:Gitlab 部署 CI 持续集成> 上一篇所配置的.gitlab-ci.yml: stages: - build - test before_script: - ec ...
- 劈荆斩棘:Gitlab 部署 CI 持续集成
阅读目录: install configue gitlab-ci-multi-runner restore nuget packages bulid .sln run unit tests confi ...
- svn迁移gitlab,构建前端打包发布流程
前端资源迁移 目前公司的前端资源托管在svn服务器上,由于团队的逐渐扩大,svn的分支管控越来越不灵活,而且对于以后前端流程一体化的处理支持不是很好,因此决定在版本控制上转向git.git的好 ...
- GitLab CI持续集成配置方案(补)
上篇文章介绍了GitLab CI的持续集成配置方法,本篇文章将主要介绍NUnit的持续集成和遇到的一些坑 1.NUnit单元测试持续集成 下载NUnit.3.4.1.msi,https://githu ...
- GitLab CI持续集成配置方案
目录 1. 持续集成介绍 1.1 概念 1.2 持续集成的好处 2. GitLab持续集成(CI) 2.1 简介 2.2 GitLab简单原理图 2.3 GitLab持续集成所需环境 2.4 需要了解 ...
- CentOS安装gitlab,gerrit,jenkins并配置ci流程
CentOS安装gitlab,gerrit,jenkins并配置ci流程 By Wenbin juandx@163.com 2016/4/9 这是我参考了网上很多的文档,配置了这三个软件在一个机器上, ...
- gitlab基本维护和使用
基本介绍 GitLab是一个自托管的Git项目仓库,可以自己搭建个人代码管理的仓库,功能与github类似. 安装 下载 gitlab下载地址: https://about.gitlab.com/do ...
- gitlab使用个人版v16.11
title: gitlab使用个人版v16.11 date: 2016-11-13 20:53:00 tags: [gitlab] --- 1.安装gitbash 附上地址链接:git 2.配置git ...
- Gitlab完美安装【CentOS6.5安装gitlab-6.9.2】
摘要: 拆腾了几天,终于在今天找到了快速安装Gitlab的方法.CentOS6.5安装gitlab-6.9.2 参考网址:https://gitlab.com/gitlab-org/omnibus-g ...
随机推荐
- .pro文件中设置版本等信息
VERSION = 1.2.3 QMAKE_TARGET_PRODUCT = 产品名称QMAKE_TARGET_COMPANY = 公司QMAKE_TARGET_DESCRIPTION = 文件描述Q ...
- 好用的Google Chrome插件
juejin掘金 帮助我们随时了解Github上热门的项目,保证技术思想不掉队. Momentum 专注.待办清单…… Octotree Octotree 可以让我们在 Github 上浏览代码更加方 ...
- Manthan, Codefest 19
目录 Contest Info Solutions A. XORinacci B. Uniqueness C. Magic Grid D. Restore Permutation E. Let The ...
- Tkinter 之Frame标签
一.参数说明 语法 作用 width 设置 Frame 的宽度默认值是 0 height 设置 Frame 的高度默认值是 0 background(bg) 设置 Frame 组件的背景颜色 bord ...
- [端口安全]Hydra密码爆破
目录 0x01 简介 0x02 常见参数 0x03 使用案例 0x04 密码字典 0x01 简介 Hydra中文名:九头蛇,这是一款相当强大的爆破工具,它基本支持了所有可爆破协议,而且容容错率非常好 ...
- ICEM-圆锥的一种画法(2D转3D)
原视频下载地址:https://pan.baidu.com/s/1jIOEelo 密码: btap
- GC和GC分配策略
一.内存如何回收 解决如何回收问题,首先需要解决回收对象的问题?什么样的对象需要回收,怎么样的不需要回收?保证有引用的内存不被释放:回收没有指针引用的内存是Collector的职责,在保证没有指针引用 ...
- STL算法之find
定义 template <class InputIterator, class T> InputIterator find (InputIterator first, InputItera ...
- Python3中转换字符串编码
在使用subprocess调用Windows命令时,遇到了字符串不显示中文的问题,源码如下:#-*-coding:utf-8-*-__author__ = '$USER' #-*-coding:utf ...
- JavaScript DOM的一些扩展
对DOM的扩展主要是:Selectors API和HTML5. Selectors API Selectors API是由W3C发起指定的一个标准,致力于让浏览器原生支持CSS查询.Selectors ...