
dragino2 ar9331将LED管脚当做普通gpio使用
1、 将gpio13和gpio17也当作普通gpio使用,修改
target/linux/ar71xx/files/arch/mips/ath79/mach-dragino2.c文件如下
/*

 *  DRAGINO V2 board support, based on Atheros AP121 board support

 *

 *  Copyright (C) 2011-2012 Gabor Juhos <juhosg@openwrt.org>

 *  Copyright (C) 2012 Elektra Wagenrad <elektra@villagetelco.org>

 *

 *  This program is free software; you can redistribute it and/or modify it

 *  under the terms of the GNU General Public License version 2 as published

 *  by the Free Software Foundation.

 */

#include <linux/gpio.h>

#include <asm/mach-ath79/ath79.h>

#include <asm/mach-ath79/ar71xx_regs.h>

#include "common.h"

#include "dev-eth.h"

#include "dev-gpio-buttons.h"

#include "dev-leds-gpio.h"

#include "dev-m25p80.h"

#include "dev-spi-gpio.h"    // add by merlin

#include "dev-spi.h"

#include "dev-usb.h"

#include "dev-wmac.h"

#include "machtypes.h"

#define DRAGINO2_GPIO_LED_WLAN        0

//#define DRAGINO2_GPIO_LED_LAN        13

//#define DRAGINO2_GPIO_LED_WAN        17

/*

 * The following GPIO is actually named "Router" on the board.

 * However, since the "Router" feature is not supported as of yet

 * we use it to display USB activity.

 */

#define DRAGINO2_GPIO_LED_USB        28

#define DRAGINO2_GPIO_BTN_JUMPSTART    11

#define DRAGINO2_GPIO_BTN_RESET        12

#define DRAGINO2_KEYS_POLL_INTERVAL    20    /* msecs */

#define DRAGINO2_KEYS_DEBOUNCE_INTERVAL    (3 * DRAGINO2_KEYS_POLL_INTERVAL)

#define DRAGINO2_MAC0_OFFSET        0x0000

#define DRAGINO2_MAC1_OFFSET        0x0006

#define DRAGINO2_CALDATA_OFFSET        0x1000

#define DRAGINO2_WMAC_MAC_OFFSET    0x1002

static struct gpio_led dragino2_leds_gpio[] __initdata = {

//    {

//        .name        = "dragino2:red:lan",

//        .gpio        = DRAGINO2_GPIO_LED_LAN,

//        .active_low    = 0,

//    },

    {

        .name        = "dragino2:red:wlan",

        .gpio        = DRAGINO2_GPIO_LED_WLAN,

        .active_low    = ,

    },

//        {

//        .name        = "dragino2:red:wan",

//        .gpio        = DRAGINO2_GPIO_LED_WAN,

//        .active_low    = 0,

//    },

    {

        .name        = "dragino2:red:usb",

        .gpio        = DRAGINO2_GPIO_LED_USB,

        .active_low    = ,

    },

};

static struct gpio_keys_button dragino2_gpio_keys[] __initdata = {

    {

        .desc        = "jumpstart button",

        .type        = EV_KEY,

        .code        = KEY_WPS_BUTTON,

        .debounce_interval = DRAGINO2_KEYS_DEBOUNCE_INTERVAL,

        .gpio        = DRAGINO2_GPIO_BTN_JUMPSTART,

        .active_low    = ,

    },

    {

        .desc        = "reset button",

        .type        = EV_KEY,

        .code        = KEY_RESTART,

        .debounce_interval = DRAGINO2_KEYS_DEBOUNCE_INTERVAL,

        .gpio        = DRAGINO2_GPIO_BTN_RESET,

        .active_low    = ,

    }

};

static void __init dragino2_common_setup(void)

{

    u8 *art = (u8 *) KSEG1ADDR(0x1fff0000);

    ath79_register_m25p80(NULL);

    ath79_register_wmac(art + DRAGINO2_CALDATA_OFFSET,

                art + DRAGINO2_WMAC_MAC_OFFSET);

    ath79_init_mac(ath79_eth0_data.mac_addr, art + DRAGINO2_MAC0_OFFSET, );

    ath79_init_mac(ath79_eth1_data.mac_addr, art + DRAGINO2_MAC1_OFFSET, );

    ath79_register_mdio(, 0x0);

    /* Enable GPIO15 and GPIO16 and possibly GPIO26 and GPIO27 */

    //ath79_gpio_function_disable(AR933X_GPIO_FUNC_ETH_SWITCH_LED2_EN |

    //                AR933X_GPIO_FUNC_ETH_SWITCH_LED3_EN);

    ath79_gpio_function_disable(AR933X_GPIO_FUNC_ETH_SWITCH_LED0_EN |

                    AR933X_GPIO_FUNC_ETH_SWITCH_LED1_EN |

                    AR933X_GPIO_FUNC_ETH_SWITCH_LED2_EN |

                    AR933X_GPIO_FUNC_ETH_SWITCH_LED3_EN |

                    AR933X_GPIO_FUNC_ETH_SWITCH_LED4_EN);

    /* LAN ports */

    ath79_register_eth();

    /* WAN port */

    ath79_register_eth();

    // add by merlin 2014-07-18

    ath79_register_spi_gpio();

}

static void __init dragino2_setup(void)

{

    dragino2_common_setup();

    ath79_register_leds_gpio(-, ARRAY_SIZE(dragino2_leds_gpio),

                 dragino2_leds_gpio);

    ath79_register_gpio_keys_polled(-, DRAGINO2_KEYS_POLL_INTERVAL,

                    ARRAY_SIZE(dragino2_gpio_keys),

                    dragino2_gpio_keys);

    ath79_register_usb();

}

MIPS_MACHINE(ATH79_MACH_DRAGINO2, "DRAGINO2", "Dragino Dragino v2",

         dragino2_setup);
注意两点,1,将DRAGINO2_GPIO_LED_LAN和DRAGINO2_GPIO_LED_WAN相关定义注释掉;2,将管脚当做普通gpio使用,要在ath79_gpio_function_disable函数中添加相关内容,按默认的即可。
2、测试
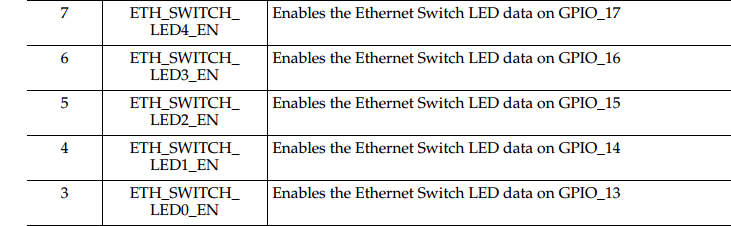
如测试LED3 (GPIO_14)和LED6 (GPIO_17)
root@SC-M-BASE:/sys/class/gpio# echo  > export

root@SC-M-BASE:/sys/class/gpio# echo out > gpio14/direction

root@SC-M-BASE:/sys/class/gpio# echo  > gpio14/value

root@SC-M-BASE:/sys/class/gpio# echo  > export

root@SC-M-BASE:/sys/class/gpio# echo out > gpio17/direction

root@SC-M-BASE:/sys/class/gpio# echo  > gpio17/value
参考:
http://www.cnblogs.com/tfanalysis/p/4206513.html
dragino2 ar9331将LED管脚当做普通gpio使用的更多相关文章
- EC20模块(mdm9607)复用pin脚当作普通gpio的设置方法
修改pin37~40,当作普通gpio的方法如下: 下面代码截图需要确认是否一样,如不一样请修改: 修改pin41~42 ,当作普通gpio方法如下: Pin24~27,当作普通gpio方法如下: P ...
- led的驱动及测试程序
一.驱动源码 #include <linux/module.h> #include <linux/kernel.h> #include <linux/fs.h> # ...
- 【Windows 10 IoT - 2】LED闪烁及动画绘制(树莓派 Pi2)
在上一篇博文<Windows 10 IoT系统安装>中,我们实现了在树莓派2平台上运行Window 10 IoT,本篇文章将介绍在该平台上的程序开发. 在最初获得的资讯中,以为Window ...
- [SAM4N学习笔记]LED点灯程序
一.准备工作: 将上一节搭建的工程模板复制一份,命名为"1.blink",这作为我们开发的第一个程序. 二.程序编写: 板子上只有一个可控制的LED,就是LED ...
- K1 K2作为中断源控制红色LED灯,实现任意键按一下LED灯亮或者灭
#include "stm32f10x.h" // 相当于51单片机中的 #include <reg51.h> #include "stm32f10x_gpi ...
- 云中树莓派(4):利用声音传感器控制Led灯
云中树莓派(1):环境准备 云中树莓派(2):将传感器数据上传到AWS IoT 并利用Kibana进行展示 云中树莓派(3):通过 AWS IoT 控制树莓派上的Led 云中树莓派(4):利用声音传感 ...
- 驱动学习5: zynq实现点亮led
驱动代码: #include <linux/module.h> #include <linux/kernel.h> #include <linux/fs.h> #i ...
- fl2440 platform总线led字符设备驱动
首先需要知道的是,设备跟驱动是分开的.设备通过struct device来定义,也可以自己将结构体封装到自己定义的device结构体中: 例如:struct platform_device: 在inc ...
- 30个物联网传感器小实验:三行代码点亮LED灯
30个物联网传感器小实验:三行代码点亮LED灯 三行代码点亮LED灯 LED灯闪烁 LED灯调亮度 LED淡入淡出 不写一行代码点亮LED灯 全彩RGB灯 面包板 30个物联网传感器小实验:三行代码点 ...
随机推荐
- 2018年3月最新的Ubuntu 16.04.4漏洞提权代码
2018年3月最新的Ubuntu 16.04.4漏洞提权代码,本代码取自Vitaly Nikolenko的推子 亲测阿里云提权可用. /* * Ubuntu 16.04.4 kernel priv e ...
- SpringBoot(2.0.4.RELEASE)+Elasticsearch(6.2.4)+Gradle简单整合
记录一下SpringBoot(2.0.4.RELEASE)+Elasticsearch(6.2.4)+Gradle整合的一个小例子. 1.在Gradle内加入相关jar包的依赖: compile('o ...
- HDU 1004 Let the Balloon Rise(map应用)
Problem Description Contest time again! How excited it is to see balloons floating around. But to te ...
- 批注@SuppressWarnings 的作用
J2SE 提供的最后一个批注是 @SuppressWarnings.该批注的作用是给编译器一条指令,告诉它对被批注的代码元素内部的某些警告保持静默. 一点背景:J2SE 5.0 为 Java 语言增加 ...
- win7英文版
下载个系统,不是一堆木马,就是一堆病毒:相对来说,我还是倾向于相信国外的镜像. https://pcriver.com/operating-systems/windows-7-ultimate-iso ...
- PRCT-1302 the OCR has an invalid ip address
PRCT-1302 the OCR has an invalid ip address 1. 报错信息 an internal error occurred within cluster verifi ...
- 可变,不可变类型和hash
可变与不可变类型 截止到目前为止我们已经学过很多数据类型:数字类型.字符串类型.列表类型.元祖类型. 在python中,我们对数据类型还有另外一种分类方式,我们给数据类型分为可变数据类型和不可变数据类 ...
- Python语言规范
Lint 对你的代码运行pylint 定义: pylint是一个在Python源代码中查找bug的工具. 对于C和C++这样的不那么动态的(译者注: 原文是less dynamic)语言, 这些bug ...
- java 类方法和实例方法 以及 类变量和实例变量 各种区别
我们已经知道类体中的方法分为实例方法和类方法两种,用static修饰的是类方法.二者有什么区别呢?当一个类创建了一个对象后,这个对象就可以调用该类的方法. 当类的字节码文件被加载到内存时,类的实例方法 ...
- Create-React-App脚手架使用方法
Facebook 官方推出Create-React-App脚手架,基本可以零配置搭建基于webpack的React开发环境,内置了热更新等功能. 由于create-react-app命令预先安装和配置 ...