Android有趣的全透明效果--Activity及Dialog的全透明(附android系统自带图标大全)[转]
原文地址:http://blog.csdn.net/sodino/article/details/5822147
1.Activity全透明
同学zzm给了这个有趣的代码,现在公布出来。
先在res/values下建colors.xml文件,写入:
<? xml   version = "1.0"   encoding = "UTF-8" ?>

< resources >

    < color   name = "transparent" > #9000 </ color >

</ resources >
这个值设定了整个界面的透明度,为了看得见效果,现在设为透明度为56%(9/16)左右。
再在res/values/下建styles.xml,设置程序的风格
<?xml version="1.0" encoding="utf-8"?>

<resources>

    <style name="Transparent">

        <item name="android:windowBackground">@color/transparent</item>

        <item name="android:windowIsTranslucent">true</item>

        <item name="android:windowAnimationStyle">@+android:style/Animation.Translucent</item>

    </style>

</resources>
最后一步,把这个styles.xml用在相应的Activity上。即在AndroidManifest.xml中的任 意<activity>标签中添加
- android:theme = "@style/transparent"
如果想设置所有的activity都使用这个风格,可以把这句标签语句添加在<application>中。
最后运行程序,哈哈,是不是发现整个界面都被蒙上一层半透明了。最后可以把背景色#9000换成#0000,运行程序后,就全透明了,看得见背景下 的所有东西可以却都操作无效。呵呵....
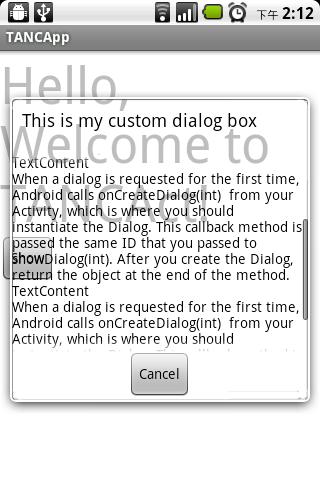
2.Dialog全透明
1.准备保留边框的全透明素材如下图:

2.在values中新建一styles.xml文件,内容如下:
<?xml version="1.0" encoding="UTF-8"?>

<resources>

    <style name="TANCStyle" parent="@android:style/Theme.Dialog">

        <!-- 更换背景图片实现全透明 -->

        <item name="android:windowBackground">@drawable/panel_background_sodino1</item>

        <!-- 屏幕背景不变暗 -->

        <item name="android:backgroundDimEnabled">false</item>

        <!-- 更改对话框标题栏 -->

        <item name="android:windowTitleStyle">@style/TitleStyle</item>

    </style>

    <style name="TitleStyle" parent="@android:style/DialogWindowTitle">

        <item name="android:textAppearance">@style/TitleText</item>

    </style>

    <style name="TitleText" parent="@android:style/TextAppearance.DialogWindowTitle">

        <!-- 设置Dialog标题栏文字颜色。 -->

        <item name="android:textColor">#000</item>

    </style>

</resources>
3.在layout文件夹下新建一文件句为main_dialog.xml,内容如下:
<?xml version="1.0" encoding="UTF-8"?>

<RelativeLayout xmlns:android="http://schemas.android.com/apk/res/android"

    android:layout_width="wrap_content"

    android:layout_height="wrap_content"

    android:background="#0000">

    <ScrollView android:id="@+id/ScrollView01"

        android:layout_width="wrap_content"

        android:layout_height="200px"

        android:layout_below="@+id/ImageView01"

        android:background="#0000">

        <TextView android:id="@+id/TextView01"

            android:text="SodinoText"

            android:textColor="#f000"

            android:layout_width="wrap_content"

            android:layout_height="wrap_content"

            android:background="#0000"

        ></TextView>

    </ScrollView>

    <Button android:id="@+id/btnCancel"

        android:layout_below="@id/ScrollView01"

        android:layout_width="wrap_content"

        android:layout_height="wrap_content"

        android:layout_centerHorizontal="true"

        android:text="Cancel">

    </Button>

</RelativeLayout>
4.Activity代码如下:
package lab.sodino.tanc;

import android.app.Activity;

import android.app.Dialog;

import android.os.Bundle;

import android.view.View;

import android.widget.Button;

import android.widget.TextView;

public class TANCAct extends Activity {

    /** Called when the activity is first created. */

    @Override

    public void onCreate(Bundle savedInstanceState) {

        super.onCreate(savedInstanceState);

        setContentView(R.layout.main);

        Button btnShow = (Button) findViewById(R.id.btnShow);

        btnShow.setOnClickListener(new Button.OnClickListener() {

            public void onClick(View view) {

                showTANC(

                        "This is my custom dialog box",

                        "TextContent/nWhen a dialog is requested for the first time, Android calls onCreateDialog(int)  from your Activity, which is where you should instantiate the Dialog. This callback method is passed the same ID that you passed to showDialog(int). After you create the Dialog, return the object at the end of the method.",

                        "http://blog.csdn.net/sodino");

            }

        });

    }

    private void showTANC(String header, String content, String url) {

        final Dialog dialog = new Dialog(this, R.style.TANCStyle);

        dialog.setContentView(R.layout.main_dialog);

        dialog.setTitle(header);

        dialog.setCancelable(true);

        TextView textView01 = (TextView) dialog.findViewById(R.id.TextView01);

        textView01.setText(content + content + content);

        Button btnCancel = (Button) dialog.findViewById(R.id.btnCancel);

        btnCancel.setOnClickListener(new Button.OnClickListener() {

            public void onClick(View view) {

                dialog.cancel();

            }

        });

        dialog.show();

    }

}
最后效果图:
Android有趣的全透明效果--Activity及Dialog的全透明(附android系统自带图标大全)[转]的更多相关文章
- 茴香豆的第五种写法---设置ExpandableListView系统自带图标按下效果
1 编写groupindicator_selector.xml如下: <?xml version="1.0" encoding="utf-8"?> ...
- android系统自带图标
android:src="@android:drawable/ic_media_rew"
- android系统自带图标集合(android.R.drawable查看)
alert_dark_frame alert_light_frame arrow_down_float arrow_up_float bottom_bar btn_default btn_defaul ...
- 【Unity Shader】(五) ------ 透明效果之半透明效果的实现及原理
笔者使用的是 Unity 2018.2.0f2 + VS2017,建议读者使用与 Unity 2018 相近的版本,避免一些因为版本不一致而出现的问题 [Unity Shader学习笔记](三) -- ...
- Unity3D学习(八):《Unity Shader入门精要》——透明效果
前言 在实时渲染中要实现透明效果,通常会在渲染模型时控制它的透明通道. Unity中通常使用两种方法来实现透明 :(1)透明度测试(AlphaTest)(2)透明度混合(AlphaBlend).前者往 ...
- Android基础总结(六)Activity
创建第二个Activity(掌握) 需要在清单文件中为其配置一个activity标签 标签中如果带有这个子节点,则会在系统中多创建一个快捷图标 <intent-filter> <ac ...
- Android 编程下实现 Activity 的透明效果
实现方式一(使用系统透明样式) 通过配置 Activity 的样式来实现,在 AndroidManifest.xml 找到要实现透明效果的 Activity,在 Activity 的配置中添加如下的代 ...
- Android学习之Android 5.0分享动画实现微信点击全屏效果
Android5.0过渡动画,请看 http://blog.csdn.net/qq_16131393/article/details/51112772 今天用分享动画实现微信点击全屏效果 本文源代码下 ...
- Android课程---Android设置透明效果的三种方法(转)
1.使用Android系统自带的透明效果资源 <Button android:background="@android:color/transparent"/> ...
随机推荐
- javascript基础-js继承
1.prototype方式 示例:没有使用prototype(下列这些代码只能获取array1数组的总和,而无法对array2数据进行求和) var array1 = new Array(1,4,9, ...
- HttpClient使用示例
1)使用HttpClient发送GET请求 public class MainActivity extends Activity implements OnClickListener { privat ...
- TCP之二:TCP的三次握手与四次分手
一.TCP是什么? 具体的关于TCP是什么,我不打算详细的说了:当你看到这篇文章时,我想你也知道TCP的概念了,想要更深入的了解TCP的工作,我们就继续.它只是一个超级麻烦的协议,而它又是互联网的基础 ...
- 杂项:NoSQL
ylbtech-杂项:NoSQL NoSQL,泛指非关系型的数据库.随着互联网web2.0网站的兴起,传统的关系数据库在应付web2.0网站,特别是超大规模和高并发的SNS类型的web2.0纯动态网站 ...
- 分析iOS Crash文件:符号化iOS Crash文件的3种方法
转自:http://www.cocoachina.com/industry/20140514/8418.html 转自wufawei的博客 当你的应用提交到App Store或者各个渠道之后,请问你多 ...
- Svg 和 canvas的区别
Canvas 和 SVG 都允许您在浏览器中创建图形,但是它们在根本上是不同的. SVG SVG 是一种使用 XML 描述 2D 图形的语言. SVG 基于 XML,这意味着 SVG DOM 中的每个 ...
- EasyUI介绍及常见问题
JQuery Easy UI介绍 1.JQuery Easy UI环境搭建和调试: https://jingyan.baidu.com/article/67508eb4342f9f9cca1ce426 ...
- 在php中设置PHPSESSID的httponly属性
ThinkPHP3.0完全开发手册 19.1 Session: 支持默认情况下,初始化之后系统会自动启动session. 如果不希望系统自动启动session的话,可以设置SESSION_AUTO_S ...
- redmineBUG系统
bitnami-redmine-2.6.3-0-linux-x64-installer.run 我的是linux 64位 官网下载bitnami-redmine http://bitnami.com/ ...
- MYSQL用户权限管理GRANT使用
http://yanue.net/post-97.html GRANT语句的语法: mysql> grant 权限1,权限2,-权限n on 数据库名称.表名称 to 用户名@用户地址 iden ...