Android有趣的全透明效果--Activity及Dialog的全透明(附android系统自带图标大全)[转]
原文地址:http://blog.csdn.net/sodino/article/details/5822147
1.Activity全透明
同学zzm给了这个有趣的代码,现在公布出来。
先在res/values下建colors.xml文件,写入:
<? xml   version = "1.0"   encoding = "UTF-8" ?>

< resources >

    < color   name = "transparent" > #9000 </ color >

</ resources >
这个值设定了整个界面的透明度,为了看得见效果,现在设为透明度为56%(9/16)左右。
再在res/values/下建styles.xml,设置程序的风格
<?xml version="1.0" encoding="utf-8"?>

<resources>

    <style name="Transparent">

        <item name="android:windowBackground">@color/transparent</item>

        <item name="android:windowIsTranslucent">true</item>

        <item name="android:windowAnimationStyle">@+android:style/Animation.Translucent</item>

    </style>

</resources>
最后一步,把这个styles.xml用在相应的Activity上。即在AndroidManifest.xml中的任 意<activity>标签中添加
- android:theme = "@style/transparent"
如果想设置所有的activity都使用这个风格,可以把这句标签语句添加在<application>中。
最后运行程序,哈哈,是不是发现整个界面都被蒙上一层半透明了。最后可以把背景色#9000换成#0000,运行程序后,就全透明了,看得见背景下 的所有东西可以却都操作无效。呵呵....
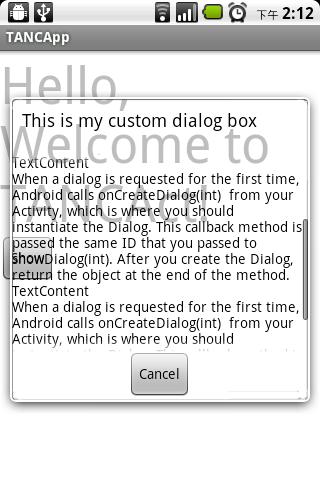
2.Dialog全透明
1.准备保留边框的全透明素材如下图:

2.在values中新建一styles.xml文件,内容如下:
<?xml version="1.0" encoding="UTF-8"?>

<resources>

    <style name="TANCStyle" parent="@android:style/Theme.Dialog">

        <!-- 更换背景图片实现全透明 -->

        <item name="android:windowBackground">@drawable/panel_background_sodino1</item>

        <!-- 屏幕背景不变暗 -->

        <item name="android:backgroundDimEnabled">false</item>

        <!-- 更改对话框标题栏 -->

        <item name="android:windowTitleStyle">@style/TitleStyle</item>

    </style>

    <style name="TitleStyle" parent="@android:style/DialogWindowTitle">

        <item name="android:textAppearance">@style/TitleText</item>

    </style>

    <style name="TitleText" parent="@android:style/TextAppearance.DialogWindowTitle">

        <!-- 设置Dialog标题栏文字颜色。 -->

        <item name="android:textColor">#000</item>

    </style>

</resources>
3.在layout文件夹下新建一文件句为main_dialog.xml,内容如下:
<?xml version="1.0" encoding="UTF-8"?>

<RelativeLayout xmlns:android="http://schemas.android.com/apk/res/android"

    android:layout_width="wrap_content"

    android:layout_height="wrap_content"

    android:background="#0000">

    <ScrollView android:id="@+id/ScrollView01"

        android:layout_width="wrap_content"

        android:layout_height="200px"

        android:layout_below="@+id/ImageView01"

        android:background="#0000">

        <TextView android:id="@+id/TextView01"

            android:text="SodinoText"

            android:textColor="#f000"

            android:layout_width="wrap_content"

            android:layout_height="wrap_content"

            android:background="#0000"

        ></TextView>

    </ScrollView>

    <Button android:id="@+id/btnCancel"

        android:layout_below="@id/ScrollView01"

        android:layout_width="wrap_content"

        android:layout_height="wrap_content"

        android:layout_centerHorizontal="true"

        android:text="Cancel">

    </Button>

</RelativeLayout>
4.Activity代码如下:
package lab.sodino.tanc;

import android.app.Activity;

import android.app.Dialog;

import android.os.Bundle;

import android.view.View;

import android.widget.Button;

import android.widget.TextView;

public class TANCAct extends Activity {

    /** Called when the activity is first created. */

    @Override

    public void onCreate(Bundle savedInstanceState) {

        super.onCreate(savedInstanceState);

        setContentView(R.layout.main);

        Button btnShow = (Button) findViewById(R.id.btnShow);

        btnShow.setOnClickListener(new Button.OnClickListener() {

            public void onClick(View view) {

                showTANC(

                        "This is my custom dialog box",

                        "TextContent/nWhen a dialog is requested for the first time, Android calls onCreateDialog(int)  from your Activity, which is where you should instantiate the Dialog. This callback method is passed the same ID that you passed to showDialog(int). After you create the Dialog, return the object at the end of the method.",

                        "http://blog.csdn.net/sodino");

            }

        });

    }

    private void showTANC(String header, String content, String url) {

        final Dialog dialog = new Dialog(this, R.style.TANCStyle);

        dialog.setContentView(R.layout.main_dialog);

        dialog.setTitle(header);

        dialog.setCancelable(true);

        TextView textView01 = (TextView) dialog.findViewById(R.id.TextView01);

        textView01.setText(content + content + content);

        Button btnCancel = (Button) dialog.findViewById(R.id.btnCancel);

        btnCancel.setOnClickListener(new Button.OnClickListener() {

            public void onClick(View view) {

                dialog.cancel();

            }

        });

        dialog.show();

    }

}
最后效果图:
Android有趣的全透明效果--Activity及Dialog的全透明(附android系统自带图标大全)[转]的更多相关文章
- 茴香豆的第五种写法---设置ExpandableListView系统自带图标按下效果
1 编写groupindicator_selector.xml如下: <?xml version="1.0" encoding="utf-8"?> ...
- android系统自带图标
android:src="@android:drawable/ic_media_rew"
- android系统自带图标集合(android.R.drawable查看)
alert_dark_frame alert_light_frame arrow_down_float arrow_up_float bottom_bar btn_default btn_defaul ...
- 【Unity Shader】(五) ------ 透明效果之半透明效果的实现及原理
笔者使用的是 Unity 2018.2.0f2 + VS2017,建议读者使用与 Unity 2018 相近的版本,避免一些因为版本不一致而出现的问题 [Unity Shader学习笔记](三) -- ...
- Unity3D学习(八):《Unity Shader入门精要》——透明效果
前言 在实时渲染中要实现透明效果,通常会在渲染模型时控制它的透明通道. Unity中通常使用两种方法来实现透明 :(1)透明度测试(AlphaTest)(2)透明度混合(AlphaBlend).前者往 ...
- Android基础总结(六)Activity
创建第二个Activity(掌握) 需要在清单文件中为其配置一个activity标签 标签中如果带有这个子节点,则会在系统中多创建一个快捷图标 <intent-filter> <ac ...
- Android 编程下实现 Activity 的透明效果
实现方式一(使用系统透明样式) 通过配置 Activity 的样式来实现,在 AndroidManifest.xml 找到要实现透明效果的 Activity,在 Activity 的配置中添加如下的代 ...
- Android学习之Android 5.0分享动画实现微信点击全屏效果
Android5.0过渡动画,请看 http://blog.csdn.net/qq_16131393/article/details/51112772 今天用分享动画实现微信点击全屏效果 本文源代码下 ...
- Android课程---Android设置透明效果的三种方法(转)
1.使用Android系统自带的透明效果资源 <Button android:background="@android:color/transparent"/> ...
随机推荐
- mstsc遇到CredSSP加密Oracle修正
Windows Registry Editor Version 5.00 [HKEY_LOCAL_MACHINE\SOFTWARE\Microsoft\Windows\CurrentVersion\P ...
- DomHelper
public class DomHelper { public static ArrayList<Person> queryXML(Context context) { ArrayList ...
- 2017百度之星初赛A-1006(HDU-6113)
思路:在图的外面包一圈'0'字符,然后dfs统计'0'字符的个数和'1'字符的个数.结果如下(num0表示0字符的个数,num1表示1字符的个数): num0 == 1 && num1 ...
- django之全文检索
全文检索 全文检索不同于特定字段的模糊查询,使用全文检索的效率更高,并且能够对于中文进行分词处理 haystack:django的一个包,可以方便地对model里面的内容进行索引.搜索,设计为支持wh ...
- [Z] Shell中脚本变量和函数变量的作用域
在shell中定义函数可以使代码模块化,便于复用代码.不过脚本本身的变量和函数的变量的作用域问题可能令你费解,在这里梳理一下这个问题. (1)Shell脚本中定义的变量是global的,其作用域从被定 ...
- Java-从堆栈常量池解析equals()与==
一.基本概念 ①JAVA中的基本数据类型(简单类型,内置类型): 字节型(byte),短整型(short),整型(int),长整型(long),字符型(char),浮点型(float),双精度型(do ...
- A标签的href设置为#代表什么意思?
空锚点<a href="#abc">a link <#>表示跳到锚点abc,<a href="#">a link <# ...
- Oracle的Spool导出数据
出自:http://wallimn.iteye.com/blog/472182 实践 只能在一个终端上的一个窗口中进行操作 第一步:连接oracle数据库 sqlplus qkp/mm_eft ...
- 利用maven实现差异化配置
回顾过去 生产环境,测试环境,开发环境在不同的环境下会有各种各样的配置,比如数据库链接地址,账户名,密码等等.不同环境下都需要配置,但是配置却又不同.以前分享过一篇文章,介绍了我之前A公司的差异化配置 ...
- Java并发编程之——Amino框架
Amino框架是一个采用无锁方式实现并行计算的框架,可惜的是,网上关于Amino框架的介绍甚少.根据所掌握的资料,稍微总结一下: 1. 锁机制到无锁机制 锁机制可以确保程序和数据的线程安全,但是锁是一 ...