(转)springboot应用启动原理(一) 将启动脚本嵌入jar
转:https://segmentfault.com/a/1190000013489340
Takes an opinionated view of building production-ready Spring applications. Spring Boot favors convention over configuration and is designed to get you up and running as quickly as possible.
SpringBoot项目为我们构建Spring应用带来了极大的方便,同时SpringBoot在构建Spring应用方面也做出了很大建树
众所周知,SpringBoot可以通过gradle或者maven插件构建Executable Jar/War Spring Boot Gradle Plugin Reference Guide
除了传统方式java -jar myapp.jar运行外,还可以通过myapp.jar start|stop|restart运行,安装为systemd服务,通过同名文件myapp.conf配置运行时参数等等高级功能 Installing Spring Boot Applications
讲到这里很多童鞋都会问,这一切都是如何做到的?
将启动脚本嵌入jar
首先,我们创建一个简单的示例
package com.manerfan.springboot.theory;
/**
* @author manerfan
* @date 2018/3/2
*/
public class RunnableApp {
public static void main(String[] args) {
System.out.println("Hello You!");
}
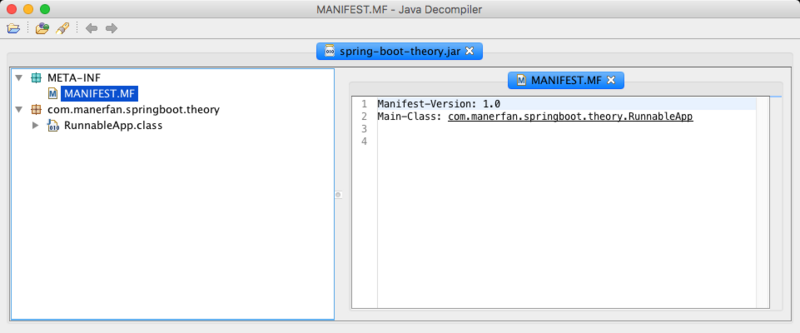
}使用eclipse或idea或其他工具,编译并打包为jar(spring-boot-theory.jar),打包时选择main-class为com.manerfan.springboot.theory.RunnableApp
对于Runnable Jar,总有一个META-INF/MANIFEST.MF文件,记录Main-Class、Class-Path等信息
我们可以通过java -jar spring-boot-theory.jar来运行,但尝试直接运行spring-boot-theory.jar时便会报错
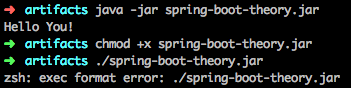
这表明,spring-boot-theory.jar仅仅为Runnable Jar,而不是Executable Jar
使用shell脚本启动jar
一般情况,我们都会借助shell脚本来运行我们的jar,如下 runJar.sh
#!/bin/sh

JAR="/usr/local/spring-boot-theory.jar"

java=java

if test -n "$JAVA_HOME"; then

    java="$JAVA_HOME/bin/java"

fi

exec "$java" -jar $JAR "$@"

exit 1 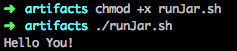
在此基础上,我们可以加入更多控制,以实现runJar.sh start | stop | restart等特性
#!/bin/bash

# chkconfig: 2345 85 85

# description: spring boot theory

# processname: spring-boot-theory

# Created By: manerfan (manerfan.china@gmail.com)

JAR="/usr/local/spring-boot-theory.jar"

PIDFILE=/data/sms-service/smss.pid

java=java

if test -n "$JAVA_HOME"; then

    java="$JAVA_HOME/bin/java"

fi

start() {}

stop() {}

restart() {}

status() {}

case "$action" in

start)

  start "$@"; exit $?;;

stop)

  stop "$@"; exit $?;;

restart)

  restart "$@"; exit $?;;

status)

  status "$@"; exit $?;;

*)

  echo "Usage: $0 {start|stop|force-stop|restart|force-reload|status|run}"; exit 1;

esac

exit 0
可以参考 http://blog.csdn.net/zhanngle...
但这样也只是通过shell脚本控制jar的启动停止,如何做到Executable Jar呢?
整合shell脚本与Runnable Jar
同样,首先是一段shell脚本 runJar.sh
#!/bin/sh

JAR =`which "$0" 2>/dev/null`

[ $? -gt 0 -a -f "$0" ] && JAR="./$0"

java=java

if test -n "$JAVA_HOME"; then

    java="$JAVA_HOME/bin/java"

fi

exec "$java" -jar $JAR "$@"

exit 1
通过以下语句将shell脚本与jar文件整合到一起 ~划重点~
cat runJar.sh spring-boot-theory.jar > exec-spring-boot-theory.jar && chmod +x exec-spring-boot-theory.jar大功告成!

同样,在此基础上,我们可以加入更多控制,以实现exec-spring-boot-theory.jar start | stop | restart等特性
可以参考 https://coderwall.com/p/ssuax...
Spring Boot的实现原理
springboot项目源码在https://github.com/spring-pro...,可以对照查看
我们从 JarWriter 开始
public JarWriter(File file, LaunchScript launchScript)

    throws FileNotFoundException, IOException {

  FileOutputStream fileOutputStream = new FileOutputStream(file);

  if (launchScript != null) {

    // 将启动脚本写入文件

    fileOutputStream.write(launchScript.toByteArray());

    // 设置文件可执行属性

    setExecutableFilePermission(file);

  }

  this.jarOutput = new JarArchiveOutputStream(fileOutputStream);

  this.jarOutput.setEncoding("UTF-8");

}
当执行gradle build或mvn package时,会使用JarWriter重新生成jar文件。JarWrite构造函数中,会首先将启动脚本写入文件,并设置文件的可执行属性。
除此之外,JarWriter还有众多方法,如writeManifest写入manifest文件、writeNestedLibrary写入第三方依赖等等,通过JarWriter以构建Executable Jar.
此过程,与上述将shell脚本与jar文件整合效果一致。
但是,launchScript又是什么?
public DefaultLaunchScript(File file, Map<?, ?> properties) throws IOException {

  // 加载启动脚本

  String content = loadContent(file);

  this.content = expandPlaceholders(content, properties);

}

private String loadContent(File file) throws IOException {

  if (file == null) {

    // 默认launch.script

    return loadContent(getClass().getResourceAsStream("launch.script"));

  }

  return loadContent(new FileInputStream(file));

}
默认的LaunchScript为DefaultLaunchScript,在构造DefaultLaunchScript时,若不指定启动脚本,则取默认的launch.script,内容见 launch.script
launch.script实现较为复杂,此处不做解析,launch.script与上述shell脚本的实现思路基本相同,同样实现了start stop restart等功能,方便安装为systemd服务
不同的是,launch.script会解析与jar文件同名的conf文件,以实现启动脚本定制化 Customizing a Script When It Runs
如,我们实现一个简单的web接口
@SpringBootApplication

@RestController

public class WebApp {

    public static void main(String[] args) {

        SpringApplication.run(WebApp.class, args);

    }

    @RequestMapping("/")

    @GetMapping

    public String hello() {

        return "Hello You!";

    }

}使用spring-boot-gradle-plugin插件打包,执行./spring-boot-theory-1.0.0.jar,可以看到输出
访问 http://localhost:8080 可以看到 Hello You! 字样
若要对启动参数,如监听端口做修改,除了使用java -jar spring-boot-theory-1.0.0.jar --server.port=8000外,还可以新建同名文件 spring-boot-theroy-1.0.0.conf,填入内容
RUN_ARGS="--server.port=8000"再次执行./spring-boot-theory-1.0.0.jar
监听端口由默认的8080变为指定的8000
conf配置文件可配置的内容较多,如使用JAVA_OPTS配置jvm运行参数,使用MODE=service可将程序放入后台运行等等 Customizing a Script When It Runs
以如下conf配置为例
MODE=service

JAVA_OPTS="-Xms1g -Xmx1g -Dfile.encoding=utf-8"

RUN_ARGS="--server.port=8000"执行./spring-boot-theory-1.0.0.jar start

查看该进程运行参数
/usr/bin/java -Dsun.misc.URLClassPath.disableJarChecking=true -Xms1g -Xmx1g -Dfile.encoding=utf-8 -jar /Users/manerfan/Project/learning/javaspring-boot-theory/build/libs/spring-boot-theory-1.0.0.jar --server.port=8000
总结
SpringBoot实现ExecutableJar的原理,便是将启动脚本及原有的jar文件(以及第三方依赖包)写入同一个文件,并给该文件赋可执行权限,结合conf配置文件,使RunnableJar变为ExecutableJar的同时,得以更加便捷的控制程序的启动/运行参数
(转)springboot应用启动原理(一) 将启动脚本嵌入jar的更多相关文章
- (转)springboot应用启动原理(二) 扩展URLClassLoader实现嵌套jar加载
转:https://segmentfault.com/a/1190000013532009 在上篇文章<springboot应用启动原理(一) 将启动脚本嵌入jar>中介绍了springb ...
- springboot学习入门之三---启动原理
3启动原理 3.1启动类 @SpringBootApplication public class Application { public static void main(String[] args ...
- 1-20 RHEL7的启动原理和服务控制
大纲: RHEL7启动原理 RHEL7服务启动配置 网络概述 发布内网服务器 ############################################################ ...
- Linux系统的启动原理
Linux系统的启动原理 RHEL的启动原理BIOS自检-MBR-启动GRUB-加载内核-systemd的init进程 systemd的初始化进程加载需要的服务,挂载文件系统/etc/fstabsys ...
- springboot之启动原理解析
前言 SpringBoot为我们做的自动配置,确实方便快捷,但是对于新手来说,如果不大懂SpringBoot内部启动原理,以后难免会吃亏.所以这次博主就跟你们一起一步步揭开SpringBoot的神秘面 ...
- SpringBoot之旅第六篇-启动原理及自定义starter
一.引言 SpringBoot的一大优势就是Starter,由于SpringBoot有很多开箱即用的Starter依赖,使得我们开发变得简单,我们不需要过多的关注框架的配置. 在日常开发中,我们也会自 ...
- SpringBoot启动原理及相关流程
一.springboot启动原理及相关流程概览 springboot是基于spring的新型的轻量级框架,最厉害的地方当属自动配置.那我们就可以根据启动流程和相关原理来看看,如何实现传奇的自动配置 二 ...
- 带着萌新看springboot源码12(启动原理 下)
先继续接上一篇,那个启动原理还有一点没说完. 6. afterRefresh(context, applicationArguments); 看这个名字就知道,应该就是ioc容器刷新之后的一些操作了, ...
- 尚硅谷springboot学习26-嵌入式servlet容器自动配置、启动原理
EmbeddedServletContainerAutoConfiguration:嵌入式的Servlet容器自动配置 @AutoConfigureOrder(Ordered.HIGHEST_PREC ...
随机推荐
- pandas dataframe 一行变多行 (query pv统计term pv)
关键字: 用jieba切词 用expand 一列变多列 用stack 列转行 用group by + aggr 相同term的pv求和 上效果: query pv 今日新鲜事 今日头条 北京天气 上海 ...
- hihocoder 1015 : KMP算法(kmp)
传送门 Description 小Hi和小Ho是一对好朋友,出生在信息化社会的他们对编程产生了莫大的兴趣,他们约定好互相帮助,在编程的学习道路上一同前进. 这一天,他们遇到了一只河蟹,于是河蟹就向小H ...
- [Linux] 022 RPM 包查询
1. 查询是否安装 (1) 查询包是否安装 $ rpm -q 包名 选项 释义 -q (query) 查询 (2) 查询所有已安装的 RPM 包 $ rpm -qa 选项 释义 -a (all) 所有 ...
- 2.openshift授权策略和scc理解
policy管理概念 查看policy的方式可以通过cli进行查看 Roles grant various levels of access in the system-wide cluster po ...
- Vue / keep-alive使用
keep-alive keep-alive是Vue提供的一个抽象组件,用来对组件进行缓存,从而节省性能,由于是一个抽象组件,所以在v页面渲染完毕后不会被渲染成一个DOM元素 <keep-aliv ...
- asp.net ajax的使用
参考:https://www.cnblogs.com/acles/articles/2385648.html https://www.cnblogs.com/xujingyang/p/5560646. ...
- 纯css实现星级评分效果
效果 效果图如下,纯css实现超酷炫的星级评分动画效果 实现思路 5个类型为radio的input,label标签修改样式背景图为星星 label标签给每个星星鼠标停留时加注名字 点击星星有放大旋 ...
- 形象生动的SpringBoot和SpringMVC的区别
spring boot只是一个配置工具,整合工具,辅助工具. springmvc是框架,项目中实际运行的代码 Spring 框架就像一个家族,有众多衍生产品例如 boot.security.jpa等等 ...
- python发行包 IDE
https://blog.csdn.net/qq_38188725/article/details/80624004 https://blog.csdn.net/qq_38188725/article ...
- EXCUTE JAVAScript点击事件
# Execute Javascript document.getElementsByClassName('chooseFile')[${index}].arguments[0].click(); # ...