基于谷歌开源的TensorFlow Object Detection API视频物体识别系统搭建自己的应用(四)
本章主要内容是利用mqtt、多线程、队列实现模型一次加载,批量图片识别分类功能
目录结构如下:
mqtt连接及多线程队列管理
# -*- coding:utf8 -*-

import paho.mqtt.client as mqtt

from multiprocessing import Process, Queue

import images_detect

MQTTHOST = "192.168.3.202"

MQTTPORT = 1883

mqttClient = mqtt.Client()

q = Queue()

# 连接MQTT服务器

def on_mqtt_connect():

    mqttClient.connect(MQTTHOST, MQTTPORT, 60)

    mqttClient.loop_start()

# 消息处理函数

def on_message_come(mqttClient, userdata, msg):

    q.put(msg.payload.decode("utf-8"))  # 放入队列

    print("产生消息", msg.payload.decode("utf-8"))

def consumer(q, pid):

    print("开启消费序列进程", pid)

    # 多进程中发布消息需要重新初始化mqttClient

    ImagesDetect = images_detect.ImagesDetect()

    ImagesDetect.detect(q)

# subscribe 消息订阅

def on_subscribe():

    mqttClient.subscribe("test", 1)  # 主题为"test"

    mqttClient.on_message = on_message_come  # 消息到来处理函数

# publish 消息发布

def on_publish(topic, msg, qos):

    mqttClient.publish(topic, msg, qos);

def main():

    on_mqtt_connect()

    on_subscribe()

    for i in range(1, 3):

        c1 = Process(target=consumer, args=(q, i))

        c1.start()

    while True:

        pass

if __name__ == '__main__':

    main()
图片识别
images_detect.py
# coding: utf-8

import numpy as np

import os

import sys

import tarfile

import tensorflow as tf

from object_detection.utils import label_map_util

from object_detection.utils import visualization_utils as vis_util

import cv2

import decimal

import MyUtil

context = decimal.getcontext()

context.rounding = decimal.ROUND_05UP

class ImagesDetect():

    def __init__(self):

        sys.path.append("..")

        MODEL_NAME = 'faster_rcnn_inception_v2_coco_2018_01_28'

        MODEL_FILE = MODEL_NAME + '.tar.gz'

        # Path to frozen detection graph. This is the actual model that is used for the object detection.

        PATH_TO_CKPT = MODEL_NAME + '/frozen_inference_graph.pb'

        # List of the strings that is used to add correct label for each box.

        PATH_TO_LABELS = os.path.join('data', 'mscoco_label_map.pbtxt')

        NUM_CLASSES = 90

        tar_file = tarfile.open(MODEL_FILE)

        for file in tar_file.getmembers():

            file_name = os.path.basename(file.name)

            if 'frozen_inference_graph.pb' in file_name:

                tar_file.extract(file, os.getcwd())

        # ## Load a (frozen) Tensorflow model into memory.

        self.detection_graph = tf.Graph()

        with self.detection_graph.as_default():

            od_graph_def = tf.GraphDef()

            with tf.gfile.GFile(PATH_TO_CKPT, 'rb') as fid:

                serialized_graph = fid.read()

                od_graph_def.ParseFromString(serialized_graph)

                tf.import_graph_def(od_graph_def, name='')

        # ## Loading label map

        # Label maps map indices to category names, so that when our convolution network predicts `5`, we know that this corresponds to `airplane`.  Here we use internal utility functions, but anything that returns a dictionary mapping integers to appropriate string labels would be fine

        label_map = label_map_util.load_labelmap(PATH_TO_LABELS)

        categories = label_map_util.convert_label_map_to_categories(label_map, max_num_classes=NUM_CLASSES, use_display_name=True)

        self.category_index = label_map_util.create_category_index(categories)

        self.image_tensor = self.detection_graph.get_tensor_by_name('image_tensor:0')

        # 每个框代表一个物体被侦测到

        self.boxes = self.detection_graph.get_tensor_by_name('detection_boxes:0')

        # 每个分值代表侦测到物体的可信度.

        self.scores = self.detection_graph.get_tensor_by_name('detection_scores:0')

        self.classes = self.detection_graph.get_tensor_by_name('detection_classes:0')

        self.num_detections = self.detection_graph.get_tensor_by_name('num_detections:0')

    def detect(self, q):

        with self.detection_graph.as_default():

            config = tf.ConfigProto()

            # config.gpu_options.allow_growth = True

            config.gpu_options.per_process_gpu_memory_fraction = 0.2

            with tf.Session(graph=self.detection_graph, config=config) as sess:

                while True:

                    img_src = q.get()

                    print('------------start------------' + MyUtil.get_time_stamp())

                    image_np = cv2.imread(img_src)

                    # 扩展维度,应为模型期待: [1, None, None, 3]

                    image_np_expanded = np.expand_dims(image_np, axis=0)

                    # 执行侦测任务.

                    (boxes, scores, classes, num_detections) = sess.run(

                        [self.boxes, self.scores, self.classes, self.num_detections],

                        feed_dict={self.image_tensor: image_np_expanded})

                    # 检测结果的可视化

                    vis_util.visualize_boxes_and_labels_on_image_array(

                        image_np,

                        np.squeeze(boxes),

                        np.squeeze(classes).astype(np.int32),

                        np.squeeze(scores),

                        self.category_index,

                        use_normalized_coordinates=True,

                        line_thickness=8)

                    print('------------end------------' + MyUtil.get_time_stamp())

                    # cv2.imshow('object detection', cv2.resize(image_np, (800, 600)))

                    if cv2.waitKey(25) & 0xFF == ord('q'):

                        cv2.destroyAllWindows()

                        break
import time

def get_time_stamp():

    ct = time.time()

    local_time = time.localtime(ct)

    data_head = time.strftime("%Y-%m-%d %H:%M:%S", local_time)

    data_secs = (ct - int(ct)) * 1000

    time_stamp = "%s.%03d" % (data_head, data_secs)

    return time_stamp
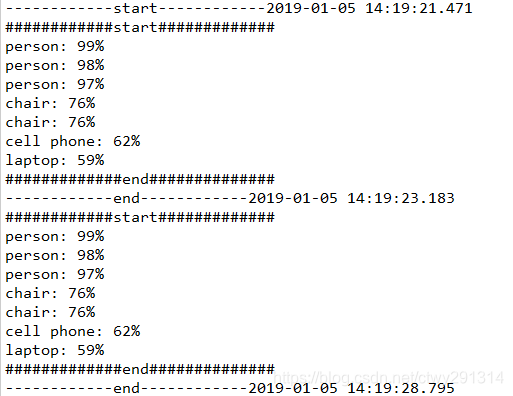
效果:
基于谷歌开源的TensorFlow Object Detection API视频物体识别系统搭建自己的应用(四)的更多相关文章
- 对于谷歌开源的TensorFlow Object Detection API视频物体识别系统实现教程
本教程针对Windows10实现谷歌近期公布的TensorFlow Object Detection API视频物体识别系统,其他平台也可借鉴. 本教程将网络上相关资料筛选整合(文末附上参考资料链接) ...
- 谷歌开源的TensorFlow Object Detection API视频物体识别系统实现教程
视频中的物体识别 摘要 物体识别(Object Recognition)在计算机视觉领域里指的是在一张图像或一组视频序列中找到给定的物体.本文主要是利用谷歌开源TensorFlow Object De ...
- 谷歌开源的TensorFlow Object Detection API视频物体识别系统实现(二)[超详细教程] ubuntu16.04版本
本节对应谷歌开源Tensorflow Object Detection API物体识别系统 Quick Start步骤(一): Quick Start: Jupyter notebook for of ...
- 谷歌开源的TensorFlow Object Detection API视频物体识别系统实现(一)[超详细教程] ubuntu16.04版本
谷歌宣布开源其内部使用的 TensorFlow Object Detection API 物体识别系统.本教程针对ubuntu16.04系统,快速搭建环境以及实现视频物体识别系统功能. 本节首先介绍安 ...
- 安装运行谷歌开源的TensorFlow Object Detection API视频物体识别系统
Linux安装 参照官方文档:https://github.com/tensorflow/models/blob/master/research/object_detection/g3doc/inst ...
- 使用Tensorflow object detection API——训练模型(Window10系统)
[数据标注处理] 1.先将下载好的图片训练数据放在models-master/research/images文件夹下,并分别为训练数据和测试数据创建train.test两个文件夹.文件夹目录如下 2. ...
- 基于TensorFlow Object Detection API进行迁移学习训练自己的人脸检测模型(二)
前言 已完成数据预处理工作,具体参照: 基于TensorFlow Object Detection API进行迁移学习训练自己的人脸检测模型(一) 设置配置文件 新建目录face_faster_rcn ...
- 基于TensorFlow Object Detection API进行相关开发的步骤
*以下二/三.四步骤确保你当前的文件目录是以research文件夹为相对目录. 一/安装或升级protoc 查看protoc版本命令: protoc --version 如果发现版本低于2.6.0或运 ...
- 使用TensorFlow Object Detection API+Google ML Engine训练自己的手掌识别器
上次使用Google ML Engine跑了一下TensorFlow Object Detection API中的Quick Start(http://www.cnblogs.com/take-fet ...
随机推荐
- 如何生成各种mif文件,绝对经典!!!
mif文件生成模板,只需要5步,很简单!!!!! 先说明如何操作,1-2-3-4-5步,后面附上模板!!! 下面以汉字去模演示过程: 1.取模软件设置:注意这里是设置的输出数据的格式!!!!!!!!! ...
- 二、angular7的基础知识学习
<p> hello works </p> <div *ngIf="isShow">我是测试内容</div> <p> &l ...
- Android ListView焦点事件冲突问题与解决
Android ListView对于单纯列表展示是很好用的,但是一旦牵扯到对listView进行操作就会遇到各种各样的问题.比如保存Checkbox状态与item复用的冲突.遇到可获取焦点的控件比如说 ...
- 20180827-Java网络编程
Java 网络编程 网络编程是指编写运行在多个设备(计算机)的程序,这些设备都通过网络连接起来. java.net包中J2SE的API包含有类和接口,它们提供低层次的通信细节.你可以直接使用这些类和接 ...
- [洛谷P3939]:数颜色(二分)
题目传送门 题目描述 小$C$的兔子不是雪白的,而是五彩缤纷的.每只兔子都有一种颜色,不同的兔子可能有相同的颜色.小$C$把她标号从$1$到$n$的$n$只兔子排成长长的一排,来给他们喂胡萝卜吃.排列 ...
- css基础—字体那些事
css基础-字体那些事 1. 首先讲字的大小样式等 字体大小 font-size: 40px; 文字字体 font-family: "宋体",Arial; 文字样式 font-st ...
- Understanding the Module Pattern in JavaScript
Understanding the Module Pattern in JavaScript Of all the design patterns you are likely to encounte ...
- centos 6.10源码安装mysql5.5.62实验
查看系统版本 [root@ABC ~]# cat /etc/redhat-release CentOS release 6.10 (Final) 下载mysql5.5.62源码包,解压后安装 tar ...
- MySQL主从复制中replicate-ignore-db replicate-wild-ignore-table的应用
MySQL主从复制中replicate-ignore-db replicate-wild-ignore-table的应用 replicate-ignore-dbreplicate-wild-ignor ...
- LeetCode 47——全排列 II
1. 题目 2. 解答 在 LeetCode 46--全排列 中我们已经知道,全排列其实就是先确定某一个位置的元素,然后余下就是一个子问题.在那个问题中,数据没有重复,所以数据中的任意元素都可以放在最 ...