2-13 搭建LAMP环境并部署Ucenter和Ucenter-home网站
环境:
VMware Virtual Machine : XGan63.cn
IP: 192.168.31.63 (Bridge)
已配置本地yum源 ---> /mnt
已配置网络yum源 ---> http://mirrors.aliyun.com
安装前确保环境干净,避免软件冲突造成影响
检查环境:
which httpd #查看是否安装httpd服务
chkconfig --list httpd #检查httpd启动项
chkconfig --list mysqld #检查mysqld启动项
which php #检查php是否已安装
rpm -qa | grep httpd #查看 httpd,php,mysql是否已安装
rpm -qa | grep php
rpm -qa | grep mysql
一. 安装 Apache,MySQL,PHP
yum -y install httpd mysql-server php php-mysql
# httpd是apache的web服务,提供web访问服务
# mysql-server是数据库服务,mysql是本地访问数据客户端程序,安装server时,会被装上的
# php 解析php网页
# php-mysql php与mysql连接程序,是php可以访问数据库
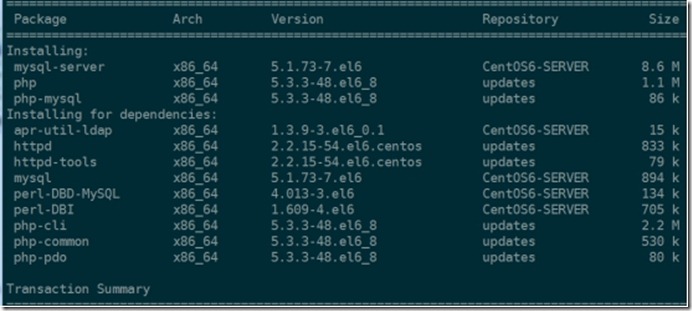
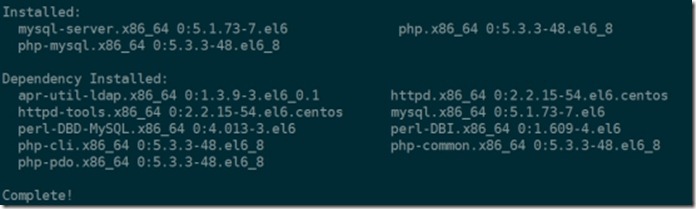
httpd数错了,没装上,不过php依赖关系时,给装上了
二. 配置环境
1. 配置apahce并测试php
设置开机启动项
chkconfig httpd on
启动服务,在客户端访问,测试
service httpd start
测试PHP,创建查看phpinfo()信息界面
echo "<?php phpinfo() ?> " >> /var/www/html/index.php
在宿主机中访问地址192.168.31.63,结果如下:Ok

2. 配置Apache开启虚拟主机实现
uc.xgan63.cn访问ucenter;
www.xgan63.cn访问ucenter_home;
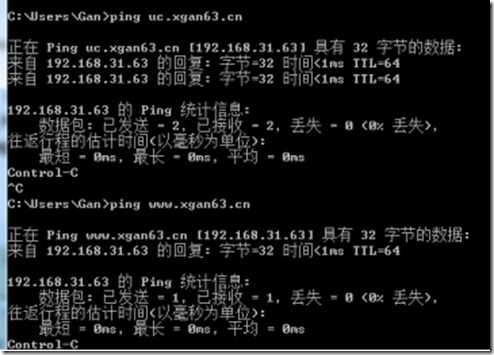
2.1 在宿主机中,修改host添加域名信息,
使其能够解析域名uc.xgan63.cn和www.xgan63.cn
C:\Windows\System32\drivers\etc\hosts
192.168.31.63 uc.xgan63.cn
192.163.31.63 www.xgan63.cn

在命令行测试如下:
2.2 配置httpd服务,开启虚拟主机:
vim /etc/httpd/conf/httpd.conf

修改如下:
NameVirtualHost *.80

修改如下:
<VirtualHost *:80>
ServerAdmin webmaster@dummy-host.example.com
DocumentRoot /var/www/html/ucenter
ServerName uc.xgan63.cn
ErrorLog logs/dummy-host.example.com-error_log
CustomLog logs/dummy-host.example.com-access_log common
</VirtualHost>
<VirtualHost *:80>
ServerAdmin webmaster@dummy-host.example.com
DocumentRoot /var/www/html/ucenter_home
ServerName www.xgan63.cn
ErrorLog logs/dummy-host.example.com-error_log
CustomLog logs/dummy-host.example.com-access_log common
</VirtualHost>
2.3 重启squid和httpd服务:
service httpd restart #httpd重启
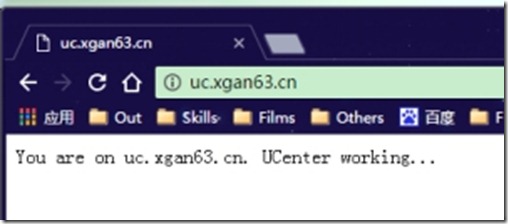
2.4 在宿主机中测试如下图:Ok!!!

3. 配置mysql
chkconfig mysqld on #添加开机启动
service mysqld start # 启动mysqld服务
[root@xgan63 ~]# service mysqld start
Initializing MySQL database: Installing MySQL system tables...
OK
Filling help tables...
OK #见到这两个Ok表示初始化并启动成功
To start mysqld at boot time you have to copy
support-files/mysql.server to the right place for your system
PLEASE REMEMBER TO SET A PASSWORD FOR THE MySQL root USER !
To do so, start the server, then issue the following commands:
/usr/bin/mysqladmin -u root password 'new-password'
/usr/bin/mysqladmin -u root -h xgan63.cn password 'new-password'
Alternatively you can run:
/usr/bin/mysql_secure_installation
which will also give you the option of removing the test
databases and anonymous user created by default. This is
strongly recommended for production servers.
See the manual for more instructions.
You can start the MySQL daemon with:
cd /usr ; /usr/bin/mysqld_safe &
You can test the MySQL daemon with mysql-test-run.pl
cd /usr/mysql-test ; perl mysql-test-run.pl
Please report any problems with the /usr/bin/mysqlbug script!
[ OK ]
Starting mysqld: [ OK ]

mysql_secure_installation #运行安全配置初始化
[root@xgan63 ~]# mysql_secure_installation
...
Enter current password for root (enter for none): # 回车即可
OK, successfully used password, moving on...
...
Set root password? [Y/n] y # 设置root密码
New password: # 输入root密码
Re-enter new password: # 再次输入
... Success!...
...
Remove anonymous users? [Y/n] y # 删除匿名用户
... Success!
...
Disallow root login remotely? [Y/n] y # 禁止root用户远程连接
... Success!
Remove test database and access to it? [Y/n] y # 测试数据
- Dropping test database...
... Success!
...
- Removing privileges on test database...
... Success!
...
Reload privilege tables now? [Y/n] y
... Success!
Cleaning up...
All done! If you've completed all of the above steps, your MySQL
installation should now be secure.
为UCenter创建数据库,和专门的维护用户
安全起见,我们应该在mysql中ucenter专门创建一个用户用于维护数据库,方法如下:
mysql -uroot -p123456 #命令行中,进入数据库
create database ucenter; # 创建UCenter数据库
create user ‘center’@’localhost’ identified by ‘shihuan1989’; #创建本机用户,并设置密码为shihuan1989
grant all privileges on ucenter.* to ‘center’@’localhost’;#授权本机用户center对于ucenter的所有权限

4. 下载UCenter_1.5.2_SC_UTF8.zip和UCenter_Home_2.0_SC_UTF8.zip
并安装配置
UCenter_1.5.2 URL:
http://download.comsenz.com/UCenter/1.5.2/UCenter_1.5.2_SC_UTF8.zip
UCenter_Home_2.0 URL:
http://download.comsenz.com/UCenter_Home/2.0/UCenter_Home_2.0_SC_UTF8.zip
使用wget命令或通过浏览器下载到宿主机后使用Xshell上传到服务器XGan63.cn
解压缩UCenter和UCenter_Home到指定目录
并将解压后的upload目录中的文件全部移动到对应的工作目录下:
解压UCenter并上传文件到工作目录:
unzip -d /usr/local/src/ucenter UCenter_1.5.2_SC_UTF8.zip
unzip -d /usr/local/src/ucenter_home UCenter_Home_2.0_SC_UTF8.zip
mv /usr/local/src/ucenter/upload/* /var/www/html/ucenter/.
mv /usr/local/src/ucenter_home/upload/* /var/www/html/ucenter_home/.
并赋予apache文件权限
chown -R apache:apache /var/www
安装UCenter
在宿主机浏览器中访问uc.xgan63.cn

点击Please click here to install it.
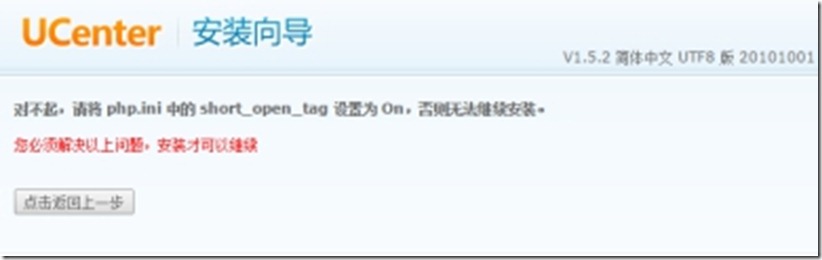
上图须知,php需开启标签功能
vim /etc/php.ini
short_open_tag=on #如下图

保存退出,推出后,重启httpd服务
service httpd restart
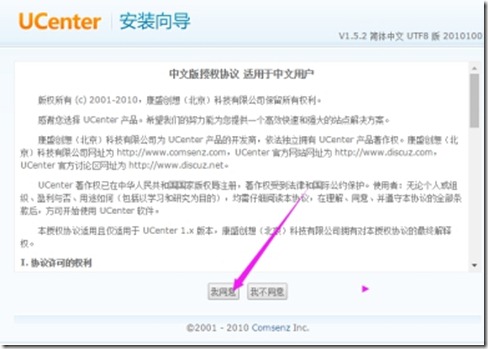
然后宿主机浏览器中F5刷新,点击我同意,如下图
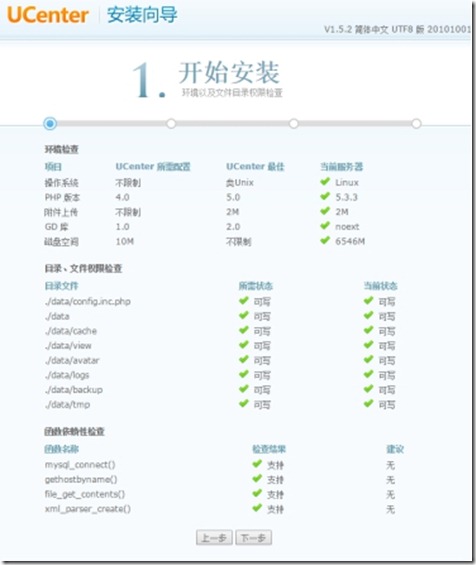
然后开机检测运行环境以及,文件权限和依赖关系全部Ok,点击下一步,如下图:
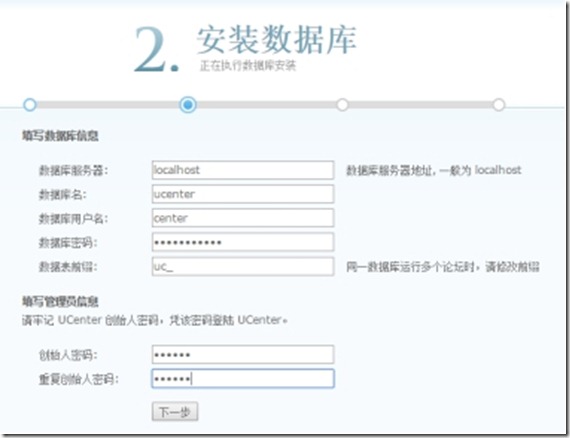
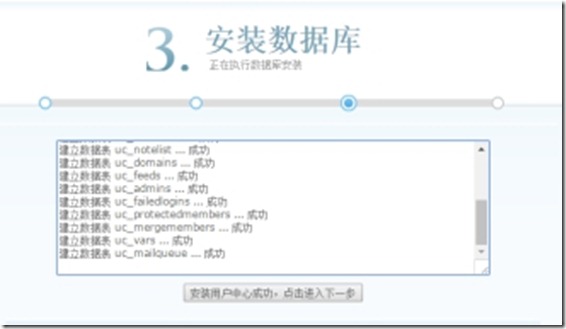
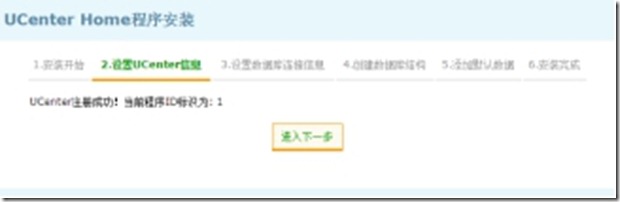
开始安装数据库,填写之前配置好的信息,并创建管理员密码如下图,点击下一步:
出现,如下图界面表示,已安装成功!!!,点击下一步:

尝试输入密码,登录

OK,UCenter安装完成了
安装UCenter_Home
在宿主机浏览器地址栏中,输入www.xgan63.cn,

按图,在服务器中操作如下:
mv /var/www/html/ucenter_home/config.new.php /var/www/html/ucenter_home/config.php
然后在宿主机浏览器中按F5刷新,
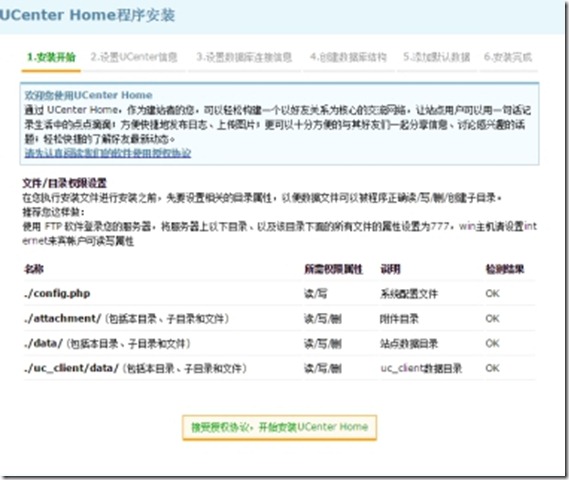
出现如下图(检测文件访问权限,都没有问题):(点击授权协议,并开始安装)
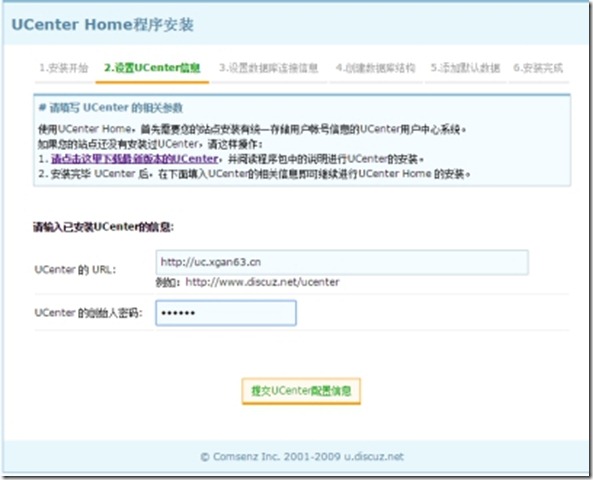
然后,出现如下图,让我们输入UCenter信息(地址和创世密码),输入后点击提交:
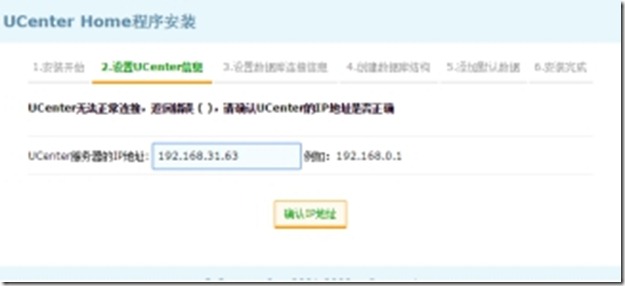
出现如下图,找不到UCenter,输入IP地址,并点击确认
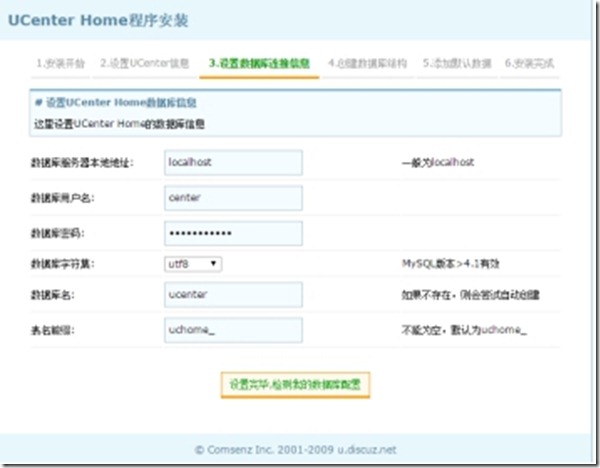
点击下一步,开始安装数据库
填入已经设置好的数据库信息,如下图,并点击设置完毕:
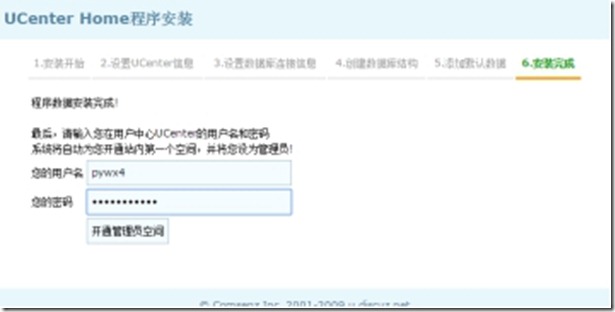
UCenter Home连接到数据库并创建数据库结构,添加默认数据后,出现如下图:
(填写想要创建的管理员账户和密码后,点击开通管理员空间)
出现如下图界面,Ok UCenter Home已安装完成,可点击 进入我的空间或进入管理平台进行管理
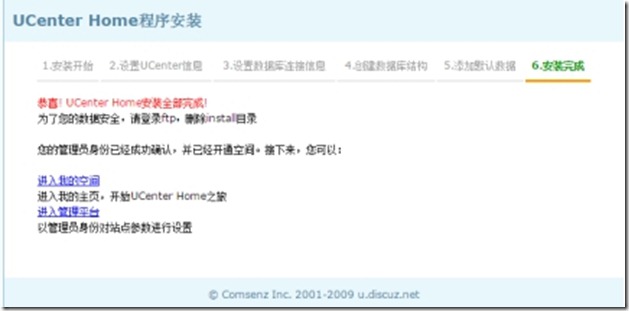
---> 进入我的空间
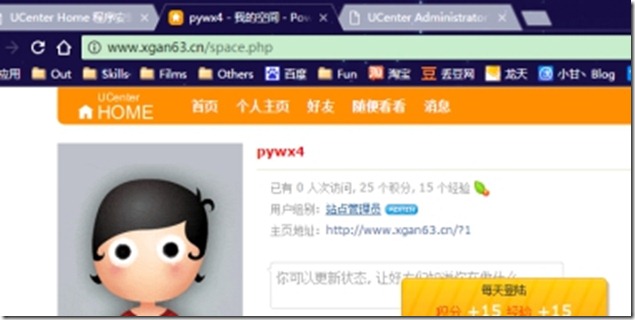
---> 进入管理平台
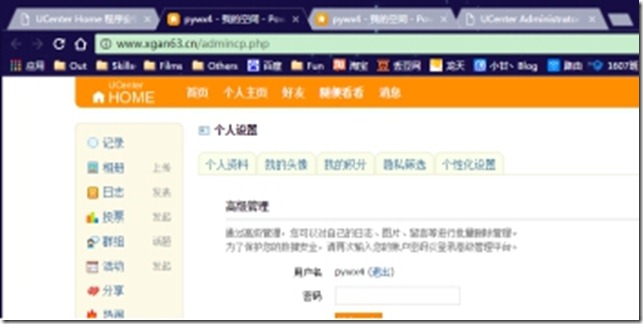
Ok,到此时,我们的UCenter和UCenter_Home已搭建完成了!!!
2-13 搭建LAMP环境并部署Ucenter和Ucenter-home网站的更多相关文章
- •搭建LAMP环境及快速部署双网站并实现基于域名的虚拟主机
本节所讲内容: 实战:搭建LAMP环境及快速部署双网站并实现基于域名的虚拟主机 LAMP架构:??? Linux+Apache+Mysql+PHP Linux+Apache+Mysql/MariaDB ...
- 搭建LAMP环境部署GLPI资源管理系统
搭建LAMP环境部署GLPI资源管理系统 一.关闭防火墙和Selinux [root@localhost ~]# systemctl disable --now firewalld [root@loc ...
- 搭建LAMP环境部署opensns微博网站
搭建LAMP环境部署opensns微博网站 实验环境 centos7 ip: 192.168.121.17 一.关闭防火墙和selinux [root@localhost ~]# systemctl ...
- 搭建LAMP环境部署Nextcloud私人网盘
搭建 LAMP 环境部署 Nextcloud 私人网盘 前言 Nextcloudd 是一个开源的.基于本地的文件共享和协作平台,它允许您保存文件并通过多个设备(如PC.智能手机和平板电脑)访问它们. ...
- Centos7+Apache2.4+php5.6+mysql5.5搭建Lamp环境——为了wordPress
最近想搭建个人博客玩玩,挑来挑去发现口碑不错的博客程序是wordpress,简称wp.虽然是学java路线的程序员,但因入行时间太短,至今没有发现较为称手开源的博客程序,如果各位大神有好的推荐,也希望 ...
- CentOS6.5下搭建LAMP环境(源码编译方式)
CentOS 6.5安装配置LAMP服务器(Apache+PHP5+MySQL) 学习PHP脚本编程语言之前,必须先搭建并熟悉开发环境,开发环境有很多种,例如LAMP ,WAMP,MAMP等.这里我介 ...
- CentOS下搭建LAMP环境详解
前言:在这里将介绍如何在CentOS下搭建LAMP环境(全部使用源码编译安装),用于web服务器开发. •LAMP: Linux + Apache + PHP + Mysql. •系统: CentOS ...
- 在ubuntu上搭建开发环境4---ubuntu简单的搭建LAMP环境和配置
最近重新安装了Ubuntu,但是之前的LAMP环境自然也就没有了,实在是不想再去编译搭建LAMP环境(这种方法实在是太费时间,而且太容易遇到各种不知道为什么的错误),所以,就去查查有没有什么简单的搭建 ...
- Centos6.4版本下搭建LAMP环境
Centos6.4版本下搭建LAMP环境 配置yum mkdir/mnt/cdrom mount/dev/cdrom /mnt/cdrom 装载光盘 vi /etc/yum.repos.d/Cent ...
随机推荐
- oracle通过profile限制用户的恶意登录和使用期限
用户profile口令管理 1,可以把profile想象成一个数据对象(文件,规则) 案例: 允许某用户,最多尝试登录3次,如3次未登录成功,则锁定该用户,锁定后两天不能登录系统 设置语法(syste ...
- Java学习记录-Lambda表达式示例
List<Integer> userIds=userInfoList.stream().map(m->m.getUserId()).collect(Collectors.toList ...
- iptables综述
1 概述 如下图所示,iptables共有Filter,Nat,Mangle和RAW共四个table,每个table还有若干个chain,每个chain中还包含若干个rule 1.1 Filter t ...
- idea 设置
1.代码提示不区分大小写 2.自动导入 抽取成接口-push members up 你可能不知道的IDEA使用技巧
- uva The Tower of Babylon[LIS][dp]
转自:https://mp.weixin.qq.com/s/oZVj8lxJH6ZqL4sGCXuxMw The Tower of Babylon(巴比伦塔) Perhaps you have hea ...
- C++ lamda、function、bind使用
参考资料: http://blog.csdn.net/augusdi/article/details/11771699 lambda 表达式的简单语法如下:[capture] (parameters) ...
- Linux安装rpm包时报错Header V3 DSA/SHA1 Signature, key ID 1d1e034b: NOKEY解决办法
这是因为yum安装了旧版本的GPG key造成的,解决办法: rpm --import /etc/pki/rpm-gpg/RPM* Header V3 DSA/SHA1 Signature, key ...
- Openresty学习汇总
在锤子科技发布会上,提到给Openresty的捐赠的事情,出于好奇我在是网上查询了Openresty,看到了Openresty的官网(http://openresty.org/en/).看到介绍说的很 ...
- 打开 EXCEL时出现RUN-TIME ERROR“91”,怎么解决?
方法一: 开始—程序—microsoft—打开“windows office 2007 简易设置”,把“使用 office 03样式经典菜单”前的“√”去掉就OK了 方法二: 1. 打开注册表编辑器. ...
- bzoj3751 / P2312 解方程
P2312 解方程 bzoj3751(数据加强) 暴力的一题 数据范围:$\left | a_{i} \right |<=10^{10000}$.连高精都无法解决. 然鹅面对这种题,有一种常规套 ...