ansible管理windows实践
一、前言
近期打算搞搞自动部署,因为是windows服务器,一些工具和系统支持都不是太好。最后发现ansible比较火,最重要的是他支持windows。本文主要就ansible 在windows使用环境搭建过程分享。
二、Ansible简介
(1)、连接插件connection plugins:负责和被监控端实现通信;
(2)、host inventory:指定操作的主机,是一个配置文件里面定义监控的主机;
(3)、各种模块核心模块、command模块、自定义模块;
(4)、借助于插件完成记录日志邮件等功能;
(5)、playbook:剧本执行多个任务时,非必需可以让节点一次性运行多个任务。
三、Windows下Ansible工作模式
Ansible 从1.7+版本开始支持Windows,但前提是管理机必须为Linux系统,远程主机的通信方式也由SSH变更为PowerShell,同时管理机必须预安装Python的Winrm模块,方可和远程Windows主机正常通信,但PowerShell需3.0+版本且Management Framework 3.0+版本,实测Windows 7 SP1和Windows Server 2008 R2及以上版本系统经简单配置可正常与Ansible通信。简单总结如下:
(1) 管理机必须为Linux系统且需预安装Python Winrm模块
(2) 底层通信基于PowerShell,版本为3.0+,Management Framework版本为3.0+
(3) 远程主机开启Winrm服务
四、Ansible管理机部署安装
(1). 对管理主机的要求
目前,只要机器上安装了 Python 2.6 或 Python 2.7 (windows系统不可以做控制主机),都可以运行Ansible.
主机的系统可以是 Red Hat, Debian, CentOS, OS X, BSD的各种版本,等等.
(2) 从源码运行
从项目的checkout中可以很容易运行Ansible,Ansible的运行不要求root权限,也不依赖于其他软件,不要求运行后台进程,也不需要设置数据库.因此我们社区的许多用户一直使用Ansible的开发版本,这样可以利用最新的功能特性,也方便对项目做贡献.因为不需要安装任何东西,跟进Ansible的开发版相对于其他开源项目要容易很多.
从源码安装的步骤
$ git clone git://github.com/ansible/ansible.git --recursive

$ cd ./ansible
使用 Bash:
$ source ./hacking/env-setup
如果没有安装pip, 请先安装对应于你的Python版本的pip:
$ sudo easy_install pip
以下的Python模块也需要安装:
$ sudo pip install paramiko PyYAML Jinja2 httplib2 six
一旦运行env-setup脚本,就意味着Ansible从源码中运行起来了.默认的inventory文件是 /etc/ansible/hosts。
配置hosts文件:
$ vim /etc/ansible/hosts
[windows]

192.168.1.105 ansible_ssh_user="Administrator" ansible_ssh_pass="" ansible_ssh_port= ansible_connection="winrm" ansible_winrm_server_cert_validation=ignore
192.168.1.105是windows服务器的IP。
至此,服务端配置完毕。
和Linux发版版稍有区别,远程主机系统如为Windows需预先如下配置:
- 安装Framework 3.0+
- 更改powershell策略为remotesigned
- 升级PowerShell至3.0+
- 设置Windows远端管理,英文全称WS-Management(WinRM)
(1)安装Framework 3.0+
下载链接为:http://download.microsoft.com/download/B/A/4/BA4A7E71-2906-4B2D-A0E1-80CF16844F5F/dotNetFx45_Full_x86_x64.exe。 下载至本地后双击左键安装即可,期间可能会多次重启,电脑需正常连接Internet。
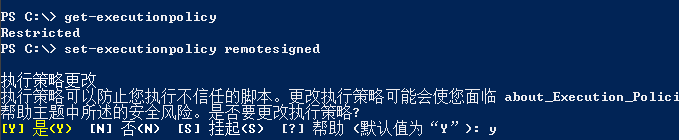
(2)更改powershell策略为remotesigned
(3)升级PowerShell至3.0+
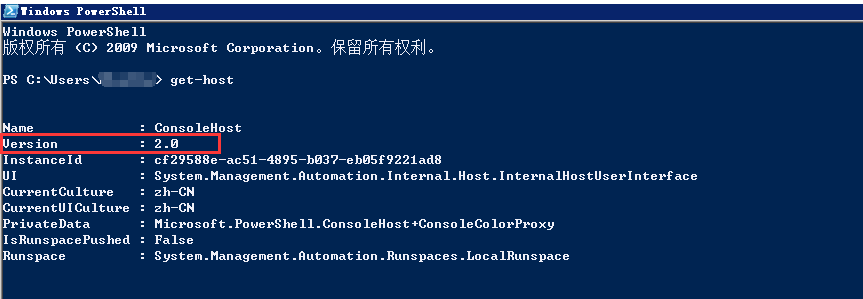
Window 7和Windows Server 2008 R2默认安装的有PowerShell,但版本号一般为2.0版本,所以我们需升级至3.0+,如下图中数字1部分表示PowerShell版本过低需3.0+版本,数字2部分表示当前PowerShell版本为2.0。
 # Powershell script to upgrade a PowerShell 2.0 system to PowerShell 3.0

 # based on http://occasionalutility.blogspot.com/2013/11/everyday-powershell-part-7-powershell.html

 #

 # some Ansible modules that may use Powershell 3 features, so systems may need

 # to be upgraded.  This may be used by a sample playbook.  Refer to the windows

 # documentation on docs.ansible.com for details.

 #

 # - hosts: windows

 #   tasks:

 #     - script: upgrade_to_ps3.ps1

 # Get version of OS

 # 6.0 is 2008

 # 6.1 is 2008 R2

 # 6.2 is 2012

 # 6.3 is 2012 R2

 if ($PSVersionTable.psversion.Major -ge 3)

 {

     write-host "Powershell 3 Installed already; You don't need this"

     Exit

 }

 $powershellpath = "C:\powershell"

 function download-file

 {

     param ([string]$path, [string]$local)

     $client = new-object system.net.WebClient

     $client.Headers.Add("user-agent", "PowerShell")

     $client.downloadfile($path, $local)

 }

 if (!(test-path $powershellpath))

 {

     New-Item -ItemType directory -Path $powershellpath

 }

 # .NET Framework 4.0 is necessary.

 #if (($PSVersionTable.CLRVersion.Major) -lt 2)

 #{

 #    $DownloadUrl = "http://download.microsoft.com/download/B/A/4/BA4A7E71-2906-4B2D-A0E1-80CF16844F5F/dotNetFx45_Full_x86_x64.exe"

 #    $FileName = $DownLoadUrl.Split('/')[-1]

 #    download-file $downloadurl "$powershellpath\$filename"

 #    ."$powershellpath\$filename" /quiet /norestart

 #}

 #You may need to reboot after the .NET install if so just run the script again.

 # If the Operating System is above 6.2, then you already have PowerShell Version > 3

 if ([Environment]::OSVersion.Version.Major -gt 6)

 {

     write-host "OS is new; upgrade not needed."

     Exit

 }

 $osminor = [environment]::OSVersion.Version.Minor

 $architecture = $ENV:PROCESSOR_ARCHITECTURE

 if ($architecture -eq "AMD64")

 {

     $architecture = "x64"

 }

 else

 {

     $architecture = "x86"

 }

 if ($osminor -eq 1)

 {

     $DownloadUrl = "http://download.microsoft.com/download/E/7/6/E76850B8-DA6E-4FF5-8CCE-A24FC513FD16/Windows6.1-KB2506143-" + $architecture + ".msu"

 }

 elseif ($osminor -eq 0)

 {

     $DownloadUrl = "http://download.microsoft.com/download/E/7/6/E76850B8-DA6E-4FF5-8CCE-A24FC513FD16/Windows6.0-KB2506146-" + $architecture + ".msu"

 }

 else

 {

     # Nothing to do; In theory this point will never be reached.

     Exit

 }

 $FileName = $DownLoadUrl.Split('/')[-1]

 download-file $downloadurl "$powershellpath\$filename"

 Start-Process -FilePath "$powershellpath\$filename" -ArgumentList /quiet
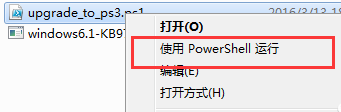
upgrade_to_ps3.ps1

(4)设置Windows远端管理(WS-Management,WinRM)
winrm service 默认都是未启用的状态,先查看状态;如无返回信息,则是没有启动;
winrm enumerate winrm/config/listener
针对winrm service 进行基础配置:
winrm quickconfig
查看winrm service listener:
winrm e winrm/config/listener
为winrm service 配置auth:
winrm set winrm/config/service/auth @{Basic="true"}
为winrm service 配置加密方式为允许非加密:
winrm set winrm/config/service @{AllowUnencrypted="true"}
好了,远程Windows主机配置到此结束,我们验证配置的是否有问题。
六、Windows下可用模块测试
ansible windows -m win_ping

传输/etc/passwd文件至远程F:\file\目录下
执行命令:
ansible windows -m win_copy -a 'src=/etc/passwd dest=F:\file\passwd'
返回结果:
192.168.1.105 | success >> {

    "changed": true,

    "checksum": "896d4c79f49b42ff24f93abc25c38bc1aa20afa0",

    "operation": "file_copy",

    "original_basename": "passwd",

    "size": 2563

}
部分返回结果诠释:
- “operation”: “file_copy”—执行的操作为 file_copy;
- “original_basename”: “passwd”—文件名为 passwd;
- “size”: 2563—文件大小为 2563 bytes。
Playbook写法如下:
---

- name: windows module example

  hosts: windows

  tasks:

     - name: Move file on remote Windows Server from one location to another

       win_file: src=/etc/passwd dest=F:\file\passwd
删除F:\file\passwd
执行命令:
ansible windows -m win_file -a "path=F:\file\passwd state=absent"
返回结果:
192.168.1.105 | success >> {

    "changed": true

}
七、总结
ansible管理windows实践的更多相关文章
- [转帖]Ansible管理windows集群
Ansible管理windows集群 http://www.cnblogs.com/Dev0ps/p/10026908.html 写的挺好的 我关注点还是不够好呢 最近公司新项目需要安装400+win ...
- 厉害—Ansible管理windows集群
最近公司新项目需要安装400+windows server 2012系统的工作站,想着怎么能像linux下运用ansible批量管理,linux就很简单了有ssh服务 但是下却没这么简单,但还是有办法 ...
- ansible管理windows (发送文件)
https://github.com/ansible/ansible/raw/devel/examples/scripts/ConfigureRemotingForAnsible.ps1 环境: 服务 ...
- ansible管理windows主机
1. 在windows开启winrm winrm service 默认都是未启用的状态,先查看状态:如无返回信息,则是没有启动: winrm enumerate winrm/config/listen ...
- Ansible 管理Windows 受控端
- Ansible学习笔记(一):部署管理Windows机器遇到的一些坑
在给国盛通上海测试环境做Ansible管理Windows服务器的时候,遇到了一些坑,Google解决掉了,特此记录,坑用红色标记. 一.环境说明 1.Ansible管理主机 操作系统:CentOS 7 ...
- [转帖]Ansible批量远程管理Windows主机(部署与配置)
2018-09-12 12:04:42 https://blog.51cto.com/7424593/2174156 一.测试环境介绍 Ansible管理主机: 系统: CentOS6.8 IP ...
- Ansible 批量管理Windows Server服务器
Ansible批量管理Windows Server Ansible是一款为类Unix系统开发的自由开源的配置和自动化工具, 它用Python写成,类似于saltstack和Puppe ...
- Ansible批量远程管理Windows主机(部署与配置)
一.测试环境介绍 Ansible管理主机: 系统: CentOS6.8 IP Addr: 172.16.10.22 Linux管理服务器需安装pip.pywinrm插件 Windows客户端主机: ...
随机推荐
- 【spring data jpa】repository中使用@Query注解使用hql查询,使用@Param引用参数,报错:For queries with named parameters you need to use provide names for method parameters. Use @Param for query method parameters, or when on
在spring boot中, repository中使用@Query注解使用hql查询,使用@Param引用参数 如题报错: For queries with named parameters you ...
- Ubuntu下添加开机启动项的2种方法
1.方法一,编辑rc.loacl脚本 Ubuntu开机之后会执行/etc/rc.local文件中的脚本,所以我们可以直接在/etc/rc.local中添加启动脚本.当然要添加到语句:exit 0 前面 ...
- CSDN - 进程结束后new出的内存会回收吗?
http://blog.csdn.net/stanjiang2010/article/details/5386647 关键词:内存回收
- C# 知识点随手学习网站推荐
http://www.studyofnet.com/news/list-8881.2-1-1.html
- ruby on rails模拟HTTP请求错误发生:end of file reached
在文章 Ruby On Rails中REST API使用演示样例--基于云平台+云服务打造自己的在线翻译工具 中,利用ruby的Net::HTTP发起http请求訪问IBM Bluemix上的sour ...
- Active Directory虚拟机搭建域控服务器环境
前言 还是和上一章一样,痛苦过后还是记录下给后来人提供便利为妙. 虚拟机选择:建议Hyper-V或者VMware 系统选择:建议WIindows Server 2003及以上 我这里是使用VMware ...
- HSSFWorkbook
public ActionResult excelPrint() { HSSFWorkbook workbook = new HSSFWorkbook();// 创建一个Excel文件 HSSFShe ...
- Python 008- 游戏2048
#-*- coding:utf-8 -*- import curses from random import randrange, choice # generate and place new ti ...
- Package template (html/template) ... Types HTML, JS, URL, and others from content.go can carry safe content that is exempted from escaping. ... (*Template) Funcs ..
https://godoc.org/text/template GoDoc Home About Go: text/templateIndex | Examples | Files | Directo ...
- Part of defining a topology is specifying for each bolt which streams it should receive as input
http://storm.apache.org/ [doing for realtime processing what Hadoop did for batch processing ] Apach ...