springmvc之hibernate整合
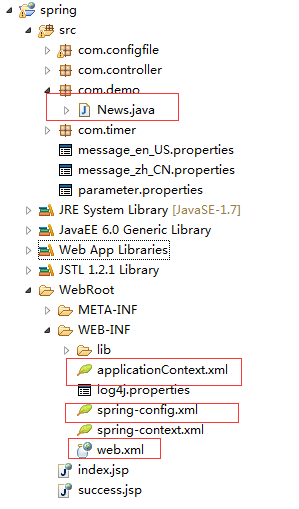
1、项目结构
2、所需jar包

3、web.xml
<?xml version="1.0" encoding="UTF-8"?>

<web-app xmlns:xsi="http://www.w3.org/2001/XMLSchema-instance"

    xmlns="http://java.sun.com/xml/ns/javaee"

    xmlns:web="http://java.sun.com/xml/ns/javaee/web-app_2_5.xsd"

    xsi:schemaLocation="http://java.sun.com/xml/ns/javaee

    http://java.sun.com/xml/ns/javaee/web-app_3_0.xsd" id="WebApp_ID" version="3.0">

      <display-name>spring</display-name>

      <context-param>

        <param-name>contextConfigLocation</param-name>

        <param-value>/WEB-INF/spring-context.xml,/WEB-INF/applicationContext.xml</param-value>

    </context-param>

    <listener>

        <listener-class>org.springframework.web.context.ContextLoaderListener</listener-class>

    </listener>

      <!-- log4j配置文件路径 -->

    <context-param>

        <param-name>log4jConfigLocation</param-name>

        <param-value>/WEB-INF/log4j.properties</param-value>

    </context-param>

    <context-param>

        <param-name>log4jRefreshInterval</param-name>

        <param-value>6000</param-value>

    </context-param>

    <!-- 加载log4j配置文件 -->

    <listener>

        <listener-class>org.springframework.web.util.Log4jConfigListener</listener-class>

    </listener>

    <!-- springmvc配置 -->

      <servlet>

        <servlet-name>springMVC</servlet-name>

        <servlet-class>org.springframework.web.servlet.DispatcherServlet</servlet-class>

        <init-param>

            <param-name>contextConfigLocation</param-name>

            <param-value>/WEB-INF/spring-config.xml</param-value>

        </init-param>

        <load-on-startup>1</load-on-startup>

    </servlet>

    <servlet-mapping>

        <servlet-name>springMVC</servlet-name>

        <url-pattern>/</url-pattern>

    </servlet-mapping>

  <welcome-file-list>

    <welcome-file>index.html</welcome-file>

    <welcome-file>index.htm</welcome-file>

    <welcome-file>index.jsp</welcome-file>

    <welcome-file>default.html</welcome-file>

    <welcome-file>default.htm</welcome-file>

    <welcome-file>default.jsp</welcome-file>

  </welcome-file-list>

</web-app>
注:ContextLoaderListener作用:Spring之ContextLoaderListener的作用
4、applicationContext.xml,配置hibernate
<?xml version="1.0" encoding="UTF-8"?>

<beans xmlns="http://www.springframework.org/schema/beans"

       xmlns:xsi="http://www.w3.org/2001/XMLSchema-instance"

       xmlns:aop="http://www.springframework.org/schema/aop"

       xmlns:tx="http://www.springframework.org/schema/tx"

       xmlns:context="http://www.springframework.org/schema/context"

       xsi:schemaLocation="http://www.springframework.org/schema/beans

       http://www.springframework.org/schema/beans/spring-beans-3.0.xsd

       http://www.springframework.org/schema/aop

       http://www.springframework.org/schema/aop/spring-aop-3.0.xsd

       http://www.springframework.org/schema/tx

       http://www.springframework.org/schema/tx/spring-tx-3.0.xsd

       http://www.springframework.org/schema/context

       http://www.springframework.org/schema/context/spring-context-3.0.xsd">

    <!-- 配置扫瞄注解service,controller -->

    <context:annotation-config/>

    <context:component-scan base-package="com.*" scoped-proxy="targetClass"></context:component-scan>

    <!-- 配置数据库连接 -->

    <bean id="dataSource" class="org.springframework.jdbc.datasource.DriverManagerDataSource">

        <property name="driverClassName" value="com.mysql.jdbc.Driver"/>

        <property name="url" value="jdbc:mysql://localhost:3306/myhib"/>

        <property name="username" value="root"/>

        <property name="password" value="root"/>

    </bean>

    <!-- 配置hibernate相关信息 -->

    <bean id="sessionFactory" class="org.springframework.orm.hibernate4.LocalSessionFactoryBean">

        <property name="dataSource" ref="dataSource"/>

        <property name="hibernateProperties">

            <props>

                <prop key="hibernate.dialect">org.hibernate.dialect.MySQLDialect</prop>

                <prop key="hibernate.show_sql">true</prop>

                <prop key="hibernate.hbm2ddl.auto">update</prop>

            </props>

        </property>

            <!-- 以下列表写入实体类 -->

        <property name="annotatedClasses">

            <list><value>com.demo.News</value></list>

        </property>

    </bean>

    <bean id="transactionManager" class="org.springframework.orm.hibernate4.HibernateTransactionManager">

        <property name="sessionFactory" ref="sessionFactory"/>

    </bean>

    <!-- 使用annotation定义事务 -->

    <tx:annotation-driven transaction-manager="transactionManager" />

</beans>
5、spring-mvc.xml,springmvc配置文件
<?xml version="1.0" encoding="UTF-8"?>

<beans xmlns="http://www.springframework.org/schema/beans"

    xmlns:xsi="http://www.w3.org/2001/XMLSchema-instance"

    xmlns:oxm="http://www.springframework.org/schema/oxm"

    xmlns:context="http://www.springframework.org/schema/context"

    xmlns:aop="http://www.springframework.org/schema/aop"

    xmlns:tx="http://www.springframework.org/schema/tx"

    xmlns:task="http://www.springframework.org/schema/task"

    xsi:schemaLocation="http://www.springframework.org/schema/beans

       http://www.springframework.org/schema/beans/spring-beans-3.0.xsd

       http://www.springframework.org/schema/oxm

       http://www.springframework.org/schema/oxm/spring-oxm-3.0.xsd

       http://www.springframework.org/schema/context

       http://www.springframework.org/schema/context/spring-context-3.0.xsd

       http://www.springframework.org/schema/tx

        http://www.springframework.org/schema/tx/spring-tx-3.0.xsd

         http://www.springframework.org/schema/aop

         http://www.springframework.org/schema/aop/spring-aop-3.0.xsd

         http://www.springframework.org/schema/task

       http://www.springframework.org/schema/task/spring-task-3.2.xsd">

    <!--  通知spring容器通过注解的方式装配bean -->

      <context:annotation-config />

    <!--  通知spring容器采用自动扫描机制查找注解的bean -->

      <context:component-scan base-package="com.*" />

      <task:annotation-driven /> <!-- 定时器开关-->

      <bean id="agentExcelTask" class="com.timer.TimerController1"/>

    <task:scheduled-tasks>

        <task:scheduled ref="agentExcelTask" method="print" cron="0/600 * * * * ?"/>

    </task:scheduled-tasks>

    <!--  配置返回页面过滤 -->

    <bean id="viewResolver" class="org.springframework.web.servlet.view.UrlBasedViewResolver">

        <property name="viewClass"

            value="org.springframework.web.servlet.view.JstlView" />

        <property name="prefix" value="/" />

        <property name="suffix" value=".jsp" />

    </bean>

</beans>
6、News.java
package com.demo;

import javax.persistence.Entity;

import javax.persistence.GeneratedValue;

import javax.persistence.Id;

@Entity

public class News {

    @Id

    @GeneratedValue

    private long id;

    private String title;

    private String contend;

    public long getId() {

        return id;

    }

    public void setId(long id) {

        this.id = id;

    }

    public String getTitle() {

        return title;

    }

    public void setTitle(String title) {

        this.title = title;

    }

    public String getContend() {

        return contend;

    }

    public void setContend(String contend) {

        this.contend = contend;

    }

}
7、java.lang.NoClassDefFoundError: [Lorg/hibernate/engine/FilterDefinition错误
原先:<bean id="sessionFactory"

class="org.springframework.orm.hibernate3.annotation.AnnotationSessionFactoryBean">

改成:<bean id="sessionFactory"

class="org.springframework.orm.hibernate4.LocalSessionFactoryBean">
springmvc之hibernate整合的更多相关文章
- SpringMVC+Spring+Hibernate整合开发
最近突然想认真研究下java web常用框架,虽然现在一直在用,但实现的整体流程不是很了解,就在网上搜索资料,尝试自己搭建,以下是自己的搭建及测试过程. 一.准备工作: 1/安装并配置java运行环境 ...
- 【Java EE 学习 83 下】【SpringMVC】【使用注解替代已过时的API】【SpringMVC、Hibernate整合】
一.SpringMVC中注解的使用 1.为什么要使用注解 之前曾经提到过的三种控制器在spring3.0中都已经被明确标记为过时了,spring3.0推荐使用注解的方式替代三种控制器,实际上使用注解的 ...
- Java Web开发之Spring | SpringMvc | Mybatis | Hibernate整合、配置、使用
1.Spring与Mybatis整合 web.xml: <?xml version="1.0" encoding="UTF-8"?> <web ...
- SpringMVC+Spring+hibernate整合及分页
1. 新建web project 2. 引入jar, 3. 创建包com.tgb.web.controller, 下面创建包(dao,entity,service, config,spring,hib ...
- 【JavaEE】Springmvc+Spring+Hibernate整合及example
前面两篇文章,分别介绍了Springmvc和Spring的搭建方法,本文再搭建hibernate,并建立SSH最基本的代码结构. Hibernate和前面两个比就比较复杂了,Hibernate是一个o ...
- Spring、SpringMVC、Hibernate整合 ----超详细教程
一.数据库表 /* Navicat MySQL Data Transfer Source Server : 本地连接 Source Server Version : 50720 Source Host ...
- springmvc,hibernate整合时候出现Cannot load JDBC driver class 'com.mysql.jdbc.Driver
原因:不清楚是什么原因,哪位知道可以给我留言,不胜感激! 解决方法: 1.把mysql的驱动包放到你项目的WEB-INF目录下的lib目录中2.要mysql的驱动包放在tomcat/lib目录下
- 框架篇:Spring+SpringMVC+hibernate整合开发
前言: 最近闲的蛋疼,搭个框架写成博客记录下来,拉通一下之前所学知识,顺带装一下逼. 话不多说,我们直接步入正题. 准备工作: 1/ IntelliJIDEA的安装配置:jdk/tomcat等..(本 ...
- spring整合springmvc和hibernate
上篇文章使用maven搭建了web环境,这篇来记录下如何使用spring整合springmvc和hibernate,亦即spring+springmvc+hibernate框架整合. 第一步:首先配置 ...
随机推荐
- 画虚线 iOS
整理了一个方法,可以直接绘制虚线,下面直接上代码.参数说明已经给出,可直接copy使用 /** ** lineView: 需要绘制成虚线的view ** lineLength: 虚线的宽度 ** li ...
- jQuery焦点不在输入框内判断不能为空
我能说JS和jquery有时候都有病吗?同样的代码,重敲一遍可以了,再过一会不行了.再试一下重敲,一模一样的代码,也不报错.就是不行.反复折腾.... 我帖上来的是经过了1个小时同等功能的测试OK的, ...
- 说说css3布局
使用float属性或position属性布局的缺点 <!DOCTYPE html> <html xmlns="http://www.w3.org/1999/xhtml&qu ...
- 【原】js检测移动端横竖屏
摘要:上周做了一个小项目,但是要放到我们的app上,然而需要横竖屏使用不同的样式.横屏一套,竖屏一套.调用了手机APP那里的api,可是他们那里ios和安卓返回的不一样. 各种头疼.于是用了css3的 ...
- 【原】flux学习笔记
最近React(web/native)依旧如火如荼,相信大家都跃跃欲试,入职新公司,现在的团队也开始在React领域有所尝试. 2016年应该是React 逐渐走向成熟的一年.之前在原来公司搞不懂的问 ...
- 以全局监听的方式处理img的error事件
http://www.ovaldi.org/2015/09/11/%E4%BB%A5%E5%85%A8%E5%B1%80%E7%9B%91%E5%90%AC%E7%9A%84%E6%96%B9%E5% ...
- CentOS安装oracle12C
安装虚拟系统CentOS6.5,分配给至少1G的内存,其他条件适当高些,具体参考官方文档 一.安装数据库: 1.安装依赖软件包 yum install binutils -y yum install ...
- mvn filter autoconfig 产生自动配置
可以使用filter, 也可以使用autoconfig 详细请见 http://www.openwebx.org/docs/autoconfig.html
- java 利用反射机制,获取实体所有属性和方法,并对属性赋值
一个普通的实体Person: private int id; private String name; private Date createdTime;...//其它字段// get set方法 . ...
- ASP.NET 生命周期
学习资料:http://www.cnblogs.com/OceanEyes/archive/2012/08/13/2635657.html